Visual Studio Code : C/C++开发者实用指南
前言
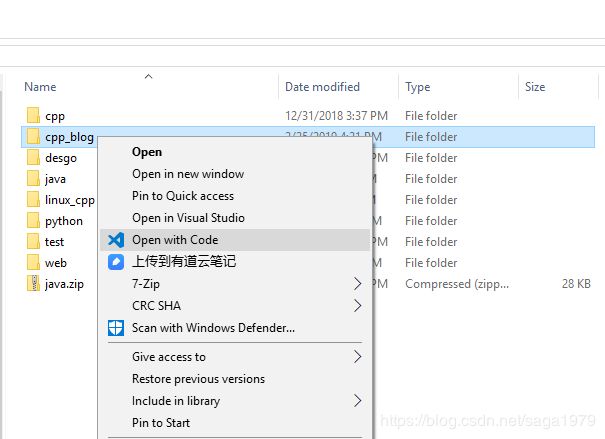
作为一个快捷、跨平台的IDE除了资源占用比较大,其他真没啥硬伤。比较适合方便轻量级开发,如以工程形式打开文件夹:

这样就不必为了一个“hello world”新建工程了。而且,它的智能提示和对调试器的集成真的很不错。虽然vs也可以,甚至做的更好,但不能跨平台。关于VS Code完整的介绍请参考官方文档,这里只介绍本人在使用过程中遇到的关键的问题点。总结一下对IDE的“关键”要求:
- 智能提示 (c_cpp_properties.json)
- 编译 (tasks.json)
- 调试 (launch.json)
开发环境配置(settings.json)
- 如果已经安装了Visual studio,那么真的没必要使用vs code,后者除了体积小,也没其他拿得出手的优点了。而且,你不会想着拿vs code做MFC开发吧?
- 如果使用Linux系统,也可以跳过这节。就是Windows下使用集成gcc的开发环境需要折腾一番。
在Windows下常见的第三方集成了GCC的开发环境有MSYS2、Cygwin、Windows Subsystem for Linux(后面简称WSL),对于这类开发环境,需要将其集成到VS code的终端窗口中。我本人是使用WSL多一些,偶尔使用MSYS2,多年未再使用Cygwin,所以就以WSL、MSYS2为例来介绍。
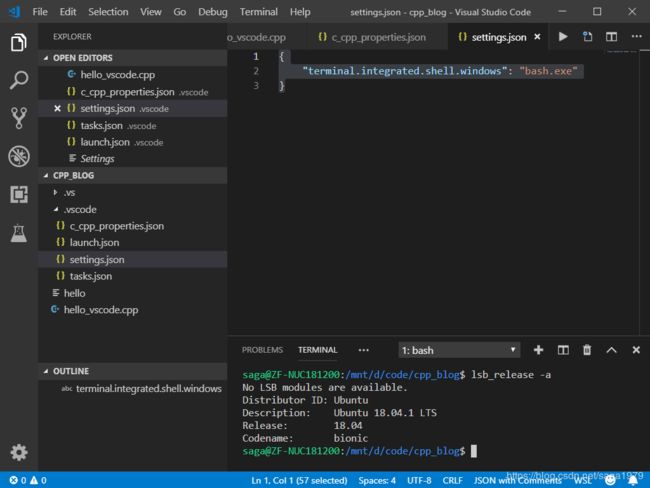
不建议修改全局配置,我们在.vscode下新建settings.json文件(也可以通过快捷键Ctrl+, ,然后选择workspace settings来生成)
- WSL:
{
    "terminal.integrated.shell.windows": "bash.exe"
}
上面的"bash.exe"用不着全路径的,因为它一般就在windows/system32这个系统路径下
bash.exe不在系统路径下,就要补全它的路径,但它一般都在windows/system32路径下。
- MSYS2,使用下面的方式集成,可参考How do I integrate MSYS2 shell into Visual studio code on Window?:
    "terminal.integrated.shell.windows": "C:\\msys64\\usr\\bin\\bash.exe",
    "terminal.integrated.shellArgs.windows": ["--login", "-i"],
    "terminal.integrated.env.windows":
    {
        "MSYSTEM": "MINGW64",
        "CHERE_INVOKING":"1"
    }
智能提示 (c_cpp_properties.json)
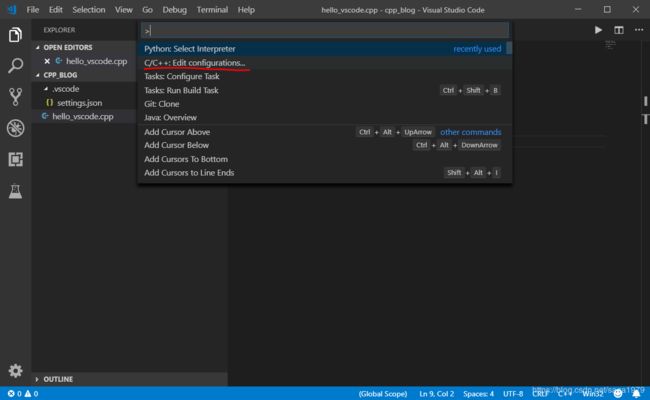
从个人使用IDE的经验(visual slickedit、visual studio、codelite、codeblock之类),只要将头文件路径配置好就行了。但是VS Code的配置方法跟之前的IDE有点区别,只提供配置文件(做的小也有不方便的地方)。如果文件夹下的.vscode目录下没有c_cpp_properties.json这个文件,从View菜单或者快捷键(Ctrl+Shift+P)打开命令面板,选择:C/Cpp: Edit configurations,会新建一个。我们要做的就是把需要包含的头文件路径配置上。

配置文件是json格式的,下面拿windows 10 下 WSL (Windows Subsystem for Linux) 的配置为示范:
{
    "configurations": [
        {
            "name": "WSL",
            "includePath": [
                "${workspaceFolder}/**",
                "C:/Users/[yourname]/AppData/Local/Packages/CanonicalGroupLimited.Ubuntu18.04onWindows_79rhkp1fndgsc/LocalState/rootfs/usr/include/**"
            ],
            "defines": ["__linux__", "__x86_64__" ],
            "compilerPath": "/usr/bin/g++",
            "cStandard": "c11",
            "cppStandard": "c++17",
            "intelliSenseMode": "gcc-x64",
            "browse": {
                "path": ["C:/Users/[yourname]/AppData/Local/Packages/CanonicalGroupLimited.Ubuntu18.04onWindows_79rhkp1fndgsc/LocalState/rootfs/usr/include/**"],
                "limitSymbolsToIncludedHeaders": false
            }
        }
    ],
    "version": 4
}compilerPath将会为智能提示引擎提供编译器内置的头文件路径,比如标准库:

**“includePath”**配置项就是智能提示的非编译器指定包含路径的头文件搜索路径
- /** 表示递归该路径
- "C:/Users/[yourname]/AppData/Local/Packages/CanonicalGroupLimited.Ubuntu18.04onWindows_79rhkp1fndgsc/LocalState/rootfs"是安装的ubuntu18.04(WSL, Windows Subsystem For Linux)的系统路径。
也可以参考官方的WSL集成介绍
但我觉得没必要那么麻烦。但如果你只使用C,请老老实实按照文档介绍过滤掉C++的头文件。如果安装的WSL不是ubuntu 18.04,该文档也给出来了查找方法,使用powershell:
PS R:\> ($(get-appxpackage).PackageFamilyName | findstr /i 'SUSE Ubuntu') -replace '^', "$`{localappdata`}/Packages/"

${localappdata}/Packages/CanonicalGroupLimited.UbuntuonWindows_79rhkp1fndgsc
${localappdata}/Packages/46932SUSE.openSUSELeap42.2_022rs5jcyhyac
${localappdata}/Packages/46932SUSE.SUSELinuxEnterpriseServer12SP2_022rs5jcyhyac
关于该配置项更详细的介绍,请参考c_cpp_properties.json Reference Guide
编译 (tasks.json)
编译的默认快捷键是ctrl+shift+b,vs code通过task.json配置来执行编译过程,配置的要点就是找到能运行的命令。个人将其分为两大类:
- 本机编译器,特点是输入路径就能运行,最简单的情况就是Linux下的GCC
- 虚拟编译器,需要进入环境才能运行,如WSL
命令不仅仅指gcc、g++、cl这些编译器,vs code只是提供了一个执行命令的模板,事实上它不关系你执行什么命令。开发者可以自己编写Makefile,使用make当作模板中的命令参数。你也可以给自己配置个先播放一段音乐再执行编译的task.json。
如果安装了cl(visual studio,微软本家的C++编译器),默认的c_cpp_properties.json内容大致如下(vs2017):
{
    "configurations": [
        {
            "name": "Win32",
            "includePath": [
                "${workspaceFolder}/**"
            ],
            "defines": [
                "_DEBUG",
                "UNICODE",
                "_UNICODE"
            ],
            "windowsSdkVersion": "10.0.17763.0",
            "compilerPath":
            "C:/Program Files (x86)/Microsoft Visual Studio/2017/Enterprise/VC/Tools/MSVC/14.16.27023/bin/Hostx64/x64/cl.exe",
            "cStandard": "c11",
            "intelliSenseMode": "msvc-x64"
        }
    ],
    "version": 4
}- 先介绍下MSYS2环境下编译工具链的安装(我自己也老忘记)。
- 从sourceforge下载安装包,一路next
- 安装 gcc、gdb 、make
安装: pacman -S mingw-w64-x86_64-gcc
查找GCC的相关软件包:pacman -Sl |grep 软件包名称:如gcc
- WSL ( windows subsystem for linux )
当在写这篇文章的时候,VS Code的C++插件已经支持WSL了,我们只需要按照前一节《集成终端窗口》将bash集成到vs code,剩下的事就跟Linux下直接使用gcc没多大区别了,可以参考: 官方解惑
 {
    // See https://go.microsoft.com/fwlink/?LinkId=733558
    // for the documentation about the tasks.json format
    "version": "2.0.0",
    "tasks": [
        {
            "label": "wsl build",
            "type": "shell",
            "command": "g++",
            "args": [
                "hello_vscode.cpp", "-g",
                "-o",
                "hello"
            ],
            "group": {
                "isDefault": false,
                "kind": "build"
            },
            "presentation": {
                "reveal": "silent"
            },
            "problemMatcher": "$gcc"
        }
    ]
}
如果使用GCC编译器,Linux以及Windows下的WSL和Msys2的编译配置没什么不同,都可以使用上述配置为模板
调试 (launch.json)
如果没有配置调试,会提示你新建一个。

先从Linux系统下的配置入手,因为它最为简单,下面就是程序自动生成的模板,通常我们只需要替换program字段就可以了:
{
    // Use IntelliSense to learn about possible attributes.
    // Hover to view descriptions of existing attributes.
    // For more information, visit: https://go.microsoft.com/fwlink/?linkid=830387
    "version": "0.2.0",
    "configurations": [
        {
            "name": "(gdb) Launch",
            "type": "cppdbg",
            "request": "launch",
            "program": "enter program name, for example ${workspaceFolder}/a.out",
            "args": [],
            "stopAtEntry": false,
            "cwd": "${workspaceFolder}",
            "environment": [],
            "externalConsole": true,
            "MIMode": "gdb",
            "setupCommands": [
                {
                    "description": "Enable pretty-printing for gdb",
                    "text": "-enable-pretty-printing",
                    "ignoreFailures": true
                }
            ]
        }
    ]
}
相比智能提示、编译,Windows下使用GDB调试的配置要麻烦一些。调试器要根据符号表中的路径去寻找对应源文件,使用msys2或者wsl,就要注意他们对路径的表示是不同的。
MSYS2:/[盘符]/[路径], 如c:\test,表示为:/c/test
WSL(ubuntu): /mnt/[盘符]/,对于c:\test,表示为:/mnt/c/test
- MSYS2 环境配置文件
{
    "version": "0.2.0",
    "configurations": [
        {
            "name": "(gdb) Launch",
            "type": "cppdbg",
            "request": "launch",
            "program": "${workspaceFolder}/test.exe",
            "args": [],
            "stopAtEntry": false,
            "cwd": "${workspaceFolder}",
            "environment": [  ],
            "externalConsole": false,
            "MIMode": "gdb",
            "miDebuggerPath": "C:/msys64/usr/bin/gdb.exe",
            "launchCompleteCommand": "exec-run",
            "sourceFileMap": {
                "/d/": "d:/"
            },
            "setupCommands": [
                {
                    "description": "Enable pretty-printing for gdb",
                    "text": "-enable-pretty-printing",
                    "ignoreFailures": true
                }
            ]
        }
    ]
}- WSL 环境配置文件(Windows SubSystem for Linux)
{
    // Use IntelliSense to learn about possible attributes.
    // Hover to view descriptions of existing attributes.
    // For more information, visit: https://go.microsoft.com/fwlink/?linkid=830387
    "version": "0.2.0",
    "configurations": [
        {
            "name": "(gdb) Launch",
            "type": "cppdbg",
            "request": "launch",
            "program": "/mnt/d/code/cpp_blog/hello",
            "args": [],
            "stopAtEntry": false,
            "cwd": "/mnt/d/code/cpp_blog",
            "environment": [],
            "externalConsole": true,
            "MIMode": "gdb",
            "setupCommands": [
                {
                    "description": "Enable pretty-printing for gdb",
                    "text": "-enable-pretty-printing",
                    "ignoreFailures": true
                }
            ],
            "pipeTransport": {
                "pipeCwd": "",
                "pipeProgram": "c:\\windows\\system32\\bash.exe",
                "pipeArgs": ["-c"],
                "debuggerPath": "/usr/bin/gdb"
            },
            "sourceFileMap": {
                "/mnt/d/": "d:\\"
            }
        }
    ]
}
- sourceFileMap:它将编译时的路径映射为本地路径。比如,这个工程目录为:d:\code\cpp_msys2,源文件为:hello_vscode.cpp,如果没有这个配置,会出现下面的错误:Unable to open ‘hello_vscode.cpp’: File not found (file:///d/code/cpp_msys2/hello_vscode.cpp).参考Debug error “Unable to ‘…’: File not Found”
- miDebuggerPath:如果把调试器纳入系统路径,那么是不需要指定全路径的
- externalConsole:因为前面已经把bash集成到了控制台,所以这个选项要给false,否则会有如下类似的错误:ERROR: Unable to start debugging. Unexpected GDB output from command “-exec-run”. During startup program exited with code 0xc0000135.
- 对于调试配置文件的完整介绍可参考Configuring launch.json for C/C++ debugging
总结一下
VS Code跨平台、体积小、插件丰富、功能强大但配置也麻烦
VS Code 体积小,但占用资源可不比任何IDE落后(clion除外)
VS Code的智能提示的强大、稳定、速度只是比VS差点,但比其他IDE不差(比如:codelite、codeblock、slickedit、clion)
负责VS Code的发布程序员心情一直不好,因为会出现Linux下32位系统安装程序给你安装64位插件集、Windows下自动升级删除原程序后又提示找不到程序的低级BUG,而且长期就这德行


