python+opencv+ml《Machine learing for opencv 2017》学习(一):3
文章目录
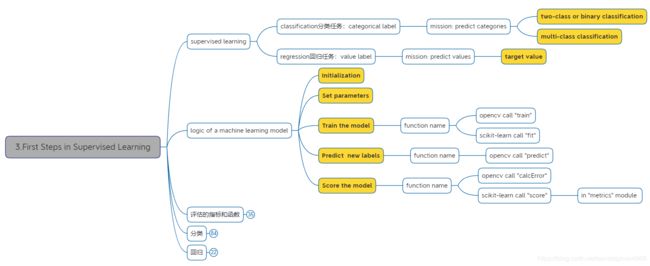
- 3.First Steps in Supervised Learning
- 3.1.评估的指标和函数
- 3.1.1分类任务
- 3.1.2.回归任务
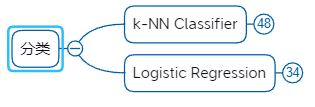
- 3.2.分类
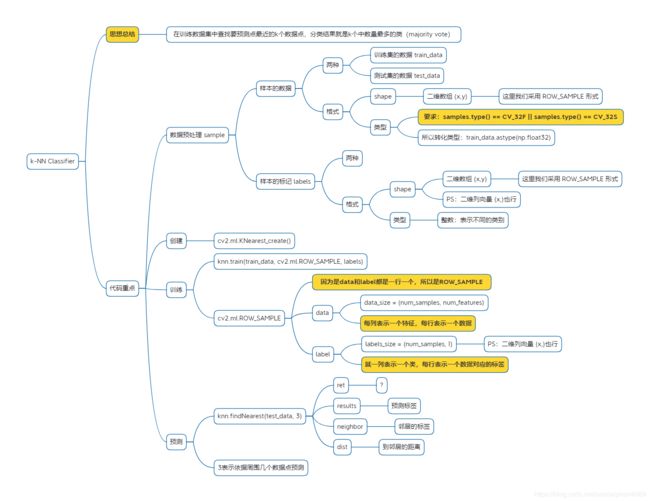
- 3.2.1.k-NN Classifier
- 3.2.1.1.实例代码
- 3.2.1.2.加载datasets的数字数据集
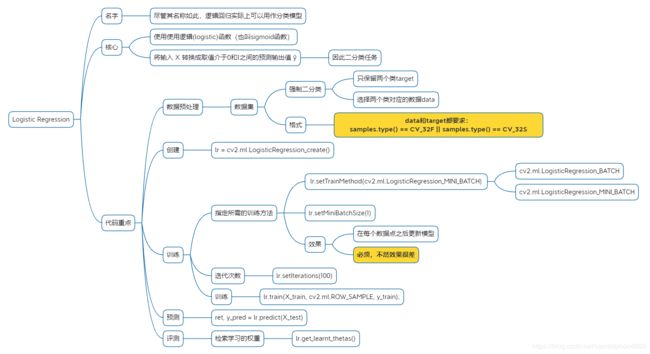
- 3.2.2.Logistic Regression
- 3.2.2.1.实例代码
- 3.3.回归
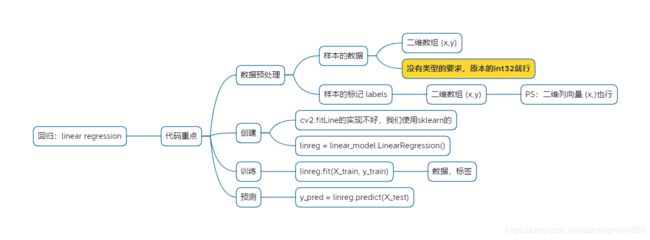
- 3.3.1.linear regression
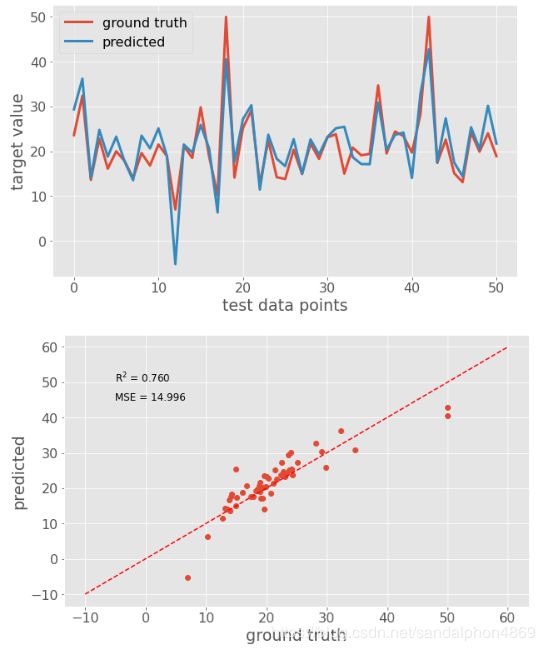
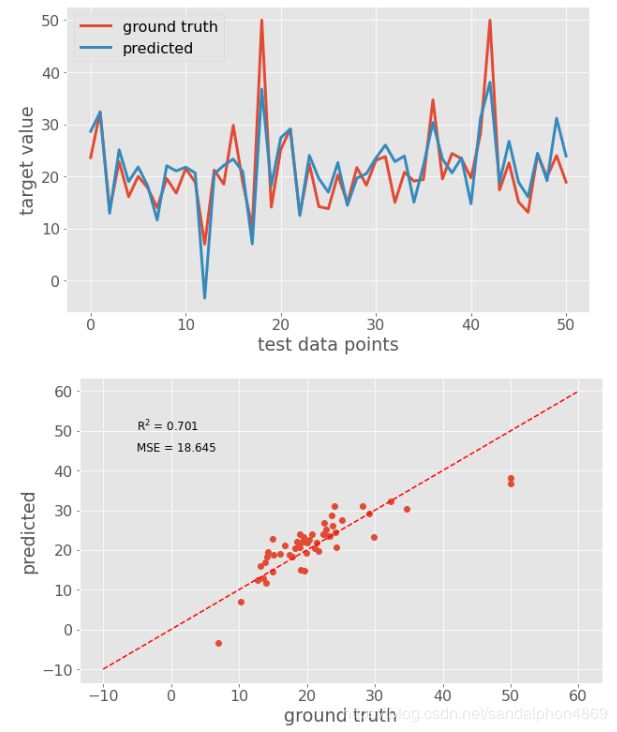
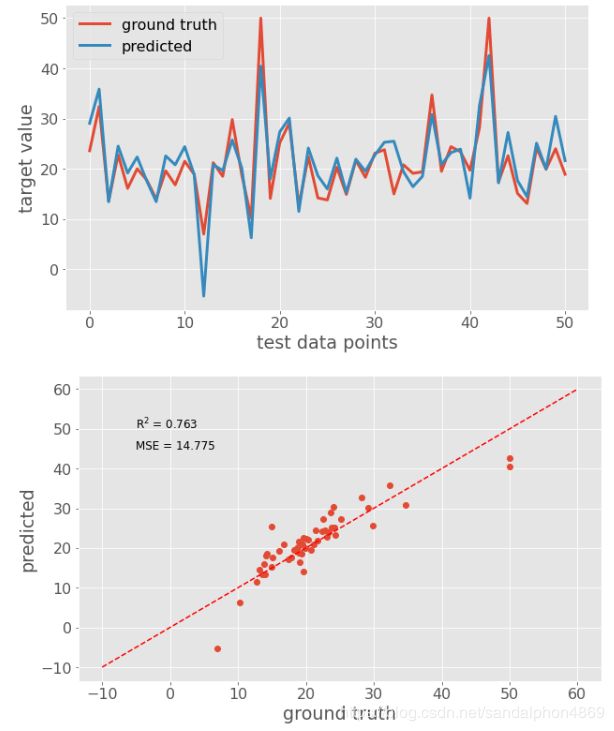
- 3.3.1.1.实例代码
- 3.3.2.其他回归模型
3.First Steps in Supervised Learning
3.1.评估的指标和函数
3.1.1分类任务
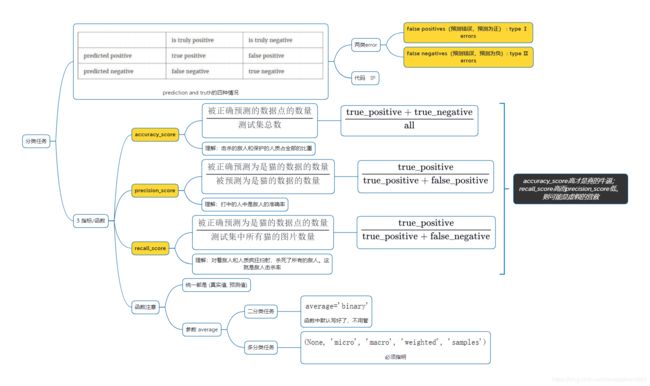

直接调用sklearn.metrics的模块函数就行:建议都写成:(真实值y_true, 预测值y_pred)的顺序
"""
分类评价
"""
import numpy as np

from sklearn import metrics


# 实际的标签
y_true = np.array([0, 1, 0, 0, 0])

# 预测的标签
y_pred = np.array([1, 1, 1, 1, 1])


# 四类情况:(y_true == 1)转化为array([False,  True, False, False, False]),相乘是元素分别相乘,然后sum统计True的个数
# 预测正确,预测为正(因为预测正确,自然真实同预测为正)
true_positive = np.sum((y_pred == 1) * (y_true == 1))
# 1
# 预测正确,预测为负
true_negative = np.sum((y_pred == 0) * (y_true == 0))
# 0
# 预测错误,预测为正(因为预测错误,自然真实和预测相反为负)
false_positive = np.sum((y_pred == 1) * (y_true == 0))
# 4
# 预测错误,预测为负
false_negative = np.sum((y_pred == 0) * (y_true == 1))
# 0


# accuracy_score
# 无先后要求
print(metrics.accuracy_score(y_true, y_pred))
# 0.2
"""
实际上就是
np.sum(true_positive + true_negative) / len(y_true)
np.sum(y_pred == y_true) / len(y_true)
"""

# precision_score
# (真实值, 预测值)
print(metrics.precision_score(y_true, y_pred))
# 0.2
"""
np.sum(true_positive) / np.sum(true_positive + false_positive)
"""

# recall_score
# (真实值, 预测值)
print(metrics.recall_score(y_true, y_pred))
# 1.0
"""
true_positive / (true_positive + false_negative)
"""
3.1.2.回归任务
"""
回归评价
"""

import numpy as np
import matplotlib.pyplot as plt
from sklearn import metrics
%matplotlib inline

# 线性点集:从0到10(包括),共100个点
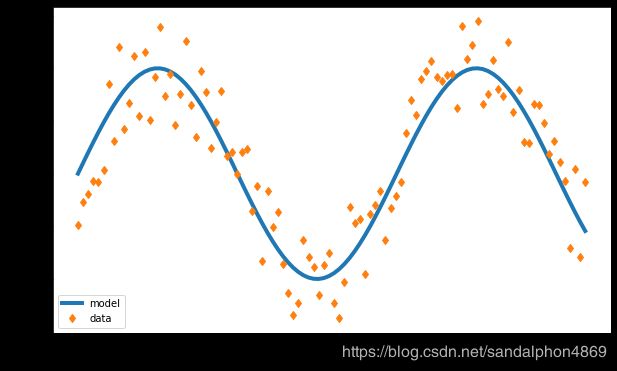
x = np.linspace(0, 10, 100)

y_pred = np.sin(x)
# 制造噪声 : np.random.rand()是[0, 1]的均匀分布,-0.5后就是周围的分布[-0.5, 0.5]
y_true = np.sin(x) + np.random.rand(x.size) - 0.5

# 画布尺寸,英寸
plt.figure(figsize=(10, 6))

# 绘制x和y上的点:linewidth宽度,label角落处的画线的注解,'d'表示形状菱形
plt.plot(x, y_pred, linewidth=4, label='model')
plt.plot(x, y_true, 'd', label='data')

# 在绘图上的x轴,y轴写注解
plt.xlabel('x')
plt.ylabel('y')

# 线条是什么的注解写在左下角
plt.legend(loc='lower left')


# 均方误差:无先后要求,因为数学上的平方
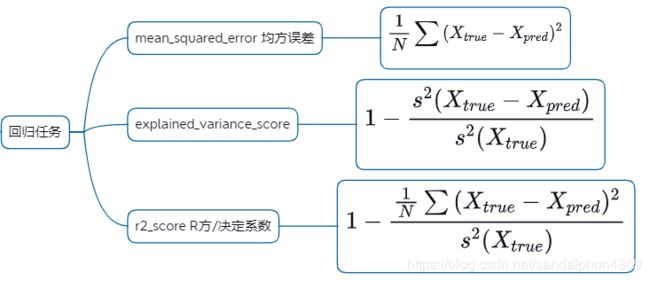
mse = metrics.mean_squared_error(y_true, y_pred)
"""
np.mean((y_true - y_pred) ** 2)
"""

# (真实值, 预测值)
metrics.explained_variance_score(y_true, y_pred)
"""
fraction_of_variance_unexplained = np.var(y_true - y_pred) / np.var(y_true)
fraction_of_variance_explained = 1- fraction_of_variance_unexplained
"""

# R方/决定系数:(真实值, 预测值)
metrics.r2_score(y_true, y_pred)
"""
1.0 - np.mean((y_true - y_pred) ** 2) / np.var(y_true)
"""
3.2.分类
3.2.1.k-NN Classifier
3.2.1.1.实例代码
"""
样本特征:二维
分类数量:二分类
存储结构:一行一个样本,每列是一个特征
"""
import numpy as np
import matplotlib.pyplot as plt
import cv2
%matplotlib inline


# 生成训练数据:num_samples是样本的数量,num_features是每个样本的特征个数
def generate_data(num_samples, num_features=2):
    # 样本数据
    data_size = (num_samples, num_features)
    # 生成[0,100)的二维整数数组
    train_data = np.random.randint(0, 100, size=data_size)

    # 样本的标记
    labels_size = (num_samples, 1)
    # 生成[0,2)即0、1的二维整数列向量
    labels = np.random.randint(0, 2, size=labels_size)

    # 将样本数据转为浮点类型:要求samples.type() == CV_32F || samples.type() == CV_32S
    return train_data.astype(np.float32), labels


# 可视化数据:一类是蓝色的(label=0),另一类是红色的(label=1)
def plot_data(all_blue, all_red):
    # 画布尺寸,英寸
    plt.figure(figsize=(10, 6))

    # 风格
    plt.style.use('ggplot')

    # 散点:蓝色用蓝色blue的square方块,红色用红色red的三角^
    plt.scatter(all_blue[:, 0], all_blue[:, 1], c='b', marker='s', s=180)
    plt.scatter(all_red[:, 0], all_red[:, 1], c='r', marker='^', s=180)

    # 在绘图上的x轴,y轴写注解
    plt.xlabel('x coordinate (feature 1)')
    plt.ylabel('y coordinate (feature 2)')
    pass


# 生成训练样本和标签
train_data, labels = generate_data(11)
# 训练样本中蓝色类的(label=0)
blue = train_data[labels.ravel() == 0]
# 训练样本中红色类的(label=1)
red = train_data[labels.ravel() == 1]

# 预测数据集:我们只要生成的数据,就不关心标记了
test, _ = generate_data(2)

# 创建 k-NN classifier
knn = cv2.ml.KNearest_create()

# 训练:因为是一行一个数据,所以是ROW_SAMPLE
knn.train(train_data, cv2.ml.ROW_SAMPLE, labels)

# 预测:用最近的k个点,多数投票就是其分类结果
ret, results, neighbor, dist = knn.findNearest(test, 3)
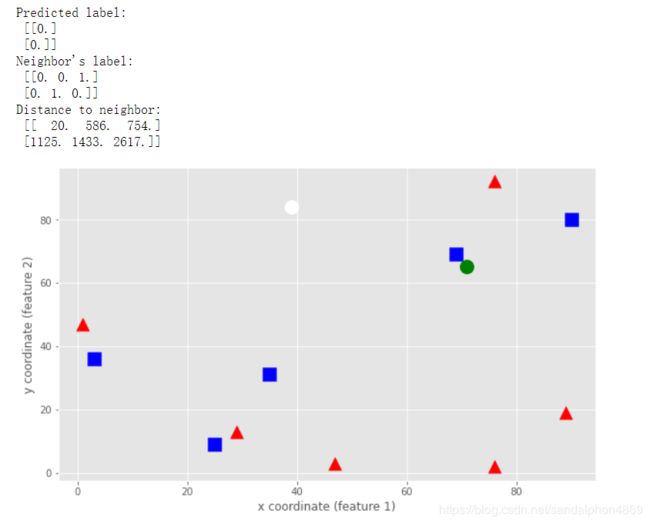
print("Predicted label:\n", results)
print("Neighbor's label:\n", neighbor)
print("Distance to neighbor:\n", dist)

# 可视化结果
# 可视化样本
plot_data(blue, red)
# 可视化预测的结果:绿色green的圆点o
plt.plot(test[0, 0], test[0, 1], 'go', markersize=14);
# 可视化预测的结果:白色white的圆点o
plt.plot(test[1, 0], test[1, 1], 'wo', markersize=14);
3.2.1.2.加载datasets的数字数据集
"""
加载datasets的数字数据集
样本特征:64维
分类数量:10类
存储结构:一行一个样本,每列是一个特征
"""
import numpy as np
import cv2
from sklearn import datasets
from sklearn import metrics

# 数据
digits = datasets.load_digits()

# 训练集:样本和标签
# 前1000个数字,将每个图片的64个像素点认为是64列特征,最后再将[0, 255]的像素范围归一化[0.0, 1.0]
train_data = digits.images[0:1000, :, :].astype(np.float32).reshape(1000,
                                                                    64) / 255
train_label = digits.target[0:1000].reshape(1000, 1)

# 预测集:预测数据和真实标签
# 1000-1300的数字
test_data = digits.images[1000:1300].astype(np.float32).reshape(300, 64) / 255
test_label = digits.target[1000:1300].reshape(300, 1)


# 创建 k-NN classifier
knn = cv2.ml.KNearest_create()

# 训练:因为是一行一个数据,所以是ROW_SAMPLE
knn.train(train_data, cv2.ml.ROW_SAMPLE, train_label)

# 预测:用最近的50个点,多数投票就是其分类结果
ret, results, neighbor, dist = knn.findNearest(test_data, 50)
# print("Predicted label:\n", results)
# print("Neighbor's label:\n", neighbor)
# print("Distance to neighbor:\n", dist)


# accuracy_score
accuracy_score = metrics.accuracy_score(test_label, results)
print('accuracy_score', accuracy_score)
# accuracy_score 0.9433333333333334

# precision_score
precision_score = metrics.precision_score(test_label, results, average='macro')
print('precision_score', precision_score)
# precision_score 0.9451685677898378

# recall_score
recall_score = metrics.recall_score(test_label, results, average='macro')
print('recall_score', recall_score)
# recall_score 0.9432798347370092
3.2.2.Logistic Regression
3.2.2.1.实例代码
import numpy as np
import cv2

from sklearn import datasets
from sklearn import model_selection
from sklearn import metrics

import matplotlib.pyplot as plt
%matplotlib inline
plt.style.use('ggplot')

# 加载数据集
iris = datasets.load_iris()

# 强行变成二分类任务
idx = iris.target != 2
# 选择这两类对应的data和target,并都要求samples.type() == CV_32F || samples.type() == CV_32S
data = iris.data[idx].astype(np.float32)
target = iris.target[idx].astype(np.float32)

# 仅仅绘制前两个特征意思意思(一共四个特征)
# PS:不要混淆,是保留两个分类,而不是保留两个特征。
plt.figure(figsize=(10, 6))
plt.scatter(data[:, 0], data[:, 1], c=target, cmap=plt.cm.Paired, s=100)
plt.xlabel(iris.feature_names[0])
plt.ylabel(iris.feature_names[1]);

# 划分数据集
X_train, X_test, y_train, y_test = model_selection.train_test_split(
    data, target, test_size=0.1, random_state=42
)

# 创建LogisticRegression
lr = cv2.ml.LogisticRegression_create()

# 效果:在每个数据点之后更新模型
# 不写这个就0.4的效果,估计是不更新的原因?
lr.setTrainMethod(cv2.ml.LogisticRegression_MINI_BATCH)
lr.setMiniBatchSize(1)

# 迭代次数
lr.setIterations(100)

# 训练
lr.train(X_train, cv2.ml.ROW_SAMPLE, y_train);

# 检索学习的权重
print(lr.get_learnt_thetas())

# 预测
ret, y_pred = lr.predict(X_test)

# 评测
print(metrics.accuracy_score(y_test, y_pred))
3.3.回归
3.3.1.linear regression
3.3.1.1.实例代码
import numpy as np
import cv2

from sklearn import datasets
from sklearn import metrics
from sklearn import model_selection
from sklearn import linear_model

%matplotlib inline
import matplotlib.pyplot as plt
plt.style.use('ggplot')
plt.rcParams.update({'font.size': 16})

# 加载数据集
boston = datasets.load_boston()

# 划分训练集和测试集
X_train, X_test, y_train, y_test = model_selection.train_test_split(
    boston.data, boston.target, test_size=0.1, random_state=42
)

# 使用sklearn的线性回归模型
linreg = linear_model.LinearRegression()

# 训练
linreg.fit(X_train, y_train)

# 预测结果
y_pred = linreg.predict(X_test)

# 新建画布
plt.figure(figsize=(10, 6))
# 绘制真实的测试集数据和标签,未指定形状就是折线
plt.plot(y_test, linewidth=3, label='ground truth')
# 绘制预测的测试集数据和标签,未指定形状就是折线
plt.plot(y_pred, linewidth=3, label='predicted')
# 图线注解plot中label的位置
plt.legend(loc='best')
# x轴的文字
plt.xlabel('test data points')
# y轴的文字
plt.ylabel('target value')

# 新建画布
plt.figure(figsize=(10, 6))
# 绘制真实的测试集标签和预测的标签,指定'o'就是散点
plt.plot(y_test, y_pred, 'o')
# 绘制一条y=x的线,用来显示真实和预测标签差别程度,'r'是红色,'--'是虚线
plt.plot([-10, 60], [-10, 60], 'r--')
# x轴的文字
plt.xlabel('ground truth')
# y轴的文字
plt.ylabel('predicted')
# 在图片上绘制文字
# R方系数:等同于linreg.score(X_test, y_test)
scorestr = r'R$^2$ = %.3f' % metrics.r2_score(y_test, y_pred)
# 均方误差(真实标签,预测标签)
errstr = 'MSE = %.3f' % metrics.mean_squared_error(y_test, y_pred)
plt.text(-5, 50, scorestr, fontsize=12)
plt.text(-5, 45, errstr, fontsize=12);
