ceph
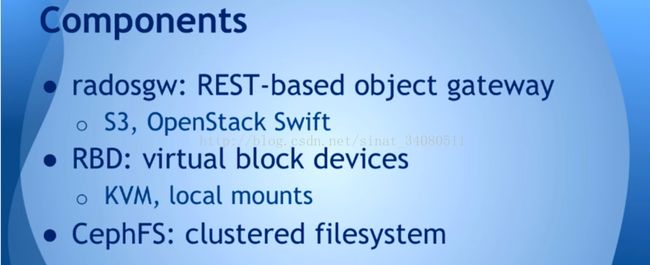
Ceph是一种集高性能、高可靠性和高可扩展性为一体的统一的、分布式的存储系统。“统一的”意味着Ceph可以一套存储系统同时提供对象存储、块存储和文件系统存储三种功能,以便在满足不同应用需求的前提下简化部署和运维。而“分布式的”在Ceph系统中则意味着真正的无中心结构和没有理论上限的系统规模可扩展性。
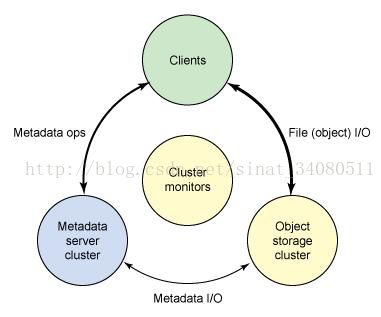
Ceph 生态系统架构可以划分为四部分:
1. Clients:客户端(数据用户)
2. cmds:Metadata server cluster,元数据服务器(缓存和同步分布式元数据)
3. cosd:Object storage cluster,对象存储集群(将数据和元数据作为对象存储,执行其他关键职能)
4. cmon:Cluster monitors,集群监视器(执行监视功能)
图1. ceph的生态系统的概念架构
ceph已继承Linux内核之中,但目前可能还不适用于生产环境,对测试目的还很有用。
一、intro to ceph
首先介绍ceph的架构,一个Ceph Storage Cluster需要至少一个Ceph monitor和至少两个Ceph OSD Daemons,当运行ceph Filesystem clients时需要ceph Metadata Server。
- ceph OSDs: Ceph OSD Daemon 存储数据,处理数据复制、恢复、填充、再平衡,通过检查其他Ceph OSD Daemons 的heartbeat来提供监测信息给Ceph Monitors。当集群做数据拷贝(默认是做数据的三个拷贝,但可调整)时,一个ceph存储集群需要至少两个ceph OSD Daemons来获得一个active+clean的状态。
- Monitors: Ceph Monitor维护集群状态的映射,包括monitor映射,OSD映射,Placement Group(PG)映射和CRUSH映射,Ceph也维护Ceph Monitors、Ceph OSD Daemons和PGs中每个状态改变的历史(也叫epoch)
- MDSs: Ceph Metadata Server(MDS)代表Ceph Filesystem存储metadata(注意Ceph Block Devices和Ceph Object Storage不用MDS),Ceph Metadata Servers使得POSIX文件系统用户可以执行基本指令包括ls, find等,而不会给Ceph存储集群造成大的负担。
名词解释:
- RADOS, Ceph Storage Cluster,
- RBD:Ceph Block Device,
- Object Storage Device:a physical or logical storage unit,简写OSD
- Ceph OSD Daemon:Ceph OSD software, 简写Ceph OSD,通常也用OSD表示,但正确的是Ceph OSD
Ceph将客户端数据作为对象存储在存储池中,通过CRUSH算法,Ceph计算哪个placement group应该保存对象,进一步计算哪个ceph OSD Daemon可以保存placement group。CRUSH算法使得Ceph存储集群可以做到规模化、再平衡、动态恢复。
ceph-deploy工具是一个只依赖SSH 连接到servers, sudo和一些python来deploy Ceph的方法。它在你的workstation上运行,不需要服务器、数据库和其他工具。If you set up and tear down Ceph clusters a lot, and want minimal extra bureaucracy, ceph-deploy is an ideal tool. The ceph-deploy tool is not a generic deployment system. It was designed exclusively for Ceph users who want to get Ceph up and running quickly with sensible initial configuration settings without the overhead of installing Chef, Puppet or Juju. Users who want fine-control over security settings, partitions or directory locations should use a tool such as Juju, Puppet, Chef or Crowbar.
有了ceph-deploy,你就可以开发脚本来安装Ceph包在远程主机上,创建一个集群,添加monitors,gather或者forget keys,添加OSDs和metadata 服务器,配置admin主机和拆卸集群。
二、installation(quick)
step1. preflight
在部署Ceph存储集群之前,Client和Node需要一些基本的配置。
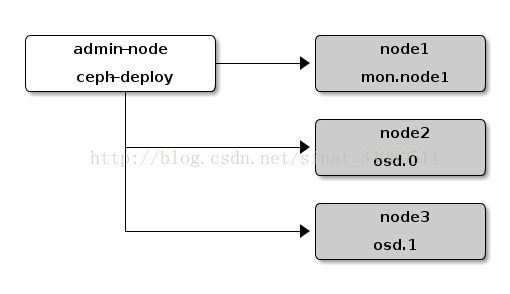
推荐设定一个ceph-deploy 管理节点和三个ceph storage cluster(或虚拟机)来探索ceph。
下面的描述中,Node指单个机器
添加Ceph repo到ceph-deploy admin node,然后安装ceph-deploy。
- APT包管理:对于Debian和Ubuntu系统,执行下面操作
1. 添加release key
wget -q -O- 'https://download.ceph.com/keys/release.asc' | sudo apt-key add -
2. 添加ceph packages到你的repo,用一个稳定的ceph版本(如hammer, jewel)取代{ceph-stable-release}
echo deb http://download.ceph.com/debian-{ceph-stable-release}/ $(lsb_release -sc) main | sudo tee /etc/apt/sources.list.d/ceph.list
3. 更新你的repo,然后安装ceph-deploy
sudo apt-get update && sudo apt-get install ceph-deploy
- RPM包管理:对于CentOS7,执行下面步骤
1. 用subscription-manager注册你的目标机器
sudo subscription-manager repos --enable=rhel-7-server-extras-rpms
2. Install and enable the Extra Packages for Enterprise Linux (EPEL) repository. Please see the EPEL wiki page for more information.
3.在CentOS上执行下面命令
sudo yum install -y yum-utils && sudo yum-config-manager --add-repo https://dl.fedoraproject.org/pub/epel/7/x86_64/ && sudo yum install --nogpgcheck -y epel-release && sudo rpm --import /etc/pki/rpm-gpg/RPM-GPG-KEY-EPEL-7 && sudo rm /etc/yum.repos.d/dl.fedoraproject.org*
4. 添加package到你的repo
粘帖下面的示例代码,用最近主流的ceph版本取代{Ceph-release},用linux版本(如CentOS7为e17)取代{distro},最后,保存内容到/etc/yum.repos.d/ceph.repo文件。
[ceph-noarch]
name=Ceph noarch packages
baseurl=http://download.ceph.com/rpm-{ceph-release}/{distro}/noarch
enabled=1
gpgcheck=1
type=rpm-md
gpgkey=https://download.ceph.com/keys/release.asc
5. sudo vim /etc/yum.repos.d/ceph.repo
更新你的repo,安装ceph-deploy
sudo yum update && sudo yum install ceph-deploy
- Ceph Node Setup
admin node必须有password-less SSH连接到Ceph node
Install NTP
我们推荐在ceph nodes(尤其ceph Monitor nodes)安装NTP来预防clock drift引起的问题。
在CentOS/RHEL,执行
sudo yum install ntp ntpdate ntp-doc
在Debian/Ubuntu,执行
sudo apt-get install ntp
INSTALL SSH SERVER
所有节点执行下面步骤
sudo apt-get install openssh-server
或sudo yum install openssh-server
CREATE A CEPH DEPLOY USER
最近的ceph-deploy版本支持--username选项,你可以指定任何有password-less sudo的用户。
推荐在所有的Ceph nodes上为ceph-deploy创建一个特定的用户,不要用ceph作为用户名。集群中统一的用户名可以提高易用性,但要避免明显的用户名,如root、admin,下面的流程中,用你定义的用户名替代{username}
1. 在每个ceph节点中创建一个新的用户
ssh user@ceph-server
sudo useradd -d /home/{username} -m {username}
sudo passwd {username}
2.对于你添加到ceph节点中的新用户,保证用户有sudo权限
echo "{username} ALL = (root) NOPASSWD:ALL" | sudo tee /etc/sudoers.d/{username}
sudo chmod 0440 /etc/sudoers.d/{username}
enable password-less ssh
由于ceph-deploy不会提示密码,你必须生成SSH keys在admin node上,然后分发public key到每个ceph node,ceph-deploy会尝试为初始monitors生成SSH keys。
1. 生成SSH keys,不要用sudo或root用户,将passphrase留空
ssh-keygen
Generating public/private key pair.
Enter file in which to save the key (/ceph-admin/.ssh/id_rsa):
Enter passphrase (empty for no passphrase):
Enter same passphrase again:
Your identification has been saved in /ceph-admin/.ssh/id_rsa.
Your public key has been saved in /ceph-admin/.ssh/id_rsa.pub.
2.拷贝key到ceph节点,将你用Create a Ceph Deploy User创造的用户名称取代{username}
ssh-copy-id {username}@node1
ssh-copy-id {username}@node2
ssh-copy-id {username}@node3
3. (推荐)修改你的ceph-deploy admin node的~/.ssh/config文件,使得ceph-deploy可以登录到ceph nodes作为你创造的用户,无需你每次执行ceph-deploy时指定--username{username},用你创造的user name取代{username}
Host node1
Hostname node1
User {username}
Host node2
Hostname node2
User {username}
Host node3
Hostname node3
User {username}
ENABLE NETWORKING ON BOOTUP
Ceph OSDs彼此互相协作,通过网络汇报给Ceph Monitors, 如果网络off,Ceph cluster不会bootup期间come online,直到你使能网络。
一些linux发行版(如CentOS)的默认配置网络接口off,在boot up期间,网络接口需要打开,才能保证你的Ceph daemons可以在网络中通信。比如,在Red Hat和CentOS中,在 /etc/sysconfig/network-scripts目录下,保证ifcfg-{iface} 文件将ONBOOT 设置为 yes。
ENSURE CONNECTIVITY
保证ping通
OPEN REQUIRED PORTS
ceph Monitors默认通过6789端口通信,Ceph OSDs默认通信端口范围是6800:7300,
未完。。。。
step2. storage cluster quick start
这个quick start通过ceph-deploy设置一个ceph存储集群在你的admin node。创造三个ceph node cluster来探究ceph功能。
用一个Ceph Monitor和两个Ceph OSD Daemons建立一个ceph Storage Cluster,一旦集群达到active+clean状态,通过增加第三个Ceph OSD Daemon、一个Metadata Server和两个Ceph Monitors来扩大集群,为了达到最好的结果,在你的admin node创建一个目录来保存配置文件和ceph-depoy为集群生成的keys。
mkdir my-cluster
cd my-cluster
ceph-deploy会输出文件到当前目录,保证你在执行ceph-deploy时在这个目录中。
important:如果你以一个不同的user来登录,不要用sudo或以root来调用ceph-deploy
- create a cluster
遇到问题想重启,执行下面的命令来重置配置
ceph-deploy purgedata {ceph-node} [{ceph-node}]
ceph-deploy forgetkeys
重置Ceph package,你也可以执行
ceph-deploy purge {ceph-node} [{ceph-node}]
在你的admin node,用ceph-deploy来执行下面命令
1. create the cluster:
ceph-deploy new {initial-monitor-node(s)}
比如:ceph-deploy new nodel
在当前目录下用ls和cat检测ceph-deploy的输出。你会看到ceph配置文件,一个monitor secret keyring和一个new cluster的日志文件,查看ceph-deploy new –h获取额外信息。
2. 在ceph配置文件中更改默认replicas数目从3到2,使得ceph用仅仅两个ceph OSDs获得active+clean状态,在[global]section添加下面的行
osd pool default size = 2
3. 如果你有不知一个网络接口,在你的ceph 配置文件的[global]区域添加public network设置
public network = {ip-address}/{netmask}
4. install Ceph
ceph-deploy install {ceph-node}[{ceph-node} ...]
l Operating Your Cluster
l Expanding Your Cluster
l Storing/Retrieving Object Data
step3. ceph client
大多数ceph user不直接在ceph存储集群中存储对象,他们用至少一个ceph block Devices, ceph Filesystem和ceph Object Storage.
3.1 Block Device Quick Start:
也被称作RBD或RADOS,在此之前先保证Ceph Storage Cluster在active + clean状态
你可以用虚拟机作ceph-client节点,但是不要执行接下来的步骤在同样的物理机作为你的Ceph Storage Cluster节点。
l Install Ceph
1.验证你有一个合适的linux kernel版本
lsb_release -a
uname -r
2.在admin node,用ceph-deploy来安装ceph在你的ceph-client节点
ceph-deploy install ceph-client
3.在admin node,用ceph-deploy来复制ceph配置文件和ceph.client.admin.keyring到ceph-client
ceph-deploy admin ceph-client
ceph-deploy拷贝keyring到/etc/ceph
l Configure a Block Device
3.2 Filesystem Quick Start
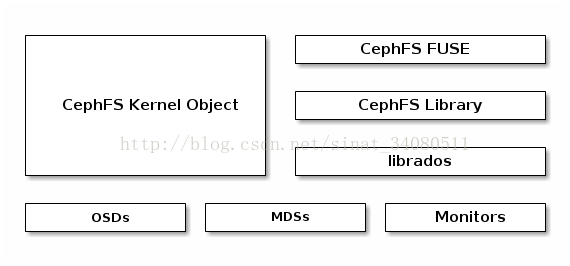
Ceph Filesystem是一个POSIX-compliant文件系统,使用Ceph Storage Cluster来存储数据,它用同样的Ceph Storage Cluster系统作为Ceph Block Devices, Ceph Object Storage,with its S3和Swift APIs或native binding.
注意:如果是第一次评估CephFS,请浏览CephFS配置的最好实践。http://docs.ceph.com/docs/master/cephfs/best-practices/
用Ceph Filesystem需要在你的Ceph Storage Cluster上至少一个Ceph Metadata Server.
step1. METADATA SERVER
step2. MOUNT CEPHFS
3.3 Object Storage Quick Start
Ceph Storage Cluster是所有Ceph deployments的基础,基于RADOS,Ceph Storage Cluster包括两种类型的daemons: 一个Ceph OSD Daemon(OSD)将数据作为对象存储到存储节点,一个Ceph Monitor(MON)维护集群映射的master版本。一个Ceph Storage Cluster可能包括数千个Storage nodes,一个最小系统至少有一个Ceph Monitor和两个Ceph OSD Daemons来实现data replication。
Ceph Filesystem, Ceph Object Storage和 Ceph Block Devices从Ceph Storage Cluster中读写数据。
config and deploy
一个典型的Ceph Storage Clusters deployment 使用一个deployment tool(ceph-deploy)来定义几个集群和启动一个监控。
当Ceph启动时,它激活三个daemons:
- ceph-mon(mandatory)
- ceph-osd(mandatory)
- ceph-mds(mandatory for cephfs only)
每个process, daemon或utility加载主机的配置文件。一个process也许有关于不止一个daemon instance的信息,一个daemon或utility只有关于一个daemon instance的信息。
Disks and Filesystems
Configuring Ceph
启动Ceph服务,初始化进程会激活一系列运行在后台的daemons,一个Ceph Storage Cluster会运行两类daemons:
- Ceph Monitor(ceph-mon)
- Ceph OSD Daemon(ceph-osd)
network settings
分布式存储学习!
http://sanwen8.cn/p/12eXN7U.html
https://github.com/kubernetes?utf8=%E2%9C%93&query=
kubernetes + CoreOS+Ceph RBD
CoreOS has the rbd module, which was the major impediment. The libraries
are better coming from the container. You can mount RBD volumes to the
host or to the container. We've done some work, over at
http://github.com/ceph/ceph-docker/ with getting Ceph running on Kubernetes
(though there is much more to do).
If, however, you only need to _consume_ Ceph resources in kubernetes, you
should be fine to do so. Just keep all the libraries and tools you need
inside your containers. The kernel modules for both rbd and cephfs have
been included with CoreOS for a while, now.
On Fri, Oct 9, 2015 at 12:01 PM Danny Chuang <[EMAIL PROTECTED]> wrote:
Mounting ceph image for kubernetes
getting Ceph running on Kubernetes
1. RBD:k8s支持RBD,用RBD实现与ceph的交互,mount RBD volume到host.
2.生成的ceph.conf和ceph keyring存储到etcd,或用ansible来生成这些配置文件和密钥
3.用fleet和etcd在容器中配置ceph
the configs (/etc/ceph/*) are created when the first ceph monitor boots up and stored in Etcd cluster. When new node joins the Ceph cluster, the configs are pulled automatically from Etcd servers.


