SpringwebMVC的了解、请求流程、运用等请阅读24-Java-Spring框架(二)
SpringAOP的了解、运用及原理等部分内容请阅读25-Java-Spring框架(三)
一、Spring框架了解
Spring框架是一个开源的框架,为JavaEE应用提供多方面的解决方案,用于简化企业级应用的开发,相当于是一种容器,可以集成其他框架(结构图如下)。
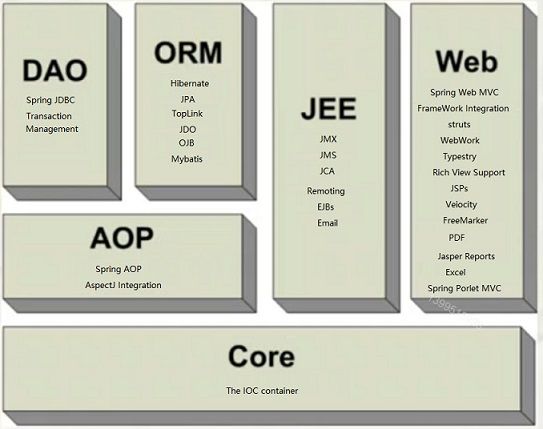
上图反映了框架引包的依赖关系(例如:DAO的jar包依赖AOP的jar包,AOP的jar包依赖Core的jar包)
上图也反映了Spring功能有:
IOC:控制反转,Spring的核心功能
AOP:面向切面编程
Web:MVC结构实现、与其他Web技术融合
DAO:与JDBC整合和事务管理
ORM:与ORM对象映射实现的框架整合
JEE:与JavaEE服务整合
二、SpringIOC(Inversion Of Control)
SpringIOC控制反转,是指程序中对象的获取方式发生反转,由最初的new方式创建,转为由框架创建注入,这样可以降低对象之间的耦合度。
IOC的主要作用是管理程序的组件,创建组件对象和维护对象之间的关系。
Spring容器:在Spring中,任何的Java类都被当成Bean组件,通过容器管理和使用,Spring容器实现了IOC和AOP机制,
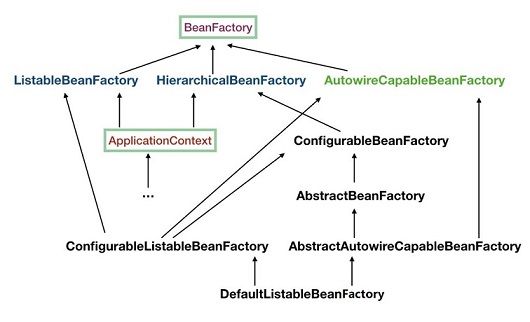
Spring容器有ApplicationContext和BeanFactory两种类型。
ApplicationContext继承自BeanFactory,提供了更多的方法,建议使用ApplicationContext。
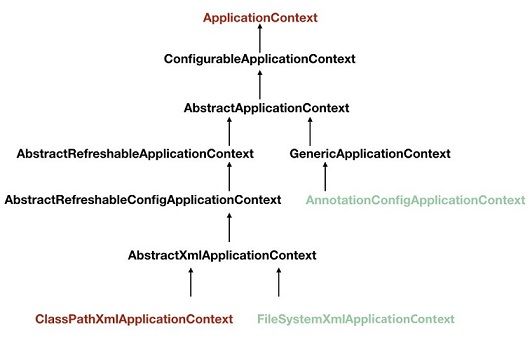
ApplicationContext实例化途径:
1.从classpath下加载配置文件实例化:ApplicationContext ac = new ClassPathXmlApplicationContext("applicationContext.xml");
2.从文件系统中加载配置文件实例化:ApplicationContext ac = new FileSystemXmlApplicationContext("D:\\applicationContext.xml");
Bean对象的创建:
Spring容器创建Bean对象有三种方法:
1.使用构造器来实例化
2.使用静态工厂方法来实例化
3.使用动态(实例)工厂方法来实例化
Spring容器创建Bean对象的步骤:
第一步:导入SpringIOC相关包到WebRoot/WBE-INF/lib下(想要相关包的网友请留言私聊)
commons-logging-1.2.jar
spring-beans-4.1.6.RELEASE.jar
spring-context-4.1.6.RELEASE.jar
spring-context-support-4.1.6.RELEASE.jar
spring-core-4.1.6.RELEASE.jar
spring-expression-4.1.6.RELEASE.jar
第二步:编写实体类和实体工厂类
实体类:
 1 package com.springioc.entity;
 2
 3 public class User {  4 private Integer id;  5 private String username;  6 private String password;  7 public User() {  8 super();  9 // TODO Auto-generated constructor stub 10  } 11 public User(Integer id, String username, String password) { 12 super(); 13 this.id = id; 14 this.username = username; 15 this.password = password; 16  } 17 public Integer getId() { 18 return id; 19  } 20 public void setId(Integer id) { 21 this.id = id; 22  } 23 public String getUsername() { 24 return username; 25  } 26 public void setUsername(String username) { 27 this.username = username; 28  } 29 public String getPassword() { 30 return password; 31  } 32 public void setPassword(String password) { 33 this.password = password; 34  } 35  @Override 36 public int hashCode() { 37 final int prime = 31; 38 int result = 1; 39 result = prime * result + ((id == null) ? 0 : id.hashCode()); 40 result = prime * result 41 + ((password == null) ? 0 : password.hashCode()); 42 result = prime * result 43 + ((username == null) ? 0 : username.hashCode()); 44 return result; 45  } 46  @Override 47 public boolean equals(Object obj) { 48 if (this == obj) 49 return true; 50 if (obj == null) 51 return false; 52 if (getClass() != obj.getClass()) 53 return false; 54 User other = (User) obj; 55 if (id == null) { 56 if (other.id != null) 57 return false; 58 } else if (!id.equals(other.id)) 59 return false; 60 if (password == null) { 61 if (other.password != null) 62 return false; 63 } else if (!password.equals(other.password)) 64 return false; 65 if (username == null) { 66 if (other.username != null) 67 return false; 68 } else if (!username.equals(other.username)) 69 return false; 70 return true; 71  } 72  @Override 73 public String toString() { 74 return "User [id=" + id + ", username=" + username + ", password=" 75 + password + "]"; 76  } 77 78 }
实体工厂类:
 1 package com.springioc.entity;
 2
 3 public class UserFactory {  4 public static User CreateUser(){  5 return new User();  6  }  7  8 public User DynamicCreateUser(){  9 return new User(); 10  } 11 }
第三步:编写实例化配置文件applicationContext.xml
  1 xml version="1.0" encoding="UTF-8"?>
  2 <beans xmlns="http://www.springframework.org/schema/beans"
  3        xmlns:xsi="http://www.w3.org/2001/XMLSchema-instance"
  4        xmlns:context="http://www.springframework.org/schema/context"
  5        xmlns:aop="http://www.springframework.org/schema/aop"
  6        xmlns:tx="http://www.springframework.org/schema/tx"
  7        xmlns:jdbc="http://www.springframework.org/schema/jdbc"
  8        xmlns:jee="http://www.springframework.org/schema/jee"
  9        xmlns:mvc="http://www.springframework.org/schema/mvc"
 10        xmlns:util="http://www.springframework.org/schema/util"
 11        xsi:schemaLocation="
 12             http://www.springframework.org/schema/beans http://www.springframework.org/schema/beans/spring-beans.xsd
 13             http://www.springframework.org/schema/tx http://www.springframework.org/schema/tx/spring-tx.xsd
 14             http://www.springframework.org/schema/aop http://www.springframework.org/schema/aop/spring-aop.xsd
 15             http://www.springframework.org/schema/util http://www.springframework.org/schema/util/spring-util.xsd
 16             http://www.springframework.org/schema/jdbc http://www.springframework.org/schema/jdbc/spring-jdbc.xsd
 17             http://www.springframework.org/schema/jee http://www.springframework.org/schema/jee/spring-jee.xsd
 18             http://www.springframework.org/schema/mvc http://www.springframework.org/schema/mvc/spring-mvc.xsd
 19             http://www.springframework.org/schema/context http://www.springframework.org/schema/context/spring-context.xsd">
 20
 21
 22
 23
 24
 25
 26
 32
 38
 46         <bean id="userFactory" class="com.springioc.entity.UserFactory">bean>
 47         <bean id="dynamicCreateUser" factory-bean="userFactory" factory-method="DynamicCreateUser">bean>
 48
 49
 63
 64
126
127
128
129
136
137
138
147
148 beans>
第四步:编写实例化测试类
 1 package com.springioc.test;
 2
 3 import org.springframework.context.ApplicationContext;//spring-context.jar包中的  4 import org.springframework.context.support.ClassPathXmlApplicationContext;//spring-context-support.jar包中的  5  6 import com.springioc.entity.User;  7  8 public class ApplicationContextBuildUserTest {  9 public static void main(String[] args) { 10 //以前的方式创建对象 11 // User user = new User(); 12 // System.out.println(user); 13 14 //现在使用Spring框架的容器来创建对象 15 //第一步:创建Spring容器 16 ApplicationContext ac = new ClassPathXmlApplicationContext("applicationContext.xml"); 17 18 /*第二步:从ApplicationContext容器获取Bean对象 19  * 1.构造器获取对象 20  * 语法格式: 21  * 类型名 变量名 = 容器对象.getBean("对象标识符",组件类型); 22  * 举例: 23  * User user = ac.getBean("user", User.class); 24  * 2.静态工厂获取对象 25  * 语法格式: 26  * 类型名 变量名 = 容器对象.getBean("静态工厂标识符",组件类型); 27  * 举例: 28  * User user = ac.getBean("staticFactory", User.class); 29  * */ 30 User user = ac.getBean("dynamicCreateUser", User.class); 31  System.out.println(user); 32  } 33 }
第五步:运行结果

Bean对象的作用域:
指定Spring容器创建Bean对象的作用域:
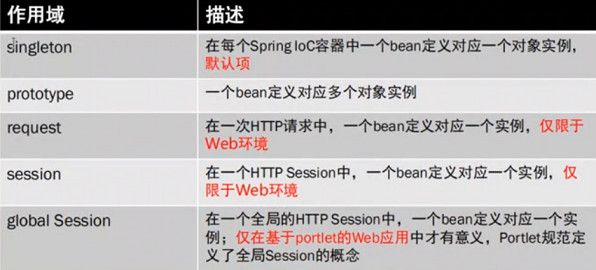
注意:singleton单例模式,通过getBean获取的对象HashCode是相同的,即user1 = user2返回true
prototype多例模式,通过getBean获取的对象HashCode是不同的,即user1 = user2返回false
Bean对象的参数注入:(看上面的applicationContext.xml中注释写的知识点)
容器可以建立Bean对象之间的关系,实现技术途径就是DI注入,Spring DI注入setter注入和构造器注入两种
组件扫描:Spring提供了一套基于注解配置的的使用方法,使用该方法可以大大简化XML的配置信息。
开启组件扫描,可以利用注解方式应用IOC,使用方法如下:
第一步:除了需要引入springIOC相关jar包之外还需要引入SpringAOP相关jar包(需要相关jar包的网友请留言私聊)
aopalliance-1.0.jar
aspectjweaver-1.5.3.jar
spring-aop-4.1.6.RELEASE.jar
spring-aspects-4.1.6.RELEASE.jar
第二步:在applicationContext.xml中添加启用标记(用了组件扫描就可以不用bean标签了)
第三步:在组件类中追加以下标记
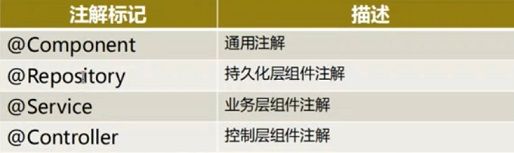
注意:1.扫描组件后,默认id值为组件类名首字母小写,也可以自定义id。例如:@Component("stu")
2.扫描组件后,默认scope为singleton单例,也可以进行指定。例如:@Scope("prototyppe")
3.也可以指定初始化和销毁的方法,例如,在组件类的方法前追加@PostConstruct来指定初始化方法,追加@PreDestory来指定销毁方法
4.将所有bean组件扫描到Spring容器后,可以使用以下注解指定注入关系
@Autowired/@Qulifier:可以处理构造器注入和setter注入
@Resource:只能处理Setter注入,但大部分情况都是setter注入
5.@Value注解可以注入Spring表达式值
首先读取db.properties文件,封装成Properties对象,在applicationContext.xml中添加
然后在组件类属性变量或Setter方法前使用@Value注解
@Value("#{db.url}")
private String url;
追加标记举例:
1 @Component//默认实体类id名称是实体类名称(首字母小写)
2 @Scope("prototype")//默认为单例模式,此处修改为多例模式
3 public class User {
4 }
第四步:测试获取bean对象:
 1 package com.springioc.test;
 2
 3 import org.springframework.context.ApplicationContext;//spring-context.jar包中的
 4 import org.springframework.context.support.ClassPathXmlApplicationContext;//spring-context-support.jar包中的
 5
 6 import com.springioc.entity.User;
 7
 8 public class ApplicationContextBuildUserTest {
 9     public static void main(String[] args) {
10         ApplicationContext ac = new ClassPathXmlApplicationContext("applicationContext.xml");
11         User user = ac.getBean("user", User.class);//此处的id:user是从@Component默认实体类id中得出来的
12         System.out.println(user);
13     }
14 }
运行结果:

SpringIOC实现解耦(重点理解)
解耦主题:通过hibernate和JDBC两种技术实现一个用户的删除操作
1.XML配置文件版的解耦
第一步:编写用户实体类和用户DAO接口
1 //用户DAO实现接口
2 package com.springiocDecoupling.usedao;
3
4 public interface UserDAO {
5     public void delete();
6 }
第二步:编写Hibernate技术和JDBC技术分别实现删除操作的类
1 //JDBC实现DAO删除操作
2 package com.springiocDecoupling.usedao;
3
4 public class JDBCDAO implements UserDAO{
5     public void delete(){
6         System.out.println("通过JDBC实现User删除");
7     }
8 }
1 //Hibernate实现DAO删除操作
2 package com.springiocDecoupling.usedao;
3
4 public class HibernateDAO implements UserDAO{
5     public void delete(){
6         System.out.println("通过Hibernate实现User删除");
7     }
8 }
第三步:编写一个控制用户删除操作的控制类
//控制类,控制删除操作
package com.springiocDecoupling.entity.Controller;
import org.springframework.stereotype.Controller;
import com.springioc_Decoupling.usedao.UserDAO;

@Controller//用于Spring框架管理
public class UserController {

    private UserDAO dao;
    public UserDAO getDao() {
        return dao;
    }
    public void setDao(UserDAO dao) {
        this.dao = dao;
    }
    public void delete(){
        dao.delete();
    }
}
第四步:配置applicationContext.xml信息
 1 xml version="1.0" encoding="UTF-8"?>
 2 <beans xmlns="http://www.springframework.org/schema/beans"
 3        xmlns:xsi="http://www.w3.org/2001/XMLSchema-instance"
 4        xmlns:context="http://www.springframework.org/schema/context"
 5        xmlns:aop="http://www.springframework.org/schema/aop"
 6        xmlns:tx="http://www.springframework.org/schema/tx"
 7        xmlns:jdbc="http://www.springframework.org/schema/jdbc"
 8        xmlns:jee="http://www.springframework.org/schema/jee"
 9        xmlns:mvc="http://www.springframework.org/schema/mvc"
10        xmlns:util="http://www.springframework.org/schema/util"
11        xsi:schemaLocation="
12             http://www.springframework.org/schema/beans http://www.springframework.org/schema/beans/spring-beans.xsd
13             http://www.springframework.org/schema/tx http://www.springframework.org/schema/tx/spring-tx.xsd
14             http://www.springframework.org/schema/aop http://www.springframework.org/schema/aop/spring-aop.xsd
15             http://www.springframework.org/schema/util http://www.springframework.org/schema/util/spring-util.xsd
16             http://www.springframework.org/schema/jdbc http://www.springframework.org/schema/jdbc/spring-jdbc.xsd
17             http://www.springframework.org/schema/jee http://www.springframework.org/schema/jee/spring-jee.xsd
18             http://www.springframework.org/schema/mvc http://www.springframework.org/schema/mvc/spring-mvc.xsd
19             http://www.springframework.org/schema/context http://www.springframework.org/schema/context/spring-context.xsd">
20         <bean id = "jdao" class = "com.springioc_Decoupling.usedao.JDBCDAO">bean>
21         <bean id = "hdao" class = "com.springioc_Decoupling.usedao.HibernateDAO">bean>
22
23         <bean id = "ucontroller" class="com.springiocDecoupling.entity.Controller.UserController">
24             <property name="dao" ref="jdao">property>
25         bean>
26 beans>
第五步:编写测试类
 1 package com.springiocDecoupling.entity.test;
 2
 3 import org.springframework.context.ApplicationContext;//spring-context.jar包中的
 4 import org.springframework.context.support.ClassPathXmlApplicationContext;//spring-context-support.jar包中的
 5
 6 import com.springiocDecoupling.entity.Controller.UserController;
 7
 8 public class ApplicationContextBuildUserTest {
 9     public static void main(String[] args) {
10         ApplicationContext ac = new ClassPathXmlApplicationContext("applicationContext.xml");
11         UserController ucon = ac.getBean("ucontroller", UserController.class);
12         ucon.delete();
13     }
14 }
测试结果:


2.通过注解的方式进行解耦
第一步:编写用户实体类和用户DAO接口
第二步:第二步:编写Hibernate技术和JDBC技术分别实现删除操作的类
 1 package com.springioc_Decoupling.usedao;
 2
 3 import org.springframework.stereotype.Repository;
 4
 5 @Repository("jdao")
 6 public class JDBCDAO implements UserDAO{
 7     public void delete(){
 8         System.out.println("通过JDBC实现User删除");
 9     }
10 }
 1 package com.springioc_Decoupling.usedao;
 2
 3 import org.springframework.stereotype.Repository;
 4
 5 @Repository("hdao")
 6 public class HibernateDAO implements UserDAO{
 7     public void delete(){
 8         System.out.println("通过Hibernate实现User删除");
 9     }
10 }
第三步:编写一个控制用户删除操作的控制类
 1 package com.springiocDecoupling.entity.Controller;
 2 import javax.annotation.Resource;
 3
 4 import org.springframework.stereotype.Controller;
 5
 6 import com.springioc_Decoupling.usedao.UserDAO;
 7
 8 @Controller("ucontroller")
 9 public class UserController {
10     //如果使用Autowired的话需要Qualifier搭配,例如:
11   //@Autowired
11   //@Qualifier("jdao")
11     @Resource(name="jdao")//解耦操作就体现在此处,要用jdbc修改为jdao就行了,要用hibernate修改为hdao就行了
12     private UserDAO dao;
13     public UserDAO getDao() {
14         return dao;
15     }
16     public void setDao(UserDAO dao) {
17         this.dao = dao;
18     }
19     public void delete(){
20         dao.delete();
21     }
22 }
第四步:配置applicationContext.xml信息,启动组件扫描
 1 xml version="1.0" encoding="UTF-8"?>
 2 <beans xmlns="http://www.springframework.org/schema/beans"
 3        xmlns:xsi="http://www.w3.org/2001/XMLSchema-instance"
 4        xmlns:context="http://www.springframework.org/schema/context"
 5        xmlns:aop="http://www.springframework.org/schema/aop"
 6        xmlns:tx="http://www.springframework.org/schema/tx"
 7        xmlns:jdbc="http://www.springframework.org/schema/jdbc"
 8        xmlns:jee="http://www.springframework.org/schema/jee"
 9        xmlns:mvc="http://www.springframework.org/schema/mvc"
10        xmlns:util="http://www.springframework.org/schema/util"
11        xsi:schemaLocation="
12             http://www.springframework.org/schema/beans http://www.springframework.org/schema/beans/spring-beans.xsd
13             http://www.springframework.org/schema/tx http://www.springframework.org/schema/tx/spring-tx.xsd
14             http://www.springframework.org/schema/aop http://www.springframework.org/schema/aop/spring-aop.xsd
15             http://www.springframework.org/schema/util http://www.springframework.org/schema/util/spring-util.xsd
16             http://www.springframework.org/schema/jdbc http://www.springframework.org/schema/jdbc/spring-jdbc.xsd
17             http://www.springframework.org/schema/jee http://www.springframework.org/schema/jee/spring-jee.xsd
18             http://www.springframework.org/schema/mvc http://www.springframework.org/schema/mvc/spring-mvc.xsd
19             http://www.springframework.org/schema/context http://www.springframework.org/schema/context/spring-context.xsd">
20
21
29
30         <context:component-scan base-package="com.springiocDecoupling">context:component-scan>
31 beans>
第五步:编写测试类
测试结果: