Spring项目搭建(一)
一创建项目,引入maven依赖
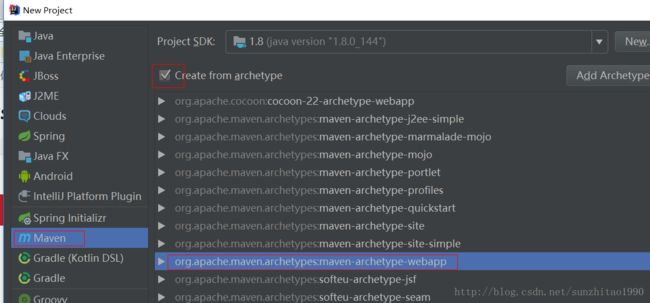
新建一个maven项目,选择maven-archetype-webapp
填写groupId和ArtifactId,点击next
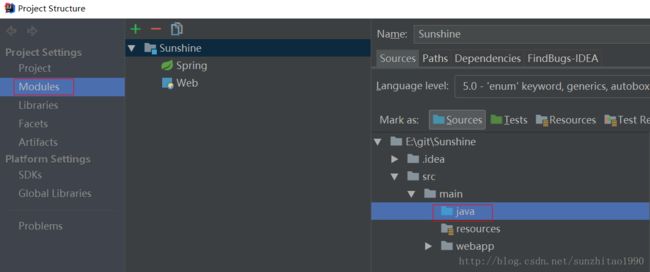
发现新建的项目main下面没有java文件夹,那么,点击File -project Structure 在Module选项中 右边的mian下面新建文件夹,并且改成Source类型
引入maven依赖:
spring的依赖共有以下四个方面:
1)spring核心依赖
spring-core、spring-beans、spring-context
2)spring dao依赖(提供JDBCTemplate)
spring-jdbc、spring-tx
3)spring web依赖
spring-web、spring-webmvc
4)spring test依赖
spring-test
pom.xml文件如图:
  4.0.0
  com.happy
  sunshine
  war
  1.0-SNAPSHOT
  sunshine Maven Webapp
  http://maven.apache.org


    4.3.7.RELEASE

    3.2.6

    1.7.7
    1.2.17


      junit
      junit
      3.8.1
      test


      org.springframework
      spring-core
      ${spring.version}


      org.springframework
      spring-beans
      ${spring.version}


      org.springframework
      spring-context
      ${spring.version}


      org.springframework
      spring-jdbc
      ${spring.version}


      org.springframework
      spring-tx
      ${spring.version}


      org.springframework
      spring-web
      ${spring.version}


      org.springframework
      spring-webmvc
      ${spring.version}


      org.springframework
      spring-test
      ${spring.version}


    sunshine
IoC控制反转的理解和实现
习惯上: 在src建立applicationContext.xml(位置:src目录或者 WEB-INF目录)web项目,就放在resources目录即可
xml文件头添加shema约束
一.在要管理的bean上加上注解@Component (Spring2.5以后引入)
二.在applicationContext.xml中开启注解开启和注解扫描(注解开启和注解扫描之后,扫描到的bean会被自动纳入Spring容器管理)
需要引入context名称空间,此时的xml为:
//Spring3.0后,提供 @Value注解,可以完成简单数据的注入
    @Value("sunny")
    private  String userName//单独使用@Autowired 按照类型注入
@Autowired
private UserService userService ;//使用@Autowired + @ Qualifier 按照名称注入
@Autowired
@Qualifier("userService")
private UserService userService ; //使用@Resource默认按照类型注入,加名字则按照名字注入
@Resource
// @Resource(name="userService1")
private UserService userService ;

