超级账本hyperledger fabric第七集:智能合约
智能合约
- 执行环境:以太坊虚拟智能合约执行环境EVM,fabric执行环境是docker
- 链码
- 是应用层和区块链底层的中间点
- 每一个链码执行环境是一个独立的docker
- 使用GRPC协议与背书节点通信,只有背书节点才能运行智能合约
- 链码的生命周期
- 打包,智能合约的编写和编译
- 安装,将打包好的文件,上传到背书节点
- 实例化,实际的安装了,执行Init方法,只执行一次,构造函数
- 升级,升级和修复链码
- 交互,自己定义的方法的调用
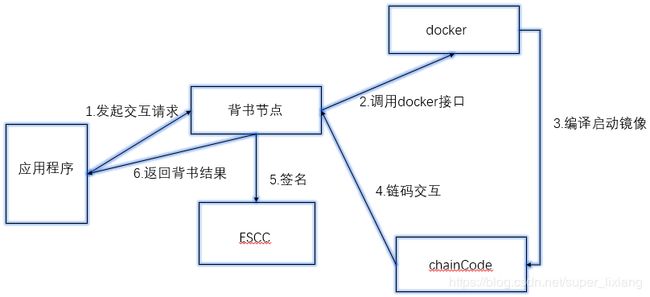
- 链码的交互流程
- 系统链码(了解)
- LSCC:管理链码的生命周期
- CSCC:配置管理链码,管理链的配置
- QSCC:查询账本存储,是一个区块索引的外部服务
- ESCC:交易背书的链码,交易执行后的链码进行封装签名,给客户端返回背书交易结果
- VSCC:交易验证的链码
- 链码编程的接口
- Init():链码初始化,只执行一次
- Invoke():链码的业务逻辑的编写
- 上面2个方法参数一样,参数是SDK的接口
- 链码SDK的接口:写代码再看
- 一些注意点:
- 分布式多机多节点执行,链码会执行很多次
- 不写随机函数,交易会无效,多次执行不一样
- 系统时间不写,多机时间不一定一样
网络搭建配置的实现
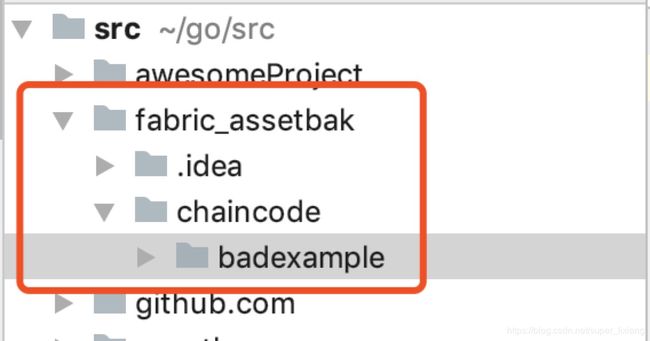
- 创建fabric_asset工程,在里面创建chaincode文件夹。
- 在badexample.go中
package main

import (
	"github.com/hyperledger/fabric/core/chaincode/shim"
	pb "github.com/hyperledger/fabric/protos/peer"
	"bytes"
	"strconv"
	"math/rand"
	"time"
	"fmt"
)

type BadExampleCC struct {
}

//每一个链码必须实现2个方法

//链码的初始化
func (c *BadExampleCC) Init(stub shim.ChaincodeStubInterface) pb.Response {
	//直接返回成功
	return shim.Success(nil)
}

//链码交互的入口
func (c *BadExampleCC) Invoke(stub shim.ChaincodeStubInterface) pb.Response {
	//直接返回一个随机数结果
	return shim.Success(bytes.NewBufferString(strconv.Itoa(int(rand.Int63n(time.Now().Unix())))).Bytes())
}

func main() {
	err := shim.Start(new(BadExampleCC))
	if err != nil {
		fmt.Printf("Error starting Simple chaincode: %s", err)
	}
}
- crypto-config.yaml:用于配置组织节点的个数,参考first-network去编写
- 编写好后,传到linux对应目录
- 进入deploy目录,设置工作目录为当前目录
- 指定按照yaml文件生成配置
- configtx.yaml:用于区块联盟中的组织信息,配置名字和证书等的位置,参考firstnetwork去编写
---
#联盟配置
#联盟内的组织对区块链的操作
Profiles:
    #系统链的配置
    #全局配置
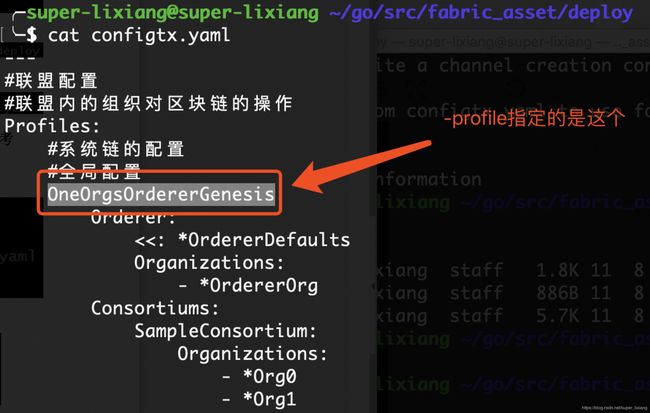
    OneOrgsOrdererGenesis:
        Orderer:
            <<: *OrdererDefaults
            Organizations:
                - *OrdererOrg
        Consortiums:
            SampleConsortium:
                Organizations:
                    - *Org0
                    - *Org1
    #业务相关的配置
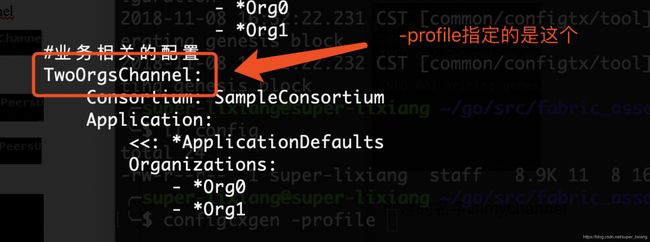
    TwoOrgsChannel:
        Consortium: SampleConsortium
        Application:
            <<: *ApplicationDefaults
            Organizations:
                - *Org0
                - *Org1

Organizations:
    #组织内的配置
    - &OrdererOrg
        #组织名字
        Name: OrdererOrg
        #组织ID
        ID: OrdererMSP
        #组织证书的位置
        MSPDir: crypto-config/ordererOrganizations/example.com/msp

    - &Org0
        Name: Org0MSP

        ID: Org0MSP

        MSPDir: crypto-config/peerOrganizations/org0.example.com/msp
        #锚节点的配置
        AnchorPeers:
            - Host: peer0.org0.example.com
              Port: 7051

    - &Org1
        Name: Org1MSP

        ID: Org1MSP

        MSPDir: crypto-config/peerOrganizations/org1.example.com/msp
        #锚节点
        AnchorPeers:
            - Host: peer0.org1.example.com
              Port: 7051
#orderer配置
Orderer: &OrdererDefaults
    #配置共识机制
    OrdererType: solo

    Addresses:
        - orderer.example.com:7050
    #出块的时间间隔
    BatchTimeout: 2s
    #每个块的大小信息
    BatchSize:

        MaxMessageCount: 10

        AbsoluteMaxBytes: 99 MB

        PreferredMaxBytes: 512 KB
    #kafka的配置
    Kafka:
        Brokers:
            - 127.0.0.1:9092

    Organizations:

Application: &ApplicationDefaults

    Organizations:
- 编写好后,传到linux对应目录
- 创建用于存放配置的目录
- 生成系统链的创世区块:-profile指定联盟配置,outputBlock指定存放的位置
- 生成通道的创世交易:profile指定业务联盟,outputCreateChannelTx存放的路径,创建的名字叫mychannel
- 生成两个组织锚节点的交易信息
- 将docker-compose.yaml拖进deploy目录
version: '2'

services:

  #1.系统一些环境变量的配置
  #2.端口的映射关系
  #3.文件的映射关系

  orderer.example.com:
    container_name: orderer.example.com
    #指定使用镜像名称
    image: hyperledger/fabric-orderer:x86_64-1.0.0
    #环境变量的配置
    environment:
      #设置日志级别
      - ORDERER_GENERAL_LOGLEVEL=debug
      #服务暴露的地址
      - ORDERER_GENERAL_LISTENADDRESS=0.0.0.0
      #下面2个是注入创世区块
      - ORDERER_GENERAL_GENESISMETHOD=file
      - ORDERER_GENERAL_GENESISFILE=/etc/hyperledger/config/genesis.block
      #下面2个是证书相关的配置
      - ORDERER_GENERAL_LOCALMSPID=OrdererMSP
      - ORDERER_GENERAL_LOCALMSPDIR=/etc/hyperledger/orderer/msp
    working_dir: /home/go_work/src/github.com/hyperledger/fabric/orderer
    command: orderer
    ports:
      #前面是本机的,端口映射
      - 7050:7050
    volumes:
        - ./config/genesis.block:/etc/hyperledger/config/genesis.block
        - ./crypto-config/ordererOrganizations/example.com/orderers/orderer.example.com/:/etc/hyperledger/orderer

  #peer的基础设置
  peer.base:
    image: hyperledger/fabric-peer:x86_64-1.0.0
    environment:
      #peer节点可能对chaincode做一些操作
      - CORE_VM_ENDPOINT=unix:///host/var/run/docker.sock
      #日志级别
      - CORE_LOGGING_PEER=debug

      #开启开发者模式
      #- CORE_CHAINCODE_MODE=dev

      #关于链码的日志级别
      - CORE_CHAINCODE_LOGGING_LEVEL=DEBUG
      #msp证书
      - CORE_PEER_MSPCONFIGPATH=/etc/hyperledger/peer/msp
      #状态数据库的存储引擎,这里配置使用levledb
      - CORE_LEDGER_STATE_STATEDATABASE=goleveldb
      #配置chaincode与peer节点使用的网络,同一个网络
      - CORE_VM_DOCKER_HOSTCONFIG_NETWORKMODE=deploy_default
    working_dir: /home/go_work/src/github.com/hyperledger/fabric
    command: peer node start
    #开启开发者模式
    #command: peer node start --peer-chaincodedev=true

  peer0.org0.example.com:
    extends:
      service: peer.base
    container_name: peer0.org0.example.com
    environment:
      - CORE_VM_ENDPOINT=unix:///host/var/run/docker.sock
      - CORE_PEER_ID=peer0.org0.example.com
      - CORE_PEER_LOCALMSPID=Org0MSP
      - CORE_PEER_ADDRESS=peer0.org1.example.com:7051
    ports:
      #grpc的端口
      - 7051:7051
      #事件监听的端口
      - 7053:7053
    volumes:
      - /var/run/:/host/var/run/
      - ./crypto-config/peerOrganizations/org0.example.com/peers/peer0.org0.example.com:/etc/hyperledger/peer
    depends_on:
      - orderer.example.com

  peer1.org0.example.com:
    extends:
      service: peer.base
    container_name: peer1.org0.example.com
    environment:
      - CORE_VM_ENDPOINT=unix:///host/var/run/docker.sock
      - CORE_PEER_ID=peer1.org0.example.com
      - CORE_PEER_LOCALMSPID=Org0MSP
      - CORE_PEER_ADDRESS=peer1.org0.example.com:7051
    ports:
      #别与上面peer0的端口冲突就可以
      - 17051:7051
      - 17053:7053
    volumes:
      - /var/run/:/host/var/run/
      - ./crypto-config/peerOrganizations/org0.example.com/peers/peer1.org0.example.com:/etc/hyperledger/peer
    depends_on:
      - orderer.example.com

  peer0.org1.example.com:
    extends:
      service: peer.base
    container_name: peer0.org1.example.com
    environment:
      - CORE_VM_ENDPOINT=unix:///host/var/run/docker.sock
      - CORE_PEER_ID=peer0.org1.example.com
      - CORE_PEER_LOCALMSPID=Org1MSP
      - CORE_PEER_ADDRESS=peer0.org1.example.com:7051
    ports:
      #注意端口不冲突就可以
      - 27051:7051
      - 27053:7053
    volumes:
      - /var/run/:/host/var/run/
      - ./crypto-config/peerOrganizations/org1.example.com/peers/peer0.org1.example.com:/etc/hyperledger/peer
    depends_on:
      - orderer.example.com

  peer1.org1.example.com:
    extends:
      service: peer.base
    container_name: peer1.org1.example.com
    environment:
      - CORE_VM_ENDPOINT=unix:///host/var/run/docker.sock
      - CORE_PEER_ID=peer1.org1.example.com
      - CORE_PEER_LOCALMSPID=Org1MSP
      - CORE_PEER_ADDRESS=peer1.org1.example.com:7051
    ports:
      #注意端口不冲突就可以
      - 37051:7051
      - 37053:7053
    volumes:
      - /var/run/:/host/var/run/
      - ./crypto-config/peerOrganizations/org1.example.com/peers/peer1.org1.example.com:/etc/hyperledger/peer
    depends_on:
      - orderer.example.com

  peer2.org1.example.com:
    extends:
      service: peer.base
    container_name: peer2.org1.example.com
    environment:
      - CORE_VM_ENDPOINT=unix:///host/var/run/docker.sock
      - CORE_PEER_ID=peer2.org1.example.com
      - CORE_PEER_LOCALMSPID=Org1MSP
      - CORE_PEER_ADDRESS=peer2.org1.example.com:7051
    ports:
      - 47051:7051
      - 47053:7053
    volumes:
      - /var/run/:/host/var/run/
      - ./crypto-config/peerOrganizations/org1.example.com/peers/peer2.org1.example.com:/etc/hyperledger/peer
    depends_on:
      - orderer.example.com

  #peer节点客户端配置
  cli:
    container_name: cli
    image: hyperledger/fabric-tools
    tty: true
    environment:
      - GOPATH=/home/go_work
      - CORE_LOGGING_LEVEL=DEBUG
      - CORE_PEER_ID=cli
      - CORE_PEER_ADDRESS=peer0.org1.example.com:7051
      - CORE_PEER_LOCALMSPID=Org1MSP
      - CORE_PEER_MSPCONFIGPATH=/etc/hyperledger/peer/users/[email protected]/msp
    working_dir: /home/go_work/src/github.com/hyperledger/fabric/
    command: /bin/bash
    volumes:
      #链码路径的注入
      #本地中的相对路径,映射的容器中的绝对路径
      - ./../chaincode:/home/go_work/src/github.com/chaincode
      - ./config:/etc/hyperledger/config
      - ./crypto-config/peerOrganizations/org1.example.com/:/etc/hyperledger/peer
启动网络
- 启动docker,后台运行
- 查看orderer节点的运行日志
- 与客户端交互操作
- 创建通道:-o指定与哪个orderer节点通信,-c指定创建的通道名称,-f指定使用的文件
- 加入通道
- 查看peer加入的通道列表
- 指定主节点
------------------------------------------------------------------基础网络搞定了----------------------------------------------------------------------------------
- 安装链码:-n是安装的名字,-v是version,-l是使用语言
- 克隆一个会话,交互执行peer0,查看安装的链码
- 链码实例化
- 链码交互执行
- 多次执行查询,得到的结果不用,因为invoke()中使用了随机数,不要这么做
package main

import (
	"github.com/hyperledger/fabric/core/chaincode/shim"
	pb "github.com/hyperledger/fabric/protos/peer"
	"bytes"
	"strconv"
	"math/rand"
	"time"
	"fmt"
)

type BadExampleCC struct {
}

//每一个链码必须实现2个方法

//链码的初始化
func (c *BadExampleCC) Init(stub shim.ChaincodeStubInterface) pb.Response {
	//直接返回成功
	return shim.Success(nil)
}

//链码交互的入口
func (c *BadExampleCC) Invoke(stub shim.ChaincodeStubInterface) pb.Response {
	//直接返回一个随机数结果
	return shim.Success(bytes.NewBufferString(strconv.Itoa(int(rand.Int63n(time.Now().Unix())))).Bytes())
}

func main() {
	err := shim.Start(new(BadExampleCC))
	if err != nil {
		fmt.Printf("Error starting Simple chaincode: %s", err)
	}
}


