subsampling-scale-image-view加载长图源码分析(二)
subsampling-scale-image-view源码分析
- 概要
- 分析
- 总结
概要
subsampling-scale-image-view是一个支持部分加载大图长图的图片库,并且还支持缩放,在subsampling-scale-image-view加载长图源码分析(一)已经介绍过它的用法和部分源码,没有看过的朋友可以先移步看前面的分析。
分析
上回说到采样率等于1的情况下,因为不需要缩放和部分加载,所以直接调用了BitmapFactory进行解码,那么接下来我就来分析采样率大于1的情况。上代码:
    private synchronized void initialiseBaseLayer(@NonNull Point maxTileDimensions) {
        debug("initialiseBaseLayer maxTileDimensions=%dx%d", maxTileDimensions.x, maxTileDimensions.y);

        satTemp = new ScaleAndTranslate(0f, new PointF(0, 0));
        fitToBounds(true, satTemp);

        // Load double resolution - next level will be split into four tiles and at the center all four are required,
        // so don't bother with tiling until the next level 16 tiles are needed.
        fullImageSampleSize = calculateInSampleSize(satTemp.scale);
        if (fullImageSampleSize > 1) {
            fullImageSampleSize /= 2;
        }

        if (fullImageSampleSize == 1 && sRegion == null && sWidth() < maxTileDimensions.x && sHeight() < maxTileDimensions.y) {

            // Whole image is required at native resolution, and is smaller than the canvas max bitmap size.
            // Use BitmapDecoder for better image support.
            decoder.recycle();
            decoder = null;
            BitmapLoadTask task = new BitmapLoadTask(this, getContext(), bitmapDecoderFactory, uri, false);
            execute(task);

        } else {

            initialiseTileMap(maxTileDimensions);

            List baseGrid = tileMap.get(fullImageSampleSize);
            for (Tile baseTile : baseGrid) {
                TileLoadTask task = new TileLoadTask(this, decoder, baseTile);
                execute(task);
            }
            refreshRequiredTiles(true);

        }

    }
else里面就是采样率大于1的情况,先进行了tileMap的初始化,接着是TilLoadTask的执行,那么我们先看一下initialiseTileMap。
    private void initialiseTileMap(Point maxTileDimensions) {
        this.tileMap = new LinkedHashMap<>();
        int sampleSize = fullImageSampleSize;
        int xTiles = 1;
        int yTiles = 1;
        while (true) {
            int sTileWidth = sWidth()/xTiles;
            int sTileHeight = sHeight()/yTiles;
            int subTileWidth = sTileWidth/sampleSize;
            int subTileHeight = sTileHeight/sampleSize;
            while (subTileWidth + xTiles + 1 > maxTileDimensions.x || (subTileWidth > getWidth() * 1.25 && sampleSize < fullImageSampleSize)) {
                xTiles += 1;
                sTileWidth = sWidth()/xTiles;
                subTileWidth = sTileWidth/sampleSize;
            }
            while (subTileHeight + yTiles + 1 > maxTileDimensions.y || (subTileHeight > getHeight() * 1.25 && sampleSize < fullImageSampleSize)) {
                yTiles += 1;
                sTileHeight = sHeight()/yTiles;
                subTileHeight = sTileHeight/sampleSize;
            }
            List tileGrid = new ArrayList<>(xTiles * yTiles);
            for (int x = 0; x < xTiles; x++) {
                for (int y = 0; y < yTiles; y++) {
                    Tile tile = new Tile();
                    tile.sampleSize = sampleSize;
                    tile.visible = sampleSize == fullImageSampleSize;
                    tile.sRect = new Rect(
                        x * sTileWidth,
                        y * sTileHeight,
                        x == xTiles - 1 ? sWidth() : (x + 1) * sTileWidth,
                        y == yTiles - 1 ? sHeight() : (y + 1) * sTileHeight
                    );
                    tile.vRect = new Rect(0, 0, 0, 0);
                    tile.fileSRect = new Rect(tile.sRect);
                    tileGrid.add(tile);
                }
            }
            tileMap.put(sampleSize, tileGrid);
            if (sampleSize == 1) {
                break;
            } else {
                sampleSize /= 2;
            }
        }
    }
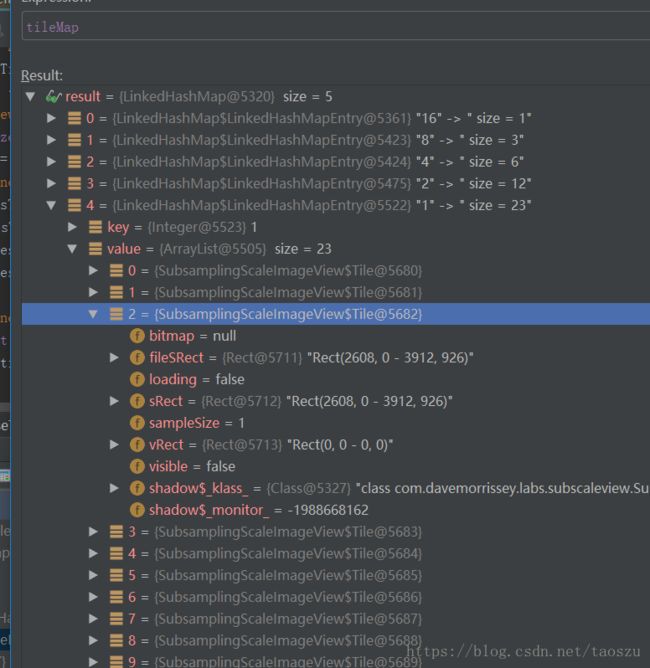
这里顾名思义就是切片,在不同的采样率的情况下切成一个个的tile,因为是进行局部加载,所以在放大的时候,要取出对应的采样率的图片,继而取出对应的区域,试想一下,如果放大几倍,仍然用的16的采样率,那么图片放大之后肯定很模糊,所以缩放级别不同,要使用不同的采样率解码图片。这里的tileMap是一个Map,key是采样率,value是一个列表,列表存储的是对应key采样率的所有切片集合,如下图
fileSRect是一个切片的矩阵大小,每一个切片的矩阵大小要确保在对应的缩放级别和采样率下能够显示正常。
初始化切片之后,就执行当前采样率下的TileLoadTask。
       try {
                SubsamplingScaleImageView view = viewRef.get();
                ImageRegionDecoder decoder = decoderRef.get();
                Tile tile = tileRef.get();
                if (decoder != null && tile != null && view != null && decoder.isReady() && tile.visible) {
                    view.debug("TileLoadTask.doInBackground, tile.sRect=%s, tile.sampleSize=%d", tile.sRect, tile.sampleSize);
                    view.decoderLock.readLock().lock();
                    try {
                        if (decoder.isReady()) {
                            // Update tile's file sRect according to rotation
                            view.fileSRect(tile.sRect, tile.fileSRect);
                            if (view.sRegion != null) {
                                tile.fileSRect.offset(view.sRegion.left, view.sRegion.top);
                            }
                            return decoder.decodeRegion(tile.fileSRect, tile.sampleSize);
                        } else {
                            tile.loading = false;
                        }
                    } finally {
                        view.decoderLock.readLock().unlock();
                    }
                } else if (tile != null) {
                    tile.loading = false;
                }
            } catch (Exception e) {
                Log.e(TAG, "Failed to decode tile", e);
                this.exception = e;
            } catch (OutOfMemoryError e) {
                Log.e(TAG, "Failed to decode tile - OutOfMemoryError", e);
                this.exception = new RuntimeException(e);
            }
            return null;
        }

        @Override
        protected void onPostExecute(Bitmap bitmap) {
            final SubsamplingScaleImageView subsamplingScaleImageView = viewRef.get();
            final Tile tile = tileRef.get();
            if (subsamplingScaleImageView != null && tile != null) {
                if (bitmap != null) {
                    tile.bitmap = bitmap;
                    tile.loading = false;
                    subsamplingScaleImageView.onTileLoaded();
                } else if (exception != null && subsamplingScaleImageView.onImageEventListener != null) {
                    subsamplingScaleImageView.onImageEventListener.onTileLoadError(exception);
                }
            }
        }
可以看到了调用了图片解码器的decodeRegion方法,传入了当前的采样率和切片矩阵大小,进入解码器代码,
  @Override
    @NonNull
    public Bitmap decodeRegion(@NonNull Rect sRect, int sampleSize) {
        getDecodeLock().lock();
        try {
            if (decoder != null && !decoder.isRecycled()) {
                BitmapFactory.Options options = new BitmapFactory.Options();
                options.inSampleSize = sampleSize;
                options.inPreferredConfig = bitmapConfig;
                Bitmap bitmap = decoder.decodeRegion(sRect, options);
                if (bitmap == null) {
                    throw new RuntimeException("Skia image decoder returned null bitmap - image format may not be supported");
                }
                return bitmap;
            } else {
                throw new IllegalStateException("Cannot decode region after decoder has been recycled");
            }
        } finally {
            getDecodeLock().unlock();
        }
    }
超级简单有没有,就是设置好inSampleSize,然后调用BitmapRegionDecoder的decodeRegion方法,传入的矩阵是切片的大小。解码成功之后,重新刷新UI,我们继续看到onDraw方法。
 for (Map.Entry> tileMapEntry : tileMap.entrySet()) {
                if (tileMapEntry.getKey() == sampleSize || hasMissingTiles) {
                    for (Tile tile : tileMapEntry.getValue()) {
                        sourceToViewRect(tile.sRect, tile.vRect);
                        if (!tile.loading && tile.bitmap != null) {
                            if (tileBgPaint != null) {
                                canvas.drawRect(tile.vRect, tileBgPaint);
                            }

                            matrix.reset();
                            setMatrixArray(srcArray, 0, 0, tile.bitmap.getWidth(), 0, tile.bitmap.getWidth(), tile.bitmap.getHeight(), 0, tile.bitmap.getHeight());
                            setMatrixArray(dstArray, tile.vRect.left, tile.vRect.top, tile.vRect.right, tile.vRect.top, tile.vRect.right, tile.vRect.bottom, tile.vRect.left, tile.vRect.bottom);

                            matrix.setPolyToPoly(srcArray, 0, dstArray, 0, 4);
                            canvas.drawBitmap(tile.bitmap, matrix, bitmapPaint);
                        }
                    }
                }
  }
这就是切片绘制的关键代码,在Tile这个类中,sRect负责保存切片的原始大小,vRect则负责保存切片的绘制大小,所以 sourceToViewRect(tile.sRect, tile.vRect) 这里进行了矩阵的缩放,其实就是根据之前计算得到的scale对图片原始大小进行缩放。 接着再通过矩阵变换,将图片大小变换为绘制大小进行绘制。分析到这里,其实整个的加载过程和逻辑已经是了解得七七八八了。
还有另外的就是手势缩放的处理,通过监听move等触摸事件,然后重新计算scale的大小,接着通过scale的大小去重新得到对应的采样率,继续通过tileMap取出采样率下对应的切片,对切片请求解码。值得一提的是,在move事件的时候,这里做了优化,解码的图片并没有进行绘制,而是对原先采样率下的图片进行缩放,直到监听到up事件,才会去重新绘制对应采样率下的图片。所以在缩放的过程中,会看到一个模糊的图像,其实就是高采样率下的图片进行放大导致的。等到缩放结束,会重新绘制,图片就显示正常了。
流程图如下:

总结
通过这两篇博客,我分别介绍了subsampling-scale-image-view的初始化过程,缩放级别,采样率等,通过不同的采样率进行不同方法的解码。在部分解码图片的时候,又会根据当前缩放级别重新去获取采样率,解码新的图片,缩放越大,需要的图片就越清晰,越小就不需要太过清晰,这样子可以起到节约内存的作用。
对应内存使用这一块,其实要想节约,就要省着来用,不可见的先不加载,subsampling-scale-image-view是如此,viewstub也是如此,编码麻烦,但是性能更加。