1,Buffer缓冲区
- 缓冲区本质上就是一个可以读写数据的内存块,底层数据结构是数组,通过一组属性和方法来实现缓冲区数据的读、写及读写转换
1.1,Buffer基本类体系结构
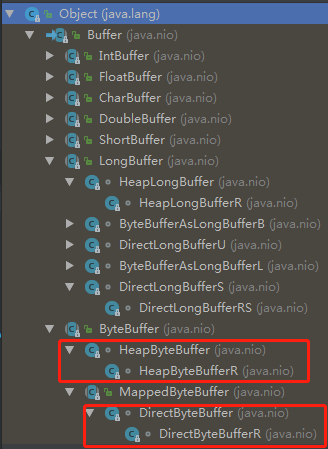
- 对于Java基本数据类型,除过 Boolean 外,每一种基本类型的包装类,都存在一种 Buffer 缓冲区与之对应
- 对于Java对象,可以转换为 Byte 字节,通过 ByteBuffer 进行数据传递
- 每一种子类缓冲区下,都有对应的间接缓冲区 Heap*Buffer 和直接缓冲区 Direct*Buffer 实现
- 每一种类型缓冲区下,都可以进行只读缓冲区 *BufferR 转换
- ByteBuffer 下定义了内存映射缓冲区 MappedByteBuffer,基于零拷贝概念可以直接进行磁盘操作
1.2,Buffer关键属性及常用API
// 0 <= mark <= position <= limit <= capacity
// 位置标记
private int mark = -1;
// 缓冲区当前操作位置,包括读写位置
private int position = 0;
// 缓冲区当前操作最大索引
private int limit;
// 容量;初始化时候设定,并不能改变
private int capacity;
// 底层数组,以ByteBuffer为例
final byte[] hb = new byte[cap];
/************************** Buffer **************************/
// 获取缓冲区容量
public final int capacity();
// 获取缓冲区操作位置
public final int position();
// 重置缓冲区操作位置
public final Buffer position(int newPosition);
// 获取缓冲区操作上限
public final int limit();
// 重置缓冲区操作上限
public final Buffer limit(int newLimit);
// 标记缓冲区操作位置
public final Buffer mark();
// 重置缓冲区操作位置到标记位置
public final Buffer reset();
// 清除缓冲区; 各个标记位恢复到初始状态,但是数据并没有真正擦除
public final Buffer clear();
// 反转缓冲区, 缓冲区状态从写到读变更
public final Buffer flip();
// 重置缓冲区操作位
public final Buffer rewind();
// 返回可读/可写元素个数
public final int remaining();
// 返回是否存在可读/可写元素判断
public final boolean hasRemaining();
// 判断缓冲区是否为只读缓冲区
public abstract boolean isReadOnly();
// 判断缓冲区是否为直接缓冲区
public abstract boolean isDirect();
// 转换缓冲区为数组
public abstract Object array();
/******************* ByteBuffer 其他类似 *******************/
// 初始化缓冲
public static ByteBuffer allocate(int capacity);
// 初始化为直接缓冲区
public static ByteBuffer allocateDirect(int capacity);
// 包装数组为缓冲区
public static ByteBuffer wrap(byte[] array);
// 从缓冲区读数据
public abstract byte get();
public abstract byte get(int index);
// 往缓冲区写数据
public abstract ByteBuffer put(byte b);
public abstract ByteBuffer put(int index, byte b);
1.3,Buffer关键属性值变更,通过一段流程演示
- Buffer缓冲区支持读和写操作,通过
capacity、limit、position、mark等字段的数值转换进行读写操作切换,涉及的数值状态变更如下
- 初始化:
capacity = 5, limit = 5, position = 0, mark = -1
capacity和limit初始化为缓冲区长度position初始化为0值mark初始化为-1,并且如果不存在mark操作,会一直是-1

// 初始化容量为5,该长度后续稳定
ByteBuffer buffer = ByteBuffer.allocate(5);
ByteBuffer buffer = ByteBuffer.allocateDirect(5);
- 写数据:
capacity = 5, limit = 5, position = 2, mark = -1
- 写数据后,
mark, limit, mark不变,position推进长度位

// 写入两个长度位数据
buffer.put("ab".getBytes());
- 写读转换:
capacity = 5, limit = position = 2, position = 0, mark = -1
- 写读转换后,将数组中的有效数据返回通过
limit和position包起来,并通过position前移进行读取,直到读到limit位置,标识整个数组读取完成

// 缓冲区从写到读转换时,需要调用该方法进行读写位重置
// 将 limit 设置为 position 值,表示最大可读索引
// 将 position 置为0值,表示从0索引开始读
buffer.flip();
- 取数据:
capacity = 5, limit = 2, position = 1, mark = -1
- 取数据就是对
position位置进行后移,并不断取数据直到limit

/* 这一部分获取数据后 position 后移 */
// 取下一条数据
buffer.get();
// 取范围数据,演示取一条
byte[] bytes = new byte[1];
buffer.get(bytes, 0, 1);
buffer.get(bytes);
/* 这一部分获取数据后 position 不变 */
// 取指定索引数据
buffer.get(0);
- 设置标记位:
capacity = 5, limit = 2, position = 1, mark = position = 1
- 设置标记位就是对
position位置进行标记,值存储在mark属性中,后续读取position前移,但mark值维持不变

buffer.mark();
- 继续取数据:
capacity = 5, limit = 2, position = 2, mark = 1
- 如上所说,
position继续前移,像演示这样,取了后limit值与position值已经相等,说明已经读取完成,如果再次强行读取,会报BufferUnderflowException异常

- 标记位重置:
capacity = 5, limit = 2, position = mark = 1, mark = -1
- 重置标记位与
mark()方法配合使用,将设置的标记位重置为初始状态。配合使用可以实现对Buffer数组中部分区间的重复读取

buffer.reset();
- 操作位重置:
capacity = 5, limit = 2, position = 0, mark = -1
- 操作位重置,就是对
position置0值,limit位置不变,且数据不清除

buffer.rewind();
- 数据清空:
capacity = 5, limit = 5, position = 0, mark = -1
- 四个基本属性回到初始化状态,数据清空也只是对基本属性值初始化,并不会对数据进行清空

buffer.clear();
2,Channel通道
2.1,Channel与流的区别
- 通道可以同时进行读写,而流只能进行读 I
nputStream 或者写 OutputStream
- 通道可以进行异步读写数据
- 通道可以从缓存读数据,也可以写数据到缓存中
2.2,常用Channel类型
FileChannel:本地文件读取通道ServerSocketChannel:TCP网络服务端通道SocketChannel:TCP网络通道DatagramChannel:UDP网络通道
2.3,Channel常用API
// 将缓冲区数据写出去
public abstract int write(ByteBuffer src) throws IOException;
// 读取数据到缓冲区中
public abstract int read(ByteBuffer dst) throws IOException;


/************FileChannel****************/
// 初始化文件通道
public static FileChannel open(Path path, OpenOption... options);
// 获取内存映射缓冲区
public abstract MappedByteBuffer map(MapMode mode, long position, long size) throws IOException;
// 从源通道中读取数据
public abstract long transferFrom(ReadableByteChannel src, long position, long count) throws IOException;
// 写数据到目标通道去,windows系统下一次最多传输8M,再多需要分段传输
public abstract long transferTo(long position, long count, WritableByteChannel target) throws IOException;
// 文件操作_只读类型
public static final MapMode READ_ONLY = new MapMode("READ_ONLY");
// 文件操作_读写类型
public static final MapMode READ_WRITE = new MapMode("READ_WRITE");
/************ServerSocketChannel****************/
// 初始化通道,根据操作系统类型初始化
public static ServerSocketChannel open() throws IOException;
// 绑定地址信息
public final ServerSocketChannel bind(SocketAddress local) throws IOException;
// 设置是否异步
public final SelectableChannel configureBlocking(boolean block);
// 获取连接的客户端信息
public abstract SocketChannel accept() throws IOException;
// 获取服务端ServerSocket
public abstract ServerSocket socket();
// 注册选择器
public final SelectionKey register(Selector sel, int ops) throws ClosedChannelException;


/************SocketChannel****************/
// 初始化
public static SocketChannel open() throws IOException;
public static SocketChannel open(SocketAddress remote) throws IOException;
// 绑定地址
public abstract SocketChannel bind(SocketAddress local) throws IOException;
// 设置异步
public final SelectableChannel configureBlocking(boolean block) throws IOException;
// 终止输入,不关闭连接
public abstract SocketChannel shutdownInput() throws IOException;
// 终止输出,不关闭连接
public abstract SocketChannel shutdownOutput() throws IOException;
// 获取客户端Socket
public abstract Socket socket();
// 注册选择器
public final SelectionKey register(Selector sel, int ops) throws ClosedChannelException;
2.4,Channel文件读写演示
/**
 * 利用通道完成文件复制_非直接缓冲区
 */
@Test
public void fileCopy() throws Exception {
    // 初始化流
    FileInputStream inputStream = new FileInputStream("F:\\1.jpg");
    FileOutputStream outputStream = new FileOutputStream("F:\\2.jpg");
    // 从流中获取通道
    FileChannel inChannel = inputStream.getChannel();
    FileChannel outChannel = outputStream.getChannel();
    // 初始化化缓冲区
    ByteBuffer buffer = ByteBuffer.allocate(1024);
    // 通过通道, 从流中读数据到缓冲区
    while (inChannel.read(buffer) != -1) {
        // 切换为写状态
        buffer.flip();
        // 将缓冲区中的数据写出去
        outChannel.write(buffer);
        // 初始化状态, 进行重新读取
        buffer.clear();
    }
    // 关资源
    outputStream.flush();
    inChannel.close();
    outChannel.close();
    outputStream.close();
    inputStream.close();
    System.out.println("执行完成...");
}
/**
 * 利用通道直接进行数据传输
 */
@Test
public void channelFileCopy() throws Exception {
    // 获取读通道
    FileChannel inChannel = FileChannel.open(Paths.get("F:\\1.jpg"), StandardOpenOption.READ);
    // 获取写通道
    FileChannel outChannel = FileChannel.open(Paths.get("F:\\2.jpg"), StandardOpenOption.WRITE,
StandardOpenOption.READ, StandardOpenOption.CREATE_NEW);
    // 直接进行通道传输
    //		outChannel.transferFrom(inChannel, 0, inChannel.size());
    inChannel.transferTo(0, inChannel.size(), outChannel);
    inChannel.close();
    outChannel.close();
}
public void txtFileOperate() throws Exception {
    // 创建文件并授权
    RandomAccessFile randomAccessFile = new RandomAccessFile("F:\\test.txt", "rw");
    // 打开通道
    FileChannel fileChannel = randomAccessFile.getChannel();
    // 获取内存映射缓冲区
    // 参数1:MapMode.READ_WRITE,文件操作类型,此处为读写
    // 参数2:0,可以直接修改的起始位置,此处表示从文件头开始修改
    // 参数3: 1024,可以修改的文件长度,此处表示可以修改1024个字节,超过限定长度修改,会报异常 IndexOutOfBoundException
    MappedByteBuffer mappedByteBuffer = fileChannel.map(MapMode.READ_WRITE, 0, 1024);
    mappedByteBuffer.clear();
    // 对缓冲区操作, 会直接同步到文件
    mappedByteBuffer.put(0, (byte) 97);
    mappedByteBuffer.put(1023, (byte) 122);
    randomAccessFile.close();
    fileChannel.close();
}
/**
 * 利用通道完成文件复制_直接缓冲区
 * 通过内存映射缓冲区完成
 */
@Test
public void directFileCopy() throws Exception {
    // 获取读通道
    FileChannel inChannel = FileChannel.open(Paths.get("F:\\1.jpg"), StandardOpenOption.READ);
    // 获取写通道
    FileChannel outChannel = FileChannel.open(Paths.get("F:\\2.jpg"), StandardOpenOption.WRITE,
                                              StandardOpenOption.READ, StandardOpenOption.CREATE_NEW);
    // 获取内存映射对应的缓冲区
    // MappedByteBuffer 存储在物理内存中
    MappedByteBuffer inMappedByteBuffer = inChannel.map(MapMode.READ_ONLY, 0, inChannel.size());
    MappedByteBuffer outMappedByteBuffer = outChannel.map(MapMode.READ_WRITE, 0, inChannel.size());
    // 直接通过缓冲区进行读写
    byte[] bytes = new byte[inMappedByteBuffer.limit()];
    inMappedByteBuffer.get(bytes);
    outMappedByteBuffer.put(bytes);
    inChannel.close();
    outChannel.close();
}
- 分散
Scattering和聚集Gatering:FileChannel演示
@Test
public void scatterAndAggregated() throws Exception {
    /* 分散读取 */
    // 创建文件并授权
    RandomAccessFile randomAccessFile = new RandomAccessFile("F:\\test.txt", "rw");
    // 获取通道
    FileChannel inChannel = randomAccessFile.getChannel();
    // 构造缓冲区, 构造分散缓冲区
    ByteBuffer bufferFirst = ByteBuffer.allocate(128);
    ByteBuffer bufferSecond = ByteBuffer.allocate(1024);
    ByteBuffer[] lstBuffers = { bufferFirst, bufferSecond };
    // 进行分散读取
    inChannel.read(lstBuffers);
    // 解析数据
    for (ByteBuffer buffer : lstBuffers) {
        // 从读状态转为写状态, 并输出
        buffer.flip();
        System.out.println(
            "初始化长度: " + buffer.capacity() + ", 结果数据: " + new String(buffer.array(), 0, buffer.limit()));
    }
    /*******************************************************************/
    /* 聚集写入 */
    RandomAccessFile accessFile = new RandomAccessFile("F://2.txt", "rw");
    FileChannel outChannel = accessFile.getChannel();
    outChannel.write(lstBuffers);
    // 关闭资源
    inChannel.close();
    outChannel.close();
    randomAccessFile.close();
    accessFile.close();
}
2.5,Buffer与Channel的注意事项
ByteBuffer支持类型化的put()和get(),put()放入的是什么数据,get()就应该使用相应的数据类型接收,否则可能会有BufferUnderFlowException;short,int,long在内存中长度分配不一致,如果存储多个short后,用long接收,则注定长度越界
@Test
public void cast() {
    // 初始化缓冲区
    ByteBuffer buffer = ByteBuffer.allocate(5);
    // 存储一个 short 数据
    buffer.putShort((short) 1);
    buffer.flip();
    // 通过 long 类型获取, 会报BufferUnderflowException异常
    System.out.println(buffer.getLong());
}
- 可以将一个普通的
Buffer转换为只读Buffer,比如ByteBuffer -> HeapByteBufferR,只读Buffer的写操作会抛出ReadOnlyBufferException异常
@Test
public void readOnly() {
    // 初始化缓冲区
    ByteBuffer buffer = ByteBuffer.allocate(5);
    // 存储数据到缓冲区
    buffer.put("a".getBytes());
    // 设置缓冲区为只读
    buffer = buffer.asReadOnlyBuffer();
    // 进行读写转换
    buffer.flip();
    // 读取数据, 读取数据正常
    System.out.println(new String(new byte[] {buffer.get()}));
    // 写数据, 因为已经设置只读, 写数据报ReadOnlyBufferException异常
    buffer.put("123".getBytes());
}
- NIO提供了
MappedByteBuffer内存映射缓冲区,可以让文件直接在内存中进行修改,并同步到磁盘文件中
- NIO支持
Buffer缓冲区的分散Scattering和聚集Gatering操作,通过多个Buffer完成一个操作
3,Selector选择器
3.1,Selector基本介绍
- NIO是非阻塞式IO,可以用一个线程,处理多个客户端连接,就是使用到
Selector选择器
Selector能够检测多个注册的通道上是否有事件发生(多个Channel可以以事件的方式注册到同一个Selector上),如果有事件发生,可以获取事件后针对每一个事件进行相应的处理。这就是使用一个单线程管理多个通道,处理多个连接和请求- 只有在连接或者通道真正有读写发生时,才进行读写,这就大大减少了系统开销,并且不必要为每一个连接都创建一个线程,不用去维护多个线程
- 避免了多线程之前的上下文切换导致的开销
3.2,Selector常用API
/**********Selector API**********/
// 初始化
public abstract boolean isOpen();
// 获取新建的事件数量,并添加到内部 SelectionKey 集合
// 阻塞获取
public abstract int select() throws IOException;
// 阻塞一定时间获取
public abstract int select(long timeout) throws IOException;
// 非阻塞获取
public abstract int selectNow() throws IOException;
// 获取所有注册事件
public abstract Set selectedKeys();
/*************SelectionKey API********************/
// 读事件状态码,即1
public static final int OP_READ = 1 << 0;
// 写事件状态码,即4
public static final int OP_WRITE = 1 << 2;
// 连接建立状态码,即8
public static final int OP_CONNECT = 1 << 3;
// 有新连接状态码,即16
public static final int OP_ACCEPT = 1 << 4;
// 获取注册通道
public abstract SelectableChannel channel();
// 获取注册的Selector对象
public abstract Selector selector();
// 获取通道绑定数据
public final Object attachment();
// 获取事件状态码
public abstract int interestOps();
// 修改事件状态码
public abstract SelectionKey interestOps(int ops);
// 是否新连接事件
public final boolean isAcceptable();
// 是否可读事件
public final boolean isReadable();
// 是否可写事件
public final boolean isWritable();
// 是否保持连接事件
public final boolean isConnectable();
- Selector代码演示参考上一篇实例,后续会具体进行原理分析