flume 的安装和入门小例子
本文结构 我的环境 CentOS 7
- flume 安装与启动
- flume 的avro小例子
- Spool 的小例子
- Syslogtcp 小例子
1. flume 安装与启动
1.1 下载安装包
访问官网传送门,不信你不点下载apache-flume-1.7.0-bin.tar.gz 安装包。
并在合适路径解压安装包。
//解压命令
tar -zxvf apache-flume-1.7.0-bin.tar.gz
//修改名字
mv  apache-flume-1.7.0-bin flume
1.2 配置环境变量
修改 vi /etc/profile 文件 添加环境变量
export FLUME_HOME=/opt/apps/flume
export PATH=.:$PATH::$FLUME_HOME/bin
注意:/opt/apps/flume 为我解压flume的路径
1.3 安装检测
进入flume的bin目录下 执行命令
flume-ng version输出:
Flume 1.7.0
Source code repository: https://git-wip-us.apache.org/repos/asf/flume.git
Revision: 511d868555dd4d16e6ce4fedc72c2d1454546707
Compiled by bessbd on Wed Oct 12 20:51:10 CEST 2016
From source with checksum 0d21b3ffdc55a07e1d08875872c00523
安装成功
2. flume 的avro小例子
案例: 发送一个文件给flume
2.1 新建avro配置文件
在flume 的conf 文件夹下新建 配置文件 avro.conf
其内容如下:
a1.sources = r1
a1.sinks = k1
a1.channels = c1

# Describe/configure the source
a1.sources.r1.type= avro
a1.sources.r1.channels = c1
a1.sources.r1.bind = 0.0.0.0
a1.sources.r1.port = 4141

# Describe the sink
a1.sinks.k1.type= logger

# Use a channel which buffers events in memory
a1.channels.c1.type= memory
a1.channels.c1.capacity = 1000
a1.channels.c1.transactionCapacity = 100

# Bind the source and sink to the channel
a1.sources.r1.channels = c1
a1.sinks.k1.channel = c1
2.2 启动flume agent a1
./flume-ng agent -c /opt/apps/flume/conf -f /opt/apps/flume/conf/avro.conf -n a1 -Dflume.root.logger=INFO,console
注意:/opt/apps/flume 是我flume的安装路径
运行成功
[root@iZuf6aefi9w82dwe9g6zllZ bin]# ./flume-ng agent -c /opt/apps/flume/conf -f /opt/apps/flume/conf/avro.conf -n a1
-Dflume.root.logger=INFO,console Info: Including Hive libraries found via () for Hive access
+ exec /opt/apps/jdk1.8.0_112/bin/java -Xmx20m -Dflume.root.logger=INFO,console -cp '/opt/apps/flume/conf:/opt/apps/flume/lib/*:/lib/*'
-Djava.library.path= org.apache.flume.node.Application -f /opt/apps/flume/conf/avro.conf -n a1 … … … 2017-01-04 15:29:02,210 (lifecycleSupervisor-1-2) [INFO - org.apache.flume.instrumentation.MonitoredCounterGroup.register(MonitoredCounterGroup.java:119)] Monitored counter group for type: SOURCE, name: r1: Successfully registered new MBean. 2017-01-04 15:29:02,211 (lifecycleSupervisor-1-2) [INFO - org.apache.flume.instrumentation.MonitoredCounterGroup.start(MonitoredCounterGroup.java:95)] Component type: SOURCE, name: r1 started 2017-01-04 15:29:02,212 (lifecycleSupervisor-1-2) [INFO - org.apache.flume.source.AvroSource.start(AvroSource.java:259)] Avro source r1 started.
2.3创建指定文件
新打开终端,在flume的conf 目录下 执行(创建test.log文件并写入内容“hello world,abel“)
echo "hello world,abel” > test.log2.4使用avro-client发送文件
//iZuf6aefi9w82dwe9g6zllZ 为当前的用户名
 ./flume-ng avro-client -c /opt/apps/flume/conf -H iZuf6aefi9w82dwe9g6zllZ -p 4141 -F /opt/apps/flume/conf/test.log
如图

此时在fulme启动的控制台,可以看到以下信息,注意最后一行

3. Spool 的小例子
**Spool监测配置的目录下新增的文件,并将文件中的数据读取出来。需要注意两点:
1) 拷贝到spool目录下的文件不可以再打开编辑。
2) spool目录下不可包含相应的子目录(新版本貌似解决了子目录问题)**
3.1创建spool配置文件
在flume 的conf 文件夹下新建 配置文件 spool.conf
内容如下:
注意:/root/logs 为我存放被监控的日志文件目录
a1.sources = r1
a1.sinks = k1
a1.channels = c1

# Describe/configure the source
a1.sources.r1.type = spooldir
a1.sources.r1.channels = c1
a1.sources.r1.spoolDir =/root/logs
a1.sources.r1.fileHeader = true

# Describe the sink
a1.sinks.k1.type = logger

# Use a channel which buffers events in memory
a1.channels.c1.type = memory
a1.channels.c1.capacity = 1000
a1.channels.c1.transactionCapacity = 100

# Bind the source and sink to the channel
a1.sources.r1.channels = c1
a1.sinks.k1.channel = c1
3.2 启动flume agent a1
./flume-ng agent -c /opt/apps/flume/conf -f /opt/apps/flume/conf/spool.conf -n a1 -Dflume.root.logger=INFO,console
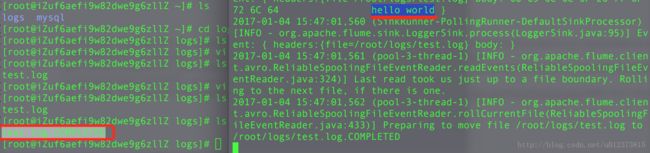
3.3 追加文件到/root/logs目录
新建文件 test.log 并写入内容“hello world“ ,然后将test.log 追加到被监控目录下。
vi test.log
mv test.log  /root/logs
此时会在flume的控制台 看到如下输出:(右边为输出)
4.Syslogtcp小例子
Syslogtcp监听TCP的端口做为数据源
4.1创建agent 配置文件
在flume 文件下的conf 文件夹下创建syslog_tcp.conf 文件内容如下:
a1.sources = r1
a1.sinks = k1
a1.channels = c1

# Describe/configure the source
a1.sources.r1.type = syslogtcp
a1.sources.r1.port = 5140
a1.sources.r1.host = localhost
a1.sources.r1.channels = c1

# Describe the sink
a1.sinks.k1.type = logger

# Use a channel which buffers events in memory
a1.channels.c1.type = memory
a1.channels.c1.capacity = 1000
a1.channels.c1.transactionCapacity = 100

# Bind the source and sink to the channel
a1.sources.r1.channels = c1
a1.sinks.k1.channel = c1
4.2 启动flume 并发送数据
启动命令
./flume-ng agent -c /opt/apps/flume/conf -f /opt/apps/flume/conf/syslog_tcp.conf -n a1 -Dflume.root.logger=INFO,console发送数据
echo "hello idoall.org syslog" | nc localhost 5140控制台输出

除了以上的展示外 flume 还有很多种配置,例如:
案例:Exec
exec source 运行时, 不停机直接修改 conf 文件 ,修改配置的监控文件名称,flume 监控文件改变为新配置的文件。(即可不停机的修改监控文件。)
EXEC执行一个给定的命令获得输出的源,如果要使用tail命令,必选使得file足够大才能看到输出内容。
实时监控/opt/apps/logs/tail4.log 文件。并将结果输出到/opt/apps/tmp 目录下
a1.sources = r1
a1.sinks = k1
a1.channels = c1

# Describe/configure the source
a1.sources.r1.type = exec
a1.sources.r1.shell = /bin/bash -c
a1.sources.r1.channels = c1
a1.sources.r1.command = tail -F /opt/apps/logs/tail4.log


# Use a channel which buffers events in memory
a1.channels.c1.type = memory
a1.channels.c1.capacity = 1000
a1.channels.c1.transactionCapacity = 100

# sink
a1.sinks.k1.type = file_roll
a1.sinks.k1.channel = c1
#a1.sinks.k1.sink.rollInterval=0
a1.sinks.k1.sink.directory = /opt/apps/tmp
案例:JSONHandler
读取指定url 的request 的json 信息,包含 headers 信息和body 信息
案例:Hadoop sink
读取信息到hdfs
案例:Replicating Channel Selector(多 Channel)
Flume支持Fan out流从一个源到多个通道。有两种模式的Fan out,分别是复制和复用。在复制的情况下,流的事件被发送到所有的配置通道。在复用的情况下,事件被发送到可用的渠道中的一个子集。Fan out流需要指定源和Fan out通道的规则。
案例:Multiplexing Channel Selector(多channel)
根据header中不同的条件分布到不同的channel上
案例:Load balancing Sink Processor(多sink)
load balance type和failover不同的地方是,load balance有两个配置,一个是轮询,一个是随机。两种情况下如果被选择的sink不可用,就会自动尝试发送到下一个可用的sink上面。
案例还有很多,这些案例的详细内容均来自 参考
参考:http://www.aboutyun.com/thread-8917-1-1.html