蓝牙hid协议源码解析
1,概述
1.1 HID协议
HID协议: Hunman Interface Device Profile人机交互设备协议
使用场景:支持人机交互设备之间的控制
市场产品:蓝牙键盘,蓝牙鼠标,蓝牙游戏手柄等。
1.2 代码路径
客户端: frameworks\base\core\java\android\bluetooth
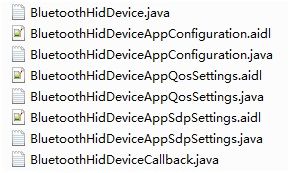
服务端: packages\apps\Bluetooth\src\com\android\bluetooth\ hid
HidDevService.java hid协议的服务端
开发流程和健康设备类似,但是稍微麻烦
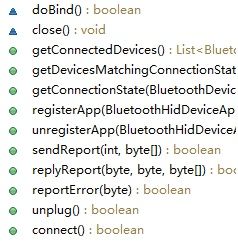
2,接口
接口如下
3,开发步骤
在官方文档中有一个建立通信的流程:
1、调用getProfileProxy(Context,BluetoothProfile.ServiceListener, int)来获取代理对象的连接。
2、创建BluetoothHidDeviceAppSdpSettings, BluetoothHidDeviceAppQosSettings对象,创建BluetoothHidDeviceCallback回调,调用registerApp方法注册
3、将手机与设备配对,并且进行连接。
4、实现BluetoothHidDeviceCallback的7个回调方法
5、调用sendReport方法分别实现蓝牙鼠标,蓝牙键盘等。
3.1 获取客户端代理对象
一般在oncreate方法中,直接调用getProfileProxy方法,这个没什么好说的。
BluetoothAdapter.getDefaultAdapter().getProfileProxy(getApplicationContext(),
				mProfileServiceListener,BluetoothProfile. HID_DEVICE);
private BluetoothProfile.ServiceListener mProfileServiceListener = new BluetoothProfile.ServiceListener() {

		@Override
		public void onServiceDisconnected(int profile) {
				if (profile == BluetoothProfile.HEALTH){
				     mBluetoothHealth = null;
			}
		}

		@SuppressLint("NewApi")
		@Override
		public void onServiceConnected(int profile, BluetoothProfile proxy) {
			if (profile == BluetoothProfile.HEALTH) {
				mHidDevice = (BluetoothHidDevice) proxy;
                 // 获取代理对象之后就进行注册
                 ...
			}
		}
	};
一般经过这个步骤,客户端的BluetoothHidDevice对象已经和服务端的HidDevService对象绑定了。
3.2 注册registerApp
BluetoothHidDeviceAppSdpSettings sdp = new BluetoothHidDeviceAppSdpSettings(
                            HidConsts.NAME, HidConsts.DESCRIPTION, HidConsts.PROVIDER,
                            BluetoothHidDevice.SUBCLASS1_COMBO, HidConsts.DESCRIPTOR);
BluetoothHidDeviceAppQosSettings inQos = new BluetoothHidDeviceAppQosSettings(
                        BluetoothHidDeviceAppQosSettings.SERVICE_GUARANTEED, 200, 2, 200,
                        10000 /* 10 ms */, 10000 /* 10 ms */);
BluetoothHidDeviceAppQosSettings outQos = new BluetoothHidDeviceAppQosSettings(
                        BluetoothHidDeviceAppQosSettings.SERVICE_GUARANTEED, 900, 9, 900,
                        10000 /* 10 ms */, 10000 /* 10 ms */);
boolean result = mHidDevice.registerApp(sdp, inQos, outQos, mCallback);
HidConsts类的定义如下:
public class HidConsts {

    public final static String NAME = "HID Device Testapp";

    public final static String DESCRIPTION = "";

    public final static String PROVIDER = "Codeaurora";

    /* @formatter:off */
    public final static byte[] DESCRIPTOR = {
        (byte) 0x05, (byte) 0x01,                    // USAGE_PAGE (Generic Desktop)
        (byte) 0x09, (byte) 0x02,                    // USAGE (Mouse)
        (byte) 0xa1, (byte) 0x01,                    // COLLECTION (Application)
        (byte) 0x09, (byte) 0x01,                    //   USAGE (Pointer)
        (byte) 0xa1, (byte) 0x00,                    //   COLLECTION (Physical)
        (byte) 0x85, (byte) 0x02,                    //     REPORT_ID (2)
        (byte) 0x05, (byte) 0x09,                    //     USAGE_PAGE (Button)
        (byte) 0x19, (byte) 0x01,                    //     USAGE_MINIMUM (Button 1)
        (byte) 0x29, (byte) 0x03,                    //     USAGE_MAXIMUM (Button 3)
        (byte) 0x15, (byte) 0x00,                    //     LOGICAL_MINIMUM (0)
        (byte) 0x25, (byte) 0x01,                    //     LOGICAL_MAXIMUM (1)
        (byte) 0x95, (byte) 0x03,                    //     REPORT_COUNT (3)
        (byte) 0x75, (byte) 0x01,                    //     REPORT_SIZE (1)
        (byte) 0x81, (byte) 0x02,                    //     INPUT (Data,Var,Abs)
        (byte) 0x95, (byte) 0x01,                    //     REPORT_COUNT (1)
        (byte) 0x75, (byte) 0x05,                    //     REPORT_SIZE (5)
        (byte) 0x81, (byte) 0x03,                    //     INPUT (Cnst,Var,Abs)
        (byte) 0x05, (byte) 0x01,                    //     USAGE_PAGE (Generic Desktop)
        (byte) 0x09, (byte) 0x30,                    //     USAGE (X)
        (byte) 0x09, (byte) 0x31,                    //     USAGE (Y)
        (byte) 0x15, (byte) 0x81,                    //     LOGICAL_MINIMUM (-127)
        (byte) 0x25, (byte) 0x7f,                    //     LOGICAL_MAXIMUM (127)
        (byte) 0x75, (byte) 0x08,                    //     REPORT_SIZE (8)
        (byte) 0x95, (byte) 0x02,                    //     REPORT_COUNT (2)
        (byte) 0x81, (byte) 0x06,                    //     INPUT (Data,Var,Rel)
        (byte) 0x09, (byte) 0x38,                    //     USAGE (Wheel)
        (byte) 0x15, (byte) 0x81,                    //     LOGICAL_MINIMUM (-127)
        (byte) 0x25, (byte) 0x7f,                    //     LOGICAL_MAXIMUM (127)
        (byte) 0x75, (byte) 0x08,                    //     REPORT_SIZE (8)
        (byte) 0x95, (byte) 0x01,                    //     REPORT_COUNT (1)
        (byte) 0x81, (byte) 0x06,                    //     INPUT (Data,Var,Rel)
        (byte) 0xc0,                                 //   END_COLLECTION
        (byte) 0xc0,                                 // END_COLLECTION

        // battery strength
        (byte) 0x05, (byte) 0x0c,
        (byte) 0x09, (byte) 0x01,
        (byte) 0xa1, (byte) 0x01,
        (byte) 0x85, (byte) 0x20,                    //   REPORT_ID (32)
        (byte) 0x05, (byte) 0x01,
        (byte) 0x09, (byte) 0x06,
        (byte) 0xa1, (byte) 0x02,
        (byte) 0x05, (byte) 0x06,                    // USAGE_PAGE (Generic Device Controls)
        (byte) 0x09, (byte) 0x20,                    // USAGE (Battery Strength)
        (byte) 0x15, (byte) 0x00,                    // LOGICAL_MINIMUM (0)
        (byte) 0x26, (byte) 0xff, (byte) 0x00,      // LOGICAL_MAXIMUM (100)
        (byte) 0x75, (byte) 0x08,                    // REPORT_SIZE (8)
        (byte) 0x95, (byte) 0x01,                    // REPORT_COUNT (1)
        (byte) 0x81, (byte) 0x02,                    // INPUT (Data,Var,Abs)
        (byte) 0xc0,
        (byte) 0xc0,

        (byte) 0x05, (byte) 0x01,                    // USAGE_PAGE (Generic Desktop)
        (byte) 0x09, (byte) 0x06,                    // USAGE (Keyboard)
        (byte) 0xa1, (byte) 0x01,                    // COLLECTION (Application)
        (byte) 0x85, (byte) 0x01,                    //   REPORT_ID (1)
        (byte) 0x05, (byte) 0x07,                    //   USAGE_PAGE (Keyboard)
        (byte) 0x19, (byte) 0xe0,                    //   USAGE_MINIMUM (Keyboard LeftControl)
        (byte) 0x29, (byte) 0xe7,                    //   USAGE_MAXIMUM (Keyboard Right GUI)
        (byte) 0x15, (byte) 0x00,                    //   LOGICAL_MINIMUM (0)
        (byte) 0x25, (byte) 0x01,                    //   LOGICAL_MAXIMUM (1)
        (byte) 0x75, (byte) 0x01,                    //   REPORT_SIZE (1)
        (byte) 0x95, (byte) 0x08,                    //   REPORT_COUNT (8)
        (byte) 0x81, (byte) 0x02,                    //   INPUT (Data,Var,Abs)
        (byte) 0x05, (byte) 0x0c,                    //   USAGE_PAGE (Consumer Devices)
        (byte) 0x15, (byte) 0x00,                    //   LOGICAL_MINIMUM (0)
        (byte) 0x25, (byte) 0x01,                    //   LOGICAL_MAXIMUM (1)
        (byte) 0x95, (byte) 0x07,                    //   REPORT_COUNT (7)
        (byte) 0x75, (byte) 0x01,                    //   REPORT_SIZE (1)
        (byte) 0x09, (byte) 0xb6,                    //   USAGE (Scan Previous Track)
        (byte) 0x09, (byte) 0xb5,                    //   USAGE (Scan Next Track)
        (byte) 0x09, (byte) 0xb7,                    //   USAGE (Stop)
        (byte) 0x09, (byte) 0xcd,                    //   USAGE (Play/Pause)
        (byte) 0x09, (byte) 0xe2,                    //   USAGE (Mute)
        (byte) 0x09, (byte) 0xe9,                    //   USAGE (Volume Up)
        (byte) 0x09, (byte) 0xea,                    //   USAGE (Volume Down)
        (byte) 0x81, (byte) 0x02,                    //   INPUT (Data,Var,Abs)
        (byte) 0x95, (byte) 0x01,                    //   REPORT_COUNT (1)
        (byte) 0x75, (byte) 0x01,                    //   REPORT_SIZE (1)
        (byte) 0x81, (byte) 0x03,                    //   INPUT (Constant,Var,Abs)
        (byte) 0x05, (byte) 0x07,                    //   USAGE_PAGE (Keyboard)
        (byte) 0x95, (byte) 0x05,                    //   REPORT_COUNT (5)
        (byte) 0x75, (byte) 0x01,                    //   REPORT_SIZE (1)
        (byte) 0x85, (byte) 0x01,                    //   REPORT_ID (1)
        (byte) 0x05, (byte) 0x08,                    //   USAGE_PAGE (LEDs)
        (byte) 0x19, (byte) 0x01,                    //   USAGE_MINIMUM (Num Lock)
        (byte) 0x29, (byte) 0x05,                    //   USAGE_MAXIMUM (Kana)
        (byte) 0x91, (byte) 0x02,                    //   OUTPUT (Data,Var,Abs)
        (byte) 0x95, (byte) 0x01,                    //   REPORT_COUNT (1)
        (byte) 0x75, (byte) 0x03,                    //   REPORT_SIZE (3)
        (byte) 0x91, (byte) 0x03,                    //   OUTPUT (Cnst,Var,Abs)
        (byte) 0x95, (byte) 0x06,                    //   REPORT_COUNT (6)
        (byte) 0x75, (byte) 0x08,                    //   REPORT_SIZE (8)
连接很简单,直接调用connect方法就可以了。
public void connect() {
        if (mHidDevice == null) return;
        mHidDevice.connect();
}
3.4 BluetoothHidDeviceCallback
BluetoothHidDeviceCallback这个抽象类有7个回调方法,
private byte[] mBuffer = new byte[1];private final BluetoothHidDeviceCallback mCallback = new BluetoothHidDeviceCallback() {
@Override
public void onAppStatusChanged(BluetoothDevice pluggedDevice,
BluetoothHidDeviceAppConfiguration config, boolean registered) {
// 一般在registerApp和unregisterApp方法之后回调
// registered 表示是否注册上
}
@Override
public void onConnectionStateChanged(BluetoothDevice device, int state) {
// device 远程蓝牙设备 state连接状态
mBuffer = (byte) 63
mHidDevice.sendReport(32, mBuffer); // 不知道为啥子这样写?
}
// 其他5个方法就可以不管了。
@Override
public void onIntrData(byte reportId, byte[] data) {
Log.v(TAG, "intr data: reportId=" + reportId + " data=" + Arrays.toString(data));
}
@Override
public void onSetProtocol(byte protocol) {
Log.d(TAG, "protocol set to " + protocol);
}
@Override
public void onVirtualCableUnplug() {
}
@Override
public void onGetReport(byte type, byte id, int bufferSize) {
}
@Override
public void onSetReport(byte type, byte id, byte[] data) {
}
};BluetoothHidDeviceCallback7个方法都是C/C++等通过JNI机制的回调。
4,蓝牙鼠标
4.1 蓝牙鼠标滑动
实现鼠标在整个界面前后左右上下滑动
mTouchpad = view.findViewById(R.id.touchpad);
        mTouchpad.setOnTouchListener(new OnTouchListener() {
            private int mPrevX;
            private int mPrevY;
            @Override
            public boolean onTouch(View v, MotionEvent event) {
                switch (event.getAction()) {

                    case MotionEvent.ACTION_DOWN:
                        mPrevX = (int) (event.getX() * mSpeed);
                        mPrevY = (int) (event.getY() * mSpeed);
                        break;

                    case MotionEvent.ACTION_MOVE:
                        int x = (int) (event.getX() * mSpeed);
                        int y = (int) (event.getY() * mSpeed);

                        mouseMove((byte) (x – mPrevX), (byte) (y - mPrevY));
                        mPrevX = x;
                        mPrevY = y;
                        break;
                }
                return true;
            }
        });
private int mSpeed = 3;mSpeed的值控制鼠标移动的速度。
private byte[] mBuffer = new byte[4];
byte id = 2;
public synchronized void move(byte dx, byte dy) {
// leave buttons state unchanged
mBuffer[1] = dx;
mBuffer[2] = dy;
mHidDevice.sendReport(id, mBuffer);
}4.2 蓝牙鼠标点击
将鼠标滑动到目标后,点击按钮可以选中目标。
button.setOnTouchListener(new OnTouchListener() {

                    @Override
                    public boolean onTouch(View v, MotionEvent event) {
                        int which = 0;
                        switch (event.getAction()) {
                            case MotionEvent.ACTION_DOWN:
                               mouseButtonDown(which);
                                break;

                            case MotionEvent.ACTION_UP:
                                mouseButtonUp(which);
                                break;
                        }

                        return false;
                    }

                });
Which的值有三种,分别是0,1,2 之间好像没什么差别。
public synchronized void buttonDown(int which) {
            mBuffer[0] |= (1 << which);
            mBuffer[1] = 0;
            mBuffer[2] = 0;

            mHidDevice.sendReport(id, mBuffer);
        }

  public synchronized void buttonUp(int which) {
            mBuffer[0] &= ~(1 << which);
            mBuffer[1] = 0;
            mBuffer[2] = 0;

            mHidDevice.sendReport(id, mBuffer);
        }
4.3 蓝牙鼠标翻页
比如在手机中,有时候界面不止一页,这样就需要翻页来显示了。
private int mScrollSpeed = 3;   // 控制翻页的速度


mScrollZone.setOnTouchListener(new OnTouchListener() {

            private int mPrevY;

            @Override
            public boolean onTouch(View v, MotionEvent event) {
                switch (event.getAction()) {
                    case MotionEvent.ACTION_DOWN:
                        mPrevY = (int) (event.getY() * mScrollSpeed);
                        break;

                    case MotionEvent.ACTION_MOVE:
                        int y = (int) (event.getY() * mScrollSpeed);

                        mouseScroll((byte) (mPrevY - y));

                        mPrevY = y;
                        break;
                }

                return true;
            }
        });


public synchronized void scroll(byte delta) {
            mBuffer[3] = delta;
            mHidDevice.sendReport(id, mBuffer);

            mBuffer[3] = 0x00;
        }
5,蓝牙键盘
市面上的键盘类型较多,实现了3种蓝牙键盘,

标准键盘
lable以及对应keyCode如下:
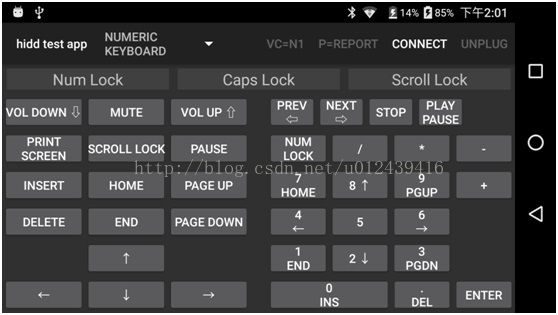
左边是导航键盘 右边是数字键盘
导航键盘的lable以及对应keyCode如下:
数字键盘的lable以及对应keyCode如下:
按键事件都是一样的,主要就是keyCode不同,
@Override
            public void onKeyUp(byte keyCode) {
                keyboardKeyUp(keyCode);
            }

            @Override
            public void onKeyDown(byte keyCode) {
                keyboardKeyDown(keyCode);
            }

private final static byte MODIFIER_BASE = (byte) 0xe0;
        private final static byte MODIFIER_COUNT = 8; /* left ctrl -> right gui */
        private byte[] mBuffer = new byte[8];
        byte id = 1;
public synchronized void keyDown(byte key) {
            if (key >= MODIFIER_BASE && key <= MODIFIER_BASE + MODIFIER_COUNT) {
                mBuffer[0] |= (1 << (key - MODIFIER_BASE));
            } else if ((key & 0x80) != 0) {
                mBuffer[1] |= (1 << (key & 0x07));
            } else {
                for (int i = 2; i < 8; i++) {
                    if (mBuffer[i] == 0x00) {
                        mBuffer[i] = key;
                        break;
                    }
                }
            }
            mHidDevice.sendReport(id, mBuffer);
        }

        public synchronized void keyUp(byte key) {
            if (key >= MODIFIER_BASE && key <= MODIFIER_BASE + MODIFIER_COUNT) {
                mBuffer[0] &= ~(1 << (key - MODIFIER_BASE));
            } else if ((key & 0x80) != 0) {
                mBuffer[1] &= ~(1 << (key & 0x07));
            } else {
                for (int i = 2; i < 8; i++) {
                    if (mBuffer[i] == key) {
                        mBuffer[i] = 0x00;
                        break;
                    }
                }
            }
            mHidDevice.sendReport(id, mBuffer);
        }
这样就可以了,很简单吧。
6,源码解析
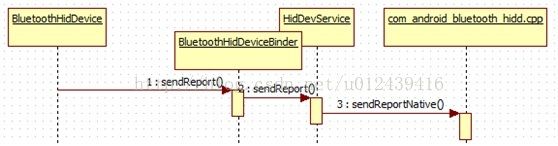
客户端的BluetoothHidDevice和服务端的HidDevService都比较简单,很直接,完全没有拐弯抹角的地方, sendReport方法从客户端到服务端的过程如下,
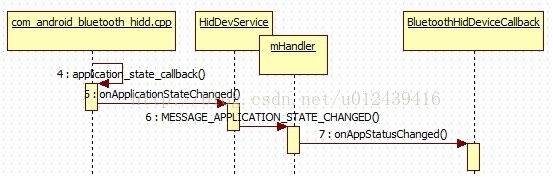
回调的7个方法流程如下,以onAppStatusChanged回调为例,
7,小节
问题:1,回调的几个方法以及2个类还未弄清楚其作用。
2,客户端的BluetoothInputDevice以及客户端的HidService和HID协议的文件在一个文件夹下,那么这2个类的作用是什么呢?如何使用。