OSG学习:新建C++/CLI工程并读取模型(C++/CLI)——根据OSG官方示例代码初步理解其方法
C++/CLI-OSG示例代码:两部分要同时下载,然后一起解压。
part1:C++/CLI-OSGDemo(1)
part2:C++/CLI-OSGDemo(2)
对上面的例子进行分步解析:
一、创建工程并设置界面
1、创建C++/CLI工程
打开Visual Studio(以2017为例),文件——新建——项目——Visual C++——CLR
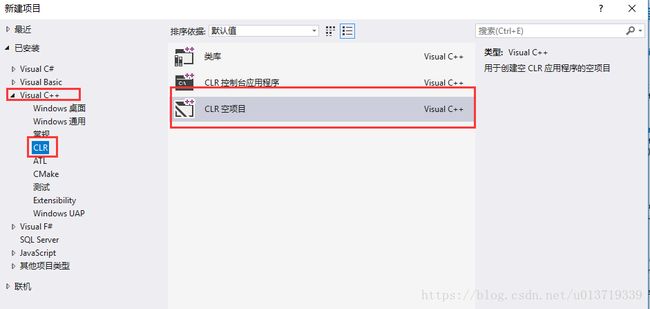
如果没有CLR,则需要打开Visual Studio Installer,然后选择更新,安装CLR。
2、配置OSG内容
在项目名称上右键——属性——进行以下设置(具体图文可以看OSG学习:WIN10系统下OSG+VS2017编译及运行的第六步):
1)配置:活动(Debug),平台(64);
2)VC++目录:包含目录设为OSG的include文件路径,库目录设为OSG的lib文件路径;
3)C/C++——与处理器:预处理器定义的内容在最前面加”WIN32;“;
4)链接器——输入:在附加依赖项上添加:
    OpenThreadsd.lib
    osgd.lib
    osgDBd.lib
    osgUtild.lib
    osgGAd.lib
    osgViewerd.lib
    osgTextd.lib
5)完成上面4步的属性配置后,将工具栏里的86也改为64。
3、创建UI界面
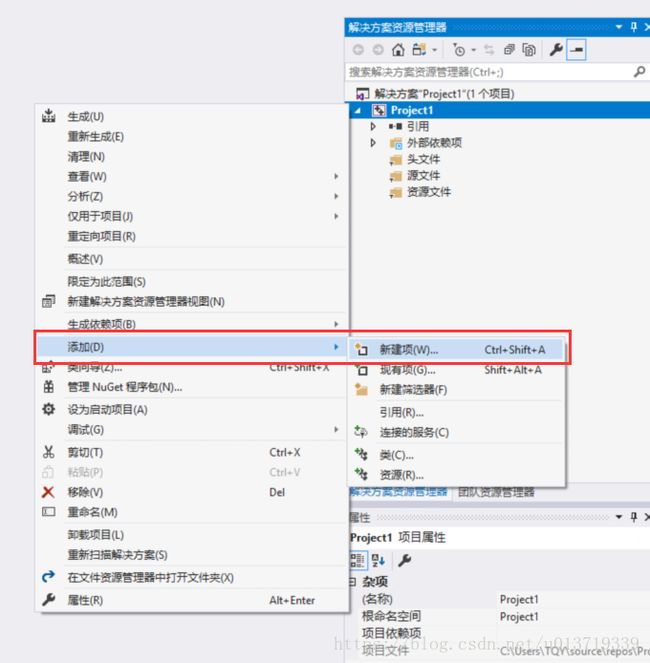
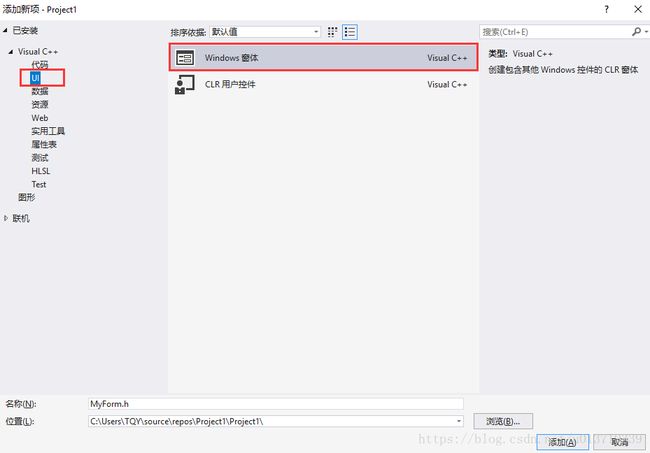
在项目名称上右键——添加——新建项——UI——Windows窗体
可以看到如下界面:

上图中,可以看到右侧红框中头文件和源文件分别多出了.h和.cpp文件,如果.cpp文件在头文件中,需要拖动到源文件下以保持结构清晰。左侧的图形界面报错是VS本身的错误,不用管,把它关掉,如果此时MyForm.h的图标是图中的图标(方框中有个h字母),则关掉整个工程,重新打开,即可看到其图标变为了上图添加的Windows窗体的图标。
4、界面布局
双击MyForm.h(此时其左侧图标为窗体图标)——点击左侧的工具箱(如果没有则选择视图——工具箱,然后使其停靠在左侧)
1)设置Form到合适大小;
2)添加一个MenuStrip(将其拖动到界面上),添加两个选项——File和Help,File下再添加两个选项——Open和Exit,可以写中文;
3)添加一个SplitContainer,它会填充除了MenuStrip的所有地方并将其分为了两部分,我们将左侧放模型,右侧放按钮等,按一下Esc,修改Panel1和Panel2的大小到合适的位置;
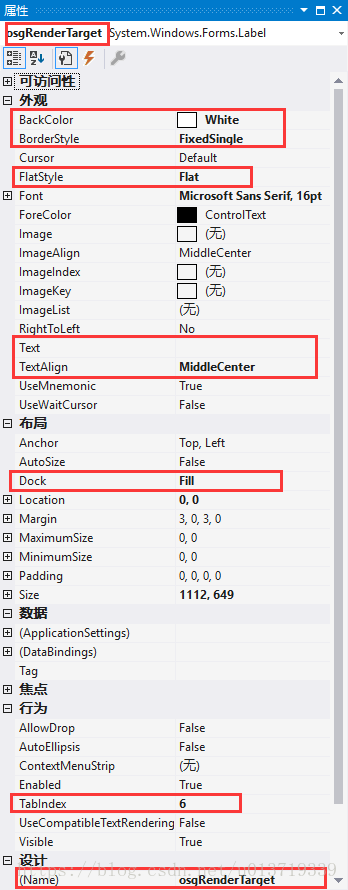
4)在SplitContainer左侧的Panel1里拖入一个Label,并修改属性:
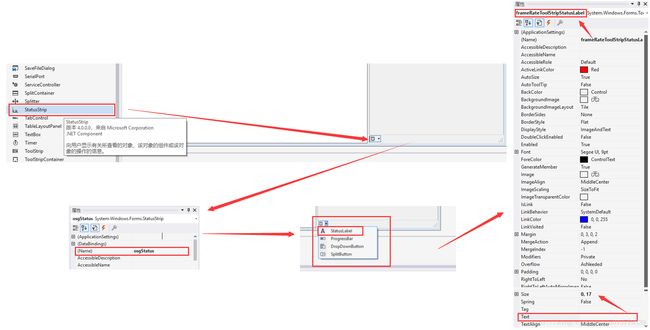
5)在SplitContainer右侧的Panel2里拖入一个StatusStrip,将其属性里的名字修改为osgStatus,点击UI界面上的图标,在上面增加一个StatusLabel,将其属性里的名称修改为frameRateToolStripStatusLabel,Text置为空;
6)在SplitContainer右侧的Panel2里拖入四个button,并修改属性(以button1为例)分别为Up、Down、Left、Right:
(1)外观——Text:修改为Up;
(2)设计——(Name):修改为btnUp
二、代码实现
以下示例中项目名称和上面不同,是OSG-CppCli,系统自动识别为OSGCppCli。

1、创建入口文件main.cpp
在工程中,程序运行必须由入口处,即main函数。在源文件上右键——添加新建项——C++文件,命名为main.cpp(自定义文件名),在文件中写:
//引入头文件
 #include "OSGForm.h"

using namespace System;
using namespace System::Windows::Forms;
//form.h自动生成的命名空间,在Form.h上右键——查看代码即可看见,命名空间的名称是项目的名称
using namespace OSGCppCli;

int main(array<System::String ^> ^args)
{
	//Run program in console mode
	//Some OSG info will print in console.
	OSGForm^ form = gcnew OSGForm();
	Application::Run(form);
}
启动生成可以发现工程可以生成。
2、创建标准系统包含的包含文件和源文件
由于C++/CLI是用来代替C++托管扩展(Managed C++,下文使用MC++指代)的语言,因此,它使用了C++的文件结构。
在头文件和源文件下分别添加新项stdafx.h和stdafx.cpp。前者的内容为标准系统包含文件的包含文件,或者经常使用但不常更改的特定于项目的包含文件;后者内容为包括标准包含文件的源文件。
由于工程用于读取模型,因此必然会用到读取模型的类osgDB和显示模型的类osgViewer,而场景的组织为场景树,场景树由结点构成,因此需要有结点类,模型由点线面组成,因此需要由几何结构类……,则文件内容如下:
// stdafx.h : 标准系统包含文件的包含文件,或是经常使用但不常更改的特定于项目的包含文件
#pragma once
// TODO: 在此处引用程序需要的其他头文件
#include // stdafx.cpp : 只包括标准包含文件的源文件
#include "stdafx.h"
3、声明全局变量和函数、定义函数
.cpp文件和.h文件成对出现,在.h文件中声明函数(declaration),在对应.cpp文件中定义函数(definitions)。
函数内调用函数时,被调用的函数必须在外部函数之前声明并定义。
首先,在OSGForm.h进行声明。在文件中,除添加的命名空间外,内容需要写在OSGForm类中。因此,在文件末尾进行声明(两个}之前):
//以下内容写在namespace OSGCppCli内

	//Monitor
	using namespace System::Threading;
	//Marshal
	using namespace System::Runtime::InteropServices;

//以下内容写在public ref class OSGForm : public System::Windows::Forms::Form内

//扩展和收缩的代码区域的开头和结尾,一个#pragma region必须以#pragma endregion结束。
 #pragma region osgStuff
		//由于C++/CLI的限制,此处不能使用智能指针。
		//如果不手动释放资源可能会发生内存泄漏。
		osg::Group* osgRoot;
		osg::StateSet* polygonStateSet;
		osgViewer::Viewer* osgViewer;

		Object^ dummyViewerObject; //管理dummy viewer object. 用于防止通过一个线程修改查看其。
		System::Threading::Thread^ OSGthread; //OSG渲染线程一直运行。

		//初始化OSG模型
		void InitOSG();
		//运行OSG
		void RunOSG();
		//OSG线程,渲染OSG
		void OSGThread();

		private:Void ViewRotate(double angleDeg, osg::Vec3 axis)
		{
			Monitor::Enter(dummyViewerObject); //防止渲染场景时修改场景。
			{
				osgGA::TrackballManipulator* trackball = (osgGA::TrackballManipulator*)osgViewer->getCameraManipulator();
				osg::Quat q = trackball->getRotation();
				osg::Vec3 v;
				osg::Quat qq(angleDeg / 180.0*osg::PI, axis);
				q = qq * q;
				trackball->setRotation(q);
			}
			Monitor::Exit(dummyViewerObject);
		}
 #pragma endregion osgStuff
然后,在OSGForm.cpp中进行定义:
 #include "StdAfx.h"
 #include "OSGForm.h"

//命名空间用于区分不同文件下的相同函数名
using namespace System::Threading;

//.cpp文件和.h文件成对出现,在.h文件中声明函数declaration,在对应.cpp文件中定义函数definitions。
//函数内调用函数时,被调用的函数必须在外部函数之前声明并定义。

void OSGCppCli::OSGForm::InitOSG()
{
	//矩形函数
	RECT rect;
	//窗口句柄 通俗地说,如果把窗口当成一个人,则hwnd为该人的身份证号码。
	HWND mHwnd = (HWND)osgRenderTarget->Handle.ToInt32();
	//返回指定窗口的边框矩形的尺寸,该尺寸以相对于屏幕坐标左上角的屏幕坐标给出。
	//参数:窗口句柄,指向一个RECT结构的指针,该结构接收窗口的左上角和右下角的屏幕坐标。
	GetWindowRect(mHwnd, &rect);

	//在osg智能指针中进行定义
	osg::ref_ptr<osg::Referenced> windata = new osgViewer::GraphicsWindowWin32::WindowData(mHwnd);
	osg::ref_ptr<osg::GraphicsContext::Traits> traits = new osg::GraphicsContext::Traits;

	//使用指针方法访问类中变量。
	traits->x = 0;
	traits->y = 0;
	traits->width = rect.right - rect.left;
	traits->height = rect.bottom - rect.top;
	traits->windowDecoration = false;
	traits->doubleBuffer = true;
	traits->sharedContext = 0;
	traits->inheritedWindowData = windata;

	//必须先设置像素格式,然后才能创建OSG渲染曲面。
	PIXELFORMATDESCRIPTOR pixelFormat =
	{
		sizeof(PIXELFORMATDESCRIPTOR),
		1,
		PFD_DRAW_TO_WINDOW | PFD_SUPPORT_OPENGL | PFD_DOUBLEBUFFER,
		PFD_TYPE_RGBA,
		24,
		0, 0, 0, 0, 0, 0, 0, 0,
		0, 0, 0, 0, 0,
		24,
		0,
		0,
		PFD_MAIN_PLANE,
		0,
		0, 0, 0
	};

	HDC hdc = ::GetDC(mHwnd);
	if (hdc == 0)
	{
		::DestroyWindow(mHwnd);
		return;
	}

	int pixelFormatIndex = ::ChoosePixelFormat(hdc, &pixelFormat);
	if (pixelFormatIndex == 0)
	{
		::ReleaseDC(mHwnd, hdc);
		::DestroyWindow(mHwnd);
		return;
	}

	if (!::SetPixelFormat(hdc, pixelFormatIndex, &pixelFormat))
	{
		::ReleaseDC(mHwnd, hdc);
		::DestroyWindow(mHwnd);
		return;
	}

	osg::ref_ptr<osg::GraphicsContext> gc = osg::GraphicsContext::createGraphicsContext(traits.get());
	osg::ref_ptr<osg::Camera> camera = new osg::Camera;
	camera->setGraphicsContext(gc.get());
	camera->setViewport(new osg::Viewport(0, 0, traits->width, traits->height));
	camera->setDrawBuffer(GL_BACK);
	camera->setReadBuffer(GL_BACK);

	osgViewer = new osgViewer::Viewer;
	osgViewer->setCameraManipulator(new osgGA::TrackballManipulator);
	osgViewer->getCamera()->setClearColor(osg::Vec4(0.8, 0.8, 0.8, 1));
	osgViewer->addSlave(camera.get());
}

void OSGCppCli::OSGForm::RunOSG()
{
	OSGthread = gcnew System::Threading::Thread(gcnew System::Threading::ThreadStart(this, &OSGForm::OSGThread));
	OSGthread->Priority = Threading::ThreadPriority::BelowNormal;
	OSGthread->Start();
}

void OSGCppCli::OSGForm::OSGThread()
{
	dummyViewerObject = gcnew Object;
	osgViewer->setDone(false);
	int frameCount = 0;
	while (!osgViewer->done())
	{
		Monitor::Enter(dummyViewerObject); //必须使用监视器在查场景渲染时防止另一个线程更新场景。
		osgViewer->frame();
		frameRateToolStripStatusLabel->Text = "Frame rendered " + frameCount;
		frameCount++;
		Monitor::Exit(dummyViewerObject); //在退出后,可以进行任何想要进行的操作。
	}
}
最后,双击要添加事件的每个控件,页面跳转到OSGForm.h,在控件函数里写对应的事件:
private: System::Void OSGForm_Load(System::Object^  sender, System::EventArgs^  e) {
	InitOSG();
}
private: System::Void openToolStripMenuItem_Click(System::Object^  sender, System::EventArgs^  e) {
	osgViewer->setDone(true);
	OpenFileDialog^ openFileDialog = gcnew OpenFileDialog();
	if (openFileDialog->ShowDialog(this) != System::Windows::Forms::DialogResult::OK)
	{
		MessageBox::Show("请选择文件!");
		return;
	}

	String^ fileName = openFileDialog->FileName;

	//Convert managed string to unmanaged.
	//NOTE: For demo purpose, here only ANSI characters is supported.
	char* stringPointer = (char*)Marshal::StringToHGlobalAnsi(fileName).ToPointer();
	osgRoot = (osg::Group*)osgDB::readNodeFile(stringPointer);
	Marshal::FreeHGlobal(IntPtr(stringPointer));

	osgViewer->setSceneData(osgRoot);
	RunOSG();
}
private: System::Void exitToolStripMenuItem_Click(System::Object^  sender, System::EventArgs^  e) {
	Application::Exit();
}
private: System::Void btnUp_Click(System::Object^  sender, System::EventArgs^  e) {
	ViewRotate(-5, osg::Vec3(1, 0, 0));
}
private: System::Void btnDown_Click(System::Object^  sender, System::EventArgs^  e) {
	ViewRotate(5, osg::Vec3(1, 0, 0));
}
private: System::Void btnLeft_Click(System::Object^  sender, System::EventArgs^  e) {
	ViewRotate(5, osg::Vec3(0, 1, 0));
}
private: System::Void btnRight_Click(System::Object^  sender, System::EventArgs^  e) {
	ViewRotate(-5, osg::Vec3(0, 1, 0));
}
至此,工程结束,运行工程,选择导入文件,报错:

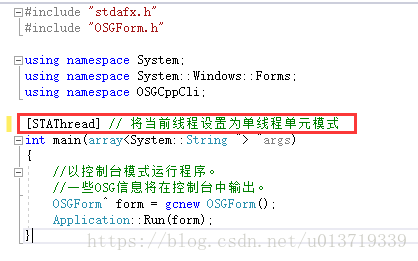
这是由于程序在访问关于剪贴板相关的OLE功能时,必须要在Main方法上添加STAThreadAttribute属性。因此在main.cpp中加入一句话,如图所示:
