基于Elasticsearch 7.0 的从零开始构建知识图谱-win10测试
Elastic{ON}北京分享了Elasticsearch7.0在Speed,Scale,Relevance等方面的很多新特性。
elasticsearch体验——在windows10上安装配置以及插件安装配置
elasticsearch-head 安装介绍
双击执行 elasticsearch.bat,该脚本文件执行 ElasticSearch 安装程序
【注意,也可以在启动时设置一些参数,比如
.\bin\elasticsearch.bat -Ecluster.name=my_cluster -Enode.name=node_1】
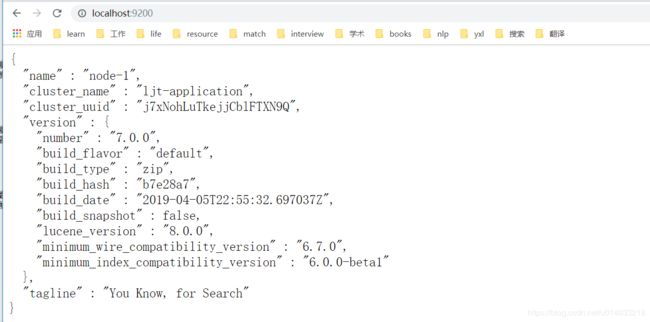
打开浏览器,输入 http://localhost:9200 ,显式以下画面,说明ES安装成功。
启动后发觉,有段时间elasticsearch还是很吃内存的,大概2G。几分钟后貌似一切恢复正常。
*还需要注意的是,使用过程中该bat运行的cmd窗口不能关闭。
想在后台启动,则需要运行elasticsearch-service.bat将其安装为后台服务。安装为服务之后可以使用elasticsearch-service-mgr.exe进行界面管理。
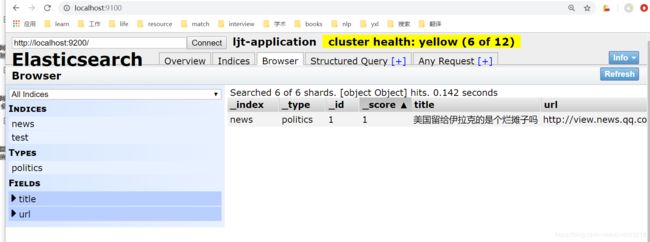
启动 elasticsearch-head
在 elasticsearch-head 目录下,执行命令:
grunt server
Elasticsearch+Hbase实现海量数据秒回查询
>>> from elasticsearch import Elasticsearch
>>> es = Elasticsearch()
>>> es.indices.create(index='news', ignore=400)
{'acknowledged': True, 'shards_acknowledged': True, 'index': 'news'}
>>> data = {'title': '美国留给伊拉克的是个烂摊子吗', 'url': 'http://view.news.qq.com/zt2011/usa_iraq/index.htm'}
>>> result = es.create(index='news', doc_type='politics', id=1, body=data)
>>> print(result)
{'_index': 'news', '_type': 'politics', '_id': '1', '_version': 1, 'result': 'created', '_shards': {'total': 2, 'successful': 1, 'failed': 0}, '_seq_no': 0, '_primary_term': 1}
class Elasticsearch(object):
"""
Elasticsearch low-level client. Provides a straightforward mapping from
Python to ES REST endpoints.
The instance has attributes ``cat``, ``cluster``, ``indices``, ``ingest``,
``nodes``, ``snapshot`` and ``tasks`` that provide access to instances of
:class:`~elasticsearch.client.CatClient`,
:class:`~elasticsearch.client.ClusterClient`,
:class:`~elasticsearch.client.IndicesClient`,
:class:`~elasticsearch.client.IngestClient`,
:class:`~elasticsearch.client.NodesClient`,
:class:`~elasticsearch.client.SnapshotClient` and
:class:`~elasticsearch.client.TasksClient` respectively. This is the
preferred (and only supported) way to get access to those classes and their
methods.
You can specify your own connection class which should be used by providing
the ``connection_class`` parameter::
# create connection to localhost using the ThriftConnection
es = Elasticsearch(connection_class=ThriftConnection)
If you want to turn on :ref:`sniffing` you have several options (described
in :class:`~elasticsearch.Transport`)::
# create connection that will automatically inspect the cluster to get
# the list of active nodes. Start with nodes running on 'esnode1' and
# 'esnode2'
es = Elasticsearch(
['esnode1', 'esnode2'],
# sniff before doing anything
sniff_on_start=True,
# refresh nodes after a node fails to respond
sniff_on_connection_fail=True,
# and also every 60 seconds
sniffer_timeout=60
)
Different hosts can have different parameters, use a dictionary per node to
specify those::
# connect to localhost directly and another node using SSL on port 443
# and an url_prefix. Note that ``port`` needs to be an int.
es = Elasticsearch([
{'host': 'localhost'},
{'host': 'othernode', 'port': 443, 'url_prefix': 'es', 'use_ssl': True},
])
If using SSL, there are several parameters that control how we deal with
certificates (see :class:`~elasticsearch.Urllib3HttpConnection` for
detailed description of the options)::
es = Elasticsearch(
['localhost:443', 'other_host:443'],
# turn on SSL
use_ssl=True,
# make sure we verify SSL certificates
verify_certs=True,
# provide a path to CA certs on disk
ca_certs='/path/to/CA_certs'
)
SSL client authentication is supported
(see :class:`~elasticsearch.Urllib3HttpConnection` for
detailed description of the options)::
es = Elasticsearch(
['localhost:443', 'other_host:443'],
# turn on SSL
use_ssl=True,
# make sure we verify SSL certificates
verify_certs=True,
# provide a path to CA certs on disk
ca_certs='/path/to/CA_certs',
# PEM formatted SSL client certificate
client_cert='/path/to/clientcert.pem',
# PEM formatted SSL client key
client_key='/path/to/clientkey.pem'
)
Alternatively you can use RFC-1738 formatted URLs, as long as they are not
in conflict with other options::
es = Elasticsearch(
[
'http://user:secret@localhost:9200/',
'https://user:secret@other_host:443/production'
],
verify_certs=True
)
By default, `JSONSerializer
`_
is used to encode all outgoing requests.
However, you can implement your own custom serializer::
from elasticsearch.serializer import JSONSerializer
class SetEncoder(JSONSerializer):
def default(self, obj):
if isinstance(obj, set):
return list(obj)
if isinstance(obj, Something):
return 'CustomSomethingRepresentation'
return JSONSerializer.default(self, obj)
es = Elasticsearch(serializer=SetEncoder())
"""
def __init__(self, hosts=None, transport_class=Transport, **kwargs):
"""
:arg hosts: list of nodes we should connect to. Node should be a
dictionary ({"host": "localhost", "port": 9200}), the entire dictionary
will be passed to the :class:`~elasticsearch.Connection` class as
kwargs, or a string in the format of ``host[:port]`` which will be
translated to a dictionary automatically. If no value is given the
:class:`~elasticsearch.Urllib3HttpConnection` class defaults will be used.
:arg transport_class: :class:`~elasticsearch.Transport` subclass to use.
:arg kwargs: any additional arguments will be passed on to the
:class:`~elasticsearch.Transport` class and, subsequently, to the
:class:`~elasticsearch.Connection` instances.
"""
self.transport = transport_class(_normalize_hosts(hosts), **kwargs)
# namespaced clients for compatibility with API names
self.indices = IndicesClient(self)
self.ingest = IngestClient(self)
self.cluster = ClusterClient(self)
self.cat = CatClient(self)
self.nodes = NodesClient(self)
self.remote = RemoteClient(self)
self.snapshot = SnapshotClient(self)
self.tasks = TasksClient(self)
self.xpack = XPackClient(self)
深入详解Elasticsearch


