用户登录前后端分离开发实战案例:React,npm,webpack,ES6, Kotlin, Spring Boot, Gradle, Freemarker, Material UI...
用户登录前后端分离开发实战案例:React,npm,webpack,ES6, Kotlin, Spring Boot, Gradle, Freemarker, Material UI
本章通过一个简单用户登录模块全栈开发案例,从前端 React工程的创建、开发,到后端 Spring Boot + Kotlin + Gradle工程的创建,使用 Spring Data JPA 来操作 MySQL数据库, 使用Freemarker视图引擎,从前往后完整的讲解整个开发过程。
前端 React 工程开发
环境准备
本节实例工程的运行环境和技术栈相关清单如下:
运行环境准备:Node
开发工具 IDE:WebStorm
浏览器:Chrome
框架和组件库:react, babel,jquery, material-ui
构建工具:webpack
我们用 webpack + es6 来结合 react 开发前端应用。本章中,我们手动使用npm来安装各种插件,来从头到尾自己搭建环境。当然,在实际的项目开发中,已经有大神们开发好了脚手架,例如 create-react-app(https://github.com/facebook/create-react-app),我们直接使用脚手架就可以了。为了保持技术细节的原汁原味,我们本章先来带领大家一步一步地来手工搭建 webpack + es6 的 React前端开发工程。
使用npm搭建React的webpack环境
本节我们来介绍如何通过 npm一步一步创建 React前端工程。我们通过Webpack打包构建React工程。
安装配置Webpack环境
我们主要来安装react react-dom babel等npm包,设置webpack.config.js,打包输出bundle.js。
安装Webpack
1.创建项目文件夹
mkdir simple-login
新建 simple-login 文件夹,在此文件夹内进行webpack本地安装。
2.npm初始化
 $ npm init -y
Wrote to /Users/jack/spring-boot-book/chapter03/front-end/simple-login/package.json:

{
  "name": "simple-login",
  "version": "1.0.0",
  "description": "",
  "main": "index.js",
  "scripts": {
    "test": "echo \"Error: no test specified\" && exit 1"
  },
  "keywords": [],
  "author": "",
  "license": "ISC"
}
初始化,目录下生成一个 package.json 文件,内容如上。
3.安装 webpack
WebPack是什么:https://github.com/webpack/webpack-cli
npm install --save-dev webpack
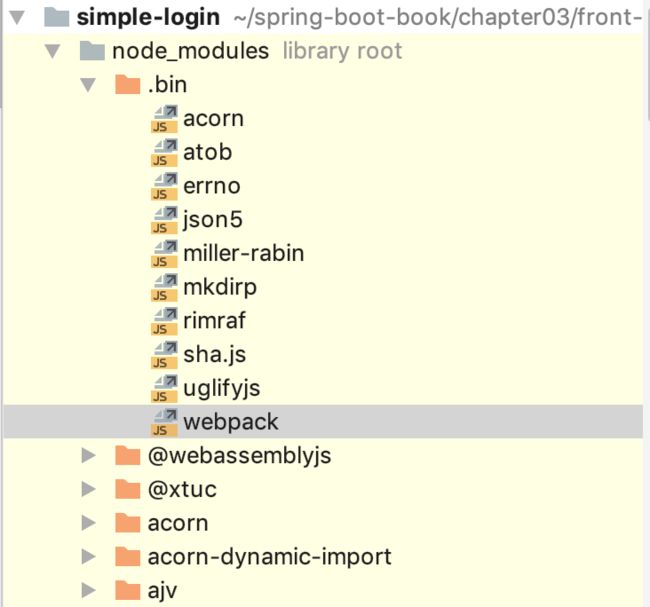
安装成功后 simple-login 目录中会出现node_modules 目录 。
注意:不推荐使用全局安装npm install --global webpack
我们可以看到 .bin 目录下面的webpack脚本:
打开脚本看到源码如下:
#!/usr/bin/env node

process.exitCode = 0;

/**
 * @param {string} command process to run
 * @param {string[]} args commandline arguments
 * @returns {Promise} promise
 */
const runCommand = (command, args) => {
    const cp = require("child_process");
    return new Promise((resolve, reject) => {
        const executedCommand = cp.spawn(command, args, {
            stdio: "inherit",
            shell: true
        });

        executedCommand.on("error", error => {
            reject(error);
        });

        executedCommand.on("exit", code => {
            if (code === 0) {
                resolve();
            } else {
                reject();
            }
        });
    });
};
...
通过脚本中的
#!/usr/bin/env node
我们即可知道,这是一个使用 node运行环境执行的一个 js。此时,我们 package.json 文件中在devDependencies 下面多了一行 webpack 包的依赖:
{
  "name": "simple-login",
  "version": "1.0.0",
  "description": "",
  "main": "index.js",
  "scripts": {
    "test": "echo \"Error: no test specified\" && exit 1"
  },
  "keywords": [],
  "author": "",
  "license": "ISC",
  "devDependencies": {
    "webpack": "^4.25.1"
  }
}
安装依赖包
使用 npm install 命令继续安装 react react-dom babel 等依赖包:
npm install --save react react-dom
npm install --save-dev babel-core babel-loader babel-preset-react babel-preset-es2015
本地安装的webpack命令为: ./node_modules/.bin/webpack
我们可以通过打开 package.json ,在 "scripts": {} 中加入"start": "webpack" ,用 npm start 命令代替 webpack命令。
这个时候,我们的 package.json 文件内容变成了
{
  "name": "simple-login",
  "version": "1.0.0",
  "description": "",
  "main": "index.js",
  "scripts": {
    "start": "webpack",
    "test": "echo \"Error: no test specified\" && exit 1"
  },
  "keywords": [],
  "author": "",
  "license": "ISC",
  "devDependencies": {
    "babel-core": "^6.26.3",
    "babel-loader": "^8.0.4",
    "babel-preset-es2015": "^6.24.1",
    "babel-preset-react": "^6.24.1",
    "webpack": "^4.25.1"
  },
  "dependencies": {
    "react": "^16.6.1",
    "react-dom": "^16.6.1"
  }
}
这里的 babel-loader:8.0.4跟babel-core:6.26.3 版本不兼容,我们改成 "babel-loader": "^7.1.5" 。
可以看到,babel、webpack依赖被放到了 devDependencies 中,react 依赖被放到了 dependencies中。那 package.json 文件里面的 devDependencies 和 dependencies 对象有什么区别呢?
devDependencies和dependencies的区别
我们在使用npm install 安装模块或插件的时候,有两种命令把他们写入到 package.json 文件里面去,比如:
--save-dev
--save
在 package.json 文件里面提现出来的区别就是,使用 --save-dev 安装的 插件,被写入到 devDependencies 对象里面去,而使用 --save 安装的插件,则被写入到 dependencies 对象里面去。
devDependencies 里面的插件只用于开发环境,不用于生产环境。而 dependencies 是需要发布到生产环境的。
配置webpack
创建项目文件,最终结构如下:
文件说明如下:
app/index.js 入口文件
dist 用于盛放webpack打包输出的bundle.js
webpack.config.js 用于配置webpack环境。
编写webpack.config.js配置文件
const path = require('path');
module.exports = {
    entry: "./app/index.js",  //入口文件
    output: {
        path: path.join(__dirname, "/dist/"),    // 所有输出文件的目标路径,绝对路径!
        filename: "bundle.js"
    },
    module: {
        rules: [
            {
                test: /\.js$/,                //babel-loader将其他文件解析为js文件
                exclude: /node_modules/,
                loader: "babel-loader",
                options: {
                    presets: ["es2015", "react"]  //babel-loader需要解析的文件
                }
            }
        ]
    }
};
webpack 开箱即用,可以无需使用任何配置文件。然而,webpack 会假定项目的入口起点为 src/index,然后会在 dist/main.js 输出结果,并且在生产环境开启压缩和优化。
通常,你的项目还需要继续扩展此能力,为此你可以在项目根目录下创建一个 webpack.config.js 文件,webpack 会自动使用它。
更多关于 webpack的配置说明参考:https://webpack.github.io/
package-lock.json的作用
我们有看到上面的目录中,多了一个package-lock.json文件。这个文件是干嘛用的呢?其实用一句话来概括很简单,就是锁定安装时的包的版本号,并且需要上传到git,以保证其他人在npm install时大家的依赖能保证一致。
根据官方文档,这个package-lock.json 是在 npm install时候生成一份文件,用以记录当前状态下实际安装的各个npm package的具体来源和版本号。它有什么用呢?因为npm是一个用于管理package之间依赖关系的管理器,它允许开发者在pacakge.json中间标出自己项目对npm各库包的依赖。你可以选择以如下方式来标明自己所需要库包的版本。
这里举个例子:
"dependencies": {
 "@types/node": "^8.0.33",
}
这里面的向上标号^是定义了向后兼容依赖,指如果 types/node的版本是超过8.0.33,并在大版本号(8)上相同,就允许下载最新版本的 types/node库包,例如实际上可能运行npm install时候下载的具体版本是8.0.35。
编写React组件 App.js
代码如下:
var React = require('react');

export default class App extends React.Component {

    render() { // Every react component has a render method.

        let now = new Date();
        let datetimeString =`${now.toDateString()}  ${now.toTimeString()}`;

        return ( // Every render method returns jsx. Jsx looks like HTML, but it's actually javascript and functions a lot like xml, with self closing tags requiring the `/` within the tag in order to work propperly

                Hello World, Now Time is {datetimeString}

        );
    }
}
其中,var React = require('react') 是引入 react 包。我们的App类继承自React.Component。每个 React Component 都必须要有一个 render() 函数,该函数返回一个 JSX 对象。
在render() 函数中,我们实现了一个简单的 App 组件:给世界问好,并展示当前的时间。
编写index.js和index.html文件
我们在 index.js 中引入我们上面的 App组件,代码如下:
import App from "./components/App";
var ReactDOM = require('react-dom');
ReactDOM.render(
其中,元素 id = 'App' 是我们下面在index.html 中指定的 div 。
在 index.html中引用 webpack 打包生成的bundle.js, 代码如下:
Hello React!
执行webpack命令
我们使用 npm start 来执行 webpack打包动作,我们看到在dist目录一下生成了一个bundle.js文件。然后,直接打开index.html 看到页面效果:
Hello World, Now Time is Sat Nov 10 2018 12:49:10 GMT+0800 (中国标准时间)
使用 React前端组件库 Material-UI
简介
React Material-UI (https://github.com/mui-org/material-ui)是一组实现了谷歌 Material Design 设计语言的 React 组件。它在 GitHub 上的 Star 数> 4w,fork>8k,可能是最受欢迎的 React 组件库了,目前最新版本是 v3.4.0。
安装
下面我们来一步一步安装Material-UI——这个世界上最受欢迎的React UI框架。Material-UI 可作为 npm 包使用。
安装核心依赖
npm install @material-ui/core
等待依赖安装完毕,我们可以看到,此时我们的package.json文件内容新增了 "@material-ui/core": "^3.4.0" 的依赖:
"dependencies": {
  "@material-ui/core": "^3.4.0",
  "react": "^16.6.1",
  "react-dom": "^16.6.1"
}
为了使用预构建的SVG Material icons,例如在组件演示中找到的那些, 须先安装 @material-ui/icons包:
npm install @material-ui/icons
详细使用参考:https://material-ui.com/getting-started/installation/
开发一个简单的登陆表单
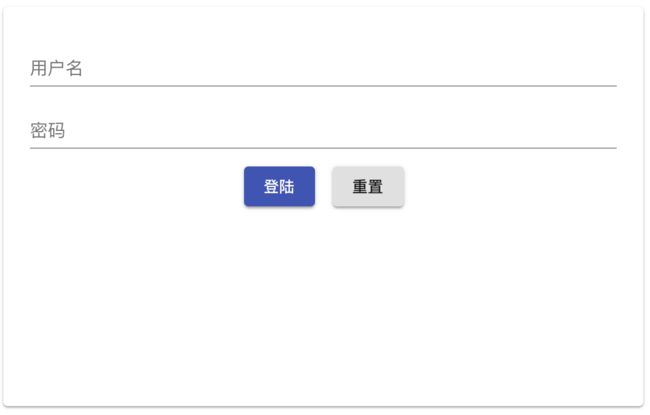
下面我们就来使用Material UI组件库,来开发一个简单的登陆表单页面。这个表单页面的最终效果如下图:
使用 Card 布局
import Card from '@material-ui/core/Card';
import CardContent from '@material-ui/core/CardContent';
使用表单 FormControl
import FormControl from '@material-ui/core/FormControl';
import Input from '@material-ui/core/Input';
import InputLabel from '@material-ui/core/InputLabel';
使用 Button 按钮
import Button from '@material-ui/core/Button';
使用 prop-types
我们使用 prop-types 第三方库对组件的props中的变量进行类型检测。安装命令:
$ npm install prop-types
最终,登陆页面的 js组件类的代码如下:
class LoginForm extends React.Component {
render() {
const {classes} = this.props;
return (
用户名
密码
)
}
}
登陆按钮事件处理
登陆按钮的前端代码如下:
其中,onClick 事件绑定当前LoginForm 类的handleClick 函数,代码如下:
handleClick(event) {
    console.log(event.currentTarget);
    const username = document.getElementById('username').value
    const password = document.getElementById('password').value
    console.log({
        username: username,
        password: password
    })
};
这样我们可以在登陆页面,输入用户名、密码:
点击“登陆”,可以看到控制台的输出:
简单前端表单校验
通常,我们会在前端页面对用户输入做一些合理性校验。例如,我们添加对用户名长度>3的校验。首先,监听用户的表单输入函数是 onChange, 用户名表单的 JSX代码如下:
    用户名

    {this.state.helperText}
使用 FormHelperText 组件来提示用户输入的校验结果。显示的 helperText 存储在 state 中。
其中,handleUsernameChange函数的代码如下:
handleUsernameChange(event) {
    console.log(event.currentTarget);
    if (event.currentTarget.value.length < 3) {
        this.setState({ // 更新 helperText 提示文本
            helperText: '用户名长度不得小于3'
        })
    } else {
        this.setState({
            helperText: ''
        })
    }
};
为了能够在JSX代码中,可以直接使用onChange={this.handleUsernameChange}这样的语法:
同时能够在handleUsernameChange()函数中使用 this.setState({...}) , 我们需要在构造函数提前绑定 this:
constructor(props) {
    super(props);
    this.state = {
        helperText: ''
    };

    // 这边绑定是必要的,这样 `this` (代表 LoginForm) 才能在回调函数中使用,例如:this.setState
    this.handleClick = this.handleClick.bind(this);
    this.handleUsernameChange = this.handleUsernameChange.bind(this);
}
这样,我们在输入用户名的过程中,会看到实时提示:
表单提交函数编写
这里我们使用熟悉的 jquery的 ajax 来进行登陆表单的提交。首先,安装 jquery依赖如下:
$ npm install jquery --save
安装完毕,我们可以在 package.json 中多了 "jquery": "^3.3.1" 。
下面,我们来使用 ajax 写登陆 Post 请求。
引入 jquery
首先,我们在LoginForm.js文件头部 import jquery,代码如下:
import $ from 'jquery'
登陆 Post代码
下面就是写一个普通的 ajax POST请求的代码。
handleClick(event) {
    console.log(event.currentTarget);
    const username = document.getElementById('username').value
    const password = document.getElementById('password').value
    const data = {
        username: username,
        password: password
    };

    console.log(data);

    $.ajax({
        url: '/login.json',
        data: data,
        type: 'POST',
        success: (res) => {
            console.log(data)
        },
        error: (err) => {
            console.log(err)
        }
    });
};
在浏览器 console中测试运行,我们可以看到 POST请求已经成功的发出了:
只不过,我们还没有后端的 HTTP接口/login.json 来接收这个请求。所以,我们看到的是404 Not Found。这种软件开发的方法,我们可以称之为“前端驱动后端开发”。
前端核心组件 LoginForm.js的完整源代码如下:
import React from 'react';
import PropTypes from 'prop-types';
import {withStyles} from '@material-ui/core/styles';
import Card from '@material-ui/core/Card';
import CardContent from '@material-ui/core/CardContent';
import Button from '@material-ui/core/Button';
import FormControl from '@material-ui/core/FormControl';
import Input from '@material-ui/core/Input';
import InputLabel from '@material-ui/core/InputLabel';
import FormHelperText from "@material-ui/core/es/FormHelperText/FormHelperText";
import $ from 'jquery'
const styles = theme => ({
container: {
display: 'flex',
flexWrap: 'wrap',
},
button: {
margin: theme.spacing.unit,
},
formControl: {
margin: theme.spacing.unit,
display: 'flex',
},
loginForm: {
textAlign: 'center',
},
inlineButton: {
display: 'inline-flex'
},
cardHeight: {
height: '360px'
}
});
class LoginForm extends React.Component {
constructor(props) {
super(props);
this.state = {
helperText: ''
};
// 这边绑定是必要的,这样 `this` (代表 LoginForm) 才能在回调函数中使用,例如:this.setState
this.handleClick = this.handleClick.bind(this);
this.handleUsernameChange = this.handleUsernameChange.bind(this);
}
handleClick(event) {
console.log(event.currentTarget);
const username = document.getElementById('username').value
const password = document.getElementById('password').value
const data = {
username: username,
password: password
};
console.log(data);
$.ajax({
url: '/login.json',
data: data,
type: 'POST',
success: (res) => {
console.log(data)
},
error: (err) => {
console.log(err)
}
});
};
handleUsernameChange(event) {
console.log(event.currentTarget);
if (event.currentTarget.value.length < 3) {
this.setState({
helperText: '用户名长度不得小于3'
})
} else {
this.setState({
helperText: ''
})
}
};
render() {
const {classes} = this.props;
return (
用户名
{this.state.helperText}
密码
)
}
}
LoginForm.propTypes = {
classes: PropTypes.object.isRequired,
};
export default withStyles(styles)(LoginForm);
下面,我们就来开始后端工程的开发。
后端 Web 工程开发
本节主要介绍简单用户登录模块的后端工程的开发。
环境准备
本节实例工程的运行环境和技术栈相关清单如下:
运行环境:JDK 8
编程语言:Java、Kotlin
Web 开发框架:Spring MVC,Spring Boot
ORM框架:Spring Data JPA
数据库:MySQL,客户端工具 mysql workbench
视图模板引擎:Freemarker
开发 IDE: IDEA
创建 Spring Boot工程
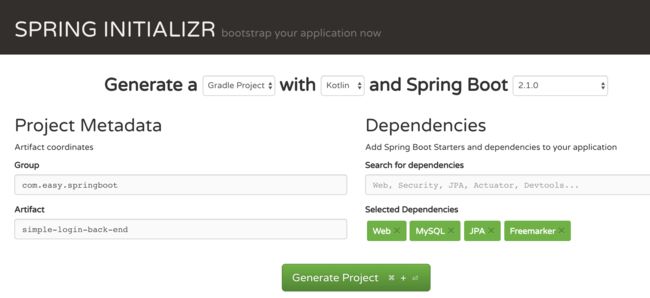
接下来,我们创建一个使用 Kotlin编程语言,Gradle 来构建项目的 Spring Boot工程。浏览器访问:https://start.spring.io/ 创建工程如下图所示:
选择 Gradle Project,Kotlin编程语言,选择 Spring Boot 2.1.0 版本,然后在项目基本信息中,分别填入 Group、Artifact,起步依赖选择:Web,MySQL,JPA,Freemarker。 点击“Generate Project”,下载自动生成的样板工程,解压,导入到 IDEA中。
构建项目
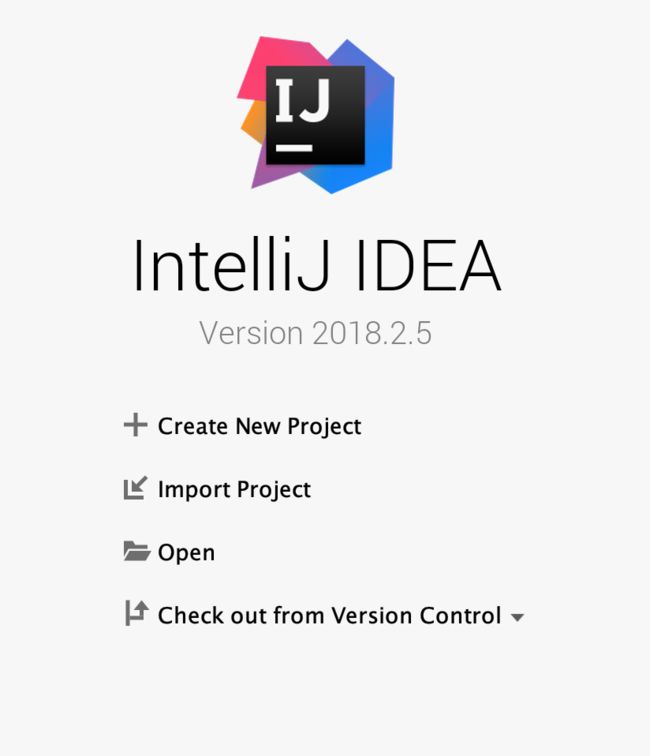
打开 IDEA,点击 Open
选择刚才自动生成的样板工程的根目录
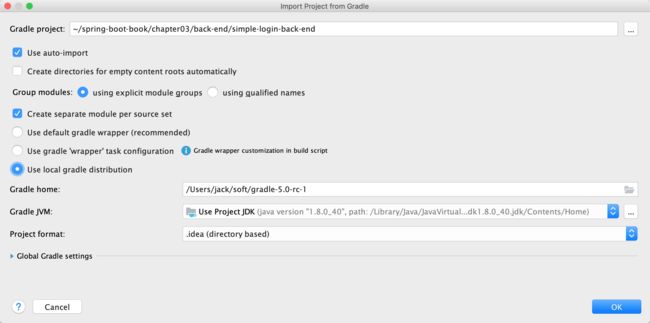
点击“Open”,进入到 Import Project from Gradle界面:
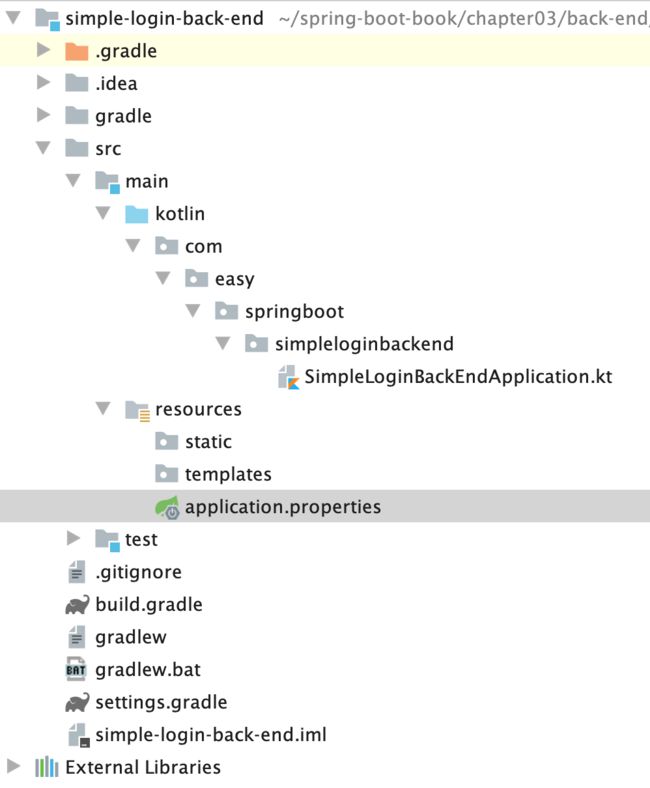
如上图勾选,其中 Gradle 安装包的根目录是:/Users/jack/soft/gradle-5.0-rc-1(这个需要根据自己的机器上的目录自己指定)。点击“OK”,进入到IDEA项目主界面,耐心等待项目构建完成,我们将看到如下的项目目录结构:
修改 maven 中央仓库地址
国外的 maven中央仓库国内访问起来比较慢,改用阿里云提供的中央仓库镜像。在build.gradle中添加阿里云仓库镜像的地址如下:
repositories {
    maven { url 'https://maven.aliyun.com/repository/central' }
    mavenCentral()
}
build.gradle 配置文件
我们可以看到在工程的依赖:
dependencies {
    implementation('org.springframework.boot:spring-boot-starter-data-jpa')
    implementation('org.springframework.boot:spring-boot-starter-freemarker')
    implementation('org.springframework.boot:spring-boot-starter-web')
    implementation('com.fasterxml.jackson.module:jackson-module-kotlin')
    implementation("org.jetbrains.kotlin:kotlin-stdlib-jdk8")
    implementation("org.jetbrains.kotlin:kotlin-reflect")
    runtimeOnly('mysql:mysql-connector-java')
    testImplementation('org.springframework.boot:spring-boot-starter-test')
}
Spring Boot工程的入口类
我们可以看到,在 Spring Boot工程中,使用@SpringBootApplication注解标注 main 程序。
package com.easy.springboot.simpleloginbackend

import org.springframework.boot.autoconfigure.SpringBootApplication
import org.springframework.boot.runApplication

@SpringBootApplication
class SimpleLoginBackEndApplication

fun main(args: Array) {
    runApplication(*args)
}
这个时候,我们直接运行这个 main函数,我们将会在控制台看到如下的报错提示:
***************************
APPLICATION FAILED TO START
***************************

Description:

Failed to configure a DataSource: 'url' attribute is not specified and no embedded datasource could be configured.

Reason: Failed to determine a suitable driver class

Action:

Consider the following:
    If you want an embedded database (H2, HSQL or Derby), please put it on the classpath.
    If you have database settings to be loaded from a particular profile you may need to activate it (no profiles are currently active).
日志告诉我们,Spring Boot应用在启动过程中,自动初始化 DataSource 配置的时候失败。因为我们还没有告诉程序,我们的数据库连接的信息。
配置数据库源
首先在数据库中,创建 schema :
CREATE SCHEMA `simple_login` DEFAULT CHARACTER SET utf8 ;
然后,在 application.properties 中配置 datasource 如下:
spring.datasource.url=jdbc:mysql://127.0.0.1:3306/simple_login?autoReconnect=true&useUnicode=true&createDatabaseIfNotExist=true&characterEncoding=utf8&useSSL=true&serverTimezone=UTC
spring.datasource.username=root
spring.datasource.password=root1234
再次启动 main 程序,我们可以看到启动成功了:
...
o.s.b.w.embedded.tomcat.TomcatWebServer  : Tomcat started on port(s): 8080 (http) with context path ''
c.e.s.s.SimpleLoginBackEndApplicationKt  : Started SimpleLoginBackEndApplicationKt in 8.981 seconds (JVM running for 10.534)
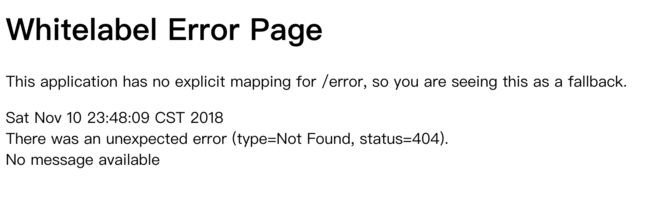
这个时候,我们访问 http://127.0.0.1:8080/ ,会看到一个默认错误页面
因为,此时我们的代码中还没有对请求处理的 Controller。
写一个 Rest 接口Hello World
下面我们就来写一个 Rest 接口。代码如下:
package com.easy.springboot.simpleloginbackend.controller

import org.springframework.web.bind.annotation.GetMapping
import org.springframework.web.bind.annotation.RestController

@RestController
class HelloWorldController {

    @GetMapping(value = ["/hello"])
    fun hello(): String {
        return "Hello World!"
    }

}
重启应用,再次访问 http://127.0.0.1:8080/ , 页面输出:Hello World!
如果想更改服务端口,只需要在 application.properties 中添加如下配置:
server.port=9000
编写登陆 POST 接口
我们先简单返回一个结果示例:
package com.easy.springboot.simpleloginbackend.controller

import com.easy.springboot.simpleloginbackend.result.Result
import org.springframework.web.bind.annotation.PostMapping
import org.springframework.web.bind.annotation.RequestParam
import org.springframework.web.bind.annotation.RestController

@RestController
class LoginController {

    @PostMapping(value = ["/login.json"])
    fun login(@RequestParam("username") username: String, @RequestParam("password") password: String): Result {
        return Result(data = "username=${username},password=${password}", success = true, msg = "")
    }

}
其中,Result类的代码是:
package com.easy.springboot.simpleloginbackend.result

class Result(
        var data: T? = null,
        var success: Boolean = false,
        var msg: String = ""
)
测试 POST 接口
为了方便地进行测试,我们添加Spring Boot Actuator依赖到工程中:
dependencies {
    ...
    implementation('org.springframework.boot:spring-boot-starter-actuator')
    ...
}
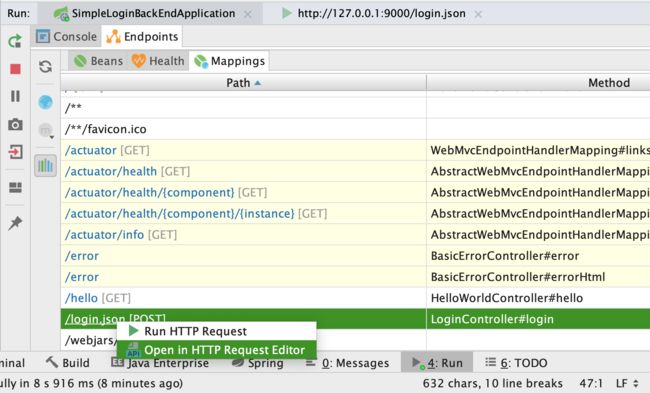
重新启动应用,我们将会在底部工具栏中看到端点请求映射:
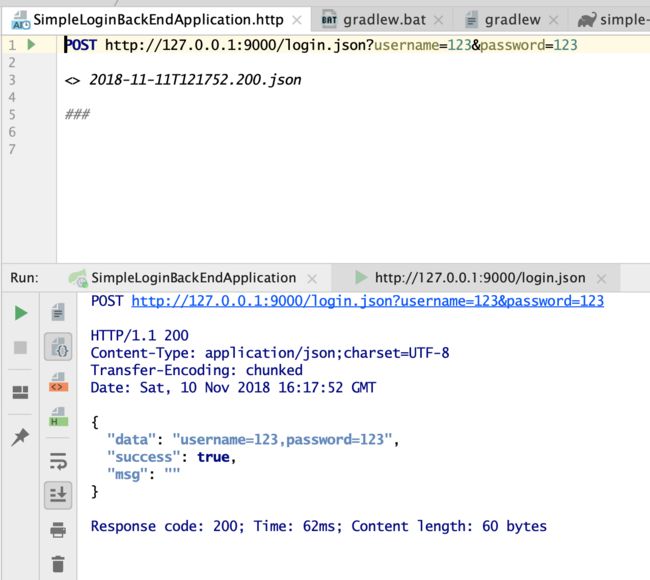
单击 /login.json [POST], 选择 Open in HTTP Request Editor, 在 POST 后面加上参数
POST http://127.0.0.1:9000/login.json?username=123&password=123
如下图, 点击绿色执行按钮
可以得到输出:
POST http://127.0.0.1:9000/login.json?username=123&password=123

HTTP/1.1 200
Content-Type: application/json;charset=UTF-8
Transfer-Encoding: chunked
Date: Sat, 10 Nov 2018 16:19:10 GMT

{
  "data": "username=123,password=123",
  "success": true,
  "msg": ""
}

Response code: 200; Time: 23ms; Content length: 60 bytes
好了,现在我们的前端表单页面有了,后端的 /login.json 接口也好了。怎样集成呢?且看下文分解。
前后端集成联调
本节我们来把上面的前端 js、html页面集成到后端的 Spring Boot应用中来。
把前端代码放到后端工程中
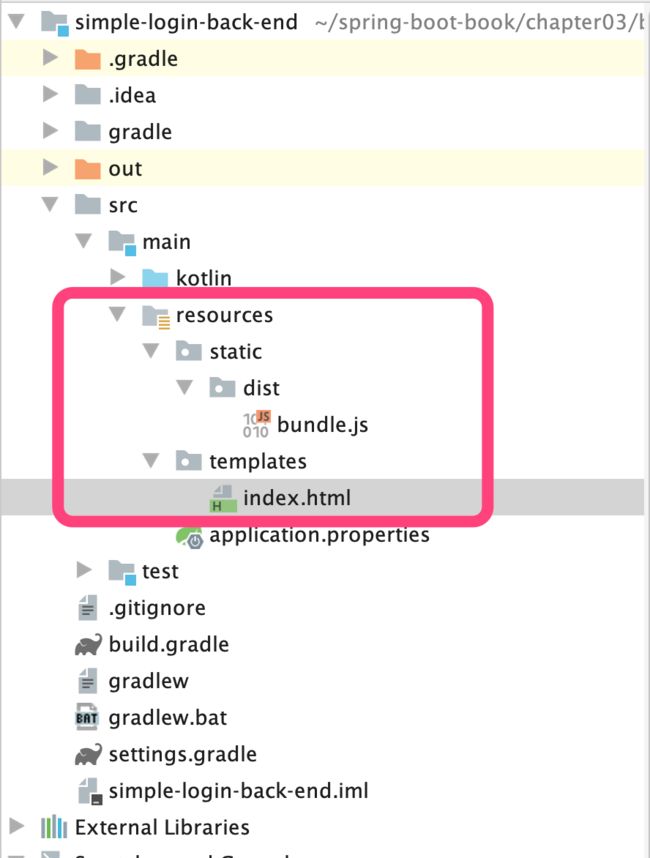
我们后端视图引擎使用的是 Freemarker。默认的视图文件在 src/main/resources/templates 目录下。
我们先手动把前端工程中的index.html、 bundle.js 分别放到 src/main/resources 相应的目录下面,如下图
视图文件默认后缀
然后,为了方便起见,我们把 Freemarker 的默认文件后缀名改成 .html, 这个配置在 application.properties中:
spring.freemarker.suffix=.html
编写请求转发路由
编写一个控制器,把来自前端的请求 "", "/", "/index.html", "/index.htm" 路由到后端的视图index.html上。代码如下:
package com.easy.springboot.simpleloginbackend.controller

import org.springframework.stereotype.Controller
import org.springframework.web.bind.annotation.GetMapping

@Controller
class IndexController {

    @GetMapping(value = ["", "/", "/index.html", "/index.htm"])
    fun index(): String {
        return "index"
    }

}
前后端联调测试
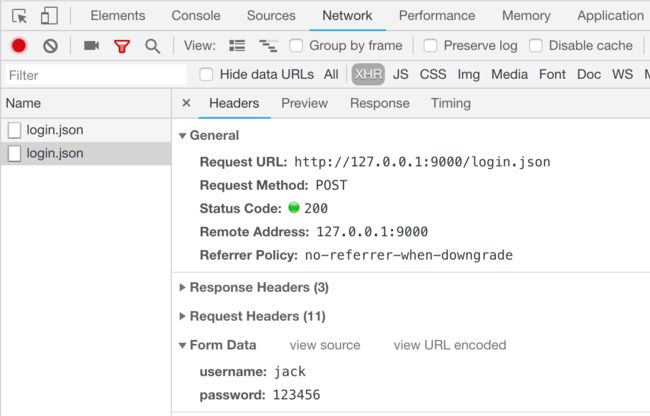
重启应用,访问 http://127.0.0.1:9000/ , 我们会看到登陆表单页面。输入用户名、密码,点击登录
观察浏览器的控制台,我们可以看到请求成功信息:
请求响应值:
{"data":"username=jack,password=123456","success":true,"msg":""}
有了上面的前后端完整的开发流程作为基础,我们就可以连接数据库,判断用户名、密码是否存在;也可以在前端做出登录成功、失败的跳转提示等处理了。我们会在后面的章节中逐步介绍。
本章小结
本章通过一个简单的用户登录表单的前端 React开发、后端 Spring Boot + Kotlin开发的完整实例,给大家讲解了前后端分离开发的简单过程。当然,在实际的项目开发中,我们有一系列的自动化脚手架、构建工具插件等,我们会在其他章节中逐步介绍。
前端工程代码地址:https://github.com/EasySpringBoot/front-end-simple-login
后端工程代码地址:https://github.com/EasySpringBoot/simple-login-back-end
Kotlin 开发者社区
国内第一Kotlin 开发者社区公众号,主要分享、交流 Kotlin 编程语言、Spring Boot、Android、React.js/Node.js、函数式编程、编程思想等相关主题。
