Eureka 2.0 开源工作宣告停止?别担心,ANS 即将 C位强势出道!
近日,Netflix 公司在 github 上公告 Eureka 2.0 开源工作停止,继续使用风险自负。这一消息在spring cloud 开发者中引起了一些担心和忧虑。
同时在阿里巴巴正式宣布其开源计划, 将通过 Nacos 项目将阿里巴巴在建设共享服务体系中使用的服务发现、配置及服务管理平台贡献给开源社区,通过打造 Dubbo + Nacos 的经典组合进一步释放 Dubbo 在云原生及 Service Mesh 时代中,在大规模微服务治理、流量治理、服务集成与服务共享等服务平台能力建设上的威力,同时 Nacos 会非常关注对主流开源社区,如 Spring Cloud 和 Kubernetes 云原生体系的无缝对接与支持。
ANS (alibaba naming service) 是 nacos 组件中的服务发现部分。开源流程正在紧张地进行中。同时 ANS 与 spring cloud 结合的 spring cloud starter ans 也将同时开源到 spring cloud 官方孵化器。
ANS 同样也支持 spring cloud 应用的服务注册与发现,同时默认集成了负载均衡组件 Ribbon,Eureka 用户可以简单地通过替换 maven 项目中 pom.xml 文件中的依赖来实现无缝迁移。
想抢先体验?来试试商业版的 EDAS Ans starter 吧!
快速开始
服务提供者
-
创建一个 Spring Cloud 工程,命名为 service-provider。这里我们以 spring boot 1.5.8 和 spring cloud Dalston.SR4 为例。在 pom.xml 中引入需要的依赖内容。
其他版本如 spring boot 2 + spring cloud Finchley 也同样支持,请您自行修改版本号和替换相应的组件依赖。
            org.springframework.boot
            spring-boot-starter-parent
            1.5.8.RELEASE


                com.alibaba.cloud
                spring-cloud-starter-ans
                1.1.3


                com.alibaba.cloud
                spring-cloud-alibaba-edas-starter
                1.1.3


                    org.springframework.cloud
                    spring-cloud-dependencies
                    Dalston.SR4
                    pom
                    import
- 编码服务提供端的启动类,其中 @EnableDiscoveryClient 注解表明此应用需开启服务注册与发现功能。
        @SpringBootApplication
        @EnableDiscoveryClient
        public class ServerApplication {

            public static void main(String[] args) {
                SpringApplication.run(ServerApplication.class, args);
            }
}- 既然是服务提供者,所以我们还需要提供一个简单的服务。这里 EchoController 的逻辑很简单,将收到的参数回显给调用者。
        @RestController
        public class EchoController {
            @RequestMapping(value = "/echo/{string}", method = RequestMethod.GET)
            public String echo(@PathVariable String string) {
                return string;
            }
}-
权限配置,配置阿里云账号的 AccessKey、SecretKey,以及 EDAS 的命名空间信息。
- 配置阿里云 AccessKey 和 SecretKey
登陆 阿里云AK管理控制台。找到
用户信息管理下的安全信息管理。复制
AccessKey ID和Access Key Secret,分别对应配置项中的 alibaba.cloud.access-key 和 alibaba.cloud.secret-key。安全凭证信息格式如下:
             alibaba.cloud.access-key=xxxxxxxxxx
             alibaba.cloud.secret-key=xxxxxxxxxx
1. 配置 EDAS 的命名空间
登录 [EDAS 控制台](https://edas.console.aliyun.com/#/home)。未开通EDAS的用户需要先开通EDAS,**EDAS 标准版促销进行中,每月仅需1元。**
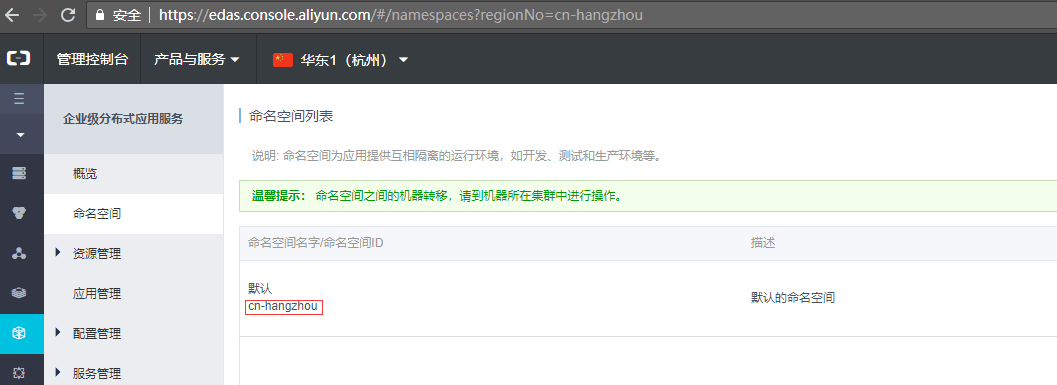
在左侧导航栏中单击**命名空间**。在命名空间列表页面选择**地域**,并找到您想发布到的命名空间,复制其**命名空间ID**,对应配置项中的 **alibaba.edas.namespace**。 alibaba.edas.namespace=xxxxxxxxxx
- 综上,我们的配置文件 application.properties 内容最后是这样的。
        spring.application.name=service-provider
        server.port=18081
        alibaba.cloud.access-key=xxxxxxxxxx
        alibaba.cloud.secret-key=xxxxxxxxxx
alibaba.edas.namespace=cn-hangzhou-
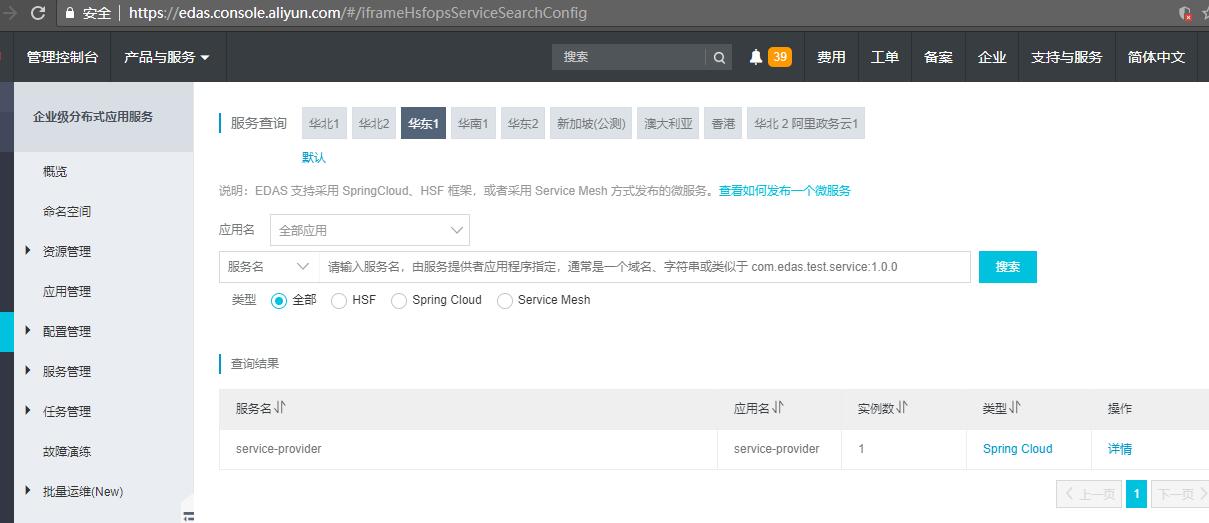
启动 service-provider 服务,在 EDAS 页面查看服务注册的信息。
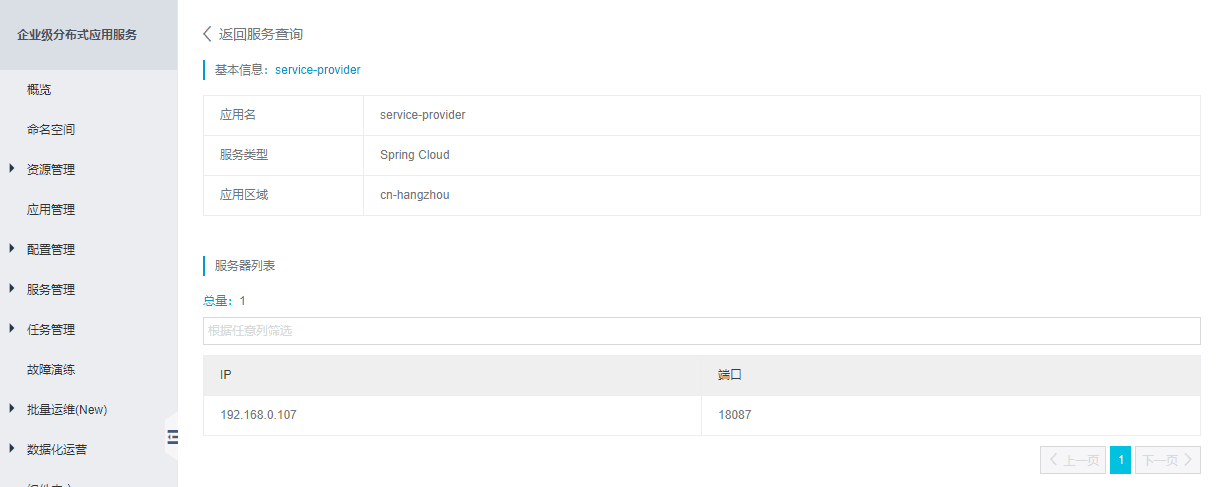
可以看到服务列表中已经存在的实例 service-provider,从详情页可以看到IP地址是本机的地址192.168.0.107,端口是 18081。  
服务消费者
这个例子中,我们将不仅仅是演示服务发现的功能,同时还将演示 ANS 服务发现 与 RestTemplate、AsyncRestTemplate 和 FeignClient 这三个客户端是如何结合的。因为实际使用中,我们更多使用的是用这三个客户端进行服务调用。
- 创建一个 Spring Cloud 工程,命名为 service-consumer。首先在 pom.xml 中引入需要的依赖内容:
            org.springframework.boot
            spring-boot-starter-parent
            1.5.8.RELEASE


                com.alibaba.cloud
                spring-cloud-starter-ans
                1.1.3


                com.alibaba.cloud
                spring-cloud-alibaba-edas-starter
                1.1.3


                    org.springframework.cloud
                    spring-cloud-dependencies
                    Dalston.SR4
                    pom
                    import
因为在这里我们要演示 FeignClient 的使用,所以与 service-provider 相比,pom.xml 文件中的依赖增加了一个 spring-cloud-starter-feign。
-
完成以下四个步骤,配置好 RestTemplate 、 AsyncRestTemplate 和 FeignClient。
- 在使用 FeignClient 之前,我们还需要对它的配置,配置服务名以及方法对应的 HTTP 请求,示例代码如下
                @FeignClient(name = "service-provider")
                public interface EchoService {
                    @RequestMapping(value = "/echo/{str}", method = RequestMethod.GET)
                    String echo(@PathVariable("str") String str);
                }
1. 在启动类中,使用 @EnableDiscoveryClient 注解启用服务注册与发现
1. 在启动类中,使用 @EnableFeignClients 注解激活 FeignClient
1. 在启动类中,添加 @LoadBalanced 注解将 RestTemplate 与 AsyncRestTemplate 与服务发现结合。
最终启动类的代码如下 @SpringBootApplication
@EnableDiscoveryClient
@EnableFeignClients
public class ConsumerApplication {
@LoadBalanced
@Bean
public RestTemplate restTemplate() {
return new RestTemplate();
}
@LoadBalanced
@Bean
public AsyncRestTemplate asyncRestTemplate(){
return new AsyncRestTemplate();
}
public static void main(String[] args) {
SpringApplication.run(ConsumerApplication.class, args);
}
}- 创建一个Controller,供我们演示和验证服务发现功能使用。
        @RestController
        public class TestController {

            @Autowired
            private RestTemplate restTemplate;
            @Autowired
            private AsyncRestTemplate asyncRestTemplate;
            @Autowired
            private  EchoService echoService;

            @RequestMapping(value = "/echo-rest/{str}", method = RequestMethod.GET)
            public String rest(@PathVariable String str) {
                return restTemplate.getForObject("http://service-provider/echo/" + str, String.class);
            }
            @RequestMapping(value = "/echo-async-rest/{str}", method = RequestMethod.GET)
            public String asyncRest(@PathVariable String str) throws Exception{
                ListenableFuture> future = asyncRestTemplate.
                        getForEntity("http://service-provider/echo/"+str, String.class);
                return future.get().getBody();
            }
            @RequestMapping(value = "/echo-feign/{str}", method = RequestMethod.GET)
            public String feign(@PathVariable String str) {
                return echoService.echo(str);
            }

} - 最后,添加应用基本配置和阿里云 AK、SK 以及 EDAS 的 namespace。
        spring.application.name=service-consumer
        server.port=18082
        alibaba.cloud.access-key=xxxxxxxxxx
        alibaba.cloud.secret-key=xxxxxxxxxx
alibaba.edas.namespace=cn-hangzhou-
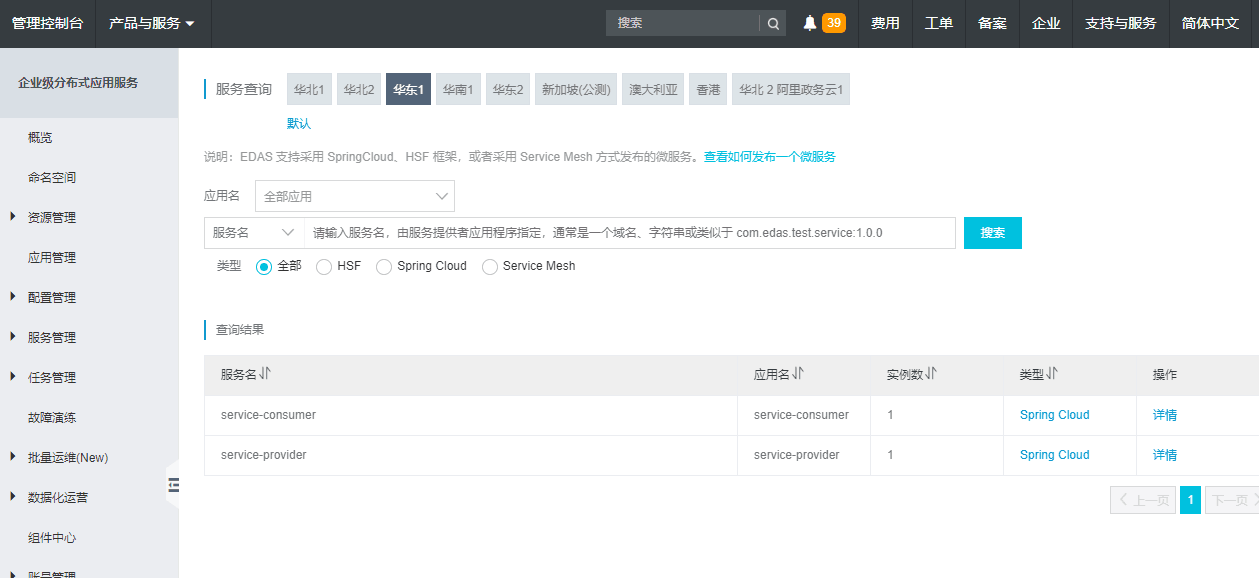
启动服务,首先查看EDAS控制台,查询服务,可以看到,服务注册成功了。
再对我们的演示 API 分别进行调用,可以看到调用都成功了。  
Demo 下载
service-provider
service-consumer
更多配置项
| 配置项 | key | 默认值 | 说明 | 补充说明 |
|---|---|---|---|---|
| 服务名 | spring.cloud.ans.doms | spring.application.name | 当此项未配置时,默认从spring.application.name中获取需要发布多个服务时,中间用英文的 , 号隔开 |
production |
| 是否注册 | spring.cloud.ans.register-enabled | true | 当只需要发现,不需要注册时,可以通过将值设置成false来关闭注册 | production |
| 想要注册的IP | spring.cloud.ans.ip | 无 | 当需要指定本机注册的IP时,通过此值来配置,优先级最高 | production |
| 想要注册的IP所属的网卡 | spring.cloud.ans.interface-name | 无 | 当确定需要发布哪块网卡对应的IP地址时,通过此参数配置,值为网卡名 | production |
| 想要注册的端口 | spring.cloud.ans.port | 无 | 想要注册的端口 | test |
| 注册的权重 | spring.cloud.ans.weight | 1 | 数值越大权重越高,取值范围为 | test |
| 集群 | spring.cloud.ans.cluster | DEFAULT | 可以通过集群来分别标记服务 | test |
| 租户环境 | spring.cloud.ans.env | DEFAULT | 相同租户的相同环境下的服务才能互相发现 | test |
工作原理
下面我们将从 服务注册中心寻址、服务注册与下线、客户端结合、高可用、安全等多个方面来分析原理。
服务注册中心寻址
配置阿里云的 AccessKey 和 SecretKey 之后,再指定 EDAS 的命名空间,那么程序会在启动的过程中去调用 EDAS 的接口,获取到此命名空间对应的账号权限信息和地址服务器的地址。
ANS 客户端通过地址服务器就能拿到 ANS Server端的地址。
服务注册与下线
服务注册的通信协议是 HTTP 协议,在 Spring 启动过程中,收到 EmbeddedServletContainerInitializedEvent 或 ServletWebServerInitializedEvent
事件时,会将服务注册到 ANS Server 端。
服务注册成功后,ANS client 端将会主动向 server 端发送心跳,当超过一定时间内 server 端没有收到 client 端的心跳时,会将服务标记成不可用,这样其他 client 在查询时就能发现此服务当前处于不可用的状态。
如果短时间内,大量 client 与 server 心跳失败,则会出发降级保护机制,服务会暂时不被标记成不可用的状态。
当应用程序停止时,收到 ContextClosedEvent 事件后,ANS client 会调用 server 端的反注册接口,将此服务下线。
客户端结合
与客户端结合的方式, ans starter已经实现自动与 Ribbon 组件的结合。
Ribbon的关键接口有下面三个:
| 属性 | 提供的功能 |
|---|---|
| ServerList | 提供 getInitialListOfServers 和 getUpdatedListOfServers 方法,获取和刷新 serverList。 |
| IRule | 选择出一个服务节点 |
| IPing | 提供 isAlive 方法,负责探测serverList中节点是否可用 |
目前 ans-starter 在 spring context 中默认实例化了一个 AnsServerList。AnsServerList 实现了 Ribbon 的 ServerList 接口。
    @Bean
    @ConditionalOnMissingBean
    public ServerList ribbonServerList(IClientConfig config) {
        AnsServerList serverList = new AnsServerList(config.getClientName());
        return serverList;
    }
如果您有其他需求,可以自行实现 Ribbon 的接口,或者直接在 github 上通过 issue 向我们提需求,我们评估通过后会加上此功能。
高可用实现
服务端高可用
ANS作为分布式系统,服务端高可用包含以下几个方面:
- 集群内机器数据对等,每台机器存储全量数据;
- 支持机房容灾功能,即一个集群中的某个机房内的机器全部挂掉不影响服务;
- 服务端异常自动探测,一旦某个机器挂了,该机器相关的任务(如健康检查)自动漂移到其他机器;
客户端高可用
ANS 为了保证高可用,在客户端高可用方面同样做了很多工作,以应对不同场景的异常情况。
- 推空保护,当客户端收到服务端推送的空数据时,忽略掉该数据,使用上次的数据;
- 本地内存缓存,当运行时与服务注册中心的连接丢失或服务注册中心完全宕机,仍能正常地调用服务。
- 本地缓存文件,当应用与服务注册中心发生网络分区或服务注册中心完全宕机后,应用进行了重启操作,内存里没有数据,此时应用可以通过读取本地已落盘持久化的数据来获取到最后一次订阅到的内容。
- 本地容灾文件夹。正常的情况下,容灾文件夹内是没有内容的。当服务端完全宕机且长时间不能恢复,同时服务提供者又发生了很大的变更时,可以通过在容灾文件夹内添加文件的方式来开启本地容灾。此时客户端会忽略原有的本地缓存文件,只从本地容灾文件中读取配置。极端情况下,服务端完全不可用时,可以通过修改缓存文件的方式达到支持服务发布变更的目的。
安全的实现
EDAS 服务注册发现组件,结合 EDAS 已有的安全功能,在每次注册、心跳和查询请求中都添加了验签鉴权的操作,保护了服务的安全性。
所以如果您发现您配置的权限信息都无误,但是运行文档中的 Demo 却注册失败了。则可能是由于您本机的时间不准确,从而导致验签鉴权失败。此时您需要校正本机的时间,建议打开时间自动同步功能。