list1 = set([1, 2, 3, 4, 5, 6, 5, 5, 5])
list2 = set([11, 2, 36, 'a', 5, 6, 5, 5, 5])
list3 = set([1, 2, 3])
list4 = set(['a', 'b', 'c'])

求交集
print(list1.intersection(list2))
print(list1&list2)
输出{2, 5, 6}

求并集
print(list1.union(list2))
print(list1 | list2)
输出{1, 2, 3, 4, 5, 6, 36, 'a', 11}


求差集
print(list1.difference(list2)) #在list1不在list2
print(list1 - list2)
输出{1, 3, 4}
print(list2.difference(list1)) #在list2不在list1
print(list2 - list1)
输出{'a', 11, 36}


子集(无运算符)
print(list1.issubset(list2))
输出False
print(list3.issubset(list1))
输出True


对称差集:两个集合互相没有的取出来放一起
print(list1.symmetric_difference(list2))
输出{1, 3, 36, 4, 11, 'a'}


isdisjoint:Return True if two sets have a null intersection #两个集合没有交集返回true,否则返回false
print(list3.isdisjoint(list1))
输出False
print(list1.isdisjoint(list4))
输出True
list1 = set([1, 2, 3, 4, 5, 6, 5, 5, 5])
list2 = set([11, 2, 36, 'a', 5, 6, 5, 5, 5])
list3 = set([1, 2, 3])
list4 = set(['a', 'b', 'c'])
集合的创建方式
1
2 1)
3 l = [1,3,4,5]
4 s = set(l)
5
6 2)
7 s = {1,2,3,4}  #用{}直接创建集合
集合与列表、字符串、元组的转换:


 1 >>> l = (1,2,3,4,1,2,3)   #元组转换为集合去重
 2 >>> s = set(l)
 3 >>> s
 4 {1, 2, 3, 4}
 5
 6 >>> l = '112223333'        #字符串转换为集合去重
 7 >>> s = set(l)
 8 >>> s
 9 {'2', '1', '3'}
10
11 >>> l = [1,2,3,1,1,1,2,3,3]    #列表转换为集合去重
12 >>> s = set(l)
13 >>> s
14 {1, 2, 3}
集合元素增删改查:
增(与列表对比:集合中没有insert,只有add)
list1.add('new')
print(list1)
list1.update(['new2','new3'])
print(list1)
输出:
{1, 2, 3, 4, 5, 6, 'new'}
{1, 2, 3, 4, 5, 6, 'new3', 'new2', 'new'}


difference_update方法:
se = {11, 22, 33, 55}
be = {22, 11, 55}

se.difference_update(be)        #找出se中存在,be中不存在的集合放到se中
print(se)
结果:{33}
删
pop随机删除集合中的元素并返回删除的元素
remove指定的元素删除,元素不存在,删除会报错
discard不会报错

print(len(list3))
输出:3

print(list1.pop())
输出:1

list4.remove('b')
print(list4)
输出:{'a', 'c'}

集合测试
for i in range(3, 6):
    if i in list3:
        print('%i is in list1' % i)
    else:
        print('%i is not in list1' % i)
输出:
3 is in list1
4 is not in list1
5 is not in list1

小结:
x in s   【集合,字典,列表,字符串,全部用这种方法判断一个字符在不在字符串里】
测试 x 是否是 s 的成员

x not in s
测试 x 是否不是 s 的成员


集合练习:
#要求 把new_dict更新到old_dict:
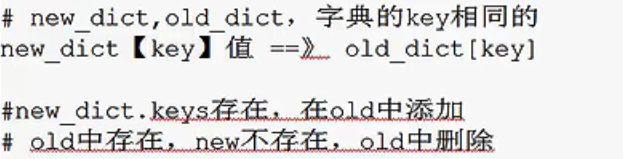
old_dict = {
    "#1": 11,
    "#2": 22,
    "#3": 100,
}

new_dict = {
    "#1": 33,
    "#4": 22,
    "#7": 100,
}
 1 for key in old_dict:
 2     if key in new_dict:
 3         old_dict[key] = new_dict[key]
 4
 5 for key, value in new_dict.items():
 6     if key not in old_dict:
 7         old_dict[key] = value
 8
 9
10 old_keys = old_dict.keys()
11 new_keys = new_dict.keys()
12
13 old_set = set(old_keys)
14 new_set = set(new_keys)
15
16 del_set = old_set.difference(new_set)
17 for key in del_set:
18     old_dict.pop(key)
19
20 print(old_dict)
21
22 #输出:{'#1': 33, '#7': 100, '#4': 22}
重要知识:字符串,列表,字典
Python成员运算符
Python还支持成员运算符,包含的成员,包括字符串,列表或元组
| 运算符 | 描述 | 实例 |
|---|---|---|
| in | 如果在指定的序列中找到值返回 True,否则返回 False。 | x 在 y 序列中 , 如果 x 在 y 序列中返回 True。 |
| not in | 如果在指定的序列中没有找到值返回 True,否则返回 False。 | x 不在 y 序列中 , 如果 x 不在 y 序列中返回 True。 |
#!/usr/bin/python
# -*- coding: UTF-8 -*-

a = 10 b = 20 list = [1, 2, 3, 4, 5 ]; if ( a in list ): print "1 - 变量 a 在给定的列表中 list 中" else: print "1 - 变量 a 不在给定的列表中 list 中" if ( b not in list ): print "2 - 变量 b 不在给定的列表中 list 中" else: print "2 - 变量 b 在给定的列表中 list 中" # 修改变量 a 的值 a = 2 if ( a in list ): print "3 - 变量 a 在给定的列表中 list 中" else: print "3 - 变量 a 不在给定的列表中 list 中"
以上实例输出结果:
1 - 变量 a 不在给定的列表中 list 中 2 - 变量 b 不在给定的列表中 list 中 3 - 变量 a 在给定的列表中 list 中
文件操作:
python2 open没有encoding参数
import os
import chardet
import codecs

for dirpath,dirnames,filenames in os.walk('/data/usr/src/app/dbmanager/slowlogs'):
    for filename in filenames:
        file_abs = dirpath+'/'+filename
        print(file_abs)
        file_handler = open(file_abs, 'rb')
        buf = file_handler.read()
        result = chardet.detect(buf)
        file_handler.close()
        print(result)

#        try:
#            file_handler = open(file_abs, encoding='utf-8')
#            lines = file_handler.readlines()
#            print(file_abs,'is utf-8')
#        except Exception as e:
#            file_handler = open(file_abs, encoding='gbk', errors='ignore')
#            lines = file_handler.readlines()
#            print(file_abs,'is gbk=====================')
使用python转换编码格式
import chardet
import sys
import codecs


def findEncoding(s):
    file = open(s, mode='rb')
    buf = file.read()
    result = chardet.detect(buf)
    file.close()
    return result['encoding']


def convertEncoding(s):
    encoding = findEncoding(s)
    if encoding != 'utf-8' and encoding != 'ascii':
        print("convert %s%s to utf-8" % (s, encoding))
        contents = ''
        with codecs.open(s, "r", encoding) as sourceFile:
            contents = sourceFile.read()

        with codecs.open(s, "w", "utf-8") as targetFile:
            targetFile.write(contents)

    else:
        print("%s encoding is %s ,there is no need to convert" % (s, encoding))


if __name__ == "__main__":
    if len(sys.argv) != 2:
        print("error filename")
    else:
        convertEncoding(sys.argv[1])
debug:
with codecs.open('/tmp/slowlog3','w', encoding='utf-8') as targetFile:
    targetFile.write(contents)


with codecs.open('/data/usr/src/app/dbmanager/slowlogs/DB-mobile01_10.21.6.84_3306_2019-05-30.slowlog', encoding='utf-8', errors='ignore') as sourceFile:
with codecs.open('/data/usr/src/app/dbmanager/slowlogs/DB-mobile01_10.21.6.84_3306_2019-05-30.slowlog', encoding='utf-8') as sourceFile:
    contents = sourceFile.read()


chardet.detect(file)


/data/usr/src/app/dbmanager/slowlogs/p.data.hadoop.bitool.config_10.11.9.42_3306_2019-05-19.slowlog


>>> file = open('/data/usr/src/app/dbmanager/slowlogs/p.data.hadoop.bitool.config_10.11.9.42_3306_2019-05-19.slowlog', 'rb').read()
>>> result = chardet.detect(file)
>>> result['encoding']
{'encoding': 'GB2312', 'confidence': 0.99, 'language': 'Chinese'}
对文件操作流程
打开文件,得到文件句柄并赋值给一个变量
通过句柄对文件进行操作
关闭文件
打开文件的模式有:
r,只读模式(默认模式)打开文件。文件的指针将会放在文件的开头。【无法创建文件,用r权限打开一个不存在文件会报错】
w,只写模式。如果文件已存在则将其清空【不可读;不存在则创建;存在则覆盖原文件;】
x ,不存在,创建;存在,报错;只写
a,打开一个文件用于追加。如果该文件已存在,文件指针将会放在文件的结尾。也就是说,新的内容将会被写入到已有内容之后。如果该文件不存在,创建新文件进行写入。【可读; 不存在则创建;存在则只追加内容;】
"+" 表示可以同时读写某个文件
r+,打开一个文件用于读写。文件指针将会放在文件的开头。【用的最多】
w+,写读,如果文件已存在则将其覆盖,不存在则创建新文件【先创建一个文件再往里写,会覆盖原文件内容,了解,少用】
a+,打开一个文件用于读写。如果该文件已存在,文件指针将会放在文件的结尾。文件打开时会是追加模式。如果该文件不存在,创建新文件用于读写【追加,读,写】(在python2.x中a+会覆盖字符,py3.x中只能在文件末尾追加)
小结:
上面三种 用的最多的就是r+,r+读写追加到末尾,w+写读覆盖
r+ ,读写:
读:指针为0,从0开始读
写:如果写之前,有过读操作,则在最后追加
主动seek,写从当前指针向后写
a+ ,读写:
读:最后位置读取
写:
最后追加
主动seek后,依然最后追加
"b"表示处理二进制文件,(处理方式是二进制,但打印出来的并非是0101形式)(如:视频文件,FTP发送上传ISO镜像文件,linux可忽略,windows处理二进制文件时需标注)
rb
wb
ab
二进制用在:socket编程中,传输数据只能用二进制模式(py3.0中,2.0支持字符)
"U"表示在读取时,可以将 \r \n \r\n自动转换成 \n (与 r 或 r+ 模式同使用)
rU
r+U
readline默认读一行,单行读,如果需要读指定行数,在循环中加判断即可,readlines:把文件读进列表,全读,每行成为一个元素
文件处理方法1:(以/etc/passwd为例)

打印文件:
f = open('yes.txt', 'r+',encoding='utf-8')
for line in f.readlines():
    print(line.strip())


不打印第十行:注意enumerate的用法
f = open('yes.txt', 'r', encoding='utf-8')
for index,line in enumerate(f.readlines()):
    if index == 9:
        pass                  #此处也可用continue
    else:
        print(line.strip())


上面的readlines处理大文件不用,它会把文件全部加载进内存
读大文件用下面方法:(读一行,覆盖上一行的内存位置,类似迭代器原理)
f = open('yes.txt', 'r', encoding='utf-8')
count = 0
for i in f:
    count += 1
    if count == 10:
        print('---------------------------------')
        continue
    print(i.strip())
此方法处理大文件效率最高


tell、seek的用法
tell 是打印指针所在字符的位置。
read,一次读多少个字符
readline一次读一行

f = open('yes.txt', 'r', encoding='utf-8')
print(f.tell())
输出 0
f = open('yes.txt', 'a+', encoding='utf-8')
print(f.tell())
输出 1664

seek(0)回到最开始字符的位置,(tell和seek搭配使用),seek:从seek到的位置到第一个换行符的字符打印出来,之前如果有字符将被舍弃
f = open('yes.txt', 'r', encoding='utf-8')
print(f.encoding)  #获取文件的编码


flush方法:把write的内容实时同步到硬盘上
应用举例:进度条的实现:
import sys,time
for i in range(20):
    sys.stdout.write('#')
    sys.stdout.flush()
    time.sleep(0.1)
如果不加flush,会等程序执行完后再一次性写入硬盘(再输出到屏幕)。


截断:truncate(truncate vt. 把…截短)
truncate(100):表示截取后只保留前100个字节

truncate举例:

file = open('mage1.txt', 'w+')
for i in range(1, 11):
    file.write('this is %i line\n' %i)
file.truncate(3)
file.seek(0)
print(file.tell())   #查看指针位置在文件尾部
print(file.readlines())
#执行write方法之后,光标已经位于文件尾部,readlines的值为空,必须移动光标到文件开头,即seek(0),readlines才会有值

#截取文件内容到当前指针所在处:
file.truncate(file.tell())

seek移动光标无效,truncate从头开始截断


文件修改:
修改思路:
1.vim编辑的方法,先把文件全部加载到内存,修改后再同步到硬盘
2.创建一个新的文件,从旧文件中读,加入判断修改,再写到新文件中
例:注意replace方法的使用
f = open('yesterday', 'r', encoding='utf-8')
f_new = open('yesterday.bak', 'w', encoding='utf-8')

for line in f:
    if '有那么多肆意的快乐等我享受' in line:
        f_new.write('有那么多肆意的快乐等whitesky享受\n')
    else:
        f_new.write(line)
f.close()
f_new.close()

方法2:
f = open('yesterday', 'r', encoding='utf-8')
f_new = open('yesterday.bak', 'w', encoding='utf-8')

for line in f:
    if '有那么多肆意的快乐等我享受' in line:
        line = line.replace('有那么多肆意的快乐等我享受', '有那么多肆意的快乐等whitesky享受')
    f_new.write(line)
f.close()
f_new.close()


with语句

为了避免打开文件后忘记关闭,可以通过管理上下文,即:

 with open('log','r') as f:

如此方式,当with代码块执行完毕时,内部会自动关闭并释放文件资源。

在Python 2.7 后,with又支持同时对多个文件的上下文进行管理,即:

with open('log1') as obj1, open('log2') as obj2:
    pass

例:注意换行(python规范:每行不超过80字符)写法:
with open('yesterday', 'r', encoding='utf-8') as f, \
        open('yesterday.bak', 'w', encoding='utf-8') as f_new:
    for line in f.readlines():
        if '有那么多肆意的快乐等我享受' in line:
            line = line.replace('有那么多肆意的快乐等我享受', '有那么多肆意的快乐等whitesky享受')
        f_new.write(line)
import subprocess


def get_ptquery_result(cdbip,conn_user,pwd):
    ret = subprocess.run( '/usr/bin/pt-query-digest --processlist {} --user={} --password="{}" --port=3307 --run-time=10 --outliers Query_time:0.01:1000'.format(
          cdbip,conn_user,pwd), stdout=subprocess.PIPE, shell=True, timeout=20)
    # print('ret--------------------',ret)
    print('result======================\n',
          ret.stdout.decode(encoding="utf-8"))
    # with open('/tmp/b.txt', 'w+') as a:
    #     a.write(ret.stdout.decode(encoding="utf-8"))

if __name__ == '__main__':
    get_ptquery_result('10.1.3.127', 'root', 'tangcaijun')
字符编码与转换:
计算机最初编码ascii码,但是 不能存中文,只能存英文或特殊字符(英文字符占一个字节8位)
-----》1980年出来个gb2312(只能存7000多汉字)
--------》95年出来个gb18030(存2万多汉字)
--------》现在出来个gbk(windows中文的默认字符编码)
向上兼容--gbk兼容gb2312(windows默认编码gbk)
各个国家都有各自的字符编码,导致中国的软件放日本看乱码,为了解决跨国家的语言支持问题,
ISO搞了个----Unicode(中英文默认都占两个字节即16位),兼容各个国家语言的编码
但是过于浪费空间-------
又出来个UTF8,默认英文字符依然都按ascii码的形式存储,中文统一占3个字节
小结:python程序中所有不同字符集的转换都要经过unicode(中转,万能翻译)
在python2默认编码是ASCII, python3里默认是unicode(支持中文,所以不必在开头加utf-8声明了)
例:gbk转utf-8----》gbk-decode->unicode-encode->utf-8
例:
python2中:
#-*-coding:utf-8-*-
__author__ = 'Alex Li'
import sys
print(sys.getdefaultencoding())
msg = "我爱北京天安门"
msg_gb2312 = msg.decode("utf-8").encode("gb2312") #默认decode解码为unicode(中转,你懂得)
gb2312_to_gbk = msg_gb2312.decode("gbk").encode("gbk")
print(msg)
print(msg_gb2312)
print(gb2312_to_gbk)
输出:
ascii
我爱北京天安门
�Ұ������찲��
�Ұ������찲��
python3中:
#-*-coding:gb2312 -*- #这个也可以去掉
__author__ = 'Alex Li'
import sys
msg = "我爱北京天安门"
#msg_gb2312 = msg.decode("utf-8").encode("gb2312")
msg_gb2312 = msg.encode("gb2312") #默认就是unicode,不用再decode,喜大普奔
gb2312_to_unicode = msg_gb2312.decode("gb2312")
gb2312_to_utf8 = msg_gb2312.decode("gb2312").encode("utf-8")
print(sys.getdefaultencoding())
print(msg)
print(msg_gb2312)
print(gb2312_to_unicode)
print(gb2312_to_utf8)
输出:
utf-8
我爱北京天安门
b'\xce\xd2\xb0\xae\xb1\xb1\xbe\xa9\xcc\xec\xb0\xb2\xc3\xc5'
我爱北京天安门
b'\xe6\x88\x91\xe7\x88\xb1\xe5\x8c\x97\xe4\xba\xac\xe5\xa4\xa9\xe5\xae\x89\xe9\x97\xa8'
函数
局部变量:
1.函数中的变量称为局部变量,作用域只在函数中生效,除非强制声明 global var;
2.不同的函数,可以定义相同的名字的局部变量,但是各用个的不会产生影响;
3.局部变量的作用:为了临时保存数据需要在函数中定义变量来进行存储;

全局变量:
  在整个程序中都生效的变量,在程序的顶层定义的变量,既能在一个函数中使用,也能在其他的函数中使用;

注意:
1.生产中不要在函数中定义或更改全局变量,很难调试(函数可能在程序多处调用,改动之后逻辑混乱)【如果在函数中修改全局变量,那么就需要在修改前使用global 进行声明】
2.全局变量和局部变量名字相同时,局部变量的值会覆盖全局变量的值(强龙不压地头蛇)
3.字符串和数字在函数外定义,视为全局变量,在函数体内不能修改,列表和字典在函数外定义,在函数体内可以修改


函数return返回值的应用:
return作用(return 的后面可以是数值,也可是一个表达式):
1.返回值
2.结束函数,函数体中遇到return将不再往下运行
计算1~num的累积和
def calculate(num):
    result = 0
    count = 1
    while count <= num:
        result += count
        count += 1
    return result
result = calculate(100)
print(result)

函数返回多个值
def multi_return_val():
    return 100, 200

print(multi_return_val())
输出:(100, 200)   #本质是利⽤了元组


函数嵌套应用
1. 写一个函数打印一条横线
2. 打印自定义行数的横线

def print_line():
    print('------------------')


def print_num_line(num):
    for i in range(int(num)):
        print_line()

print_num_line(10)


1. 写⼀个函数求三个数的和
2. 写⼀个函数求三个数的平均值
def sum3num(a, b, c):
    return a+b+c


def cal_aver(a, b, c):
    outcome = sum3num(a, b, c)
    aver_out = outcome/3
    return aver_out

result = cal_aver(27, 27, 27)
print('average is %d' % result)


函数参数:
位置参数调用:与形参一一对应
关键字参数(关键字参数特点:带等号)调用:与形参顺序无关
记住一句话:关键字参数一定放在后边,不能写在位置参数之前,
顺序: def test_args(位置参数 -- 关键字参数 -- 默认参数 -- 可变参数(*arg,**arg)):    注意:*arg收集位置参数,**arg收集关键字参数


一:默认参数(缺省参数)
特点:可有可无
用途:
1.默认安装值(类似装软件时的一键安装的默认参数)
2.在一个连接数据库的函数中,可以设定默认端口

def printinfo(userID,servername='test_01',port=3306):
    print('userID:', userID)
    print('servername', servername)
    print('port', port)

printinfo(userID='3', servername='whisky')
print('\nthe following use default value:')
printinfo(userID='666')

输出:
userID: 3
servername whisky
port 3306

the following use default value:
userID: 666
servername test_01
port 3306

注意:带有默认值的参数⼀定要位于参数列表的最后⾯,否则报错:SyntaxError: non-default argument follows default argument


参数组(不定长参数):说白了就是批量传参(加了星号(*)的变量args会存放所有未命名的变量参数,args为元组;⽽加**的变量kwargs会存放命名参数,即形如key=value的参数, kwargs为字典)
作用:(把所有不固定的实参变成一个元组)函数在定义时没想好具体传几个参数,方便业务扩展
*args:接收N个位置参数传参转换成元组的形式(接收不到关键字参数)
**kwargs:接收N个关键字参数,转换成字典的形式(注意下它的两种传参方式)

元组和字典的传参方法:
def fun(a, b, *args, **kwargs):
    print('a = ', a)                  # 取传递到函数中的字典中的值
    print('b = ', b)
    print('args = ', args)
    print('kwargs = ', kwargs)
    for key, value in kwargs.items():
        print(key, "=", value)

c = (3, 4, 5)
d = {"m":6, "n":7, "p":8}
fun(1, 2, *c, **d)           # 注意元组与字典的传参方式
上面三行输出结果等同于fun(1, 2, 3, 4, 5, m=6, n=7, p=8)

fun(1, 2, c, d)             # 注意不加星号与上面的区别(传参时,带*表示传入元组,带**表示传入字典)

输出:
a =  1
b =  2
args =  (3, 4, 5)
kwargs =  {'m': 6, 'p': 8, 'n': 7}
m = 6
p = 8
n = 7

a =  1
b =  2
args =  ((3, 4, 5), {'m': 6, 'p': 8, 'n': 7})
kwargs =  {}


**kwargs:把N个关键字参数,转换成字典的方式:
def test1(*kwargs):
    print(kwargs)

test1(*(1, 2, 3))              # 输出(1, 2, 3)
#等同于
tuple = (1, 2, 3)    # 定义一个元组
test1(*tuple)                  # 输出(1, 2, 3)


def test2(**kwargs):
    print(kwargs)
    print(kwargs['port'])                 # 取传递到函数中的字典中的值
    print(kwargs['user'])
    print(kwargs['ip'])
dicto = {'port': 80, 'user': 'root', 'ip': '192.168.2.1'}
test2(**dicto)
# 等同于
test2(port=80, user='root', ip='192.168.2.1')
# 等同于
test2(**{'port': 80, 'user': 'root', 'ip': '192.168.2.1'})

# 三次函数调用输出结果一致:
# {'ip': '192.168.2.1', 'port': 80, 'user': 'root'}
# 80
# root
# 192.168.2.1


递归函数(嵌套函数,多次调用自身):
例1:
def calc(n):
    print(n)
    if n < 10:     # 限制条件,防止无限递归
       return calc(n+1)
calc(0)
例2:求阶乘
def calc(num):
    if num > 1:
        result = num * calc(num-1)
    else:
        result = 1
    print(num)
    print(result)
    return result

ret = calc(3)
print(ret)
 1 # 输出斐波那契数列第十个数字
 2 # 0 1 1 2 3 5 8 13 21 34 55 89
 3
 4
 5 def func(count, a, b):
 6     if count == 10:
 7         return b
 8     c = a + b
 9     a = b
10     b = c
11     return func(count+1, a, b)
12
13 r = func(1, 0, 1)
14 print(r)
15
16 '''
17 1 0 1
18 2 1 1
19 3 1 2
20 4 2 3
21 5 3 5
22 6 5 8
23 7 8 13
24 8 13 21
25 9 21 34
26 10 34 55
27 11 55 89
28 '''
递归小结:不断的调用自身,函数逐层调用自身(此时函数不退出),再逐层返回
匿名函数
用lambda关键词能创建小型匿名函数。这种函数得名于省略了用def声明函数的标准步骤

lambda函数的语法只包含一个语句,如下:
      lambda [arg1 [,arg2,.....argn]]:expression

a = lambda arg1, arg2: arg1 * arg2

print('value is: ', a(2, 3333))


匿名函数应用:
1.作为内置函数的参数

例:给出一个字典,分别按名字,年龄排序
stus = [
{"name": "zhangsan", "age": 18},
{"name": "lisi", "age": 19},
{"name": "wangwu", "age": 17}
]
name = lambda n: n['name']
age = lambda n: n['age']

stus.sort(key=name)
print('sort by name: ', stus)
#输出:sort by name:  [{'age': 19, 'name': 'lisi'}, {'age': 17, 'name': 'wangwu'}, {'age': 18, 'name': 'zhangsan'}]

stus.sort(key=age)
print('sort by age: ', stus)
#输出:sort by age:  [{'age': 17, 'name': 'wangwu'}, {'age': 18, 'name': 'zhangsan'}, {'age': 19, 'name': 'lisi'}]


2.自己定义函数
例:
def fun(a, b, c):
    print('a: ', a)
    print('b: ', b)
    print('result: ', c(a, b, 8))

fun(2, 3, lambda i, j, g: i**j+g)

输出:
a: 2
b: 3
result: 16
l = [(lambda x: x*2), lambda y: y*3]
for i in l:
    print(i(4))
stus = [不带参数的lambda表达式:
{"name": "zhangsan", "age": 18},
{"name": "lisi", "age": 19},
{"name": "wangwu", "age": 17}
]
name = lambda n: n['name']
age = lambda n: n['age']
for i in name:
lambda 还是有以下优势的:
1. 省去定义函数的过程,快速定义单行的最小函数,让代码更加精简
2. 不需要复用的函数,无须定义函数名称
3. 和 filter map reduce 结合使用
补充:
lambda:x 相当于
View Code
def xo():
return x
 1 # 不带参数的lambda:
 2
 3 def count():
 4     fs = []
 5     for i in range(1, 4):
 6         def f(i):
 7             return lambda : i*i
 8         fs.append(f(i))
 9     return fs
10
11 f1, f2, f3 = count()
12 print(f1(), f2(), f3())
13
14
15 def f(i):
16     return lambda: i * i
17
18 a = f(2)
19 print(a())
1 def lam():
2     return 6666
3
4 a = lambda : lam()
5
6 print(a())  # 6666
filter 函数:
filter 函数会对指定序列执行过滤操作,filter(function or None, sequence) -> filter object (list, tuple, or string in 2.x)
filter 函数会对序列(如列表)参数 sequence 中的每个元素调用 function 函数,最后返回的结果包含调用结果为True的元素
注意:3.x 返回的是一个filter object (后续的函数map也是返回object),要加上list()等类型转换;而之前 2.x 版本的返回值类型和参数sequence的类型相同

例1:
 l = [1, 2, 3, 4, 5, 6, 7, 8, 9, 10]
l1 = filter(lambda x: x % 2 == 0, l)
 l1 = list(filter(lambda x: x % 2 == 0, l))  # 在此处可以直接转换filter函数的结果
print(list(l1))

输出:[2, 4, 6, 8, 10]
例2:
def f1(x):
    if x >22:
        return True
    else:
        return False
ret = filter(f1,[11,22,33])   #调用函数对象,并非执行函数,所以f1无需加括号
# 默认处理结果返回是一个类,需要迭代打印,因为浪费内存。 可以用next迭代取值。 或者for循环 循环依次取出
print(next(ret))
  print(list(ret))
filter的实现原理:
 1 #filter 实现
 2 def myfilter(fuc,seq):
 3     new_li = []
 4     for i in seq:
 5         #print(i)
 6         ret = fuc(i)
 7         if ret:
 8             new_li.append(i)
 9     return new_li
10 def f1(x):
11     if x > 22:
12         return True
13     else:
14         return False
15 li = [11,22,33,44]
16 new=myfilter(f1,li)
17 print(new)
map 函数
 map 函数会对指定序列做映射操作,map(function or None, sequence) ->  map object (list, tuple, or string in 2.x)
 map 函数会对序列参数 sequence 中的每个元素调用 function 函数,返回的结果为每一个元素调用function函数的返回值
l = [1, 2, 3]
l = list(map(lambda x: x**2, l))
print(l)
输出:[1, 4, 9]

实现原理:
1 def mymap(func, seq):
2     li = []
3     for i in seq:
4         ret = func(i)
5         li.append(ret)
6     print(li)
7
8 mymap(lambda x: x + 100, [1, 2, 3])
9 #输出:[101, 102, 103]
例:
1 li = [11, 22, 33, 44]
2
3 def x(arg):
4     return arg + 100
5
6 r = map(x, li)   # 在python 2.x中,直接print r 输出结果,py3 中返回一个迭代器对象
7 for i in r:
8     print(i)
输出:111 122 133 144
reduce 函数
注意:reduce 函数在 3.x 版本不是内建函数了,reduce()函数已经被从全局名字空间里移除了,它现在被放置在fucntools模块里,用的话要 先引入
from functools import reduce
reduce 函数会对指定序列做迭代操作,reduce(function, sequence[, initial]) -> value
reduce 函数中的function参数是一个有两个参数的函数,reduce依次从 sequence 中取一个元素,和上一次调用 function 的结果做参数再次调用function。


from functools import reduce                # 3.x 版本须引入
def sum(x,y):
    return x+y
l = [1, 2, 3, 4, 5, 6]
l = reduce(sum, l)
print(l)    # 结果21

结合lambda
from functools import reduce

l = [1, 2, 3, 4, 5, 6]
l = reduce(lambda x, y: x+y, l)
print(l)            # 结果21
help(reduce)
1 首先介绍一下 sorted() 函数:

输入代码:print(help(sorted)), 查看函数用法

输出为:
Help on built-in function sorted in module builtins:

sorted(iterable, key=None, reverse=False)
    Return a new list containing all items from the iterable in ascending order.
    A custom key function can be supplied to customize the sort order, and the
    reverse flag can be set to request the result in descending order.


sorted(iterable, key=None, reverse=False) , 返回一个有序的列表

iterable , 一个可以迭代的对象

key , 用来比较的对象,可以省略

reverse , 指定是否颠倒,即是否逆序,默认是正序, 可以省略

2 使用 sorted 对字典排序,注意字典的键key值都是同类型的

test = {1: "a", 3: "d", 6: "g", 2: "c", 5: "e", 0: "f", 4: 'b'}


# 对字典的key值列表排序,返回列表

print(sorted(test.keys()))

# 对字典的键值对元组列表排序,按元组的第1个元素排序,也就是 key

# 返回的是一个元组列表

print(sorted(test.items(), key=lambda obj: obj[0]))


# 对字典的键值对元组列表排序,按元组的第2个元素排序,也就是 value
# 返回的是一个元组列表
print(sorted(test.items(), key=lambda obj: obj[1]))


输出结果为:
[0, 1, 2, 3, 4, 5, 6]
[(0, 'f'), (1, 'a'), (2, 'c'), (3, 'd'), (4, 'b'), (5, 'e'), (6, 'g')]
[(1, 'a'), (4, 'b'), (2, 'c'), (3, 'd'), (5, 'e'), (0, 'f'), (6, 'g')]

如果要反序,添加 reverse=True 即可, 如:sorted(test.keys(), reverse=True)


3 使用 OrderedDict 对字典排序
from collections import OrderedDict


test = {1: "a", 3: "d", 6: "g", 2: "c", 5: "e", 0: "f", 4: 'b'}


# 普通 dict 插入元素时是无序的,使用 OrderedDict 按元素插入顺序排序

# 对字典按key排序, 默认升序, 返回 OrderedDict

def sort_key(old_dict, reverse=False):

    """对字典按key排序, 默认升序, 不修改原先字典"""

    # 先获得排序后的key列表

    keys = sorted(old_dict.keys(), reverse=reverse)

    # 创建一个新的空字典

    new_dict = OrderedDict()

    # 遍历 key 列表

    for key in keys:

        new_dict[key] = old_dict[key]

    return new_dict


# 对字典按 value 排序,默认升序, 返回 OrderedDict

def sort_value(old_dict, reverse=False):

    """对字典按 value 排序, 默认升序, 不修改原先字典"""

    # 获取按 value 排序后的元组列表

    items = sorted(old_dict.items(), key=lambda obj: obj[1], reverse=reverse)

    # 创建一个新的空字典

    new_dict = OrderedDict()

    # 遍历 items 列表

    for item in items:

        # item[0] 存的是 key 值

        new_dict[item[0]] = old_dict[item[0]]

    return new_dict


print(sort_key(c))

print(sort_value(c))


输出结果为:


OrderedDict([(0, 'f'), (1, 'a'), (2, 'c'), (3, 'd'), (4, 'b'), (5, 'e'), (6, 'g')])

OrderedDict([(1, 'a'), (4, 'b'), (2, 'c'), (3, 'd'), (5, 'e'), (0, 'f'), (6, 'g')])


使用 OrderedDict 可以保证元素按插入顺序排序,如果修改上面函数:


# 创建一个新的空字典

new_dict = {}

这样创建的就是一个普通字典,虽然之前已经对key或value排好序了,但是插入的时候还是无序的,所以没作用。

简化使用 OrderedDict :


from collections import OrderedDict


test = {1: "a", 3: "d", 6: "g", 2: "c", 5: "e", 0: "f", 4: 'b'}


print(OrderedDict(sorted(test.items(), key=lambda obj: obj[0])))

print(OrderedDict(sorted(test.items(), key=lambda obj: obj[1])))


输出结果还是和之前一样:

OrderedDict([(0, 'f'), (1, 'a'), (2, 'c'), (3, 'd'), (4, 'b'), (5, 'e'), (6, 'g')])

OrderedDict([(1, 'a'), (4, 'b'), (2, 'c'), (3, 'd'), (5, 'e'), (0, 'f'), (6, 'g')])
http://python.jobbole.com/85124/