私有Chart仓库搭建以及使用CodePipeline部署Chart到Kubernetes集群的实践
阿里云Kubernetes服务已经内置提供了Helm/Chart支持,可以直接使用。参考文档:https://help.aliyun.com/document_detail/58587.html
搭建私有Chart仓库
本文主要演示使用阿里云OSS Bucket和阿里云容器服务提供的ChartMuseum应用搭建私有Chart仓库的过程。
申请OSS Bucket
为了保证chart存储的高可用,可漂移,这里使用oss作为chart文件存储的载体。
安装ChartMuseum
在阿里云Kubernetes服务的应用目录页面找到chartmuseum并选择安装此chart。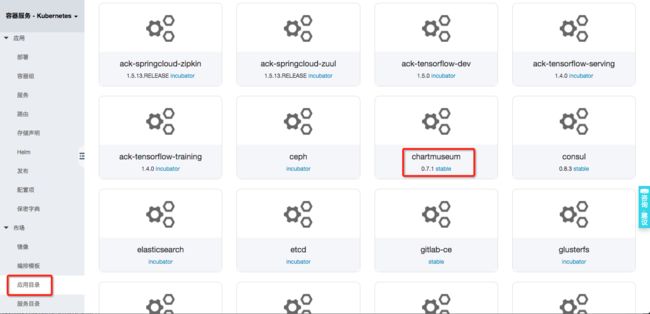
这里需要修改一些默认的values配置:
env:
  open:
    # storage backend, can be one of: local, alibaba, amazon, google, microsoft
    STORAGE: alibaba
    # oss bucket to store charts for alibaba storage backend
    STORAGE_ALIBABA_BUCKET: codepipeline-chart-demo
    # prefix to store charts for alibaba storage backend
    STORAGE_ALIBABA_PREFIX:
    # oss endpoint to store charts for alibaba storage backend
    STORAGE_ALIBABA_ENDPOINT: oss-cn-beijing.aliyuncs.com

    ALIBABA_CLOUD_ACCESS_KEY_ID: xxxxxxxxxx
    ALIBABA_CLOUD_ACCESS_KEY_SECRET: xxxxxxxxxx
DISABLE_API 设置为false 这样能打开API 请求。
DISABLE_API: falseChartmuseum 可以打开basic auth,保护私有chart。这里就可以设置用户名密码,后面会使用这个用户名密码来 Push或者Pull chart。
  secret:
    # username for basic http authentication
    BASIC_AUTH_USER: admin
    # password for basic http authentication
    BASIC_AUTH_PASS: xxxxxx
本示例使用LoadBalancer的方式暴露Service,配置如下:
service:
  type: LoadBalancer
  externalPort: 8080
  nodePort:
  annotations: {}
配置好以后就可以创建这个应用。
至此,私有Chart仓库就创建好了。浏览器访问ChartMuseum服务http://xx.xx.xx.xx:8080,输入用户名密码登录后显示如下:
上传Chart文件到私有仓库
Helm Client的安装可以参考云栖社区博客:https://yq.aliyun.com/articles/159601
安装helm plugin
本示例使用helm plugin来实现chart上传,plugin 地址https://github.com/chartmuseum/helm-push, 安装方式如下:
helm plugin install https://github.com/chartmuseum/helm-pushHelm初始化及repo设置
初始化:
$ helm init --client-only --stable-repo-url https://kubernetes.oss-cn-hangzhou.aliyuncs.com/charts
Creating /root/.helm
Creating /root/.helm/repository
Creating /root/.helm/repository/cache
Creating /root/.helm/repository/local
Creating /root/.helm/plugins
Creating /root/.helm/starters
Creating /root/.helm/cache/archive
Creating /root/.helm/repository/repositories.yaml
Adding stable repo with URL: https://kubernetes.oss-cn-hangzhou.aliyuncs.com/charts
Adding local repo with URL: http://127.0.0.1:8879/charts
$HELM_HOME has been configured at /root/.helm.
Not installing Tiller due to 'client-only' flag having been set
Happy Helming!
添加repo:
$ helm repo add codepipeline-chartmuseum http://xx.xx.xx.xx:8080 --username admin --password xxxxxx
"codepipeline-chartmuseum" has been added to your repositories
更新和查看repo:
$ helm repo update
Hang tight while we grab the latest from your chart repositories...
...Skip local chart repository
...Successfully got an update from the "codepipeline-chartmuseum" chart repository
...Successfully got an update from the "stable" chart repository
Update Complete. ⎈ Happy Helming!⎈

$ helm repo list
NAME                        URL
stable                      https://kubernetes.oss-cn-hangzhou.aliyuncs.com/charts
local                       http://127.0.0.1:8879/charts
codepipeline-chartmuseum    http://xx.xx.xx.xx:8080
上传chart到私有仓库
本示例提供了一个简单的java应用的源码示例,下载地址:
$ git clone https://code.aliyun.com/CodePipeline/kubernetes-helm-deploy-demo.git$ cd kubernetes-helm-deploy-demo/codepipeline-helm-java-demo
$ tree
├── Chart.yaml
├── templates
│ ├── deployment.yaml
│ ├── _helpers.tpl
│ ├── ingress.yaml
│ ├── NOTES.txt
│ └── service.yaml
└── values.yaml
1 directory, 7 fileshelm package对chart进行打包:
$ helm package .
Successfully packaged chart and saved it to: /kubernetes-helm-deploy-demo/codepipeline-helm-java-demo/codepipeline-helm-java-demo-0.1.0.tgz
上传chart:
$ helm push codepipeline-helm-java-demo-0.1.0.tgz codepipeline-chartmuseum
Pushing codepipeline-helm-java-demo-0.1.0.tgz to codepipeline-chartmuseum...
Done.
查看私有仓库中是否有我们上传的chart:
$ helm search codepipeline-helm-java-demo
NAME                                                  CHART VERSION    APP VERSION    DESCRIPTION
codepipeline-chartmuseum/codepipeline-helm-java...    0.1.0            1.0            A Helm chart for Kubernetes
local/codepipeline-helm-java-demo                     0.1.0            1.0            A Helm chart for Kubernetes
使用CodePipeline安装、重装、升级Helm应用
进入CodePipeline主页,创建名为test-helm的作业,进入配置页面,增加构建步骤选择Helm部署Kubernetes,并配置各个参数项如下: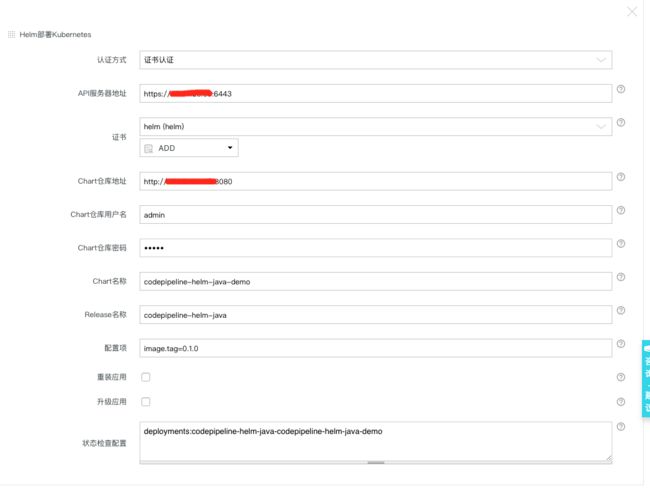
各个参数项说明如下:
| 参数项 | 说明 |
|---|---|
| 认证方式 | 选择认证方式 |
| API服务器地址 | Kubernetes集群API Server地址 |
| 证书 | Kubernetes集群认证证书 |
| Chart仓库地址 | 请输入私有Chart仓库地址,例如http://xx.xx.xx.xx:8080。 |
| Chart仓库用户名 | 请输入私有Chart仓库的用户名,若无用户名密码则置空。 |
| Chart仓库密码 | 请输入私有Chart仓库的密码,若无用户名密码则置空。 |
| Chart名称 | 请输入要部署的Chart名称。 |
| Release名称 | 请输入部署的Chart的Release名称。 |
| 配置项 | 请输入要部署的Chart的参数项。多个参数项请用逗号隔开。 |
| 重装应用 | 请选择是否重新安装Chart。 |
| 升级应用 | 请选择是否升级Chart, 可以用来升级Chart版本或更改已部署的Release的参数项。 |
| 状态检查配置 | 支持检验的 Kubernetes Kind:pods,daemonsets,deployments,replicasets,replicationcontrollers,statefulsets。 |
本示例中,我们在部署codepipeline-helm-java-demo chart的时候设置了使用镜像tag为0.1.0的镜像,构建日志如下: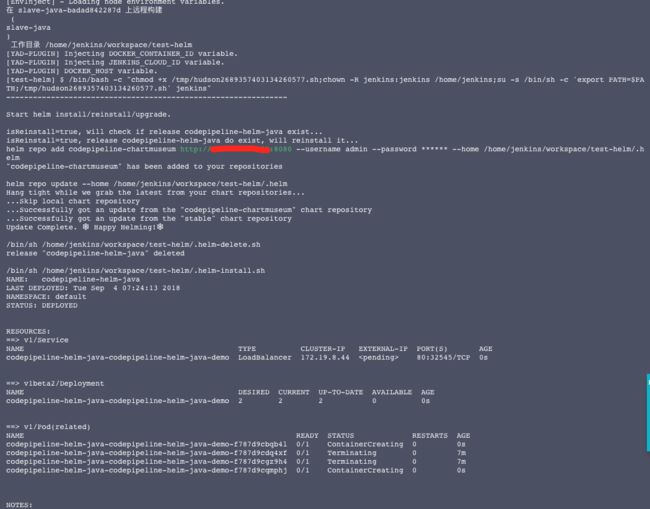
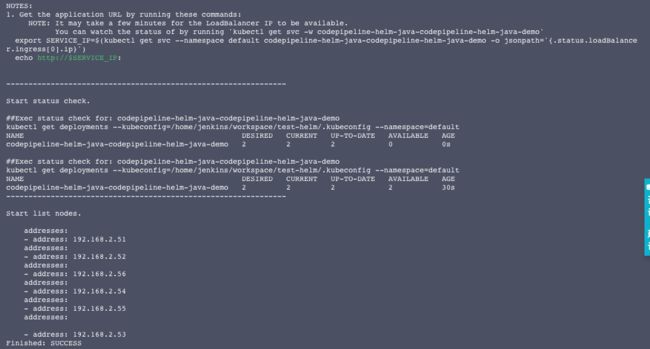
浏览器访问服务http://xx.xx.xx.xx/demo/打印信息为:
Hello World!
若需要重新部署则勾选“重装应用”选项, CodePipeline会先检测名为“codepipeline-helm-java”的Release是否存在, 若存在则先删除再安装, 若不存在则直接安装。
注意,“重装应用”选项会覆盖“升级应用”选项的设置, 如果需要做升级操作, 请确保“重装应用选项没有被勾选”。
若需要升级Chart或者更改values参数项, 则需要勾选“升级应用”选项。例如,我需要更新codepipeline-helm-java-demo应用使用的镜像tag为0.2.0,则CodePipeline的项目配置如下: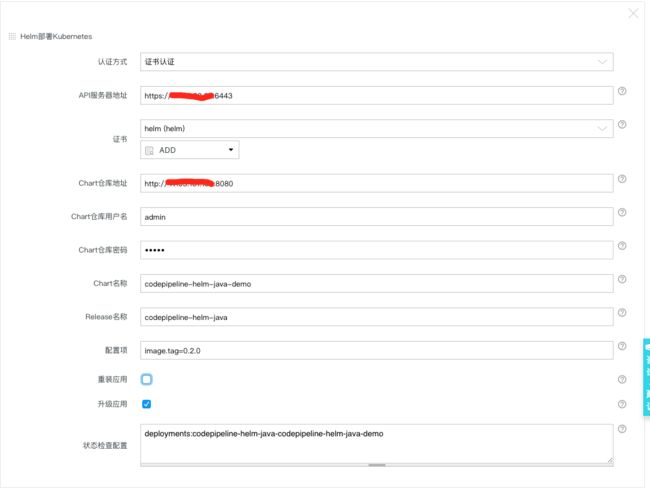
浏览器访问服务http://xx.xx.xx.xx/demo/打印信息为:
Hello CodePipeline!
使用阿里云容器服务团队提供的公共Chart仓库部署Kubernetes应用
阿里云容器服务团队提供的公共Chart仓库地址为:
https://kubernetes.oss-cn-hangzhou.aliyuncs.com/charts
我们以部署wordpress应用到Kubernetes集群为例, CodePipeline作业配置如下: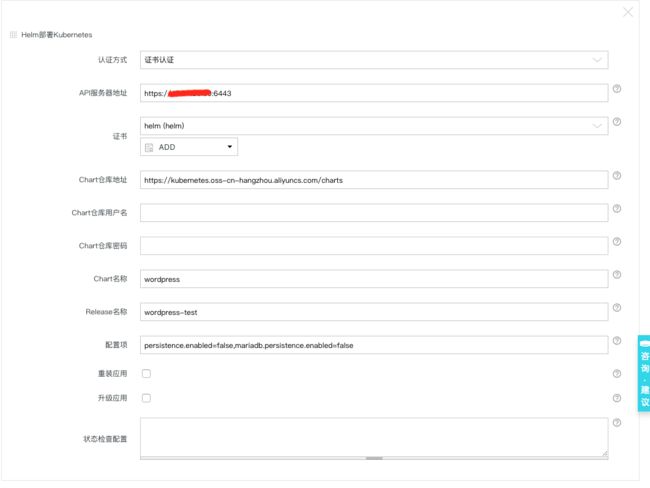
可以在浏览器上看到熟悉的WordPress站点:
总结
Helm项目提供了一个统一软件打包方式,支持版本控制,可以大大简化Kubernetes应用分发与部署中的复杂性。 CodePipeline通过开发插件的形式集成和支持Helm自动化部署应用到Kubernetes集群的能力。
了解更多CodePipeline内容,请访问https://www.aliyun.com/product/codepipeline;
了解更多阿里云容器服务内容,请访问 https://www.aliyun.com/product/containerservice