2019独角兽企业重金招聘Python工程师标准>>> 
Flume简介
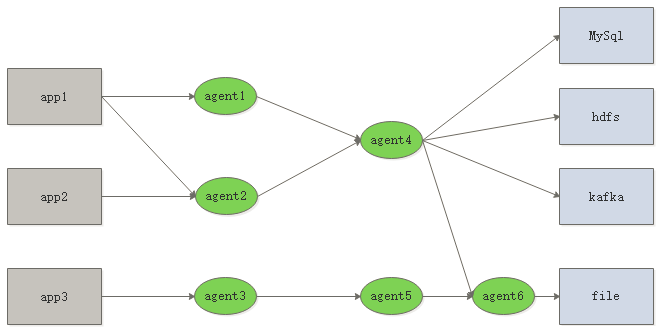
一款分布式的海量应用日志采集、聚合、传输的框架,支持配置多种数据发送方与接收方,具有高可用、高可靠的特性。比如可以同时从文件目录、log4j、http、avro、kafka等渠道收集日志,通过传输输出到kafka、hdfs、MySQL、文件等。在传输过程中可以对数据做简单处理。
应用架构
单个agent
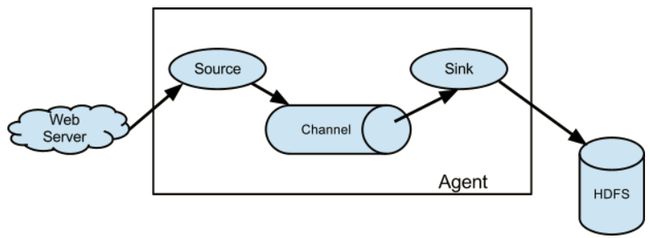
flume的核心是agent,而agent包含source、channel、sink三个组件。
source:source组件是专门用来收集数据的,可以处理各种类型、各种格式的日志数据,包括avro、thrift、exec、jms、spooling directory、netcat、sequence generator、syslog、http、legacy、自定义。
channel:source组件把数据收集来以后,临时存放在channel中,即channel组件在agent中是专门用来存放临时数据的——对采集到的数据进行简单的缓存,可以存放在memory、jdbc、file等等。
sink:sink组件是用于把数据发送到目的地的组件,目的地包括hdfs、logger、avro、thrift、ipc、file、null、hbase、solr、自定义
工作流程:flume把数据从数据源(source)收集过来,再将数据送到指定的目的地(sink)。为保证传输的过程一定成功,在送到目的地(sink)之前,会先缓存数据(channel),待数据真正到达目的地(sink)后,flume再删除自己缓存的数据。 在整个数据的传输的过程中,流动的是event(基本单位),因此事务保证是在event级别进行的。
event:event将传输的数据进行封装,是flume传输数据的基本单位,如果是文本文件,通常是一行记录。event也是事务的基本单位。event在单个agent中经历source—channel—sink过程,后面可能输出到下一个agent或者flume外的系统中。event本身为一个字节数组,其携带headers(头信息)信息,消息体,消息内容
从上面图中可以看出flume支持多级的成网状数据流动,非常的灵活好用,这应该就是flume广泛使用原因吧。比如数据扇入到同一个agent或者扇出到多个agent。
安装
1.安装jdk,1.6版本以上
2.上传flume的安装包
3.解压安装
4.在conf目录下,创建一个配置文件,比如:template.conf(名字可以不固定,后缀也可以不固定)
使用举例
建议多看官方文档,而且随着flume版本变化,下面的配置可能针对你的版本会不能生效,甚至抛异常
基本配置
spooldir source
source来源为一个目录,flume会检测目录下新增的文件,将文件的内容通过logger打印到控制台上,channel为内存
vi flume-dir.conf
#先配置单通道,定义source,channel,sink,它们分别都可以配置多份,比如n个channel和n个sink
#a1 是该agent的名字,在启动的时候需要指定agent的名字
a1.sources=r1
a1.channels=c1
a1.sinks=s1

##############配置source###################
#source的类型
a1.sources.r1.type=spooldir
#spooldir类型的source监控的目录
a1.sources.r1.spoolDir=/home/hadoop/data/flume
#0.0.0.0表示本机
a1.sources.r1.bind=0.0.0.0
#使用的端口
a1.sources.r1.port=44445

#指定sink类型
a1.sinks.s1.type=logger

#指定channel类型
a1.channels.c1.type=memory
#buffer可以保存多少个event
a1.channels.c1.capacity=1000
#事务一次可以处理多少个event
a1.channels.c1.transactionCapacity=100

#三个核心组件的绑定
a1.sources.r1.channels=c1
a1.sinks.s1.channel=c1
启动:./flume-ng agent -n a1 -c ../conf -f ../conf/flume-dir.conf -Dflume.root.logger=INFO,console
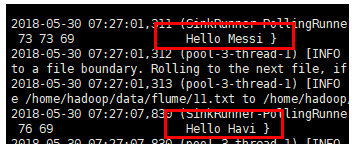
在/home/hadoop/data/flume目录下新增文件
echo Hello Messi > 11.txt
echo Hello Havi > 22.txt
观察结果
http source
#先配置单通道
a1.sources=r1
a1.channels=c1
a1.sinks=s1

##############配置source###################
a1.sources.r1.type=http
#0.0.0.0表示本机
a1.sources.r1.port=44445

a1.sinks.s1.type=logger

a1.channels.c1.type=memory
#buffer可以保存多少个event
a1.channels.c1.capacity=1000
#事务一次可以处理多少个event
a1.channels.c1.transactionCapacity=100

#三个核心组件的绑定
a1.sources.r1.channels=c1
a1.sinks.s1.channel=c1
启动:./flume-ng agent -n a1 -c ../conf -f ../conf/flume-http.conf -Dflume.root.logger=INFO,console
测试方法与上面类似,需要构造http请求
curl -X POST -d '[{"headers":{"a":"a1","b":"b1"},"body":"hello Messi"}]' http://0.0.0.0:44445

avro source
avro source一般用在扇入场景,可以使用./flume-ng avro-client -H 0.0.0.0 -p 44445 -F ./1.txt -c ../conf 客户端测试
avro是一种序列化和rpc框架
#先配置单通道
a1.sources=r1
a1.channels=c1
a1.sinks=s1

##############配置source###################
a1.sources.r1.type=avro
#0.0.0.0表示本机
a1.sources.r1.bind=0.0.0.0
a1.sources.r1.port=44445

a1.sinks.s1.type=logger

a1.channels.c1.type=memory
#buffer可以保存多少个event
a1.channels.c1.capacity=1000
#事务一次可以处理多少个event
a1.channels.c1.transactionCapacity=100

#三个核心组件的绑定
a1.sources.r1.channels=c1
a1.sinks.s1.channel=c1
启动:./flume-ng agent -n a1 -c ../conf -f ../conf/flume-avro.conf -Dflume.root.logger=INFO,console
准备测试文件:echo 111111 > 1.txt
测试:./flume-ng avro-client -H 0.0.0.0 -p 44445 -F ./1.txt -c ../conf

avro sink
#先配置单通道
a1.sources=r1
a1.channels=c1
a1.sinks=s1

##############配置source###################
a1.sources.r1.type=netcat
#0.0.0.0表示本机
a1.sources.r1.bind=0.0.0.0
a1.sources.r1.port=44444

a1.sinks.s1.type=avro
a1.sinks.s1.hostname=192.168.245.142
a1.sinks.s1.port=44445

a1.channels.c1.type=memory
#buffer可以保存多少个event
a1.channels.c1.capacity=1000
#事务一次可以处理多少个event
a1.channels.c1.transactionCapacity=100

#三个核心组件的绑定
a1.sources.r1.channels=c1
a1.sinks.s1.channel=c1
avro sink扇出
#先配置单通道
a1.sources=r1
a1.channels=c1 c2
a1.sinks=s1 s2

##############配置source###################
a1.sources.r1.type=netcat
#0.0.0.0表示本机
a1.sources.r1.bind=0.0.0.0
a1.sources.r1.port=44444

a1.sinks.s1.type=avro
a1.sinks.s1.hostname=192.168.245.142
a1.sinks.s1.port=44445

a1.sinks.s2.type=avro
a1.sinks.s2.hostname=192.168.245.142
a1.sinks.s2.port=44446

a1.channels.c1.type=memory
#buffer可以保存多少个event
a1.channels.c1.capacity=1000
#事务一次可以处理多少个event
a1.channels.c1.transactionCapacity=100

a1.channels.c2.type=memory
#buffer可以保存多少个event
a1.channels.c2.capacity=1000
#事务一次可以处理多少个event
a1.channels.c2.transactionCapacity=100

#三个核心组件的绑定
a1.sources.r1.channels=c1 c2
a1.sinks.s1.channel=c1
a1.sinks.s2.channel=c2
输出到hdfs
#先配置单通道
a1.sources=r1
a1.channels=c1
a1.sinks=s1

##############配置source###################
a1.sources.r1.type=netcat
#0.0.0.0表示本机
a1.sources.r1.bind=0.0.0.0
a1.sources.r1.port=44444

a1.sinks.s1.type=hdfs
a1.sinks.s1.hdfs.path=hdfs://192.168.245.150:9000/flume
a1.sinks.s1.hdfs.fileType=DataStream
#在实际生产中要非常注意这三个值的设定,一定要避免生成的文件不要太小,否则hadoop的性能发挥不出来
#单位是秒,如果设置为0,表示该配置不生效
a1.sinks.s1.rollInterval=60
#单位是字节,如果设置为0,表示该配置不生效
a1.sinks.s1.rollSize=1024
#记录行数,如果设置为0,表示该配置不生效
a1.sinks.s1.rollCount=0

a1.channels.c1.type=memory
#buffer可以保存多少个event
a1.channels.c1.capacity=1000
#事务一次可以处理多少个event
a1.channels.c1.transactionCapacity=100

#三个核心组件的绑定
a1.sources.r1.channels=c1
a1.sinks.s1.channel=c1
还有很多很多的source,channel,sink,他们之间可以相互组合使用,在生产中根据实际场景进行选择,这里就不一一列举了,可以在官方网址查看,都有例子
http://flume.apache.org/FlumeUserGuide.html#flume-sources
http://flume.apache.org/FlumeUserGuide.html#flume-sinks
http://flume.apache.org/FlumeUserGuide.html#flume-channels
Channel选择器
replicating selector
a1.sources.r1.selector.type=replicating
a1.sources.r1.selector.optional=c1
如果没有配置selector,flume默认配置的selector就是replicating
replicating表示同一个数据源的数据每个channel都会发送一份,如果要忽略某个发送失败的channel,可以通过a1.sources.r1.selector.optional指定。比如当接入flume中的某一个分支对数据要求没有那么严格,就可以将其配置到optional当中。还可以使用这种方式+监控来做高可用
#先配置单通道
a1.sources=r1
a1.channels=c1 c2 c3
a1.sinks=s1 s2 s3

##############配置source###################
a1.sources.r1.type=spooldir
a1.sources.r1.spoolDir=/home/hadoop/data/flume
#0.0.0.0表示本机
a1.sources.r1.bind=0.0.0.0
a1.sources.r1.port=44445
a1.sources.r1.selector.type=replicating
a1.sources.r1.selector.optional=c1

a1.sinks.s1.type=logger
a1.sinks.s2.type=logger
a1.sinks.s3.type=logger

a1.channels.c1.type=memory
a1.channels.c2.type=memory
a1.channels.c3.type=memory
#buffer可以保存多少个event
a1.channels.c1.capacity=1000
#事务一次可以处理多少个event
a1.channels.c1.transactionCapacity=100

#三个核心组件的绑定
a1.sources.r1.channels=c1 c2 c3
a1.sinks.s1.channel=c1
a1.sinks.s2.channel=c2
a1.sinks.s3.channel=c3
启动:
../bin/flume-ng agent -n a1 -c ./ -f ./flume-dir-replicate-selector.conf -Dflume.root.logger=INFO,console
创建新文件
echo 123abchahah > 3.txt
multiplexing selector
根据头信息中的字段做匹配,可以将指定内容发送到指定通道对应的sink上,实现数据的路由发送,就像rabbitMQ中的路由模式或者主题模式
#配置Agent a1 的组件
a1.sources=r1
a1.sinks=s1 s2
a1.channels=c1 c2

#描述/配置a1的source1
a1.sources.r1.type=http
a1.sources.r1.port=8888
a1.sources.r1.selector.type=multiplexing
a1.sources.r1.selector.header=state
a1.sources.r1.selector.mapping.cn=c1
a1.sources.r1.selector.mapping.us=c2
a1.sources.r1.selector.default=c2

#描述sink
a1.sinks.s1.type=logger
a1.sinks.s2.type=logger

#描述内存channel
a1.channels.c1.type=memory
a1.channels.c1.capacity=1000
a1.channels.c1.transactionCapacity=100

a1.channels.c2.type=memory
a1.channels.c2.capacity=1000
a1.channels.c2.transactionCapacity=100

#位channel 绑定 source和sink
a1.sources.r1.channels=c1 c2
a1.sinks.s1.channel=c1
a1.sinks.s2.channel=c2
启动:
../bin/flume-ng agent -n a1 -c ./ -f ./flume-dir-multi-selector.conf -Dflume.root.logger=INFO,console
测试:
curl -X POST -d '[{"headers":{"cn":"c1"},"body":"hello Messi"}]' http://0.0.0.0:8888
如果想数据输出到c2,那么执行
curl -X POST -d '[{"headers":{"us":"c2"},"body":"hello Messi"}]' http://0.0.0.0:8888
输出结果:只会有一个通道会输出数据

为了更好的观测结果,可以配置avro sink将数据发送给flume中的下一个agent
序列化器
一般不需要设置,都使用默认配置,但是在生产当中为了解决数据格式与默认的序列化器不匹配问题,可以采用两种方式: 1.在输入flume采集之前,将数据格式调整为与序列化器匹配的格式
2.自定义序列化器,在flume采集的时候就自动做格式转换,参考Flume自定义Hbase Sink的EventSerializer序列化类
拦截器配置
Timestamp
在头信息里面包含timestamp键值对
在multiplexing selector对应的配置文件中增加如下配置
#配置拦截器
a1.sources.r1.interceptors=i1
a1.sources.r1.interceptors.i1.type=timestamp
启动与测试与multiplexing selector一样
输出:
![]()
host
在头信息里面包含host键值对
按照如下的配置对timestamp的配置文件做相应修改
#配置拦截器
a1.sources.r1.interceptors=i1 i2
a1.sources.r1.interceptors.i1.type=timestamp
a1.sources.r1.interceptors.i2.type=host
#true表示用ip,否则是host
a1.sources.r1.interceptors.i2.useIP=true
启动与测试与multiplexing selector一样
输出:
![]()
static
在头信息中增加一静态的键值对,键和值都是在配置文件中指定
#配置拦截器
a1.sources.r1.interceptors=i1 i2 i3
a1.sources.r1.interceptors.i1.type=timestamp
a1.sources.r1.interceptors.i2.type=host
#true表示用ip,否则是host
a1.sources.r1.interceptors.i2.useIP=true
a1.sources.r1.interceptors.i3.type=static
a1.sources.r1.interceptors.i3.key=mykey
a1.sources.r1.interceptors.i3.value=myvalue
配置中我增加了一对mykey:myvalue的健值,在输出结果里面即为:
Event: { headers:{host=192.168.245.141, mykey=myvalue, us=c2, timestamp=1527748087208} body: 68 65 6C 6C 6F 20 4D 65 73 73 69 hello Messi }
remove
是flume1.7后增加的特性,这里只是列一下配置,没有做测试,功能是把前面增加的static拦截器输出的mykey:myvalue去掉
#配置拦截器
a1.sources.r1.interceptors=i1 i2 i3 i4
a1.sources.r1.interceptors.i1.type=timestamp
a1.sources.r1.interceptors.i2.type=host
#true表示用ip,否则是host
a1.sources.r1.interceptors.i2.useIP=true
a1.sources.r1.interceptors.i3.type=static
a1.sources.r1.interceptors.i3.key=mykey
a1.sources.r1.interceptors.i3.value=myvalue
a1.sources.r1.interceptors.i4.type=remove_header
a1.sources.r1.interceptors.i4.withName=mykey
uuid
在头信息中添加一个uuid(全局唯一的ID)
#配置拦截器
#a1.sources.r1.interceptors=i1 i2 i3 i4
a1.sources.r1.interceptors=i1 i2 i3 i4
a1.sources.r1.interceptors.i1.type=timestamp
a1.sources.r1.interceptors.i2.type=host
#true表示用ip,否则是host
a1.sources.r1.interceptors.i2.useIP=true
a1.sources.r1.interceptors.i3.type=static
a1.sources.r1.interceptors.i3.key=mykey
a1.sources.r1.interceptors.i3.value=myvalue
#a1.sources.r1.interceptors.i4.type=remove_header
#a1.sources.r1.interceptors.i4.withName=mykey
a1.sources.r1.interceptors.i4.type=org.apache.flume.sink.solr.morphline.UUIDInterceptor$Builder
a1.sources.r1.interceptors.i4.headerName=acctId
启动与测试与上面相同
输出:
Event: { headers:{host=192.168.245.141, acctId=9ae14360-f8f8-480c-98a1-32afac593a8a, mykey=myvalue, us=c2, timestamp=1527749151344} body: 68 65 6C 6C 6F 20 4D 65 73 73 69 hello Messi }
search and replace
功能与String类中的replace类似,支持正则表达式做匹配,将匹配到的内容替换为replace_string
a1.sources.avroSrc.interceptors = search-replace
a1.sources.avroSrc.interceptors.search-replace.type = search_replace

# Remove leading alphanumeric characters in an event body.
a1.sources.avroSrc.interceptors.search-replace.searchPattern = ^[A-Za-z0-9_]+
a1.sources.avroSrc.interceptors.search-replace.replaceString = replace_string
regex filter
使用正则表达式在消息内容中做匹配,如果匹配成功,可以将event排除掉,也可以包含进来
regex extractor
使用正则表达式从消息内容中匹配到字符串,并将匹配到的字符串作为头信息key-value中的value,key在配置文件中指定
		a1.sources.r1.interceptors = i1
		a1.sources.r1.interceptors.i1.type = regex_extractor
		a1.sources.r1.interceptors.i1.regex = ^(?:[^\\|]*\\|){14}\\d+_\\d+_(\\d+)\\|.*$
		a1.sources.r1.interceptors.i1.serializers = s1
		a1.sources.r1.interceptors.i1.serializers.s1.name = timestamp
将匹配到的结果作为timestamp的值
logger-4j appender
配合上面的regex extractor配置,可以将log4j中输出的日志直接传给flume。log4j.properties中需要如下配置
		log4j.rootLogger = info,stdout,flume

		log4j.appender.stdout = org.apache.log4j.ConsoleAppender
		log4j.appender.stdout.Target = System.out
		log4j.appender.stdout.layout = org.apache.log4j.PatternLayout
		log4j.appender.stdout.layout.ConversionPattern = %m%n

		log4j.appender.flume = org.apache.flume.clients.log4jappender.Log4jAppender
		log4j.appender.flume.Hostname = hadoop01
		log4j.appender.flume.Port = 44444
		#表示如果flume响应失败,应用不出现异常
		log4j.appender.flume.UnsafeMode = true
		log4j.appender.flume.layout = org.apache.log4j.PatternLayout
		#可以将%n去掉,否则结果会出现两个换行,因为flume后面会对每个event自动换行
		log4j.appender.flume.layout.ConversionPattern = %m%n
该appender还有负载均衡功能,都可以参考apache flume官方文档轻松搞定,有兴趣的同学多研究研究