2019独角兽企业重金招聘Python工程师标准>>> ![]()
1.hashmap存储结构
数组+链表+红黑树, 当链表长度超过阈值(8)时,将链表转换为红黑树。当数组的元素个数大于 容量*扩容因子时,会进行扩容操作。
2.hashmap的属性:
public class HashMap extends AbstractMap implements Map, Cloneable, Serializable {
    // 序列号
    private static final long serialVersionUID = 362498820763181265L;
    // 默认的初始容量是16
    static final int DEFAULT_INITIAL_CAPACITY = 1 << 4;
    // 最大容量
    static final int MAXIMUM_CAPACITY = 1 << 30;
    // 默认的填充因子
    static final float DEFAULT_LOAD_FACTOR = 0.75f;
    // 当桶(bucket)上的结点数大于这个值时会转成红黑树
    static final int TREEIFY_THRESHOLD = 8;
    // 当桶(bucket)上的结点数小于这个值时树转链表
    static final int UNTREEIFY_THRESHOLD = 6;
    // 桶中结构转化为红黑树对应的table的最小大小
    static final int MIN_TREEIFY_CAPACITY = 64;
    // 存储元素的数组,总是2的幂次倍
    transient Node[] table;
    // 存放具体元素的集
    transient Set> entrySet;
    // 存放元素的个数,注意这个不等于数组的长度。
    transient int size;
    // 每次扩容和更改map结构的计数器
    transient int modCount;
    // 临界值 当实际大小(容量*填充因子)超过临界值时,会进行扩容
    int threshold;
    // 填充因子
    final float loadFactor;
}
2.hashmap的构造函数
| HashMap() 构造一个空的 HashMap ,默认初始容量(16)和默认负载系数(0.75)。 |
| HashMap(int initialCapacity) 构造一个空的 HashMap具有指定的初始容量和默认负载因子(0.75)。 |
| HashMap(int initialCapacity, float loadFactor) 构造一个空的 HashMap具有指定的初始容量和负载因子。 |
| HashMap(MapK,? extends V> m) 构造一个新的 HashMap与指定的相同的映射 Map 。 |
3.put
源码解析
final V putVal(int hash, K key, V value, boolean onlyIfAbsent, boolean evict) {

    Node[] tab; Node p; int n, i;
    //如果当前的table为空或者长度为0时,执行扩容函数 resize()
    if ((tab = table) == null || (n = tab.length) == 0)
        n = (tab = resize()).length;
    //定位到table的 (n-1)& hash 的位置,如果没有值的话,就赋值一个新的node
   if ((p = tab[i = (n - 1) & hash]) == null)
        tab[i] = newNode(hash, key, value, null);
    else {//定位到table的 (n-1)& hash 的位置有值
        Node e; K k;
        if (p.hash == hash &&
            ((k = p.key) == key || (key != null && key.equals(k))))//如果是同一个key
            e = p;
        else if (p instanceof TreeNode)//如果是一个TreeNode(红黑树)
            e = ((TreeNode)p).putTreeVal(this, tab, hash, key, value);
        else {//如果新的key和原来的key不一样
            for (int binCount = 0; ; ++binCount) {//对 p.next进行迭代
                if ((e = p.next) == null) {
                    p.next = newNode(hash, key, value, null);
                    if (binCount >= TREEIFY_THRESHOLD - 1) // -1 for 1st
                        treeifyBin(tab, hash);
               //当迭代的个数大于 TREEIFY_THRESHOLD - 1 时,将table[(n-1)&hash] 原本为链表改造成红黑树
                    break;
                }
                if (e.hash == hash &&
                    ((k = e.key) == key || (key != null && key.equals(k))))
                    break;
                p = e;
            }
        }
        if (e != null) { // existing mapping for key
            V oldValue = e.value;
            if (!onlyIfAbsent || oldValue == null)
                e.value = value;
            afterNodeAccess(e);
            return oldValue;
        }
    }
    ++modCount;
    if (++size > threshold)
        resize();
    afterNodeInsertion(evict);
    return null;
}
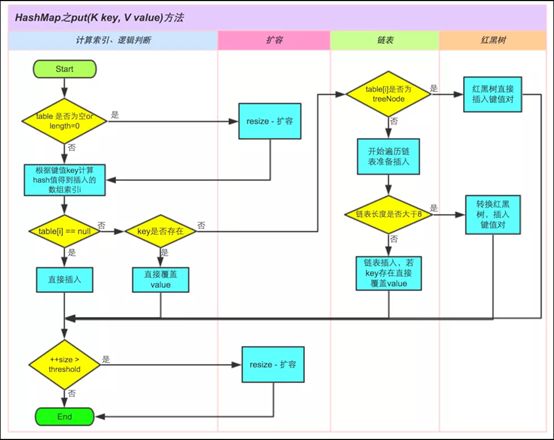
参数hash的神奇之处:键值对(k,v)的存放位置是 tab[(n-1)& k.getHashCode()],n为当前table的容量大小 ,而size是table已经存放的个数。
当 插入一个键值对,且原本的tab[i = (n - 1) & hash]存在,且新旧键值对的key不相等时,就会进行 e.next进行遍历,如果期间遍历到key的值相等,就将新值替换旧值,否则将新的键值对添加在最后面, lastNode.next= newNode。
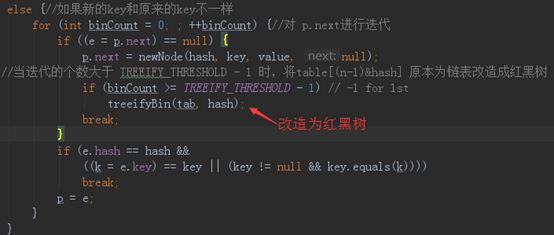
而在对e.next遍历过程中,会对这个遍历的次数进行统计,当次数大于等于TREEIFY_THRESHOLD – 1时,会将这个链表改造成红黑树。
改造红黑树:
1.将tab[(n-1)&hash]位置上的Node链表改造成 TreeNode链表,一次只将这个位置的链表修改,tab的其他位置不变。
 final void treeifyBin(Node[] tab, int hash) {
    int n, index; Node e;
    //table is too small, in which case resizes instead.
    if (tab == null || (n = tab.length) < MIN_TREEIFY_CAPACITY)
        resize();
    //Replaces all linked nodes in bin at index for given hash
    else if ((e = tab[index = (n - 1) & hash]) != null) {
        TreeNode hd = null, tl = null;//hd表示红黑树根节点, tl为前一个节点
        do {
            TreeNode p = replacementTreeNode(e, null);//新的树节点
            if (tl == null)//如果前一个节点为空,说明树的根节点为空,则把当前的树节点当做根节点
                hd = p;
            else {
                p.prev = tl;//p的父节点为前一个节点tl
                tl.next = p;//前一个节点tl的下一个节点为p,
                //这个next来自父类Node的属性
            }
            tl = p;
        } while ((e = e.next) != null);//对tab[(n-1)& hash]位置上的链表进行遍历
        if ((tab[index] = hd) != null)//将第[(n-1)&hash]的位置替换
            hd.treeify(tab);
    }
}
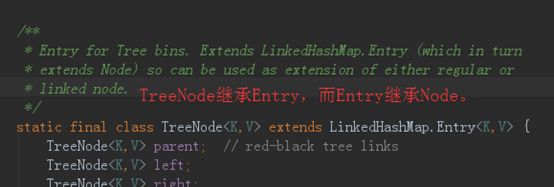
为什么可以将原来Node
2.将TreeNode链表修改红黑树
final void treeify(Node[] tab) {//做树
    TreeNode root = null;
    for (TreeNode x = this, next; x != null; x = next) {
        next = (TreeNode)x.next;//记录x.next,使得下一轮x=x.next遍历
        //x 为当前要插入树中的数据
        x.left = x.right = null;
        if (root == null) {//根节点
           x.parent = null;
            x.red = false;
            root = x;
        }
        else {
            K k = x.key;//当前要插入的树节点的key
            int h = x.hash;//当前节点的hash
            Class kc = null;
            for (TreeNode p = root;;) {
                //从根节点开始遍历 p,p要跟x比较,才能找到x要插到树的哪个位置
                int dir, ph;//dir:方向  ph:当前被比较的p的hashcode
                K pk = p.key;
                if ((ph = p.hash) > h)//如果p的hash值大于x的hash值,则dir为-1
                    dir = -1;
                else if (ph < h)//如果p的hash值小于x的hash值,则dir为1
                    dir = 1;
                else if ((kc == null &&//当p和x的hash值一样,且没有可比较时
                          (kc = comparableClassFor(k)) == null) ||//是否有实现comparable接口
                         (dir = compareComparables(kc, k, pk)) == 0)//
                    dir = tieBreakOrder(k, pk);//当无法比较时,使用自带的比较方法。当k和pk 的classname相同,就调用比较k和pk的原始hashcode。

               TreeNode xp = p;
                if ((p = (dir <= 0) ? p.left : p.right) == null) {
                    x.parent = xp;
                    if (dir <= 0)
                        xp.left = x;
                    else
                        xp.right = x;
                    //保持红黑树并插入数据,
                    root = balanceInsertion(root, x);
                    break;
                }
            }
        }
    }//Ensures that the given root is the first node of its bin.
    moveRootToFront(tab, root);

}
4.get
先前HashMap通过hash code来存放数据,那么get方法一样要通过hash code来获取数据。可以看到如果当前table没有数据的话直接返回null反之通过传进来的hash值找到对应节点(Node)first,如果first的hash值以及Key跟传入的参数匹配就返回对应的value反之判断是否是红黑树,如果是红黑树则从根节点开始进行匹配如果有对应的数据则结果否则返回Null,如果是链表的话就会循环查询链表,如果当前的节点不匹配的话就会从当前节点获取下一个节点来进行循环匹配,如果有对应的数据则返回结果否则返回Null。
public V get(Object key) {
    Node e;
    return (e = getNode(hash(key), key)) == null ? null : e.value;
}

final Node getNode(int hash, Object key) {
    Node[] tab; Node first, e; int n; K k;
    //当tab的[(n-1)&hash]的数据存在
    if ((tab = table) != null && (n = tab.length) > 0 &&
        (first = tab[(n - 1) & hash]) != null) {
        if (first.hash == hash && // 检查第一个
            ((k = first.key) == key || (key != null && key.equals(k))))
            return first;
        if ((e = first.next) != null) {//如果第一个不为空,就接下去找
            if (first instanceof TreeNode)
                return ((TreeNode)first).getTreeNode(hash, key);
            do {
                if (e.hash == hash &&
                    ((k = e.key) == key || (key != null && key.equals(k))))
                    return e;
            } while ((e = e.next) != null);
        }
    }
    return null;
}

final TreeNode getTreeNode(int h, Object k) {
    return ((parent != null) ? root() : this).find(h, k, null);
}

final TreeNode find(int h, Object k, Class kc) {
    TreeNode p = this;
    do {
        int ph, dir; K pk;
        TreeNode pl = p.left, pr = p.right, q;
        if ((ph = p.hash) > h)
            p = pl;
        else if (ph < h)
            p = pr;
        else if ((pk = p.key) == k || (k != null && k.equals(pk)))
            return p;
        else if (pl == null)
            p = pr;
        else if (pr == null)
            p = pl;
        else if ((kc != null ||
                  (kc = comparableClassFor(k)) != null) &&
                 (dir = compareComparables(kc, k, pk)) != 0)
           p = (dir < 0) ? pl : pr;
        else if ((q = pr.find(h, k, kc)) != null)
            return q;
        else
            p = pl;
    } while (p != null);
    return null;
}
5.扩容 resize()
在新的 new hashMap()后对其进行put操作后,会对table进行第一次初始化,容量为16,扩容因子为0.75。
final Node[] resize() {

    Node[] oldTab = table;

    int oldCap = (oldTab == null) ? 0 : oldTab.length;

    int oldThr = threshold;

    int newCap, newThr = 0;

    if (oldCap > 0) {

        // 如果之前table大小达到最大容量上限(1<<30)

        if (oldCap >= MAXIMUM_CAPACITY) {

            threshold = Integer.MAX_VALUE;     // 阈值调整为最大的整数

            return oldTab;

        } // 否则就容量翻倍

        else if ((newCap = oldCap << 1) < MAXIMUM_CAPACITY &&

                 oldCap >= DEFAULT_INITIAL_CAPACITY)

            newThr = oldThr << 1; // double threshold

    }

    else if (oldThr > 0) // initial capacity was placed in threshold

        newCap = oldThr;

    else {               // zero initial threshold signifies using defaults

        newCap = DEFAULT_INITIAL_CAPACITY;

        newThr = (int)(DEFAULT_LOAD_FACTOR * DEFAULT_INITIAL_CAPACITY);

    }

    if (newThr == 0) {

        float ft = (float)newCap * loadFactor;

        newThr = (newCap < MAXIMUM_CAPACITY && ft < (float)MAXIMUM_CAPACITY ?

                  (int)ft : Integer.MAX_VALUE);

    }

    threshold = newThr;

    @SuppressWarnings({"rawtypes","unchecked"})

        Node[] newTab = (Node[])new Node[newCap];

    table = newTab;

    // 原来的table[]不为空,就进行复制

    if (oldTab != null) {

        // 遍历bucket

        for (int j = 0; j < oldCap; ++j) {

            Node e;

            // 如果bucket不为空

            if ((e = oldTab[j]) != null) {

                oldTab[j] = null;

                // 如果只有一个元素,直接放入

                if (e.next == null)

                    newTab[e.hash & (newCap - 1)] = e;

                // 否则是树实现

                else if (e instanceof TreeNode)

                    ((TreeNode)e).split(this, newTab, j, oldCap);

                // 是链表实现

                else { // preserve order

                    // 这里与容量和扩容都为2的幂有关

                    Node loHead = null, loTail = null;

                    Node hiHead = null, hiTail = null;

                    Node next;

                    do {

                        next = e.next;
                          // 如果扩容后的那一位是0,说明位置没有改变

                        if ((e.hash & oldCap) == 0) {

                            if (loTail == null)

                                loHead = e;

                            else

                                loTail.next = e;

                            loTail = e;

                        } // 否则是改变了,会最后放到原位置+oldCap的位置

                        else {

                            if (hiTail == null)

                                hiHead = e;

                            else

                                hiTail.next = e;

                            hiTail = e;

                        }

                    } while ((e = next) != null);

                  // 原索引放到bucket里
                   if (loTail != null) {

                        loTail.next = null;

                        newTab[j] = loHead;

                    }
                 // 原索引+oldCap放到bucket里

                    if (hiTail != null) {

                        hiTail.next = null;

                        newTab[j + oldCap] = hiHead;

                    }

                }

            }

        }

    }

    return newTab;

}
6.将容量设置为2的幂的好处(转https://www.cnblogs.com/fightfordream/p/8457699.html)
计算Hash
方法一:static final int hash(Object key) { //jdk1.8 & jdk1.7int h;// h = key.hashCode() 为第一步 取hashCode值 // h ^ (h >>> 16) 为第二步 高位参与运算
return (key ==null) ? 0 : (h = key.hashCode()) ^ (h >>> 16);}方法二:static int indexFor(int h, int length) { //jdk1.7的源码,jdk1.8没有这个方法,但是实现原理一样的
return h & (length-1); //第三步 取模运算}在计算hash的时候,因为n为2的幂,因此可以使用 hashPostion = hash & (n-1) 来代替取模运算,可以加快计算速度。
扩容的时候,扩容也是原容量乘二,这样可以省去重新计算hash的时间,因为元素的位置要么是在原位置,要么是在原位置再移动2次幂的位置。这里将原来的size为2扩容为4
.
这样只需要看原来的hash在扩容后的那一位是1还是0就可以得到新的hash值了。是1的话newHash = oldHash + oldCap(扩容前的容量) / 2。


