本文内容是,如何在Linux centos7下快速搭建LNMP环境。虚拟机、实体机环境都可以。
另外,安装教程参考的是,下面这篇文章进行文字排版和内容扩充,感谢hcchanqing作者。
CentOS6.2 yum安装配置LNMP服务器(Nginx+PHP+MySQL)
特别提醒:本文系统用的Centos7,是7!!参考教程用的是centos6.2
环境
环境配置
- windows7 64位
- vmware workstation 12
- linux CentOS7_x64
准备
Web环境(LNMP)
LNMP 指 Linux + Nginx + Mysql + PHP
LAMP 指 Linux + Apache + Mysql + PHPLNMP 也称 LEMP 其中 E 表示 engine x,国外喜欢简称这个 Why? Nginx官方发音
安装之前先配置防火墙,主要能让windows系统能够访问80和数据库3306端口。
# 注意,下面命令适用于centos7以下,不含centos7
vi /etc/sysconfig/iptables # 编辑防火墙配置文件
-A INPUT -m state --state NEW -m tcp -p tcp --dport 80 -j ACCEPT # 允许80端口通过防火墙
-A INPUT -m state --state NEW -m tcp -p tcp --dport 3306 -j ACCEPT # 允许3306端口通过防火墙
Centos7的设置请点这里
Linux安装
安装过程太长就不一一写了,可以参考这个Vmware 装Linux教程
安装Nginx
使用yum安装Nginx
yum install nginx启动Nginx服务
service nginx start没开成功,出现了下面的一段文本
搜了一下,说版本太新,提示命令已经换了。好,那就输入下面的命令
/bin/systemctl start nginx.service
# 更简洁的写法
systemctl start nginx.service
结果什么都没有返回,那怎么验证nginx服务是否有开启?
ps -ef | grep nginx # 有返回的话表示已经开启了设置开机自启
chkconfig nginx on返回了一串提示,猜测应该是版本太新,命令又换了。
按照提示,输入。systemctl 相关命令
systemctl enable nginx.serviceOK,还是什么都没有返回,看来linux的尿性应该是成功执行一般不会有东西返回的
systemctl is-enabled nginx.service # 验证是否开启,有开启会显示enabled测试访问
在浏览器输入linux的ip地址,如果出现下面的内容,表示nginx搭建OK了。
centos7设置防火墙端口
然而过程并没有那么顺利,再得到welcome页前,我是打不开页面的
找了下度娘,果不其然,又是和版本有关,centos的防火墙改成了firewall不再叫iptables 查看原文
键入下面命令
firewall-cmd --zone=public --add-port=80/tcp --permanent
# 命令含义:
# –zone #作用域
# –add-port=80/tcp #添加端口,格式为:端口/通讯协议
# –permanent #永久生效,没有此参数重启后失效然后重启防火墙,再访问一下地址就能看到welcome to nginx
systemctl stop firewalld.service
systemctl start firewalld.service
安装Mysql
接着再按照教程安装mysql,显然只要把其中的旧命令换成新命令就能安装mysql了。
照着这个思路,结果又踩坑了。。。道路真是坎坷
首先跑了下面的命令
yum install mysql mysql-server第一次安装过程很正常,还看到了complete(可能我看了一个假的complete)。
然后接下来的启动服务、设置开机自启等操作都是返回not found(差不多这个意思,就是没找到)
再查看mysql的相关进程却是有的,而且which mysql也有返回目录
会不会是名字的原因?于是折腾之前操作中mysql服务的名字,比如下面的命令
/bin/systemctl start mysqld.service
/bin/systemctl start mysql-server.service
/bin/systemctl start mysql.service
...
结果肯定是掉坑里了。正解在这:CentOS7下安装Mysql失败经历--CentOS7使用yum安装和卸载Mysql过程
关键的命令Mark一下
wget http://repo.mysql.com/mysql-community-release-el7-5.noarch.rpm # step 1
rpm -ivh mysql-community-release-el7-5.noarch.rpm # step 2
yum install mysql-server # step 3
启动Mysql服务
/bin/systemctl start mysqld.service
# 更简洁的写法
systemctl start mysqld.service
# 或者
systemctl start mysqld
设置开机自启
systemctl enable mysqld.service
systemctl is-enabled mysqld.service # 检测是否已经设置开机自启
配置
参考一
参考二
我的命令行记录
mysql -u root -p # 登录账号
mysql>use mysql; # 进入mysql数据库
mysql>update user set password=password('要设置的密码') where user='root' and host='localhost'; # 设置root的账号密码为root
mysql>flush privileges; # 不重启生效
mysql>grant all privileges on *.* to root@'%' identified by '要设置的密码'; # 设置远程连接账号

#############################
# 语法
# grant all privileges on 库名.表名 to '用户名'@'IP地址' identified by '密码' with grant option;
#############################

# PS:在mysql命令下,要结束或运行命令一定要让语句结束加上 ; 号
安装PHP
安装之前,我尝试查看php版本,发现是有的,版本为5.4,所以我决定升级PHP的版本
php --version首先查看php的安装包(我使用的是yum安装方式)
yum list installed | grep php看到的都是5.4的安装包
安装前移除当前的安装包,避免之后的安装冲突
yum remove php*添加第三方yum源
由于默认的YUM源无法升级PHP,所以需要添加第三方的YUM源,此处用到webtatic
# CentOS 7.x
rpm -Uvh http://mirror.webtatic.com/yum/el7/epel-release.rpm
rpm -Uvh http://mirror.webtatic.com/yum/el7/webtatic-release.rpm
# CentOS 6.5
rpm -Uvh http://mirror.webtatic.com/yum/el6/latest.rpm
使用yum安装
yum install php71w -y # 基础
yum install php71w-fpm -y # nginx连接使用
yum install php71w-mbstring -y # 宽字节
yum install php71w-mysqlnd -y # mysql相关
yum install php71w-pecl-redis -y # redis扩展
yum install php71w-mcrypt -y # 加密使用
yum install php71w-opcache -y # 性能加速 php5.5 以上使用
或者更短的命令
yum install php71w php71w-fpm php71w-mbstring php71w-mysqlnd php71w-pecl-redis php71w-mcrypt php71w-opcache原文链接:yum安装高版本PHP
启动服务
systemctl start php-fpm.service设置开机自启
systemctl enable php-fpm.service配置
让Nginx支持PHP
cp /etc/nginx/nginx.conf  /etc/nginx/nginx.confbak # 备份原有配置文件
vi /etc/nginx/nginx.conf # 编辑这个文件
user nginx nginx; # 修改nginx运行账号为:nginx组的nginx用户按Esc输入:wq保存并退出
紧接着
cp /etc/nginx/conf.d/default.conf  /etc/nginx/conf.d/default.confbak # 备份原有配置文件
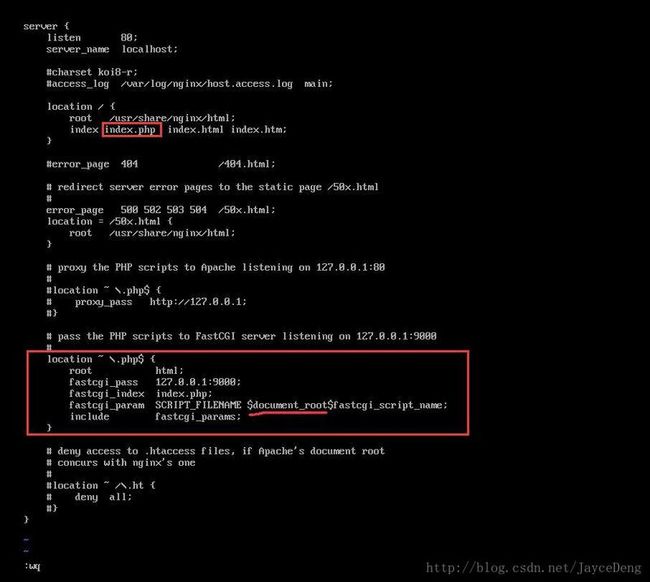
vi /etc/nginx/conf.d/default.conf # 编辑找到location / {增加index.php
index index.php index.html index.htm;接着,取消FastCGI server部分location的注释
# pass the PHP scripts to FastCGI server listening on 127.0.0.1:9000
location ~ \.php$ {
    root           html;
    fastcgi_pass   127.0.0.1:9000;
    fastcgi_index  index.php;
# 要注意fastcgi_param行的参数 改为 $document_root$fastcgi_script_name 或者使用绝对路径
    fastcgi_param  SCRIPT_FILENAME   $document_root$fastcgi_script_name;
    include        fastcgi_params;
}
如下
特殊情况:
配置成上面的方式,我的php文件并不能正常访问,要修改如下
$document_root$fastcgi_script_name
# 替换成绝对路径
/usr/share/nginx/html$fastcgi_script_name
配置PHP
vi /etc/php.ini设置中国时区
date.timezone = PRC配置php-fpm
cp /etc/php-fpm.d/www.conf   /etc/php-fpm.d/www.confbak # 备份原来的配置文件
vi /etc/php-fpm.d/www.conf
# 修改内容如下
user = nginx  # 由原来的apache换成nginx
group = nginx # 由原来的apache换成nginx
设置目录权限
chown nginx.nginx /usr/share/nginx/html/ -R  # 设置目录所有者
chmod 700  /usr/share/nginx/html/ -R   # 设置目录权限
重启服务
systemctl restart nginx.service   # 重启nginx服务
systemctl restart php-fpm.service # 重启php服务
测试
在/usr/share/nginx/html/目录下放置index.php文件
在浏览器中输入服务器的ip,OK访问没问题 :)
资源
本文使用的系统安装包:Linux_CentOS7_x64
https://pan.baidu.com/s/1cGfe... 密码:5sph
文章内容亲测有效,也是安装过程,文章如果有内容不正确或者内容有误的地方请不吝指出 :)
查看文章最新的内容


