技术分享——mongodb入门(1)
ps:这次分享整理自慕课网、菜鸟教程和搜索引擎
WHAT IS IT?:MongoDB 是一个基于分布式文件存储的数据库。
能解决什么问题:分布式,高性能,不用建表(降低开发成本,美滋滋)
环境:ubuntu14.04server,php7.1,apache2
安装:
sudo apt-get install mongodb
开启实例:
Sudo mongod
关闭实例:
db.runCommand(“shutdownServer”)
进入shell:
sudo mongo
基本语法:
插入
use test//如果数据库不存在,自动创建
db.mycollection.insert({x:1,y:2})//如果文档不存在,自动创建
更新:
Update:
myCollection={x:1,y:1}
局部更新:db.myCollection.update({x:1},{$set:{y:99}})
更新不存在的数据:db.myCollection.update({x:1},{y:99},true)
更新多条数据(默认更新匹配到的第一条记录):db.myCollection.update({c:1},{$set:{c:2}},false,true)//第三个参数表示数据不存在不需要创建,倒数第四个true表示批量更新
删除:
Remove:
db.mycollection.remove({c:2})//默认删除所有匹配的记录
Drop:
db.mucollection.drop()//删除表
索引:
获取索引:getIndexes()
创建索引:ensureIndex({x:1})//1代表正向排序,-1代表负向排序,此例为单键索引
默认索引:_id
复合索引(当查询条件不只有一个时):ensureIndex({x:1,y:1})
过期索引(有时效性的索引,插入的数据会在设置的时间后被删除,而且这个索引字段的值必须是时间类型,不能使用时间戳,最小时间为60s,就算设置是30s,也会在60s后才删除):db.test_collection.ensureIndex({time:1},{expireAfterSeconds:30})
db.test_collection.insert({time:new Date()})//该数据会在30秒后被删除
全文索引(每个集合只能有一个全文索引):例子{auther:””,title:””,comment:””}
db.test_collection.ensureIndex({auther:”text”})
db.test_collection.ensureIndex({auther:”text”,title:”text”})
db.test_collection.ensureIndex({$**:”text”})
Eg.
db.test_collection2.insert({“article”:”aa bb cc”})
db.test_collection2.find({$text:{$search:”aa”}})
// db.test_collection2.find({$text:{$search:”aa bb”}}) //或查询
// db.test_collection2.find({$text:{$search:”aa -bb”}}) //负号表示不包含该字符串
// db.test_collection2.find({$text:{$search:”\”aa\” \“ bb\””}}) //并查询
// db.test_collection2.find({$text:{$search:"aa bb"}},{score:{$meta:"textScore"}}) //相似度查询

按score排序
Php扩展安装:
第一步:
sudo /usr/bin/pecl install mongodb//安装扩展
/**如果pecl不存在
sudo apt-get install php-pear php7.1-dev
sudo apt-get install pkg-config
sudo apt-get install libpcre3-dev
**/

#Success
第二步:
在php.ini添加“extension=mongodb.so”

查看phpinfo
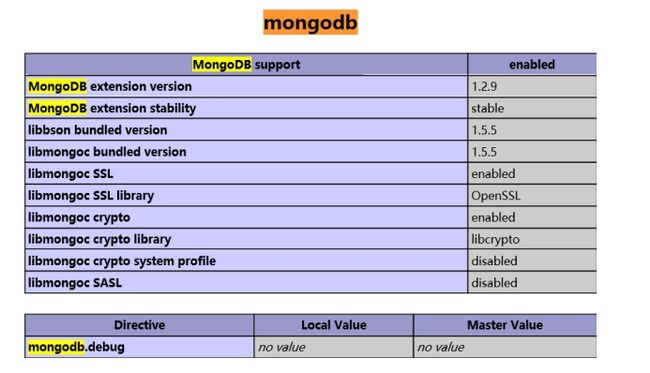
#success
第三步
php操作mongodb
Php部分

文末会有自己写的辣鸡mongo类封装
查看一下
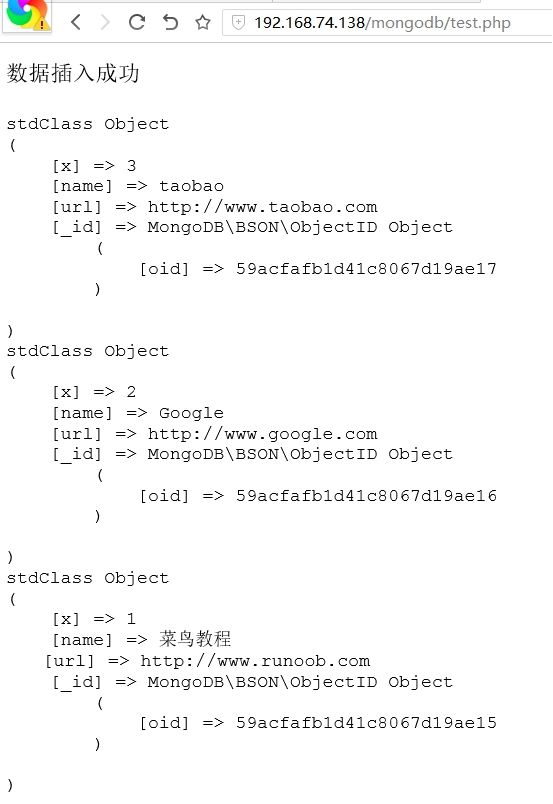
#success

复制集:
1.复制集包括两类节点:数据节点、投票节点(不存储数据)
2.一个复制集有一个主节点,多个从节点(数据节点),用户只能在主节点写操作(记录都oplog),无法对从节点进行写操作(根据oplog来同步,保障了数据的一致性),默认读操作也是对主节点进行的
3.复制集特性
(1)主是唯一的
(2)主节点不是固定的(主节点挂了的话会从从节点中选举出合适的节点当主节点)
(3)大多数原则(复制集的服务器挂一半的时候就没办法选举了,将全部降为从节点,整个复制集只能进行读操作,因为没有主节点了)
4.复制集快速搭建
(1)目录搭建
在mongodb下建立conf,data,log方便管理
(2)配置文件编写


如此类推写三个配置文件
(3)开启三个实例


(3)复制集初始化

![]()
将28003变为arbiter节点(选举节点)

初始化(在哪个节点初始化那个节点就会变成主节点)

(4)查看复制集状态
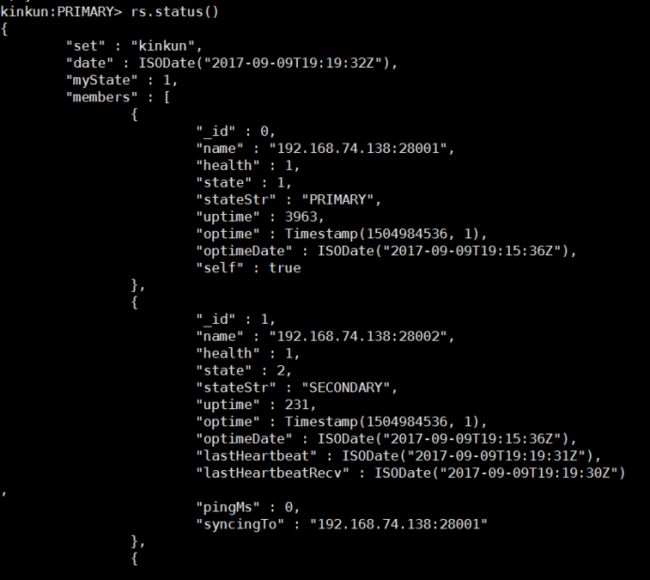

#success
(5)验证复制集同步
在主节点插入数据

在从节点上查看(如果不是通过驱动连接操作的的话要开启slaveOk才能读取数据)

发现出现了主节点创建的数据库了,接着查看数据

数据也同步了
#success
OK~关于mongodb的安装、基本操作、PHP操作、复制集就介绍完了,下一个分享会带上复制集详细介绍和分片技术介绍,大佬们看个乐就好,溜了溜了~
自己写的辣鸡php封装:
 "mongodb://localhost:27017", "dbname" => "index"];

    /**
     * 创建mongo对象
     */
    static function getInstance(Array $config = array())
    {
        $config = $config ? $config : self::$_config;
        if (!(self::$_instance instanceof self)) {
            self::$_instance = new self($config);
        }
        return self::$_instance;
    }

    private function __construct($config)
    {
        try {
            $this->_conn = new Manager($config["url"]);
            $this->_db = $config["dbname"];
        } catch (MongoException $e) {
            exit($e->getMessage());
        }
    }

    /**插入数据
     */

    public function add($collname, array $document)
    {
        $bulk = new BulkWrite;
        $bulk->insert($document);
        return $this->_conn->executeBulkWrite("$this->_db.$collname", $bulk);
    }

    /**
     * 删除数据
     */
    public function del($collname, array $filter, array $writeOps = [])
    {
        $bulk = new BulkWrite;
        $bulk->delete($filter, $writeOps);
        $this->_conn->executeBulkWrite("$this->_db.$collname", $bulk);
    }

    /**
     * 更新数据
     */
    public function update($collname, array $filter, array $doc, array $writeOps = [])
    {
        $bulk = new BulkWrite;
        $bulk->update($filter, $doc, $writeOps);
        $this->_conn->executeBulkWrite("$this->_db.$collname", $bulk);
    }

    /**
     * 查询
     */
    public function select($collname, array $filter, array $writeOps = [])
    {
        $query = new Query($filter, $writeOps);
        $docs = $this->_conn->executeQuery("$this->_db.$collname", $query);
        return $docs;
    }

    /**
     * 获取当前mongoDB Manager
     */
    public function getMongoManager()
    {
        return $this->_conn;
    }

}