IDEA完成Spring+Mybatis的增删改查
第一次写CSDN献给IDEA编译器里使用Maven搭建Spring4+Mybatis3的小教程。
以下内容参考“博客园”的一篇博客,传送门:Mybatis学习总结(八)。
需要用到的工具:IDEA | Tomcat | 连接mysql的Jar包 | mysql
一. 创建项目
1. IDEA版本2018.1
2.选择Maven类型,选择SDK1.8,Next

3.取个名字吧,Next

4.取个项目名字吧(建议以上的命名都一致),设置项目路径,Next

5.留意右下角,选择Enable Auto-import

二. 正式开始
1. 修改pom.xml文件, 添加依赖
* 自行修改
    4.0.0

    SpringMybatisDemo
    SpringMybatisDemo
    war
    http://maven.apache.org
    1.0-SNAPSHOT


            org.springframework
            spring-core
            4.1.4.RELEASE


            org.springframework
            spring-context
            4.1.4.RELEASE


            org.springframework
            spring-tx
            4.1.4.RELEASE


            org.springframework
            spring-jdbc
            4.1.4.RELEASE


            org.springframework
            spring-test
            4.1.4.RELEASE


            org.springframework
            spring-web
            4.1.4.RELEASE


            org.aspectj
            aspectjweaver
            1.8.5


            org.mybatis
            mybatis
            3.2.8


            org.mybatis
            mybatis-spring
            1.2.2


            javax.servlet
            javax.servlet-api
            3.0.1


            javax.servlet.jsp
            javax.servlet.jsp-api
            2.3.2-b01


            javax.servlet
            jstl
            1.2


            mysql
            mysql-connector-java
            5.1.34


            com.alibaba
            druid
            1.0.12


            junit
            junit
            4.12
            test


            junit
            junit
            4.12
            test


            junit
            junit
            4.12
            test


        spring4mybatis3


                src/main/java

                    **/*.xml


                src/main/resources


                org.mybatis.generator
                mybatis-generator-maven-plugin
                1.3.2

                    spring-mybatis.xml
                    true
                    true


                        Generate MyBatis Artifacts

                            generate


                        org.mybatis.generator
                        mybatis-generator-core
                        1.3.2
2. 添加数据库和数据表,以下使用Mysql
Create DATABASE spring4_mybatis3;
USE spring4_mybatis3;

DROP TABLE IF EXISTS t_user;
CREATE TABLE t_user (
  user_id char(32) NOT NULL,
  user_name varchar(30) DEFAULT NULL,
  user_birthday date DEFAULT NULL,
  user_salary double DEFAULT NULL,
  PRIMARY KEY (user_id)
) ENGINE=InnoDB DEFAULT CHARSET=utf8;
创建好的数据库和数据表如下

3. 在resources中添加四个配置文件dbconfig.properties | generatorConfig.xml | spring.xml | spring-mybatis.xml

dbconfig.properties(修改username | password)
driverClassName=com.mysql.jdbc.Driver
validationQuery=SELECT 1
jdbc_url=jdbc:mysql://localhost:3306/spring4_mybatis3?useUnicode=true&characterEncoding=UTF-8
jdbc_username=root
jdbc_password=123456
generatorConfig.xml
*修改mysql.connector-java.jar的路径
*修改数据库连接信息中userId | password
spring.xml
spring-mybatis.xml
service.*
* 注意:各配置文件中有些地方会显示报错,都是因为没有依赖或者路径不正确或者文件不存在引起的。
4. 添加项目目录(dao | entity | mapping)

5. 在编译器的右边,有一个"Maven Projects"标签,打开选中Plugins,找到mybatis-generator,双击运行
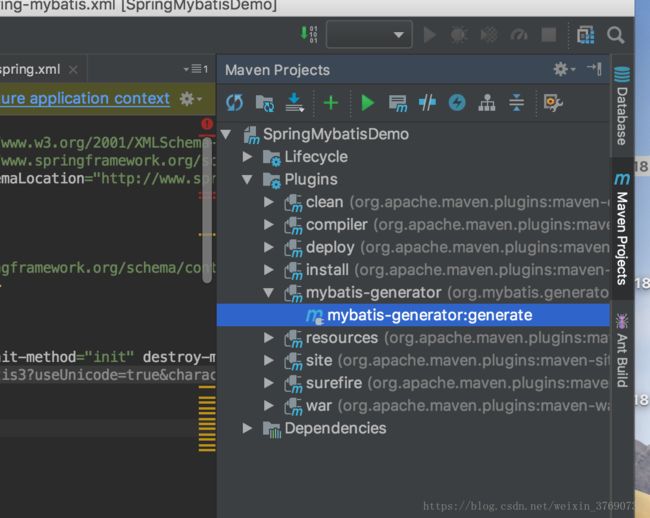
若成功,控制台显示:

* 报错的话,请留意mysql连接的jar包版本问题 或 文件路径问题 或 文件名字问题
6. 以上,完成用generator插件自动生成代码。若生成失败,可以手写代码,如下展示:

entity/TUser.java
package entity;

import java.util.Date;

public class TUser {
    private String userId;

    private String userName;

    private Date userBirthday;

    private Double userSalary;

    public String getUserId() {
        return userId;
    }

    public void setUserId(String userId) {
        this.userId = userId == null ? null : userId.trim();
    }

    public String getUserName() {
        return userName;
    }

    public void setUserName(String userName) {
        this.userName = userName == null ? null : userName.trim();
    }

    public Date getUserBirthday() {
        return userBirthday;
    }

    public void setUserBirthday(Date userBirthday) {
        this.userBirthday = userBirthday;
    }

    public Double getUserSalary() {
        return userSalary;
    }

    public void setUserSalary(Double userSalary) {
        this.userSalary = userSalary;
    }
}
dao/TUserMapper
package dao;

import entity.TUser;
import entity.TUserExample;
import org.apache.ibatis.annotations.Param;

import java.util.List;

public interface TUserMapper {
    int countByExample(TUserExample example);

    int deleteByExample(TUserExample example);

    int deleteByPrimaryKey(String userId);

    int insert(TUser record);

    int insertSelective(TUser record);

    List selectByExample(TUserExample example);

    TUser selectByPrimaryKey(String userId);

    int updateByExampleSelective(@Param("record") TUser record, @Param("example") TUserExample example);

    int updateByExample(@Param("record") TUser record, @Param("example") TUserExample example);

    int updateByPrimaryKeySelective(TUser record);

    int updateByPrimaryKey(TUser record);

    List getAllUser();
}
mapping/TUserMapper.xml(删除了部分未用到的操作)
user_id, user_name, user_birthday, user_salary
delete from t_user
where user_id = #{userId,jdbcType=CHAR}
insert into t_user (user_id, user_name, user_birthday,
user_salary)
values (#{userId,jdbcType=CHAR}, #{userName,jdbcType=VARCHAR}, #{userBirthday,jdbcType=DATE},
#{userSalary,jdbcType=DOUBLE})
insert into t_user
user_id,
user_name,
user_birthday,
user_salary,
#{userId,jdbcType=CHAR},
#{userName,jdbcType=VARCHAR},
#{userBirthday,jdbcType=DATE},
#{userSalary,jdbcType=DOUBLE},
update t_user
user_name = #{userName,jdbcType=VARCHAR},
user_birthday = #{userBirthday,jdbcType=DATE},
user_salary = #{userSalary,jdbcType=DOUBLE},
where user_id = #{userId,jdbcType=CHAR}
update t_user
set user_name = #{userName,jdbcType=VARCHAR},
user_birthday = #{userBirthday,jdbcType=DATE},
user_salary = #{userSalary,jdbcType=DOUBLE}
where user_id = #{userId,jdbcType=CHAR}
三. 现在基本搭建完成,可以做一下单元测试
1. 建立service目录,如下

service / UserServiceI
package service;

import entity.TUser;

import java.util.List;

public interface UserServiceI {

    /**
     * 添加用户
     * @param user
    */
    void addUser(TUser user);

    /**
     * 根据用户id获取用户
     * @param userId
     * @return
     */
    TUser getUserById(String userId);

    /**获取所有用户信息
     * @return List
     */
    List getAllUser();

    /**删除指定用户
     * @param userId
     */
    void deleteByPrimaryKey(String userId);

    /**更新指定用户
     * @param user
     */
    void updateByPrimaryKey(TUser user);
}
service/impl/UserServiceImpl
package service.impl;

import dao.TUserMapper;
import entity.TUser;
import org.springframework.beans.factory.annotation.Autowired;
import org.springframework.stereotype.Service;
import service.UserServiceI;

import java.util.List;

/**
 * 使用@Service注解将UserServiceImpl类标注为一个service
 * service的id是userService
 */
@Service("userService")
public class UserServiceImpl implements UserServiceI {

    /**
     * 使用@Autowired注解标注userMapper变量,
     * 当需要使用UserMapper时,Spring就会自动注入UserMapper
     */
    @Autowired
    private TUserMapper userMapper;//注入dao

    @Override
    public void addUser(TUser user) {
        userMapper.insert(user);
    }

    @Override
    public TUser getUserById(String userId) {
        return userMapper.selectByPrimaryKey(userId);
    }

    @Override
    public List getAllUser() {
        return userMapper.getAllUser();
    }

    @Override
    public void deleteByPrimaryKey(String userId) {
        userMapper.deleteByPrimaryKey(userId);
    }

    @Override
    public void updateByPrimaryKey(TUser user) {
        userMapper.updateByPrimaryKey(user);
    }
}
此时,可能会有报错:@Overide is not allowed when implementing interface method.
解决方法:右键project->Open Modules Setting->Language level->6-@Overide in interfaces

2. 编写测试类,在src/test/java 新建MyBatisTest.java
import entity.TUser;
import org.junit.Before;
import org.junit.Test;
import org.springframework.context.ApplicationContext;
import org.springframework.context.support.ClassPathXmlApplicationContext;
import service.UserServiceI;

import java.util.Date;
import java.util.UUID;


public class MyBatisTest {

    private UserServiceI userService;

    /**
     * 这个before方法在所有的测试方法之前执行,并且只执行一次
     * 所有做Junit单元测试时一些初始化工作可以在这个方法里面进行
     * 比如在before方法里面初始化ApplicationContext和userService
     */
    @Before
    public void before(){
        //使用"spring.xml"和"spring-mybatis.xml"这两个配置文件创建Spring上下文
        ApplicationContext ac = new ClassPathXmlApplicationContext(new String[]{"classpath*:spring.xml","classpath*:spring-mybatis.xml"});
        //从Spring容器中根据bean的id取出我们要使用的userService对象
        userService = (UserServiceI) ac.getBean("userService");
    }

    @Test
    public void testAddUser(){
        ApplicationContext ac = new ClassPathXmlApplicationContext(new String[]{"classpath*:spring.xml","classpath*:spring-mybatis.xml"});
        UserServiceI userService = (UserServiceI) ac.getBean("usrService");
        TUser user = new TUser();
        user.setUserId(UUID.randomUUID().toString().replaceAll("-", ""));
        user.setUserName("testUser");
        user.setUserBirthday(new Date());
        user.setUserSalary(10000D);
        userService.addUser(user);
    }

}
3. 右键->Run"MyBatisTest"

以上,单元测试通过。
四. 在Tomcat上部署
1. 在src/main中 新建包webapp、web.xml、add.jsp 、index.jsp 、update.jsp 。目录结构如下。

web.xml
        index.jsp


        Spring监听器
        org.springframework.web.context.ContextLoaderListener


        contextConfigLocation

        classpath:spring.xml,classpath:spring-mybatis.xml
add.jsp
<%--
Created by IntelliJ IDEA.
User: WUCHAKMING
Date: 2018/6/7
Time: 21:43
To change this template use File | Settings | File Templates.
--%>
<%@ page contentType="text/html;charset=UTF-8" language="java" %>
ADD
A D D
index.jsp
<%--
Created by IntelliJ IDEA.
User: WUCHAKMING
Date: 2018/6/7
Time: 21:28
To change this template use File | Settings | File Templates.
--%>
<%@ page language="java" pageEncoding="UTF-8"%>
<%--引入JSTL核心标签库 --%>
<%@ taglib prefix="c" uri="http://java.sun.com/jsp/jstl/core"%>
显示用户信息
用户ID
用户名
用户生日
工资
操作
<%--遍历lstUsers集合中的User对象 --%>
${user.userId}
${user.userName}
${user.userBirthday}
${user.userSalary}
修改
删除
增加
刷新
update.jsp
<%--
Created by IntelliJ IDEA.
User: WUCHAKMING
Date: 2018/6/7
Time: 22:36
To change this template use File | Settings | File Templates.
--%>
<%@ page contentType="text/html;charset=UTF-8" language="java" %>
UPDATE
<%
String userId = request.getParameter("userId");
String userName = request.getParameter("userName");
String userBirthday = request.getParameter("userBirthday");
String userSalary = request.getParameter("userSalary");
%>
U P D A T E
2. Views视图布置完毕,接下来编写Controller控制器。在src/main/java目录下新建包controller 、AddServlet、DeleteServlet、UpdateServlet、UserServlet。目录结构如下:

AddServlet
package controller;

import entity.TUser;
import org.springframework.context.ApplicationContext;
import org.springframework.web.context.support.WebApplicationContextUtils;
import service.UserServiceI;

import javax.servlet.ServletException;
import javax.servlet.annotation.WebServlet;
import javax.servlet.http.HttpServlet;
import javax.servlet.http.HttpServletRequest;
import javax.servlet.http.HttpServletResponse;
import java.io.IOException;
import java.util.Date;
import java.util.UUID;

@WebServlet("/AddServlet")
public class AddServlet extends HttpServlet {

    private UserServiceI userService;

    protected void doPost(HttpServletRequest request, HttpServletResponse response) throws ServletException, IOException {
        TUser user = new TUser();
        user.setUserId(UUID.randomUUID().toString().replaceAll("-", ""));
        user.setUserName(request.getParameter("userName"));
        user.setUserBirthday(new Date());
        user.setUserSalary(Double.parseDouble(request.getParameter("salary")));
        userService.addUser(user);
        request.getRequestDispatcher("/index.jsp").forward(request, response);
    }

    protected void doGet(HttpServletRequest request, HttpServletResponse response) throws ServletException, IOException {
           doPost(request, response);
    }

    public void init() throws ServletException {
        //在Servlet初始化时获取Spring上下文对象(ApplicationContext)
        ApplicationContext ac = WebApplicationContextUtils.getWebApplicationContext(this.getServletContext());
        //从ApplicationContext中获取userService
        userService = (UserServiceI) ac.getBean("userService");
    }
}
DeleteServlet
package controller;

import org.springframework.context.ApplicationContext;
import org.springframework.web.context.support.WebApplicationContextUtils;
import service.UserServiceI;

import javax.servlet.ServletException;
import javax.servlet.annotation.WebServlet;
import javax.servlet.http.HttpServlet;
import javax.servlet.http.HttpServletRequest;
import javax.servlet.http.HttpServletResponse;
import java.io.IOException;

@WebServlet("/DeleteServlet")
public class DeleteServlet extends HttpServlet {

    private UserServiceI userService;

    protected void doPost(HttpServletRequest request, HttpServletResponse response) throws ServletException, IOException {
        userService.deleteByPrimaryKey(request.getParameter("userId"));
        request.getRequestDispatcher("/index.jsp").forward(request, response);
    }

    protected void doGet(HttpServletRequest request, HttpServletResponse response) throws ServletException, IOException {
        this.doPost(request, response);
    }

    public void init() throws ServletException {
        //在Servlet初始化时获取Spring上下文对象(ApplicationContext)
        ApplicationContext ac = WebApplicationContextUtils.getWebApplicationContext(this.getServletContext());
        //从ApplicationContext中获取userService
        userService = (UserServiceI) ac.getBean("userService");
    }
}
UpdateServlet
package controller;

import entity.TUser;
import org.springframework.context.ApplicationContext;
import org.springframework.web.context.support.WebApplicationContextUtils;
import service.UserServiceI;

import javax.servlet.ServletException;
import javax.servlet.annotation.WebServlet;
import javax.servlet.http.HttpServlet;
import javax.servlet.http.HttpServletRequest;
import javax.servlet.http.HttpServletResponse;
import java.io.IOException;
import java.util.Date;

@WebServlet("/UpdateServlet")
public class UpdateServlet extends HttpServlet {

    private UserServiceI userService;

    protected void doPost(HttpServletRequest request, HttpServletResponse response) throws ServletException, IOException {

        TUser user = new TUser();
        user.setUserId(request.getParameter("userId"));
        user.setUserName(request.getParameter("userName"));
        user.setUserBirthday(new Date());
        user.setUserSalary(Double.parseDouble(request.getParameter("userSalary")));
        userService.updateByPrimaryKey(user);
        request.getRequestDispatcher("/index.jsp").forward(request, response);

    }

    protected void doGet(HttpServletRequest request, HttpServletResponse response) throws ServletException, IOException {
        doPost(request, response);
    }

    public void init() throws ServletException {
        //在Servlet初始化时获取Spring上下文对象(ApplicationContext)
        ApplicationContext ac = WebApplicationContextUtils.getWebApplicationContext(this.getServletContext());
        //从ApplicationContext中获取userService
        userService = (UserServiceI) ac.getBean("userService");
    }
}
UserServlet
package controller;

import entity.TUser;
import org.springframework.context.ApplicationContext;
import org.springframework.web.context.support.WebApplicationContextUtils;
import service.UserServiceI;

import javax.servlet.ServletException;
import javax.servlet.annotation.WebServlet;
import javax.servlet.http.HttpServlet;
import javax.servlet.http.HttpServletRequest;
import javax.servlet.http.HttpServletResponse;
import java.io.IOException;
import java.util.List;

@WebServlet("/UserServlet")
public class UserServlet extends HttpServlet {

    private UserServiceI userService;

    public void doGet(HttpServletRequest request, HttpServletResponse response)
            throws ServletException, IOException {
        //获取所有的用户信息
        List lstUsers = userService.getAllUser();
        request.setAttribute("lstUsers", lstUsers);
        request.getRequestDispatcher("/index.jsp").forward(request, response);
    }

    public void doPost(HttpServletRequest request, HttpServletResponse response)
            throws ServletException, IOException {
        this.doGet(request, response);
    }

    public void init() throws ServletException {
        //在Servlet初始化时获取Spring上下文对象(ApplicationContext)
        ApplicationContext ac = WebApplicationContextUtils.getWebApplicationContext(this.getServletContext());
        //从ApplicationContext中获取userService
        userService = (UserServiceI) ac.getBean("userService");
    }
}
3. 部署Tomcat。由于使用了标注@WebServlet,因此Tomcat版本必须在7.0以上。
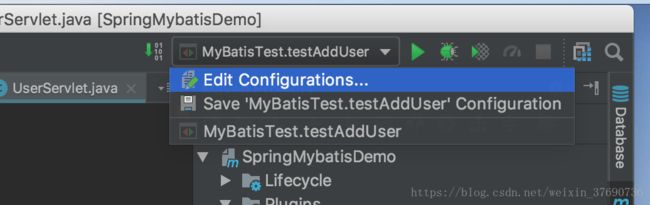
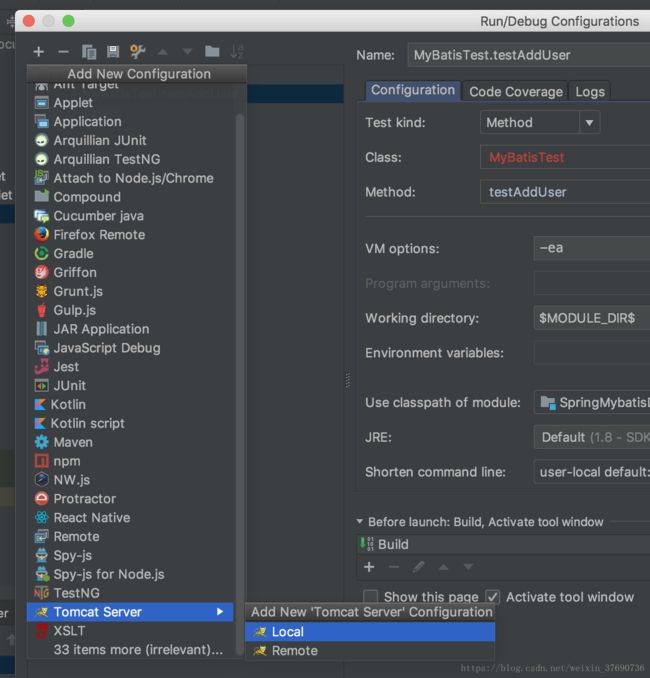
在编译器右上角,点击Edit Configurations.
添加Tomcat-local
设置部署项

4. 以上,Tomcat部署完成,运行项目
如果遇到浏览器输入地址localhost:8080/无任何响应:
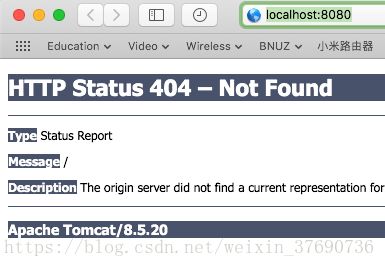
首先删除Tomcat部署,然后点击编译器右侧的Maven Project->Project->LifeCycle->双击clean->双击deploy.
再次按第3步重新部署Tomcat,问题将得到解决。
五. 运行样例


