使用pandas操作DataFrames(三)
目录
第三部分 重新排列和重塑数据
一、轴向旋转(Pivoting DataFrames)
1.1 透视单个变量
1.2 透视所有变量
二、堆叠和取消堆叠(Stacking & unstacking DataFrames)
2.1 堆叠和拆堆I(Stacking & unstacking)
2.2 堆叠和拆堆II(Stacking & unstacking)
2.3 恢复索引顺序(Restoring the index order)
三、融化(Melting DataFrames)
3.1 添加名称以提高可读性
3.2 从广泛到长久
3.3 使用melt()获取键值对
四、透视表(Pivot tables)
4.1 设置数据透视表
4.2 在数据透视表中使用其他聚合
4.3 在数据透视表中使用marginins
第三部分 重新排列和重塑数据
学习如何使用旋转,熔化,堆叠和取消堆叠等技术重塑DataFrame。 这些功能强大,可整理和重新排列数据,使其能够最轻松地分析数据以获得洞察力。
一、轴向旋转(Pivoting DataFrames)
1.1 透视单个变量
假设为一个乐队创建了一个博客,并且想记录拥有的访问者数量,以及简报注册了多少。 为了稍后设计游览,可以跟踪访问者的位置。 已预先加载了一个名为users的包含此信息的DataFrame。
检查IPython Shell中的用户并记下要用于索引行的变量('weekday'),要用于索引列的变量('city'),以及将填充值的变量 在cell中('visitors')。例如,在视频中,Dhavide使用“处理”来对行进行索引,使用“性别”来对列进行索引,并使用“响应”来填充单元格。 在透视之前,DataFrame看起来像这样:

在本练习中,转移users,使焦点在于“访问者”,其中列索引为为'city',行索引为'weekday'。
index参数,可用于指定不需要透视的列。
必须指定的另外两个参数是columns(要透视的列的名称)和values(透视列时要使用的值)
# Pivot the users DataFrame: visitors_pivot
visitors_pivot = users.pivot(index='weekday',columns='city',values='visitors')

# Print the pivoted DataFrame
print(visitors_pivot)
1.2 透视所有变量
如果没有选择任何特定变量,则所有变量都将被旋转。 在这种情况下 - 使用users DataFrame - “visitors”和“signups”都将被旋转,从而创建分层列标签。
# Pivot users with signups indexed by weekday and city: signups_pivot
signups_pivot = users.pivot(index='weekday',columns='city',values='signups')

# Print signups_pivot
print(signups_pivot)

# Pivot users pivoted by both signups and visitors: pivot
pivot = users.pivot(index='weekday',columns='city')

# Print the pivoted DataFrame
print(pivot)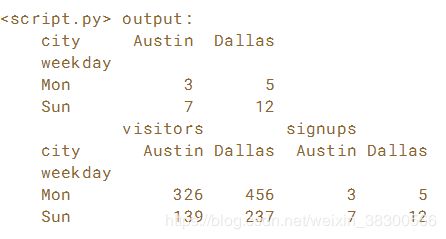
二、堆叠和取消堆叠(Stacking & unstacking DataFrames)
2.1 堆叠和拆堆I(Stacking & unstacking)
unstack :将多层索引转换会单层索引,默认情况下,unstack操作的是最内层。
传入分层级别的编号或名称即可对其他级别进行unstack操作。
stack:将单层索引转化成多层。
# Unstack users by 'weekday': byweekday
byweekday = users.unstack(level='weekday')

# Print the byweekday DataFrame
print(byweekday)

# Stack byweekday by 'weekday' and print it
print(byweekday.stack())
2.2 堆叠和拆堆II(Stacking & unstacking)
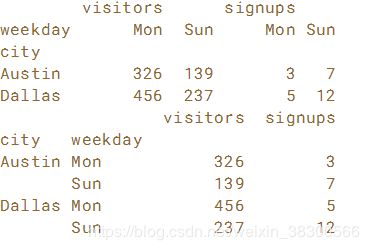
使用users DataFrame。 与往常一样,首先在IPython Shell中探索它以查看布局并记下索引。你在这个练习中的工作是取消堆叠然后叠加'city'级别,就像你之前为'weekday'所做的那样。 无法获得相同的DataFrame。
# Unstack users by 'city': bycity
bycity = users.unstack(level='city')

# Print the bycity DataFrame
print(bycity)

# Stack bycity by 'city' and print it
print(bycity.stack(level='city')) 
总结:被unstack的那列变成行时,在stack后它会变到内层。默认lever时,unstack、stack后恢复原来的DataFrame。对其他级别进行unstack、stack后恢复不到原来的DataFrame。
2.3 恢复索引顺序(Restoring the index order)
继续上一个练习,使用.swaplevel(0,1)来翻转索引级别。 请注意,它们不会被排序。 要对它们进行排序,必须用.sort_index()进行跟进。 然后获得原始DataFrame。 请注意,未排序的索引会导致切片失败。
首先,在IPython Shell中打印users和bycity。 这里的目标是将city转换回看起来像users的东西
# Stack 'city' back into the index of bycity: newusers
newusers = bycity.stack(level='city')

# Swap the levels of the index of newusers: newusers
newusers = newusers.swaplevel(0,1)

# Print newusers and verify that the index is not sorted
print(newusers)

# Sort the index of newusers: newusers
newusers = newusers.sort_index()

# Print newusers and verify that the index is now sorted
print(newusers)

# Verify that the new DataFrame is equal to the original
print(newusers.equals(users))

三、融化(Melting DataFrames)
3.1 添加名称以提高可读性
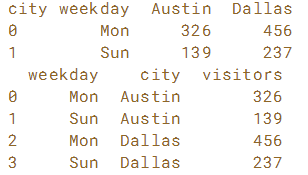
练习融化DataFrames。已预加载名为visitor_by_city_weekday的DataFrame。在IPython Shell中探索它,看看它是以前练习中的users DataFrame,其行由'weekday'索引,列为'city'的列,以及填充'visitor'的值。
融化的目标是将一个旋转的DataFrame恢复到原始形状,或者将其从宽形状(列)改变为长形状(行)。使用id_vars显式指定应保留在重新整形的DataFrame中的列,并列出要转换为value_vars值的列。如果你没有将名字传递给pd.melt()中的值,你将丢失变量的名称。使用value_name关键字参数来解决此问题。融合visitor_by_city_weekday,将城市名称从列标签移动到名为“city”的单个列中的值。
# Reset the index: visitors_by_city_weekday
visitors_by_city_weekday = visitors_by_city_weekday.reset_index()

# Print visitors_by_city_weekday
print(visitors_by_city_weekday)

# Melt visitors_by_city_weekday: visitors
visitors = pd.melt(visitors_by_city_weekday, id_vars=['weekday'], value_name='visitors')

# Print visitors
print(visitors)
左边:没reset_index()的

3.2 从广泛到长久
通过“熔化”多个列将多个列移动到一个列中(使数据变长且变细)。 已为您预加载users DataFrame。 与往常一样,在IPython Shell中探索它并记下索引。
# Melt users: skinny
skinny = pd.melt(users,id_vars=['weekday','city'])

# Print skinny
print(skinny)

3.3 使用melt()获取键值对
有时,只需要一些键值对,上下文无关紧要。 如果所述上下文在索引中,可以轻松获得所需内容。 例如,在users DataFrame中,'visitors'和'signups'列很适合表示为键值对。 因此,如果创建了以“city”和“weekday”列作为索引的层次结构索引,则可以通过融合users并指定col_level = 0轻松地为'visitors'和'signups'列提取键值对。
# Set the new index: users_idx
users_idx = users.set_index(['city','weekday'])

# Print the users_idx DataFrame
print(users_idx)

# Obtain the key-value pairs: kv_pairs
kv_pairs = pd.melt(users_idx,col_level=0)

四、透视表(Pivot tables)
4.1 设置数据透视表
数据透视表允许将所有变量视为另外两个变量的函数。 在本练习中,使用.pivot_table()方法查看users DataFrame 在作为'weekday'和'city'列的功能显示时的显示方式。 也就是说,使用'weekday'索引的行和'city'索引的列。
在使用数据透视表之前,在IPython Shell中打印用户DataFrame并观察布局。
# Create the DataFrame with the appropriate pivot table: by_city_day
by_city_day = users.pivot_table(index='weekday',columns='city')

# Print by_city_day
print(by_city_day)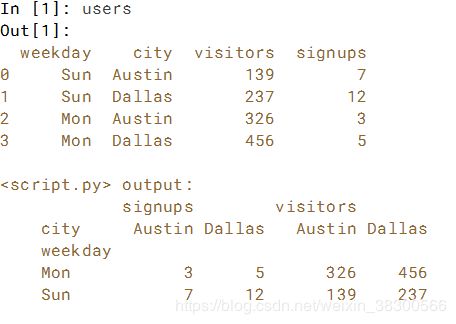
4.2 在数据透视表中使用其他聚合
通过指定aggfunc参数在数据透视表中使用聚合函数。 在本练习中,在users DataFrame上使用'count'和len聚合函数(它们产生相同的结果)。
# Use a pivot table to display the count of each column: count_by_weekday1
count_by_weekday1 = users.pivot_table(index='weekday',aggfunc='count')

# Print count_by_weekday
print(count_by_weekday1)

# Replace 'aggfunc='count'' with 'aggfunc=len': count_by_weekday2
count_by_weekday2 = users.pivot_table(index='weekday',aggfunc=len)

# Verify that the same result is obtained
print('==========================================')
print(count_by_weekday1.equals(count_by_weekday2))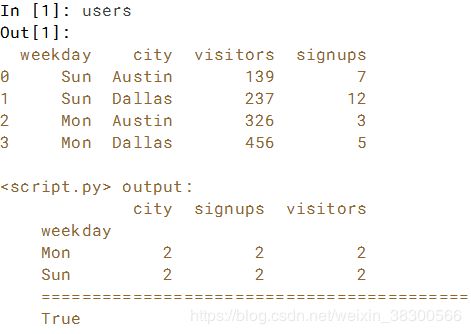
4.3 在数据透视表中使用marginins
有时在数据透视表的边缘添加总计很有用。 您可以使用参数marginins = True来执行此操作。 在本练习中,使用数据透视表中的边距以及新的聚合函数:sum。users DataFrame已经预先加载
