常用工作资源加速方法:Linux镜像/pip/docker/npm&yarn等
Linux镜像加速、pip加速、docker加速
- 1 Linux镜像加速
- 1.1 Ubuntu 16.04
- 1.2 CentOS7
- 2 pip加速
- 2.1 Linux&Mac
- 2.2 windowns
- 3 docker加速
- Ubuntu
- Centos
- Windonws&Mac
- 3 npm&yarn加速
- 3.1 npm
- 3.1.1 cnpm
- 3.1.2 定义新命令
- 3.1.3 直接修改源
- 3.2 yarn
- 4 python虚拟环境
- 4.1 venv
- 4.2 virtualenv&virtualenvwrapper
1 Linux镜像加速
1.1 Ubuntu 16.04
先备份:
sudo cp /etc/apt/sources.list /etc/apt/sources.list.bak
然后修改为下面的内容:
sudo vim /etc/apt/sources.list
deb http://mirrors.aliyun.com/ubuntu/ xenial main restricted universe multiverse
deb http://mirrors.aliyun.com/ubuntu/ xenial-security main restricted universe multiverse
deb http://mirrors.aliyun.com/ubuntu/ xenial-updates main restricted universe multiverse
deb http://mirrors.aliyun.com/ubuntu/ xenial-proposed main restricted universe multiverse
deb http://mirrors.aliyun.com/ubuntu/ xenial-backports main restricted universe multiverse
deb-src http://mirrors.aliyun.com/ubuntu/ xenial main restricted universe multiverse
deb-src http://mirrors.aliyun.com/ubuntu/ xenial-security main restricted universe multiverse
deb-src http://mirrors.aliyun.com/ubuntu/ xenial-updates main restricted universe multiverse
deb-src http://mirrors.aliyun.com/ubuntu/ xenial-proposed main restricted universe multiverse
deb-src http://mirrors.aliyun.com/ubuntu/ xenial-backports main restricted universe multiverse
参考链接:https://blog.csdn.net/weixin_39198406/article/details/79669048
1.2 CentOS7
备份原yum配置:
sudo mv /etc/yum.repos.d/CentOS-Base.repo /etc/yum.repos.d/CentOS-Base.repo.backup
下载配置并覆盖之前的配置:
sudo wget -O /etc/yum.repos.d/CentOS-Base.repo http://mirrors.aliyun.com/repo/Centos-7.repo
sudo curl -o /etc/yum.repos.d/CentOS-Base.repo http://mirrors.aliyun.com/repo/Centos-7.repo
参考链接:https://blog.csdn.net/qq_38970189/article/details/93885459
2 pip加速
编写配置文件,在Windowns中是pip.ini,在Linux中是pip.conf,内容如下:
[global]
trusted-host=mirrors.aliyun.com
index-url=http://mirrors.aliyun.com/pypi/simple/
上述使用阿里云的源,根据经验会比清华源稳定一点,有的网络使用清华源下载某些比较大的包的时候会time out。
如果设置清华源,按下面的地址设置:
[global]
trusted-host=pypi.tuna.tsinghua.edu.cn
index-url=https://pypi.tuna.tsinghua.edu.cn/simple
当然,还有腾讯、163、豆瓣等源,网上都能搜到。
创建完之后,根据不同的OS类型放在不同的地方。
2.1 Linux&Mac
在Linux和Mac下,pip.conf文件放在~/.pip/pip.conf。
2.2 windowns
Windows下,进入%AppData%路径,创建pip文件夹,把pip.ini放在该文件夹。
https://blog.csdn.net/weixin_40240670/article/details/80616834
3 docker加速
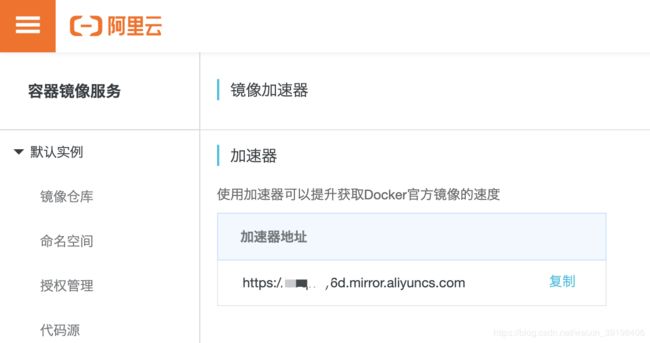
推荐使用阿里云镜像加速器。
在阿里云上申请之后便可以免费使用。

具体配置方法如下,这里列出常用的,在上述页面上也有。
Ubuntu
sudo mkdir -p /etc/docker
sudo tee /etc/docker/daemon.json <<-'EOF'
{
  "registry-mirrors": ["https://97qnoy6d.mirror.aliyuncs.com"]
}
EOF
sudo systemctl daemon-reload
sudo systemctl restart docker
Centos
sudo mkdir -p /etc/docker
sudo tee /etc/docker/daemon.json <<-'EOF'
{
  "registry-mirrors": ["https://97qnoy6d.mirror.aliyuncs.com"]
}
EOF
sudo systemctl daemon-reload
sudo systemctl restart docker
Windonws&Mac
如果你安装的是Docker Desktop的Windowns或者Mac版本,可以直接在桌面端上配置mirrors地址,具体方法如下:
Windowns:Settings => Docker Engine
Mac OS:Preferences => Daemon => Regisry mirrors
3 npm&yarn加速
3.1 npm
3.1.1 cnpm
npm加速国内最常用的就是cnpm,就是淘宝NPM镜像。
先安装cnpm:
npm install -g cnpm --registry=https://registry.npm.taobao.org
然后使用cnpm运行安装命令就可以了:
cnpm install
3.1.2 定义新命令
这个方式不适用于Windowns:
alias cnpm="npm --registry=https://registry.npm.taobao.org \
--cache=$HOME/.npm/.cache/cnpm \
--disturl=https://npm.taobao.org/dist \
--userconfig=$HOME/.cnpmrc"

# Or alias it in .bashrc or .zshrc
$ echo '\n#alias for cnpm\nalias cnpm="npm --registry=https://registry.npm.taobao.org \
  --cache=$HOME/.npm/.cache/cnpm \
  --disturl=https://npm.taobao.org/dist \
  --userconfig=$HOME/.cnpmrc"' >> ~/.zshrc && source ~/.zshrc
3.1.3 直接修改源
npm config set registry https://registry.npm.taobao.org
通过这个命令进行测试:
npm config get registry
3.2 yarn
修改源:
yarn config set registry https://registry.npm.taobao.org/
这篇有比较详细的讲解:yarn 国内加速,修改镜像源
4 python虚拟环境
4.1 venv
Python3自带了venv,而且可以直接代替Virtualenv。
需要注意的是,在Python3.3中使用venv命令创建的环境不包含pip,你需要进行手动安装。但是只有版本在3.3之上都没有问题啦。
使用下面的命令,直接创建了文件夹,并在文件夹中生成了虚拟环境。
python -m venv python_ven_demo
进入虚拟环境,不同的OS有所不同:
Linux和Mac:
source python_ven_demo/bin/activate
Windowns CMD:
C:> <XXX>/python_ven_demo/Scripts/activate.bat
Windowns PowerShell:
PS C:> <XXX>/python_ven_demo/Scripts/Activate.ps1
退出虚拟环境都一样:
deactivate
https://www.jianshu.com/p/c5f973fd34d4
4.2 virtualenv&virtualenvwrapper
介绍这个工具的博客很多,可参见:python开发之virtualenv与virtualenvwrapper讲解