Caffe环境搭建--ubuntu16.04+anaconda2+dlib+opencv2+caffe(CPU)+openblas+qt4.8+pycharm
写在前面
Caffe环境搭建比较麻烦,多次失败后。下面是一些自己经历,供参考。
目录
- 1 本机环境
- 1.1 ubuntu16.04由空系统开始
- 1.2 Caffe安装顺序
- 2 opencv2.4安装
- 2.1 下载地址
- 2.2 安装流程
- anaconda2下载与安装
- 3 openblas安装
- 3.1 下载地址
- 3.2 安装流程
- 4 dlib的安装
- 3.1 下载地址
- 3.2 安装流程
- 5 caffe的安装
- 5.1 下载地址
- 5.2 安装流程
- 5.2.1 caffe的依赖包
- 5.2.2 配置文件的修改
- 5.2.3 编译与测试
- 5.2.4生成python的caffe接口
- 5.2.5 import caffe
- 至此所有安装全部结束
- 6 安装pycharm
- 7 自己的源文件
- 8 整理好的文档,拿走不谢
- 9 后记
1 本机环境
自己的环境是:ubuntu16.04+anaconda2+dlib+opencv2+caffe(CPU)
1.1 ubuntu16.04由空系统开始
这里我给出了链接:
https://blog.csdn.net/weixin_39956356/article/details/91348507
里面有几个注意事项,你可以参考下。
坑:我建议和我一样,因为Caffe官网现在建议使用ubuntu17.04了,如果你使用ubuntu14或者更早的版本你会遇到很多问题,我试过了,我面对花式报错,我放弃了。
1.2 Caffe安装顺序
最好采用下面的的安装顺序,自己试了很多次了,或许是经验吧
opencv2.4--->anaconda2--->openblas--->dlib--->caffe
(1):不要先装anaconda2,装了会影响opencv2的安装的
(2):接下来若其中一步出现问题,无法解决的话,重来!!!不要继续装后面的,没有用。
(3):检查自己电脑是否具有GPU-N卡,若如没有,不要紧张,用无CPU版本试试手,深度学习并不是一口气吃个胖子,而且对对电脑要求高,量力而行,通过无cpu的折腾,你也可以学到很多。
lspci | grep -i nvidia
2 opencv2.4安装
2.1 下载地址
我用的是2.4的:https://opencv.org/releases/
2.2 安装流程
(1):下面内容很多,请耐心阅读。
(2):所有用到的源码最后打包成百度网盘。
(3):可以用windows下载通过SSH传到ubuntu里,uzip,tar.gz,tar.bz2等格式都可以,你熟悉啥就下啥。在ubuntu里下有点慢。
1.解压,进入文件夹,新建build文件夹,进入
	unzip opencv-2.4.13.6.zip
	cd opencv-2.4.13.6
	mkdir build; cd build
2.安装opencv的依赖包,后面会测试安装的opencv能否使用
	2.1:apt-get install build-essential libgtk2.0-dev libavcodec-dev libavformat-dev libjpeg62-dev libtiff5 libswscale-dev libjasper-dev
		原文:https://blog.csdn.net/honyniu/article/details/46390097
下面2.2操作特别重要,我试了很久和找了很多资料。cv2.so是python的接口,编译没生成的话,可以考虑这个问题。
	2.2:opencv必须要numpy依赖包和更新--python-dev。否则无法编译生成cv2.so
		apt-get install python-dev python-numpy
对于初学的我,建议先使用cmake-gui,这个图形界面很容易帮助你入门,我相信在linux/unix make这块你很懵逼的,尤其是后面交叉编译,一堆参数,建议事后阅读相关书籍。
	2.3:编译要用到cmake,为了方便选择编译的模块,建议安装带图形的cmake-gui,不然就只有make后面带一串配置参数(make xx=xx,...)
		apt-get install cmake cmake-curses-gui cmake-gui
对于大家都喜欢建立一个build文件夹,在进入操作,其实是一个好习惯,为什么呢?多试几次,你会发现生成的中间配置文件放在build中,可以方便管理和删除,否则就和源文件在同一位置,你都不知道新生成的啥文件。
	2.4:在build文件夹下执行cmake-gui ..  弹出的图形界面开始空的哈!不用紧张的
		点击左下方的configure-->点击Finish即可(要等一会哦)
很好奇,下面的两项是啥?是交叉编译选项(cross-compiling),移植再说,这里X86平台问题还少一些。

配置成无GPU,可以清楚的看见opencv依赖numpy、安装路径(自己可以修改)、使用的编译器、目标cv2.so的路径,如果先安装了anaconda2,会影响这个路径的。
		这里要去掉CUDA的配置项,不用GPU训练
			把WITH-CUDA和BUILD_opencv_gpu选项去掉打钩,其他不用改变
			依次点击configure和Generate,关闭

对于opencv编译要花很久,所以在之前我就建议全部分配CPU给虚拟机,没有问题的。
			编译安装--make -j4 && make install -j4(j4:四线程编译,无的话,要编译很久--慢的话要半个小时!)
				我测过了,编译安装没有任何问题,对于初学者,如果有问题请保持我的环境!
				看看在cv2.so生成路径是否有cv2.so,没有请停止重来!
				生成路径:/usr/local/lib/python2.7/dist-packages/下面有了两个文件
			原文:https://blog.csdn.net/jindunwan7388/article/details/80397700
![]()
更改环境变量和添加opencv动态链接库路径。必做,你弄多了,发现这两部几乎都有,很有意思。
	2.5:更改环境变量
		打开 vim /etc/profile(vim/vi/gedit均可)
		在文件最后添加   export PKG_CONFIG_PATH=$PKG_CONFIG_PATH:/usr/local/lib/pkgconfig
		环境变量立即生效 source /etc/profile
	2.6:将 opencv2 lib库添加在系统中
			若忘记opencv2在哪儿了,查找存在的目录 find / -name opencv2 -print
		打开 vim /etc/ld.so.conf.d/opencv.conf 这个文件是空的
		添加一句 /usr/local/lib,保存即可。我是默认的,如果改了路径要改为对应的路径--见上输出路径即可。
		配置立即生效 ldconfig
你一定很奇怪,为啥要这么操作?
(1):动态链接库xxx.so(dynamic link library),在程序运行时,需要动态加载,相对的静态链接库xxx.lib(static link library),不需要动态加载。其缺点:对大型程序而言,静态链接库运行的时候要占用很大的内存空间,导致运行缓慢。
(2): vim /etc/ld.so.conf.d/opencv.conf 这个文件是空的?
我带你看看为啥要这么干?
打开文件 vim /etc/ld.so.conf,发现你所建立的文件其实都内包含了,这也是个技巧。
ldconfig就将 /etc/ld.so.conf生效。

![]()
如果你不这么做,那么在其他程序调用opencv将会报错,找不到动态链接库在哪。很明显。
比如下面的例子,你就会知道怎么解决了,举一反三。
error while loading shared libraries: libopenblas.so.0: cannot open shared object file: No such file or directory
测试opencv2是否安装好了,成功的话输出一张图片
	2.7:测试opencv2是否安装好
		进入cd ../samples/c
		./build_all.sh
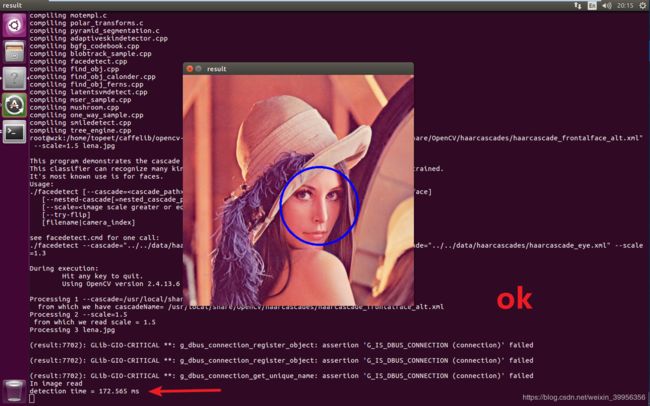
		./facedetect --cascade="/usr/local/share/OpenCV/haarcascades/haarcascade_frontalface_alt.xml" --scale=1.5 lena.jpg
		看到下面的图就OK了。

测试python是否可以导入import cv2,其实这才是我们的目的哈。
	2.8:测试python是否可以导入import cv2
		2.8.1:将生成的cv2.so拷贝到anaconda的目录下
在这里穿插下安装anaconda2,比较简单。
anaconda2下载与安装
下载地址:https://repo.continuum.io/archive/
linux下载xxxx.sh即可,几乎大部分部署都会使用anaconda,它的包管理器很容易帮你管理所有组件,容易增、删、升级/降级到指定版本组件,只需要运行conda相关命令。
安装:
(1):记得给X权限,直接执行./Anaconda-2.3.0-Linux-x86_64.sh即可,全程默认,安装在/root/anaconda下,
(2):里面有个阅读相关隐私政策的,是more,按空格-下翻一页,不要一直回车,按多了就结束安装了,默认是no。
(3):环境变量也要加上,最后一个yes
			cp /usr/local/lib/python2.7/dist-packages/cv2.so /root/anaconda/lib/python2.7/site-packages/
		2.8.2:重开终端,输入python,输出“Python 2.7.10 |Anaconda 2.3.0 (64-bit)| (default, May 28 2015, 17:02:03)”,则anaconda安装成功
2.8.3:import cv2
报错:RuntimeError: module compiled against API version 0xa but this version of numpy is 0x9

分析:大概意思是opencv2用0xa(1.10版本)编译的,而anaconda是0x9的,所以有问题,要升级。
			查看当前numpy版本信息(应该是1.9.2):两种方法
				(1):pip show numpy
				(2):pip show numpy  print numpy.__path__   print numpy.__version__

切勿更新到最新版,虽然现在不会有问题,之后还会遇到numpy版本的问题。。实事求是,要什么安装什么。
			解决办法:
				第一种方法是网上给的,这样做是有问题的!!!,因为opencv2编译用的是0xa版本,而anaconda环境是(0x9)1.9.2版本,所以必须更新到1.10版本!!!
				(1):pip install -U numpy     更新到最新版,虽然会解决问题,之后的caffe会花式报错
				用pip指定更新到1.11.1版本
				(2):pip install -U numpy==1.10.1   -U:升级的意思
			再一次import cv2,就没有任何问题了。
3 openblas安装
3.1 下载地址
https://github.com/xianyi/OpenBLAS/releases
(1):我用的OpenBLAS-0.2.20,其他的都可以,只是需要c++11特性的编译器,即至少是gcc 4.8版本以上,对于低版本,在交叉编译会遇到报错,无解,只有升级交叉工具链,在移植的时候在讲。
(2):对于ubuntu16.04 gcc版本默认是5.4.0,所以不用担心,即使版本过低,只需要升级即可,比较简单。

3.2 安装流程
自己直接把它安装到build里了,你自己按需更改。
	1.解压,进入文件夹
		tar -vxf OpenBLAS-0.2.20.tar.gz
		cd OpenBLAS-0.2.20
	2.直接编译
		make -j4
	3.新建build文件夹,进入,安装
		mkdir build; cd build
		安装:make PREFIX=/home/topeet/caffelib/OpenBLAS-0.2.20/build install
老办法:更新openblas的动态链接库到系统。
	4.lib库加载进系统
		vim /etc/ld.so.conf.d/dlib.conf
		加上一句libopenblas.so.0的路径  /home/topeet/caffelib/OpenBLAS-0.2.20/build/lib/
		配置立即生效 ldconfig
	5.如果不做第4步将会在caffe编译报错
		error while loading shared libraries: libopenblas.so.0: cannot open shared object file: No such file or directory
		解决办法:系统不知道xxx.so放在哪个目录下,这个时候就要在/etc/ld.so.conf/xxx.conf中加入xxx.so所在的目录。
			首先查找存在的目录find / -name xxx.so -print
			新建文件 vim /etc/ld.so.conf/xxx.conf
			加入目标xxx.so文件路径
			原文:https://blog.csdn.net/ariessurfer/article/details/7984001
4 dlib的安装
dlib是人脸识别的库,里面包含人脸检测,人脸5点轮廓等,在机器视觉中很流行。
3.1 下载地址
https://pypi.org/simple/dlib/
3.2 安装流程
官网上有dilb的安装过程,建议参考下。
dlib官网: http://dlib.net/compile.html
	1.解压,进入examples文件夹,新建build文件夹,进入
		tar -vxf dlib-19.13.tar.bz2
		cd dlib-19.13/examples
		mkdir build; cd build
	2.生成Makefile文件,编译
		cmake ..
		cmake -j4
		安装官网:http://dlib.net/compile.html
	3.安装python的接口,不然无法import dlib
		python setup.py install
5 caffe的安装
5.1 下载地址
	1.下载caffe的源码,clone下来
		apt-get install git
		git clone https://github.com/BVLC/caffe.git
5.2 安装流程
5.2.1 caffe的依赖包
先弄出遇到的问题,再给出完整依赖包,在交叉编译,我会在阐述各依赖包的含义。
		./include/caffe/common.hpp:5:27: fatal error: gflags/gflags.h: No such file or directory
			解决:apt-get install libgflags-dev

		./include/caffe/common.hpp:6:26: fatal error: glog/logging.h: No such file or directory
			解决:apt-get install libgoogle-golg-dev

		./include/caffe/util/db_lmdb.hpp:8:18: fatal error: lmdb.h: No such file or directory
			解决:apt-get install liblmdb-dev

		 还有一个是opencv的动态链接库问题。见上。
下面是全部依赖包
		apt-get install libprotobuf-dev libleveldb-dev libsnappy-dev libhdf5-serial-dev libgflags-dev libgoogle-glog-dev liblmdb-dev protobuf-compiler
		apt-get install --no-install-recommends libboost-all-dev
5.2.2 配置文件的修改
将配置文件更名,不然编译不了。
进入caffe文件夹,将Makefile.config.example更名为Makefile.config
				cd caffe
				mv Makefile.config.example Makefile.config
具体修改地方:
		3.2:8行,CPU_ONLY := 1前面的#去掉(#是注释的意思)
		3.3:30、39行,把CUDA去掉
		3.4:之前装了openblas,现在要编译进去,根据你自己的情况添加正确的路径
				53行,修改为 BLAS := open
				57行,修改为BLAS_INCLUDE := /home/topeet/caffelib/OpenBLAS-0.2.20/build/include
				58行,修改为BLAS_LIB := /home/topeet/caffelib/OpenBLAS-0.2.20/build/lib
		3.5:修改系统的python环境,因为这里使用了anaconda环境
			(1):注释两处,将系统的python环境注释掉
				71行,添加#  #PYTHON_INCLUDE := /usr/include/python2.7 \
											/usr/lib/python2.7/dist-packages/numpy/core/include
				86行,添加#  #PYTHON_LIB := /usr/lib
			(2):取消注释三处,添加anaconda环境
				75行,去掉#,并且修改正确的anaconda路径,我是默认安装的  ANACONDA_HOME := /root/anaconda
				76行,去掉#,注意后面的斜杠是将下面的连在一起的
				87行,去掉#,PYTHON_LIB := $(ANACONDA_HOME)/lib
		3.6:添加hdf5的路径,否则编译caffe报错
			报错:fatal error: hdf5.h,No such file
			注意空格哈!
			修改:apt-get安装的,都是这个,如果你自己编译安装的,自己用find查找  find / -name hdf5 -print
			97行,INCLUDE_DIRS := $(PYTHON_INCLUDE) /usr/local/include /usr/include/hdf5/serial
			98行,LIBRARY_DIRS := $(PYTHON_LIB) /usr/local/lib /usr/lib /usr/lib/x86_64-linux-gnu/hdf5/serial
我把我自己的配置文件贴出来,供你参考。
## Refer to http://caffe.berkeleyvision.org/installation.html
# Contributions simplifying and improving our build system are welcome!

# cuDNN acceleration switch (uncomment to build with cuDNN).
# USE_CUDNN := 1

# CPU-only switch (uncomment to build without GPU support).
 CPU_ONLY := 1

# uncomment to disable IO dependencies and corresponding data layers
# USE_OPENCV := 0
# USE_LEVELDB := 0
# USE_LMDB := 0
# This code is taken from https://github.com/sh1r0/caffe-android-lib
# USE_HDF5 := 0

# uncomment to allow MDB_NOLOCK when reading LMDB files (only if necessary)
#	You should not set this flag if you will be reading LMDBs with any
#	possibility of simultaneous read and write
# ALLOW_LMDB_NOLOCK := 1

# Uncomment if you're using OpenCV 3
# OPENCV_VERSION := 3

# To customize your choice of compiler, uncomment and set the following.
# N.B. the default for Linux is g++ and the default for OSX is clang++
# CUSTOM_CXX := g++

# CUDA directory contains bin/ and lib/ directories that we need.
#CUDA_DIR := /usr/local/cuda
# On Ubuntu 14.04, if cuda tools are installed via
# "sudo apt-get install nvidia-cuda-toolkit" then use this instead:
# CUDA_DIR := /usr

# CUDA architecture setting: going with all of them.
# For CUDA < 6.0, comment the *_50 through *_61 lines for compatibility.
# For CUDA < 8.0, comment the *_60 and *_61 lines for compatibility.
# For CUDA >= 9.0, comment the *_20 and *_21 lines for compatibility.
#CUDA_ARCH := -gencode arch=compute_20,code=sm_20 \
		-gencode arch=compute_20,code=sm_21 \
		-gencode arch=compute_30,code=sm_30 \
		-gencode arch=compute_35,code=sm_35 \
		-gencode arch=compute_50,code=sm_50 \
		-gencode arch=compute_52,code=sm_52 \
		-gencode arch=compute_60,code=sm_60 \
		-gencode arch=compute_61,code=sm_61 \
		-gencode arch=compute_61,code=compute_61

# BLAS choice:
# atlas for ATLAS (default)
# mkl for MKL
# open for OpenBlas
BLAS := open
# Custom (MKL/ATLAS/OpenBLAS) include and lib directories.
# Leave commented to accept the defaults for your choice of BLAS
# (which should work)!
 BLAS_INCLUDE := /home/topeet/caffelib/OpenBLAS-0.2.20/build/include
 BLAS_LIB := /home/topeet/caffelib/OpenBLAS-0.2.20/build/lib

# Homebrew puts openblas in a directory that is not on the standard search path
# BLAS_INCLUDE := $(shell brew --prefix openblas)/include
# BLAS_LIB := $(shell brew --prefix openblas)/lib

# This is required only if you will compile the matlab interface.
# MATLAB directory should contain the mex binary in /bin.
# MATLAB_DIR := /usr/local
# MATLAB_DIR := /Applications/MATLAB_R2012b.app

# NOTE: this is required only if you will compile the python interface.
# We need to be able to find Python.h and numpy/arrayobject.h.
#PYTHON_INCLUDE := /usr/include/python2.7 \
		/usr/lib/python2.7/dist-packages/numpy/core/include
# Anaconda Python distribution is quite popular. Include path:
# Verify anaconda location, sometimes it's in root.
 ANACONDA_HOME := /root/anaconda
 PYTHON_INCLUDE := $(ANACONDA_HOME)/include \
		# $(ANACONDA_HOME)/include/python2.7 \
		# $(ANACONDA_HOME)/lib/python2.7/site-packages/numpy/core/include

# Uncomment to use Python 3 (default is Python 2)
# PYTHON_LIBRARIES := boost_python3 python3.5m
# PYTHON_INCLUDE := /usr/include/python3.5m \
#                 /usr/lib/python3.5/dist-packages/numpy/core/include

# We need to be able to find libpythonX.X.so or .dylib.
#PYTHON_LIB := /usr/lib
 PYTHON_LIB := $(ANACONDA_HOME)/lib

# Homebrew installs numpy in a non standard path (keg only)
# PYTHON_INCLUDE += $(dir $(shell python -c 'import numpy.core; print(numpy.core.__file__)'))/include
# PYTHON_LIB += $(shell brew --prefix numpy)/lib

# Uncomment to support layers written in Python (will link against Python libs)
# WITH_PYTHON_LAYER := 1

# Whatever else you find you need goes here.
INCLUDE_DIRS := $(PYTHON_INCLUDE) /usr/local/include /usr/include/hdf5/serial
LIBRARY_DIRS := $(PYTHON_LIB) /usr/local/lib /usr/lib /usr/lib/x86_64-linux-gnu/hdf5/serial

# If Homebrew is installed at a non standard location (for example your home directory) and you use it for general dependencies
# INCLUDE_DIRS += $(shell brew --prefix)/include
# LIBRARY_DIRS += $(shell brew --prefix)/lib

# NCCL acceleration switch (uncomment to build with NCCL)
# https://github.com/NVIDIA/nccl (last tested version: v1.2.3-1+cuda8.0)
# USE_NCCL := 1

# Uncomment to use `pkg-config` to specify OpenCV library paths.
# (Usually not necessary -- OpenCV libraries are normally installed in one of the above $LIBRARY_DIRS.)
# USE_PKG_CONFIG := 1

# N.B. both build and distribute dirs are cleared on `make clean`
BUILD_DIR := build
DISTRIBUTE_DIR := distribute

# Uncomment for debugging. Does not work on OSX due to https://github.com/BVLC/caffe/issues/171
# DEBUG := 1

# The ID of the GPU that 'make runtest' will use to run unit tests.
TEST_GPUID := 0

# enable pretty build (comment to see full commands)
Q ?= @
5.2.3 编译与测试
先编译,建议使用所有资源,也要等好久的。
	4.编译
		make all -j4
		虽然上面已经将很多错误都避开了,但是任然有些错误需要注意:

	5.测试,下面两步都不会有问题的,如果出错,那就要重来的,或者解决
		make test -j4

	6.如果在上面的7.5已经完成,还可能报错。而且执行时间有点久
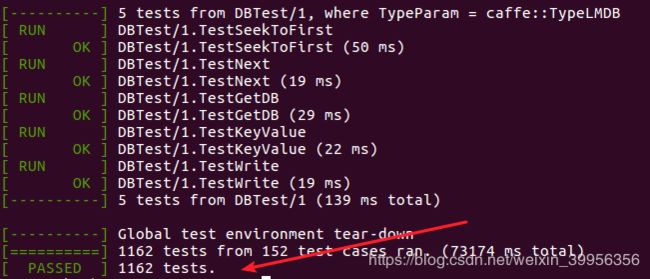
		make runtest
如果在上面操作过程中,出现动态链接库的问题,请参照上面的解决方式。
测试成功:

5.2.4生成python的caffe接口
若报错“找不到Python.h”,添加python2.7的环境变量。
make pycaffe
		报错:python/caffe/_caffe.cpp:1:52: fatal error: Python.h: No such file or directory
			解决:在.bashrc中添加anaconda的python2.7的环境变量
					.bashrc在根录下。。  cd
					vim .bashrc
					最后添加一句  export CPLUS_INCLUDE_PATH="/root/anaconda/include/python2.7:$CPLUS_INCLUDE_PATH"
					保存退出      source .bashrc
			原文:https://blog.csdn.net/weixin_40258579/article/details/85039448
5.2.5 import caffe
在import caffe前,必须指出caffe路径。有几种方式,用下面的比较好
		import sys
		sys.path.append('/home/topeet/caffe/python')
		import caffe
下面还有两处报错,第二个是之前已经提及了的。
		报错:ImportError: No module named google.protobuf.internal
			解决:pip install protobuf  不行多试几遍
		原文:https://blog.csdn.net/change_things/article/details/80817570
		报错:RuntimeError: module compiled against API version 0xa but this version of numpy is 0x9
			解决:请更新到提示正确的numpy版本去,不要像网上讲的反复卸载/安装numpy,没有用的!!!
		原文:https://www.2cto.com/kf/201803/727800.html
至此所有安装全部结束
6 安装pycharm
推荐使用pycharm完成python代码的编写。确实很好用。没有IDE,难道回到记事本时代?
直接解压即可:tar -vxf pycharm-community-2019.1.1.tar.gz
7 自己的源文件
链接: https://pan.baidu.com/s/1W6yVR3Kk2J75g4KI3kPfEA 提取码: eqrc
8 整理好的文档,拿走不谢
	HDF5下载地址:
		https://support.hdfgroup.org/ftp/HDF5/releases/

	golg下载地址:
		https://github.com/google/glog/releases

	leveldb下载地址:
		https://github.com/google/leveldb/

	gflag下载地址:
		https://github.com/gflags/gflags

	boost下载地址:
		https://www.boost.org/users/history/

	protobuf下载地址:
		https://github.com/protocolbuffers/protobuf/releases/tag/v2.5.0

	snappy下载地址:
		https://github.com/google/snappy

	caffe下载地址:
		https://github.com/BVLC/caffe.git

	opencv下载地址:
		https://opencv.org/releases/

	OpenBLAS下载地址:
		https://github.com/xianyi/OpenBLAS/releases

	dlib下载地址:
		https://pypi.org/simple/dlib/
环境如下:
	ubuntu16.04+anaconda2+dlib+opencv2+caffe(CPU)+openblas+qt4.8+pycharm
	这里从ubuntu16.04的镜像从零开始搭建的,caffe的环境并不好搭建,不像TensorFlow
	请不要用ubuntu16.04之前的14.04/12.04,会出现很多问题,现在caffe官网已建议17.04了

一:not syncing : corrupted stack end detected inside scheduler解决办法
	以兼容性5.6-7.x安装

二:更换阿里的源-国内下载速度快
	修改配置文件-- /etc/apt/sources.list
	(1):先备份:cp /etc/apt/sources.list /etc/apt/sources.list.bak
	(2):刚装的Ubuntu16.04,没有vim,有vi和gedit,如果不熟悉vi,就用gedit--和Windows一样的,不要去用apt-get去下vim编辑,真的慢的很
			gedit /etc/apt/sources.list
	复制进去就可以,把原来的删除
	deb http://mirrors.aliyun.com/ubuntu/ xenial main restricted universe multiverse
	deb http://mirrors.aliyun.com/ubuntu/ xenial-security main restricted universe multiverse
	deb http://mirrors.aliyun.com/ubuntu/ xenial-updates main restricted universe multiverse
	deb http://mirrors.aliyun.com/ubuntu/ xenial-backports main restricted universe multiverse
	##测试版源
	deb http://mirrors.aliyun.com/ubuntu/ xenial-proposed main restricted universe multiverse
	# 源码
	deb-src http://mirrors.aliyun.com/ubuntu/ xenial main restricted universe multiverse
	deb-src http://mirrors.aliyun.com/ubuntu/ xenial-security main restricted universe multiverse
	deb-src http://mirrors.aliyun.com/ubuntu/ xenial-updates main restricted universe multiverse
	deb-src http://mirrors.aliyun.com/ubuntu/ xenial-backports main restricted universe multiverse
	##测试版源
	deb-src http://mirrors.aliyun.com/ubuntu/ xenial-proposed main restricted universe multiverse
	# Canonical 合作伙伴和附加
	deb http://archive.canonical.com/ubuntu/ xenial partner
	deb http://extras.ubuntu.com/ubuntu/ xenial main

三:更新--不然你装包的时候会出问题
	apt-get update ---Ubuntu 14.04这里回报很多错误,所以建议用Ubuntu16.04!!!

三:安装vim和VMware Tools
	为什么要安装这两个?
		只有安装VMware Tools了,才会全屏显示,不然看着很难受
		(1):虚拟机->安装vmware tools,会自动挂载,不要自己又挂载了
		(2):最简单的方法:右键复制xxx.tar.gz,到一个新的文件夹下,解压,运行.pl,全程回车
		vim自己的习惯,或者大部分人都会使用vim
四:建议重启下,做个快照,这阶段磁盘会一直是爆的,休息一下

五:安装SSH--window和linux互传文件的
1:linux安装ssh服务器			apt-get install openssh-server
2:完成后查看SSH是否运行		ps -e |grep ssh     若无则使用第三步
3:								sudo service ssh start    开始
								sudo service ssh restart  重启
4:运行windows的客户端,报错---algorithm negotiation fail
5:解决办法--修改配置文件--vim /etc/ssh/sshd_config
	(1):修改如下  PermitRootLogin yes
	(2):末尾追加
Ciphers aes128-cbc,aes192-cbc,aes256-cbc,aes128-ctr,aes192-ctr,aes256-ctr,3des-cbc,arcfour128,arcfour256,arcfour,blowfish-cbc,cast128-cbc
MACs hmac-md5,hmac-sha1,[email protected],hmac-ripemd160,hmac-sha1-96,hmac-md5-96
KexAlgorithms diffie-hellman-group1-sha1,diffie-hellman-group14-sha1,diffie-hellman-group-exchange-sha1,diffie-hellman-group-exchange-sha256,ecdh-sha2-nistp256,ecdh-sha2-nistp384,ecdh-sha2-nistp521,diffie-hellman-group1-sha1,[email protected]
6:修改配置文件后要重启服务
	sudo service ssh restart  重启
	sudo service ssh restart  重启
7:参考
	https://www.cnblogs.com/zjutlitao/p/6223486.html

注意:在这里做好快照
检查自己电脑是否具有GPU-N卡
lspci | grep -i nvidia

下面是重点,如果有一步出现问题,无法解决的话,重来!!!不要继续装后面的,没有用
最好采用以下的安装顺序--自己装了很多遍了哈,总结的经验。
opencv2.4--->anaconda2--->openblas--->dlib--->caffe
六:opencv2.4安装
1.解压,进入文件夹,新建build文件夹,进入
	unzip opencv-2.4.13.6.zip
	cd opencv-2.4.13.6
	mkdir build; cd build
2.安装opencv的依赖包,后面会测试安装的opencv能否使用
	2.1:apt-get install build-essential libgtk2.0-dev libavcodec-dev libavformat-dev libjpeg62-dev libtiff5 libswscale-dev libjasper-dev
		原文:https://blog.csdn.net/honyniu/article/details/46390097
	2.2:opencv必须要numpy依赖包和更新--python-dev。否则无法编译生成cv2.so
		apt-get install python-dev python-numpy
	2.3:编译要用到cmake,为了方便选择编译的模块,建议安装带图形的cmake-gui,不然就只有make后面带一串配置参数(make xx=xx,...)
		apt-get install cmake cmake-curses-gui cmake-gui
	2.4:在build文件夹下执行cmake-gui ..  弹出的图形界面开始空的哈!不用紧张的
		点击左下方的configure-->点击Finish即可(要等一会哦)
		这里要去掉CUDA的配置项,不用GPU训练
			把WITH-CUDA和BUILD_opencv_gpu选项去掉打钩,其他不用改变
			依次点击configure和Generate,关闭
			编译安装--make -j4 && make install -j4(j4:四线程编译,无的话,要编译很久--慢的话要半个小时!)
				我测过了,编译安装没有任何问题,对于初学者,如果有问题请保持我的环境!
		注意:cmake-gui里还有安装路径,自己可以修改的,细心观察用的编译器和python(安装了anaconda会影响的!)以及cv2.so的生成路径
			看看在cv2.so生成路径是否有cv2.so,没有请停止重来!
			生成路径:/usr/local/lib/python2.7/dist-packages/下面有了两个文件
		原文:https://blog.csdn.net/jindunwan7388/article/details/80397700
	2.5:更改环境变量
		打开 vim /etc/profile(vim/vi/gedit均可)
		在文件最后添加   export PKG_CONFIG_PATH=$PKG_CONFIG_PATH:/usr/local/lib/pkgconfig
		环境变量立即生效 source /etc/profile
	2.6:将 opencv2 lib库添加在系统中
			若忘记opencv2在哪儿了,查找存在的目录 find / -name opencv2 -print
		打开 vim /etc/ld.so.conf.d/opencv.conf 这个文件是空的
		添加一句 /usr/local/lib,保存即可。我是默认的,如果改了路径要改为对应的路径
		配置立即生效 ldconfig
	2.7:测试opencv2是否安装好了,成功的话输出一张图片
		进入cd ../samples/c
		./build_all.sh
		./facedetect --cascade="/usr/local/share/OpenCV/haarcascades/haarcascade_frontalface_alt.xml" --scale=1.5 lena.jpg
	2.8:测试python是否可以导入import cv2
		2.8.1:将生成的cv2.so拷贝到anaconda的目录下
			?:有好几次自己在/usr/local/lib/python2.7/dist-packages/下找不到,是没有更新python-dev
				之前的opencv2编译环境是ubunt自带的python环境,现在要使用anaconda的环境了
					安装ananconda2
						直接运行./Anaconda-2.3.0-Linux-x86_64.sh---一键安装
						环境变量也加上,最后一个yes
			cp /usr/local/lib/python2.7/dist-packages/cv2.so /root/anaconda/lib/python2.7/site-packages/
		2.8.2:重开终端,输入python,输出“Python 2.7.10 |Anaconda 2.3.0 (64-bit)| (default, May 28 2015, 17:02:03)”,则anaconda安装成功
		2.8.3:import cv2
				出错:RuntimeError: module compiled against API version 0xa but this version of numpy is 0x9
				分析:大概意思是opencv2用0xa(1.10版本)编译的,而anaconda是0x9的,所以有问题,要升级。
				查看当前numpy版本信息(应该是1.9.2):两种方法
					(1):pip show numpy
					(2):pip show numpy  print numpy.__path__   print numpy.__version__
				解决办法:
					第一种方法是网上给的,这样做是有问题的!!!,因为opencv2编译用的是0xa版本,而anaconda环境是(0x9)1.9.2版本,所以必须更新到1.10版本!!!
					(1):pip install -U numpy     更新到最新版,虽然会解决问题,之后的caffe会花式报错
					用pip指定更新到1.11.1版本
					(2):pip install -U numpy==1.10.1   -U:升级的意思
				再一次import cv2,就没有任何问题了。
七:openblas安装
	1.解压,进入文件夹
		tar -vxf OpenBLAS-0.2.20.tar.gz
		cd OpenBLAS-0.2.20
	2.直接编译
		make -j4
	3.新建build文件夹,进入,安装
		mkdir build; cd build
		安装:make PREFIX=/home/topeet/caffelib/OpenBLAS-0.2.20/build install
	4.lib库加载进系统
		vim /etc/ld.so.conf.d/dlib.conf
		加上一句libopenblas.so.0的路径  /home/topeet/caffelib/OpenBLAS-0.2.20/build/lib/
		配置立即生效 ldconfig
	5.如果不做第4步将会在caffe编译报错
		error while loading shared libraries: libopenblas.so.0: cannot open shared object file: No such file or directory
		解决办法:系统不知道xxx.so放在哪个目录下,这个时候就要在/etc/ld.so.conf/xxx.conf中加入xxx.so所在的目录。
			首先查找存在的目录find / -name xxx.so -print
			新建文件 vim /etc/ld.so.conf/xxx.conf
			加入目标xxx.so文件路径
			原文:https://blog.csdn.net/ariessurfer/article/details/7984001
八:dlib的安装
	1.解压,进入examples文件夹,新建build文件夹,进入
		tar -vxf dlib-19.13.tar.bz2
		cd dlib-19.13/examples
		mkdir build; cd build
	2.生成Makefile文件,编译
		cmake ..
		cmake -j4
		安装官网:http://dlib.net/compile.html
	3.安装python的接口,不然无法import dlib
		python setup.py install
九:caffe的安装
	1.下载caffe的源码,clone下来
		apt-get install git
		git clone https://github.com/BVLC/caffe.git
	2.安装caffe的依赖包,这里不具体讲每个包的意义了。
		如果caffe编译make报错,那么是对应依赖包没有安装
			./include/caffe/common.hpp:5:27: fatal error: gflags/gflags.h: No such file or directory
				解决:apt-get install libgflags-dev

			./include/caffe/common.hpp:6:26: fatal error: glog/logging.h: No such file or directory
				解决:apt-get install libgoogle-golg-dev

			./include/caffe/util/db_lmdb.hpp:8:18: fatal error: lmdb.h: No such file or directory
				解决:apt-get install liblmdb-dev

				解决:见上面的安装过程
		下面是全部依赖包,
		apt-get install libprotobuf-dev libleveldb-dev libsnappy-dev libhdf5-serial-dev libgflags-dev libgoogle-glog-dev liblmdb-dev protobuf-compiler
		apt-get install --no-install-recommends libboost-all-dev
	3.修改配置文件
		3.1:进入caffe文件夹,将Makefile.config.example更名为Makefile.config
				cd caffe
				mv Makefile.config.example Makefile.config
		3.2:8行,CPU_ONLY := 1前面的#去掉(#是注释的意思)
		3.3:30、39行,把CUDA去掉
		3.4:之前装了openblas,现在要编译进去,根据你自己的情况添加正确的路径
				53行,修改为 BLAS := open
				57行,修改为BLAS_INCLUDE := /home/topeet/caffelib/OpenBLAS-0.2.20/build/include
				58行,修改为BLAS_LIB := /home/topeet/caffelib/OpenBLAS-0.2.20/build/lib
		3.5:修改系统的python环境,因为这里使用了anaconda环境
			(1):注释两处,将系统的python环境注释掉
				71行,添加#  #PYTHON_INCLUDE := /usr/include/python2.7 \
											/usr/lib/python2.7/dist-packages/numpy/core/include
				86行,添加#  #PYTHON_LIB := /usr/lib
			(2):取消注释三处,添加anaconda环境
				75行,去掉#,并且修改正确的anaconda路径,我是默认安装的  ANACONDA_HOME := /root/anaconda
				76行,去掉#,注意后面的斜杠是将下面的连在一起的
				87行,去掉#,PYTHON_LIB := $(ANACONDA_HOME)/lib
		3.6:添加hdf5的路径,否则编译caffe报错
			报错:fatal error: hdf5.h,No such file
			注意空格哈!
			修改:apt-get安装的,都是这个,如果你自己编译安装的,自己用find查找  find / -name hdf5 -print
			97行,INCLUDE_DIRS := $(PYTHON_INCLUDE) /usr/local/include /usr/include/hdf5/serial
			98行,LIBRARY_DIRS := $(PYTHON_LIB) /usr/local/lib /usr/lib /usr/lib/x86_64-linux-gnu/hdf5/serial
	4.编译
		make all -j4
		虽然上面已经将很多错误都避开了,但是任然有些错误需要注意:

	5.测试,下面两步都不会有问题的,如果出错,那就要重来的,或者解决
		make test -j4
	6.如果在上面的7.5已经完成,还可能报错。而且执行时间有点久
		make runtest
			报错:error while loading shared libraries: libhdf5_hl.so.10: cannot open shared object file: No such file or directory
				解决:vim /etc/ld.so.conf.d/hdf5.conf
					加上一句libhdf5_hl.so.10的路径  /root/anaconda/lib/
					配置立即生效 ldconfig
	7.生成python的caffe接口
		make pycaffe
		报错:python/caffe/_caffe.cpp:1:52: fatal error: Python.h: No such file or directory
			解决:在.bashrc中添加anaconda的python2.7的环境变量
					.bashrc在根录下。。  cd
					vim .bashrc
					最后添加一句  export CPLUS_INCLUDE_PATH="/root/anaconda/include/python2.7:$CPLUS_INCLUDE_PATH"
					保存退出      source .bashrc
			原文:https://blog.csdn.net/weixin_40258579/article/details/85039448
	8.测试cafe能否import,终端输入python,caffe需要自己指定路径!!!
		import sys
		sys.path.append('/home/topeet/caffe/python')
		import caffe
		报错:ImportError: No module named google.protobuf.internal
			解决:pip install protobuf  不行多试几遍
		原文:https://blog.csdn.net/change_things/article/details/80817570
		报错:RuntimeError: module compiled against API version 0xa but this version of numpy is 0x9
			解决:请更新到提示正确的numpy版本去,不要像网上讲的反复卸载/安装numpy,没有用的!!!
		原文:https://www.2cto.com/kf/201803/727800.html

至此所有安装全部结束

十:安装pycharm
	直接解压即可:tar -vxf pycharm-community-2019.1.1.tar.gz
9 后记
里面提供了很多链接,应该对你有帮助。如果转载,请指出原文出处,谢谢!


