(二) python爬虫验证码识别(去除干扰线)
(二)python爬虫验证码识别(去除干扰线)
钉钉钉~继完成第一波的任务之后,又来第二波了!!!!!!
1.开发环境与工具
- python36:sklearn、pytesser、opencv等
- pycharm
- windows7
2.数据集
3.解决思想讨论
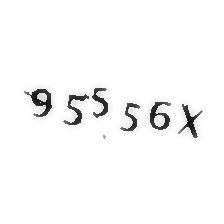
观察验证码,发现这次验证码和之前的验证码不同:
(1)验证码类型:6位验证码,有数字字母,分类较多
(2)验证码分割:验证码字符位置随机,不固定,有些验证码字符甚至叠加在一起,而且出现的概率很高,基本占一半。如果进行图片切割,就会丧失一定的信息,识别精度也会很低,所以初步想法是,在较小标注样本的情况下,不进行图片分割,尝试使用迁移学习VGG16来进行验证码识别,看是否能够提高精度。
(3)噪声去除:由于噪声的颜色有时候会和字母的颜色一样或近似相似,不适合用之前那种方法。观察验证码,可根据点噪声方法来去噪。

4。解决方案
1、迁移学习: 在训练集为63000张、进行去噪但不进行图片分割等预处理之后,尝试使用迁移学习VGG16,参考链接:tensorflow vgg16、使用CNN进行4位验证码识别,结果效果不佳,大概验证码单个数字的准确率在65%左右,训练过程慢且对gpu要求较高。
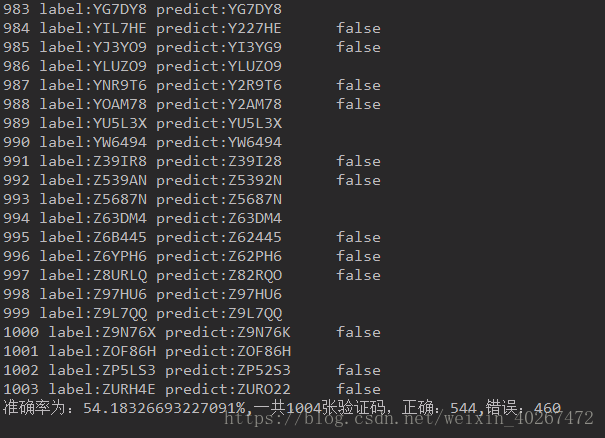
2、KNN分类:由于迁移学习调参过程复杂麻烦,而且由于使用的迁移模型较复杂,训练时间比较久,自然迟迟都没取得实质性的效果,没办法交任务,于是想着,放弃那些重叠的验证码,尝试使用之前的验证码识别的方法,对图片进行分割,看效果如何,大概做了一个小时之后,发现效果还行,准确度达54%,但是因为KNN算法,注定训练集越多,所得的训练得到的模型越大,大概1G,这样不仅模型过大占内存,而且预测效率也很低。但是,终于可以交任务啦!!!!!!!
3、CNN分类:针对KNN一些缺点,博主觉得还有待改进,使用迁移学习,有点杀鸡用牛刀,然后写了个CNN看效果如何,由于时间紧,初步取了个模型,发现,效果不错,训练得到的模型大小为101M,预测效率也高了好几倍,精度在77%左右。
5.预测结果
6.图片预处理代码
# -*- coding:utf-8 -*-
import cv2
import os
import numpy as np
import copy


''' 根据该像素周围点为黑色的像素数(包括本身)来判断是否把它归属于噪声,如果是噪声就将其变为白色'''
'''
	input:  img:二值化图
			number:周围像素数为黑色的小于number个,就算为噪声,并将其去掉,如number=6,
			就是一个像素周围9个点(包括本身)中小于6个的就将这个像素归为噪声
	output:返回去噪声的图像
'''

def del_noise(img,number):
    height = img.shape[0]
    width = img.shape[1]

    img_new = copy.deepcopy(img)
    for i in range(1, height - 1):
        for j in range(1, width - 1):
            point = [[], [], []]
            count = 0
            point[0].append(img[i - 1][j - 1])
            point[0].append(img[i - 1][j])
            point[0].append(img[i - 1][j + 1])
            point[1].append(img[i][j - 1])
            point[1].append(img[i][j])
            point[1].append(img[i][j + 1])
            point[2].append(img[i + 1][j - 1])
            point[2].append(img[i + 1][j])
            point[2].append(img[i + 1][j + 1])
            for k in range(3):
                for z in range(3):
                    if point[k][z] == 0:
                        count += 1
            if count <= number:
                img_new[i, j] = 255
    return img_new


if __name__=='__main__':
    img_dir = './img_down_sets/corpus_manual/test'
    img_name = os.listdir(img_dir)  # 列出文件夹下所有的目录与文件
    kernel = np.ones((5, 5), np.uint8)
    for i in range(len(img_name)):
        path = os.path.join(img_dir, img_name[i])
        image = cv2.imread(path)
        name_list = list(img_name[i])[:6]
        if '.' in name_list:
            print("%s标签错误,请重新标签!" % img_name[i])
        else:
            name = ''.join(name_list)
            # 灰度化
            # print(image.shape)
            grayImage = cv2.cvtColor(image, cv2.COLOR_BGR2GRAY)

            # 二值化
            result = cv2.adaptiveThreshold(grayImage, 255, cv2.ADAPTIVE_THRESH_GAUSSIAN_C, cv2.THRESH_BINARY, 21, 1)
            # 去噪声
            img = del_noise(result, 6)
            img = del_noise(img, 4)
            img = del_noise(img, 3)
            # 加滤波去噪
            im_temp = cv2.bilateralFilter(src=img, d=15, sigmaColor=130, sigmaSpace=150)
            im_temp = im_temp[1:-1,1:-1]
            im_temp = cv2.copyMakeBorder(im_temp, 83, 83, 13, 13, cv2.BORDER_CONSTANT, value=[255])
            cv2.imwrite('./img_down_sets/new_corpus/%s.jpg' %(name), im_temp)
            print("%s %s.jpg"%(i,name))
    print("图片预处理完成!")
7.图片切割代码
分割得60*34
#-*-coding:utf-8 -*-
import cv2
import os

def cut_image(image, num, img_name):
    # image = cv2.imread('./img/8.jpg')
    im = cv2.cvtColor(image, cv2.COLOR_BGR2GRAY)
    # im_cut_real = im[8:47, 28:128]

    im_cut_1 = im[80:140, 23:57]
    im_cut_2 = im[80:140, 53:87]
    im_cut_3 = im[80:140, 83:117]
    im_cut_4 = im[80:140, 113:147]
    im_cut_5 = im[80:140, 143:177]
    im_cut_6 = im[80:140, 173:207]

    im_cut = [im_cut_1, im_cut_2, im_cut_3, im_cut_4, im_cut_5, im_cut_6]
    for i in range(6):
        im_temp = im_cut[i]
        cv2.imwrite('./img_cut_train/'+str(num)+ '_' + str(i)+'_'+img_name[i]+'.jpg', im_temp)


if __name__ == '__main__':
    img_dir = './new_corpus'
    img_name = os.listdir(img_dir)  # 列出文件夹下所有的目录与文件
    for i in range(len(img_name)):
        path = os.path.join(img_dir, img_name[i])
        image = cv2.imread(path)
        name_list = list(img_name[i])[:6]
        # name = ''.join(name_list)
        cut_image(image, i, name_list)
        if i %2000==0:
            print('图片%s分割完成' % (i))

    print(u'*****图片分割预处理完成!*****')
8.KNN代码
knn代码与验证码(一)所用方法相似,在这不再贴代码。
9.CNN代码
vec_text.py(应要求贴出,加载数据的代码块)
#-*-coding:utf-8 -*-
import numpy as np
import os
import cv2

def text2vec(labels):
    # 制作词典
    number = ['2', '3', '4', '5', '6', '7', '8', '9']
    alphabet = ['A', 'B', 'C', 'D', 'E', 'F', 'G', 'H', 'I', 'J', 'K', 'L', 'M', 'N', 'O', 'P', 'Q', 'R', 'S', 'T', 'U',
                'V', 'W', 'X', 'Y', 'Z']
    dictionary = number + alphabet
    vec = [0]*34
    for i in range(len(dictionary)):
        if dictionary[i] == labels:
            vec[i] = 1
    return vec

def vec2text(index):
    # 制作词典
    number = ['2', '3', '4', '5', '6', '7', '8', '9']
    alphabet = ['A', 'B', 'C', 'D', 'E', 'F', 'G', 'H', 'I', 'J', 'K', 'L', 'M', 'N', 'O', 'P', 'Q', 'R', 'S', 'T', 'U',
                'V', 'W', 'X', 'Y', 'Z']
    dictionary = number + alphabet
    return dictionary[index]


def load_data(img_dir):
    # 读入数据
    data = []
    labels = []
    img_name = os.listdir(img_dir)

    for i in range(len(img_name)):
        path = os.path.join(img_dir, img_name[i])
        # cv2读进来的图片是RGB3维的,转成灰度图,将图片转化成1维
        image = cv2.imread(path,0)
        data.append(image)
        y_temp = img_name[i][-5]
        y_vec = text2vec(y_temp)
        labels.append(y_vec)

    # 标签规范化
    x = np.array(data)
    y = np.array(labels)
    return x, y
#
# img_dir = './img'
# x, y = load_data(img_dir)
# print(x.shape)
# print(y.shape)
训练CNN模型
# -*- coding:utf-8 -*-

import tensorflow as tf
import os
from sklearn.model_selection import train_test_split
import cv2
import numpy as np
from vec_text import text2vec,load_data

def weight_variable(shape):
    initial = tf.truncated_normal(shape,stddev=0.001)
    return tf.Variable(initial, name='w')


def bias_variable(shape):
    initial = tf.constant(0.1,shape = shape)
    return tf.Variable(initial, name='b')


def conv2d(x, W):
    return tf.nn.conv2d(x,W,strides=[1,1,1,1],padding='SAME')


def max_pool(x):
    return tf.nn.max_pool(x,ksize=[1,2,2,1],strides=[1,2,2,1],padding='SAME')

with tf.variable_scope("Input"):
    x = tf.placeholder(tf.float32,[None,60,34],name='x')
    x_image = tf.reshape(x,[-1,60,34,1])
    y = tf.placeholder(tf.float32,[None,34],name='y')

with tf.variable_scope("Cnn_net"):
    # 第一层 卷积层
    with tf.variable_scope("conv_1"):
        w_conv1 = weight_variable([3,3,1,32])
        b_conv1 = bias_variable([32])
        h_conv1 = tf.nn.relu(conv2d(x_image,w_conv1) + b_conv1)
        h_pool1 = max_pool(h_conv1)

    # 第二层 卷积层
    with tf.variable_scope("conv_2"):
        w_conv2 = weight_variable([5,5,32,64])
        b_conv2 = bias_variable([64])
        h_conv2 = tf.nn.relu(conv2d(h_pool1,w_conv2) + b_conv2)
        h_pool2 = max_pool(h_conv2)

    # 第三层 全连接层
    with tf.variable_scope("full_connect"):
        w_fc1 = weight_variable([15*9*64, 1024])
        b_fc1 = weight_variable([1024])
        h_pool2_flat = tf.reshape(h_pool2, [-1,15*9*64])
        h_fc1 = tf.nn.relu(tf.matmul(h_pool2_flat , w_fc1)+b_fc1)

    # dropout
    with tf.variable_scope("dropout"):
        keep_prob = tf.placeholder(tf.float32)
        h_fc1_drop = tf.nn.dropout(h_fc1, keep_prob)

    # 第四层 softmax输出层
    with tf.variable_scope("softmax"):
        w_fc2 = weight_variable([1024,34])
        b_fc2 = bias_variable([34])
        y_out = tf.nn.softmax(tf.matmul(h_fc1_drop,w_fc2)+b_fc2,name="output")

# 模型训练与评估
cross_entropy = -tf.reduce_sum(y * tf.log(tf.clip_by_value(y_out,1e-10,1.0))) #计算交叉熵
train_step = tf.train.AdamOptimizer(2e-6).minimize(cross_entropy) #使用adam优化器来以0.0001的学习率来进行微调
correct_prediction = tf.equal(tf.argmax(y_out,1), tf.argmax(y,1)) #判断预测标签和实际标签是否匹配
accuracy = tf.reduce_mean(tf.cast(correct_prediction, tf.float32))
tf.summary.scalar('accuracy', accuracy)
tf.summary.scalar('loss', cross_entropy)

# # 将标签转化为向量,输入'2',输出数组[0,0,1....,0]
sess = tf.Session()
sess.run(tf.global_variables_initializer())
print('New_built')
writer = tf.summary.FileWriter('./logs/cnn', sess.graph)
merged = tf.summary.merge_all()

# 保存模型
def save(path='./models/cnn', step=1):
    saver = tf.train.Saver()
    saver.save(sess, path, write_meta_graph=False, global_step=step)

img_dir = './img_cut_train'
x_data, y_data = load_data(img_dir)

# 拆分训练数据与测试数据
x_train, x_test, y_train, y_test = train_test_split(x_data, y_data, test_size=0.003)


for i in range(3000000):
    b_idx = np.random.randint(0, len(x_train), 100)
#    print(x_train[b_idx].shape)
#  train = sess.run(train_step,{x:x_train[b_idx],y:y_train[b_idx],keep_prob:0.75})
#    print(sess.run(x_image,{x:x_train[b_idx]}).shape)
    train_loss, __ , train_merged= sess.run([cross_entropy, train_step, merged], {x: x_train[b_idx], y: y_train[b_idx], keep_prob: 0.5})
    if (i+1)%100==0:
       print(str(i+1),"train loss:",train_loss)
    if (i+1) % 1000 == 0:
       accuracy_result, test_merged = sess.run([accuracy,merged],  {x: x_test, y: y_test, keep_prob:1.0})
       print(str(i+1),"test accuracy:",str(accuracy_result))
       writer.add_summary(train_merged)
       writer.add_summary(test_merged)
       if accuracy_result > 0.96 and (i+1)%10000==0:
           save(step=i+1)

writer.close()
sess.close()
CNN加载模型预测
import tensorflow as tf
from vec_text import load_data,vec2text


def predict_single(x_data, restore_from = './models/cnn-3085000'):
    def weight_variable(shape):
        initial = tf.truncated_normal(shape, stddev=0.001)
        return tf.Variable(initial, name='w')

    def bias_variable(shape):
        initial = tf.constant(0.1, shape=shape)
        return tf.Variable(initial, name='b')

    def conv2d(x, W):
        return tf.nn.conv2d(x, W, strides=[1, 1, 1, 1], padding='SAME')

    def max_pool(x):
        return tf.nn.max_pool(x, ksize=[1, 2, 2, 1], strides=[1, 2, 2, 1], padding='SAME')

    with tf.variable_scope("Input"):
        x = tf.placeholder(tf.float32,[None,60,34],name='x')
        x_image = tf.reshape(x,[-1,60,34,1])
        y = tf.placeholder(tf.float32,[None,34],name='y')

    with tf.variable_scope("Cnn_net"):
        # 第一层 卷积层
        with tf.variable_scope("conv_1"):
            w_conv1 = weight_variable([3,3,1,32])
            b_conv1 = bias_variable([32])
            h_conv1 = tf.nn.relu(conv2d(x_image,w_conv1) + b_conv1)
            h_pool1 = max_pool(h_conv1)

        # 第二层 卷积层
        with tf.variable_scope("conv_2"):
            w_conv2 = weight_variable([5,5,32,64])
            b_conv2 = bias_variable([64])
            h_conv2 = tf.nn.relu(conv2d(h_pool1,w_conv2) + b_conv2)
            h_pool2 = max_pool(h_conv2)

        # 第三层 全连接层
        with tf.variable_scope("full_connect"):
            w_fc1 = weight_variable([15*9*64, 1024])
            b_fc1 = weight_variable([1024])
            h_pool2_flat = tf.reshape(h_pool2, [-1,15*9*64])
            h_fc1 = tf.nn.relu(tf.matmul(h_pool2_flat , w_fc1)+b_fc1)

        # dropout
        with tf.variable_scope("dropout"):
            keep_prob = tf.placeholder(tf.float32)
            h_fc1_drop = tf.nn.dropout(h_fc1, keep_prob)

        # 第四层 softmax输出层
        with tf.variable_scope("softmax"):
            w_fc2 = weight_variable([1024,34])
            b_fc2 = bias_variable([34])
            y_out = tf.nn.softmax(tf.matmul(h_fc1_drop,w_fc2)+b_fc2,name="output")

    # 模型训练与评估
    y_vec = tf.argmax(y_out,1)
    cross_entropy = -tf.reduce_sum(y * tf.log(tf.clip_by_value(y_out,1e-10,1.0))) #计算交叉熵
    train_step = tf.train.AdamOptimizer(2e-6).minimize(cross_entropy) #使用adam优化器来以0.0001的学习率来进行微调
    correct_prediction = tf.equal(tf.argmax(y_out,1), tf.argmax(y,1)) #判断预测标签和实际标签是否匹配
    accuracy = tf.reduce_mean(tf.cast(correct_prediction, tf.float32))
    tf.summary.scalar('accuracy', accuracy)
    tf.summary.scalar('loss', cross_entropy)

    sess = tf.Session()
    # 重载模型
    saver = tf.train.Saver()
    saver.restore(sess, restore_from)

    y_predict = sess.run(y_vec,{x:x_data,keep_prob:1.0})  # 输出格式[1 2 8 9]
    y_predict_alpha = [vec2text(index) for index in y_predict]   #用字典转换成字母
    # print(y_predict_alpha)
    sess.close()
    tf.reset_default_graph()
    return y_predict_alpha
    # 输入单数字图片,返回该图片对应的字符


# if __name__ == "__main__":
#     img_dir = './img_test'
#     x_data, y_data = load_data(img_dir)
#     predict_single(x_data, restore_from = './models/cnn-1139999')


