Python金融大数据分析——第11章 统计学(3)主成分分析(PCA) 笔记
- 第11章 统计学
- 11.3 主成分分析
- 11.3.1 DAX指数和30种成分股(这里用 上证50指数和成份股)
- 11.3.2 应用PCA
- 11.3.3 构造PCA指数
- 11.3 主成分分析
第11章 统计学
11.3 主成分分析
主成分分析 (PCA)已经成为金融学中的流行工具。 维基百科,对这种技术的定义如下:
主成分分析(PCA)是一种统计过程, 使用正交转换将一组可能相关的变量观测值转换为一组线性无关的变量(主成分)。主成分的数量少于或者等于原始变量数量。这种转换的定义方式是,第一个主成分有最大的可能方差(也就是, 考虑数据中尽可能多的易变性), 后续的每个成分在正支(即无关)于前面的成分的条件下, 具备最大的可能方差。
例如, 考虑一个股票指数, 如30种不同股票构成的德国DAX指数。 所有股票价格的变动共同决定指数的变动(通过某种有根据的公式)。此外, 单独股票价格的变动通常是相关的, 例如, 由于总体经济状况或者某一领域的一些发展。
对于统计学应用 ,通常难以使用30种相关因素解释某种股票指数的变动。这就是 PCA 发挥作用的地方。 它得出单独的不相关 “成分” ,这些成分 “很适合” 解释股票指数的变动。 人们可以将这些成分视为指数中选择股票的线性组合(即投资组合),不用处理30种关联的指数成分,而可以处理5个、3个甚至只有1个主成分。
11.3.1 DAX指数和30种成分股(这里用 上证50指数和成份股)
import tushare as ts
# 上证50成分股
symbols = ts.get_sz50s()['code'].tolist()
# ['600000','600016','600019','600028','600029','600030','600036','600048','600050','600104','600111','600276','600309','600340','600519','600547','600585','600606','600690','600703','600887','600958','600999','601006','601088','601166','601169','601186','601211','601229','601288','601318','601328','601336','601360','601390','601398','601601','601628','601668','601688','601766','601800','601818','601857','601878','601881','601988','601989','603993']
symbols.append('sh000016') # 加上 上证50指数
indexes = pd.date_range('2014-01-01', '2018-07-06',freq='B')
# 为了保持和从toshare获取的时间序列类型一致,这里把时间类型转为字符串
indexes = indexes.map(lambda x: datetime.datetime.strftime(x, '%Y-%m-%d'))
data = pd.DataFrame(index=indexes)
for sym in symbols:
k_d = ts.get_k_data(sym, '2014-01-01', ktype='D')
# 如果上面的时间序列不转成字符串,这里就要转成时间序列,以保持index类型一致
# k_d['date'] = k_d['date'].astype('datetime64[ns]')
k_d.set_index('date', inplace=True)
k_d = k_d.dropna()
data[sym] = k_d['close']
data1 = data.ffill()
data1.info()
#11.3.2 应用PCA
scale_function = lambda x: (x - x.mean()) / x.std()

from sklearn.decomposition import KernelPCA

pca = KernelPCA().fit(data.apply(scale_function))

# 每成分的重要性(或解释功效)由特征值表示。特征值可以在KernelPCA对象的属性中找到
len(pca.lambdas_)
# 579
# 这样的分析给出了太多的成分


# 我们只观察前10个成分
pca.lambdas_[:10].round()
# array([ 31679.,  10076.,   3517.,   1192.,    993.,    619.,    513.,
#           331.,    280.,    186.])
# 第10种成分的影响已经几乎可以忽略不计

# 每种成分的相对重要性
get_we = lambda x: x / x.sum()
get_we(pca.lambdas_)[:10]
# array([ 0.62687955,  0.19939252,  0.06959768,  0.02359732,  0.01964601,
#         0.01224315,  0.01014616,  0.00654794,  0.00553158,  0.00368011])
# 第一个成分可以解释45种(50种删了5种)时间序列中易变性的60%。
get_we(pca.lambdas_)[:6].sum()
# 0.95135621471186538
# 前6种成分解释易变性的大约95%。
11.3.3 构造PCA指数
# 建立一个只包含第一个成分的PCA指数
pca = KernelPCA(n_components=1).fit(data.apply(scale_function))
sh50['PCA_1']=pca.transform(-data) # 当参数为data时画出的图是负相关,所以加个负号

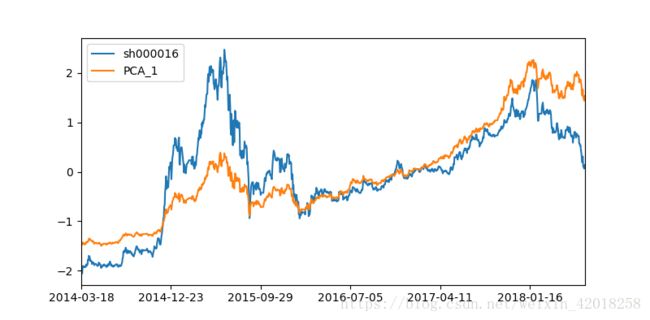
sh50.apply(scale_function).plot(figsize=(8,4))pca = KernelPCA(n_components=5).fit(data.apply(scale_function))
pca_components=pca.transform(data)# 当参数为-data时画出的图是负相关,所以不加负号
weights=get_we(pca.lambdas_)
sh50['PCA_5']=np.dot(pca_components,weights)
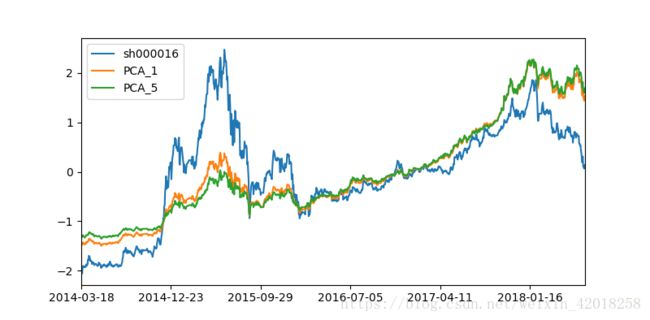
sh50.apply(scale_function).plot(figsize=(8,4))上证50指数和包含1种和5种成分的PCA指数

5种比1种没有太大的改善。
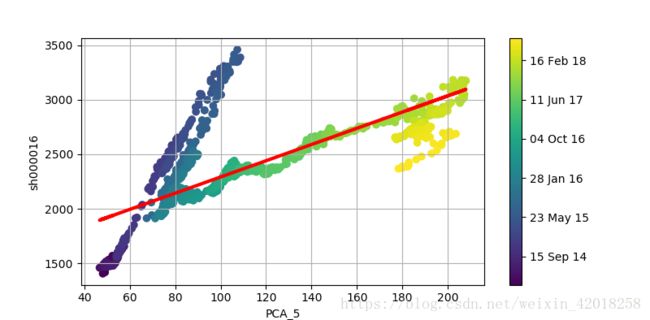
以不同的方式检查上证50指数和PCA指数之间的关系——通过散点图,在组合中加人日期信息:
# 将DataFrame对象的DatetimeIndex转换为matplotlib兼容的格式
import matplotlib as mpl
data.index = data.index.astype('datetime64[ns]')
pydatetimes = [i.to_pydatetime() for i in data.index ]
mpl_dates = mpl.dates.date2num(pydatetimes)

# 这个新的日期列表可以用于散点图, 通过不同颜色强调每个数据点的日期
plt.figure(figsize=(8,4))
plt.scatter(sh50['PCA_5'],sh50['sh000016'],c=mpl_dates)
lin_reg=np.polyval(np.polyfit(sh50['PCA_5'],sh50['sh000016'],1),sh50['PCA_5'])
plt.plot(sh50['PCA_5'],lin_reg,'r',lw=3)
plt.grid(True)
plt.xlabel('PCA_5')
plt.ylabel('sh000016')
plt.colorbar(ticks=mpl.dates.DayLocator(interval=250),format=mpl.dates.DateFormatter('%d %b %y'))图中揭示了2014-2015年存在结构晰裂。如果PCA指数完美地复制上证50指数,我们就可以预期所有数据点在一条直线上, 并且看到回归线穿越这些点。
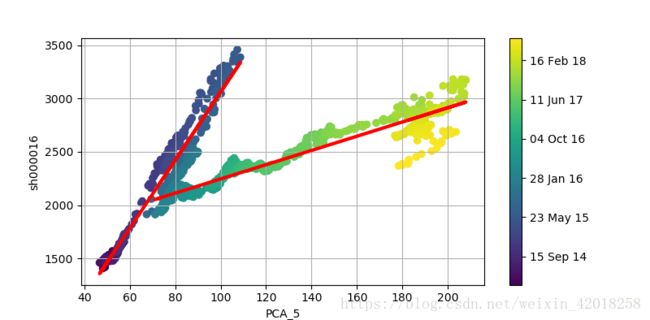
完美是难以达到的,但是我们可以做得更好。为此, 我们将整个时间轴分为两段子时期。 然后, 我们可以实施一次早期回归和一次晚期回归:
cut_date = '2016-01-28'
early_pca = sh50[sh50.index < cut_date]['PCA_5']
early_reg = np.polyval(np.polyfit(early_pca, sh50['sh000016'][sh50.index < cut_date], 1), early_pca)
late_pca = sh50[sh50.index >= cut_date]['PCA_5']
late_reg = np.polyval(np.polyfit(late_pca, sh50['sh000016'][sh50.index >= cut_date], 1), late_pca)

plt.figure(figsize=(8, 4))
plt.scatter(sh50['PCA_5'], sh50['sh000016'], c=mpl_dates)
plt.plot(early_pca, early_reg, 'r', lw=3)
plt.plot(late_pca, late_reg, 'r', lw=3)
plt.grid(True)
plt.xlabel('PCA_5')
plt.ylabel('sh000016')
plt.colorbar(ticks=mpl.dates.DayLocator(interval=250), format=mpl.dates.DateFormatter('%d %b %y'))
用早期回归和晚期回归(机制转换)对比上证50指数值和PCA指数值

上图展示了新的回归线,它确实显示了很高的解释功效,在截止日期前后都是如此。
^_^

