Linux模块编程方法总结
一、编写一个基本的内核模块
1、编辑源文件,代码hello.c
#include
#include
#include
int init_hello_module(void)
{
printk("init_hello_module\n");
return0;
}
void exit_hello_module(void)
{
printk("exit_hello_module\n");
}
MODULE_LICENSE("GPL");
module_init(init_hello_module);
module_exit(exit_hello_module);
Makefile文件
ifeq ($(KERNELRELEASE),)
$(info 1st)
all:
make-C /lib/modules/$(shell uname -r)/build M=$(shell pwd)
clean:
rm*.o *.ko *.mod.c modules.order
else
$(info 2nd)
obj-m:=hello.o
endif
2.编译
make
3. 测试sudo insmod hello.ko、sudo rmmod hello、dmesg
3. 原理:
Makefile原理
1、当用户在shell输入make 命令,会先在当前目录下找Makefile |
2、解析的第一条语句是 ifeq ($(KERNELRELEASE),) 判断当前的Makefile中是否有KERNELRELEASE 变量因为当前的Makefile中没有KERNELRELEASE,所以ifeq 条件成立 |
3、执行第一条规则语句 all: make -C path/to/kernel M=$(shell pwd) 调用了make命令,根据 -C 指定的内核顶层源码路径,去解析内核顶层源码对应的 Makefile |
4、内核顶层源码的makefile中根据 M=$(shell pwd)参数第二次进入当前目录,解析当前的 Makefile,这时,因为是从内核顶层源码的Makefile 进入的,而KERNELRELEASE 在内核顶层源码Makefile已经定义,所以这一次ifeq条件不成立,进入 else分支。 |
5、这时内核Makefile检查编译模块所依赖的.o文件(hello.o)是否存在,如果不存在,根据hello.c生成hello.o |
6、内核Makefile会第三次进入当前目录,还是走else 分支,这一次因为hello.o已经存在会根据 hello.o生成hello.ko |
module_init原理:https://www.cnblogs.com/chaozhu/p/6410271.html,补充
二、多个文件生成一个模块
在同一目录下增加show.c文件
#include
static int a;
int show_addr(void)
{
printk("aaddr = %p\n",&a);
return0;
}
Makefile改为
ifeq ($(KERNELRELEASE),)
$(info 1st)
all:
make-C /lib/modules/$(shell uname -r)/build M=$(shell pwd)
clean:
rm*.o *.ko *.mod.c modules.order
else
$(info 2nd)
obj-m:=helloshow.o
helloshow-y+=hello.o
helloshow-y+=show.o
endif
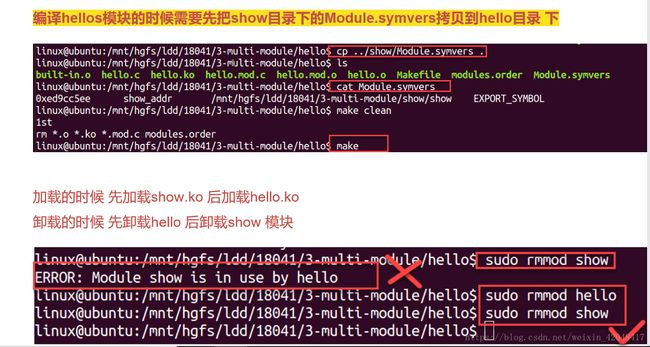
三、多个模块之间的函数调用
Show.c改为如下:
#include
#include
#include
static int a;
int show_addr(void)
{
printk("aaddr = %p\n",&a);
return0;
}
int init_show_module(void)
{
printk("init_show_module\n");
show_addr();
return0;
}
void exit_show_module(void)
{
printk("exit_show_module\n");
}
EXPORT_SYMBOL(show_addr);
MODULE_LICENSE("GPL");
module_init(init_show_module);
module_exit(exit_show_module);
Makefile改为如下:
ifeq ($(KERNELRELEASE),)
$(info 1st)
all:
make-C /lib/modules/$(shell uname -r)/build M=$(shell pwd)
clean:
rm*.o *.ko *.mod.c modules.order
else
$(info 2nd)
obj-m:=hello.o show.o
endif
四、模块传递参数
1. 在hello.c中增加模块参数定义
#include
#include
#include
static int count = 5;
static int a = 100;
static int b = 100;
static char *string = "helloworld";
int init_hello_module(void)
{
printk("init_hello_module\n");
for(;count-->0;)
{
printk("init:stringis %s\n",string);
}
return0;
}
void exit_hello_module(void)
{
printk("exit_hello_module\n");
for(;count-->0;)
{
printk("exit:stringis %s\n",string);
}
}
MODULE_LICENSE("GPL");
module_param(count, int, 0644);
module_param(a, int, 0644);
module_param(b, int, 0644);
module_param(string, charp, 0644);
module_init(init_hello_module);
module_exit(exit_hello_module);
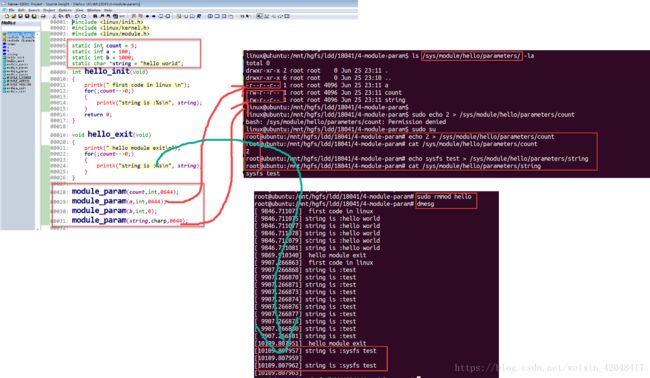
2. 编译测试模块参数传递
方法1,在加载模块的时候修改参数值
方法2,通过sysfs文件系统的节点修改模块参数值


