这段时间,一直在学习mvc3和NHibernate, 弦哥的大型项目系列和 李永京的nhibernate系列对我帮助良多,同时参考了《Asp.net设计模式》。
决定写一个简单的博客项目,巩固和加深学习成果!废话不多说!
首先建立Blog的解决方案,层次结构:
其中
Blog.Cache:缓存模块
Blog.Controllers:控制器
Blog.Infrastructure:公共基础模块
Blog.Model:实体层
Blog.Repository:数据访问层
Blog.Service:服务层
Blog.WebUI:UI层
UnitTest:单元测试
一. 我们使用的IOC容器是Unity,有两种方式进行配置注册unity:代码和配置文件;我们目前使用配置文件进行.
1.建立配置文件unity.config,注意:使用配置文件方式,接口和类要在同一命名空间,否则无法注册成功
xml version="1.0" encoding="utf-8" ?>
<configuration>
  <configSections>
    <section name="unity"
             type="Microsoft.Practices.Unity.Configuration.UnityConfigurationSection, Microsoft.Practices.Unity.Configuration"/>
  configSections>

  <unity>
    <typeAliases>
      <typeAlias alias="IUserService" type="Blog.Cache.IUserService, Blog.Cache" />
      <typeAlias alias="IUnitOfWork" type="Blog.Repository.IUnitOfWork, Blog.Repository" />
      <typeAlias alias="IUserRepository" type="Blog.Repository.IUserRepository, Blog.Repository" />
      <typeAlias alias="IApplicationSettings" type="Blog.Infrastructure.IApplicationSettings, Blog.Infrastructure" />
      <typeAlias alias="ILogger" type="Blog.Infrastructure.Logging.ILogger, Blog.Infrastructure" />
      <typeAlias alias="ICacheStorage" type="Blog.Cache.ICacheStorage, Blog.Cache" />
    typeAliases>
    <containers>
      <container>
        <types>
          <type type="IUserService" mapTo="Blog.Cache.UserService, Blog.Cache"/>
          <type type="IUnitOfWork" mapTo="Blog.Repository.NHUnitOfWork, Blog.Repository"/>
          <type type="IUserRepository" mapTo="Blog.Repository.UserRepository, Blog.Repository"/>
          <type type="IApplicationSettings" mapTo="Blog.Infrastructure.WebConfigApplicationSettings, Blog.Infrastructure"/>
          <type type="ILogger" mapTo="Blog.Infrastructure.Logging.Log4NetAdapter, Blog.Infrastructure"/>
          <type type="ICacheStorage" mapTo="Blog.Cache.HttpContextCacheAdapter, Blog.Cache"/>
        types>
      container>
    containers>
  unity>
configuration>
2.新建类UnityContainerFactory,读取配置文件,建立Unity容器
namespace Blog.Infrastructure
{
    public class UnityContainerFactory
    {
        public static IUnityContainer GetContainer()
        {
            IUnityContainer Container = new UnityContainer();

            ExeConfigurationFileMap fileMap = new ExeConfigurationFileMap();
            fileMap.ExeConfigFilename = HttpContext.Current.Server.MapPath("~/unity.config");

            UnityConfigurationSection config = (UnityConfigurationSection)ConfigurationManager
                .OpenMappedExeConfiguration(fileMap, ConfigurationUserLevel.None)
                .GetSection("unity");

            if (config.Containers.Default != null)
            {
                config.Configure(Container);
            }

            return Container;
        }
    }
}
3.Unity的第一个应用,将Controller从UI层分离出来;
(1)新建类UnityControllerFactory
namespace Blog.Controllers
{
    public class UnityControllerFactory : DefaultControllerFactory
    {
       //记得引用System.Web.Mvc和System.Web.Routing
        private readonly IUnityContainer _container;

        public UnityControllerFactory(IUnityContainer container)
        {
            _container = container;
        }

        protected override IController GetControllerInstance(RequestContext requestContext, Type controllerType)
        {
            IController icontroller = null;
            if (controllerType != null)
            {
                icontroller = _container.Resolve(controllerType) as IController;
            }
            return icontroller;
        }
    }
}
(2)在Global.asax的Application_Start()中注册
 IUnityContainer container = UnityContainerFactory.GetContainer();//生成Unity容器

 ControllerBuilder.Current.SetControllerFactory(new UnityControllerFactory(container));//Controller
现在我们就可以把控制器作为一个单独的项目了Blog.Controllers。
这还有一个好处,因为已经在全局类中注册了Unity容器,将每次控制器的实例化都绑定到了一起,以后我们在控制器和服务层使用依赖注入会很方便,不用每次都生成Unity容器了,如下例子使用构造函数进行DI
 public class UserController:Controller
    {
        private IUserService _userService;
        private IRoleService _roleService;
        private IProvinceCityService _provinceCityService;
        public UserController(IUserService userService, IRoleService roleService, IProvinceCityService provinceCityService)
        {
            _userService = userService;
            _roleService = roleService;
            _provinceCityService = provinceCityService;
        }

        public ActionResult UserAll()
        {
           IEnumerableusers= _userService.GetUserAll();
           ....................
        }
    }
二.我们使用对象映射工具是AutoMapper,在接下来的文章将会介绍其使用
三.数据库设计
构建数据库访问层方式主要有三种:
DataBase First:先设计数据库,接着根据数据库模型建立对应的实体类,访问层代码;
Model First:即所谓的领域模型驱动设计,各种概念请查看高手吐槽,本人对此不太熟悉;
Code First:可以先写好实体和实体关系代码,再反向生成数据库,NHibernate中的ConfOrm和目前新版本的Conformist就可以实现
我们的小项目,不会有多大的需求变更,就以传统的DataBase First来构建项目.Code First我们以后会有专门的文章介绍
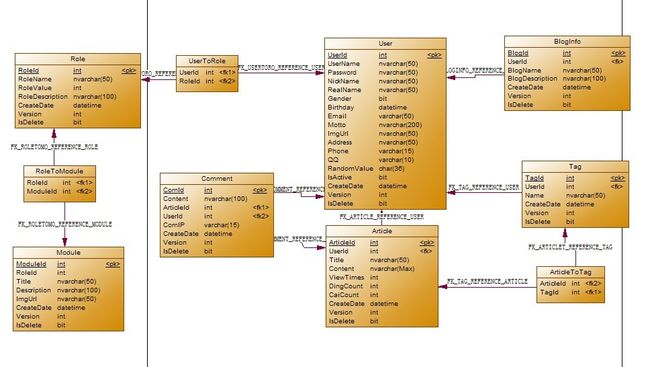
数据库设计如下
下一节我们将继续介绍使用Nhibernate构建数据库访问层!

