从头开始搭建kubernetes集群+istio服务网格(2)—— 搭建kubernetes集群
(win10 + virtualbox6.0 + centos7.6.1810 + docker18.09.8 + kubernetes1.15.1 + istio1.2.3)
本文参考网址:
https://www.jianshu.com/p/e43f5e848da1
https://kubernetes.io/docs/setup/production-environment/tools/kubeadm/install-kubeadm/
https://www.jianshu.com/p/1aebf568b786
https://blog.csdn.net/donglynn/article/details/47784393
https://blog.csdn.net/MC_CodeGirl/article/details/79998656
https://blog.csdn.net/andriy_dangli/article/details/85062983
https://docs.projectcalico.org/v3.8/getting-started/kubernetes/installation/calico
https://www.jianshu.com/p/70efa1b853f5
https://blog.csdn.net/weixin_44723434/article/details/94583457
https://preliminary.istio.io/zh/docs/setup/kubernetes/download/
https://www.cnblogs.com/rickie/p/istio.html
https://blog.csdn.net/lwplvx/article/details/79192182
https://blog.csdn.net/qq_36402372/article/details/82991098
https://www.cnblogs.com/assion/p/11326088.html
http://www.lampnick.com/php/823
https://blog.csdn.net/ccagy/article/details/83059349
https://www.jianshu.com/p/789bc867feaa
https://www.jianshu.com/p/dde56c521078
本系列分为三章,第一章是创建虚拟机、docker、kubernetes等一些基础设施;第二章是在此基础上创建一个三节点的kubernetes集群;第三章是再在之上搭建istio服务网格。
本文参考了大量其他优秀作者的创作(已经在开头列出),自己从零开始,慢慢搭建了istio服务网格,每一步都在文章中详细地列出了。之所以要自己重新从头搭建,一方面是很多CSDN、简书或其他平台的教程都已经离现在(2019.8.14)太过遥远,变得不合时宜,单纯地照着别人的路子走会遇到非常多的坑;另一方面是实践出真知。
由于我也是刚开始学习istio服务网格,才疏学浅,难免有不尽如人意的地方,还请见谅。
1 前言
之前已经创建好了三台虚拟机
三个节点IP分别为:
Node2:192.168.56.101
Node3:192.168.56.102
master:192.168.56.103
并已经分别与XSHELL相连,现在开始创建kubernetes集群。
2 建造集群第一步:初始化
在Master主节点(k8s-master)上执行:
kubeadm init --pod-network-cidr=192.168.0.0/16 --kubernetes-version=v1.15.1 --apiserver-advertise-address=192.168.56.103
1.选项–pod-network-cidr=192.168.0.0/16表示集群将使用Calico网络,这里需要提前指定Calico的子网范围
2.选项–kubernetes-version=v1.15.1指定kubernetes版本。
3.选项–apiserver-advertise-address表示绑定的网卡IP,这里一定要绑定前面提到的enp0s8网卡,否则会默认使用enp0s3网卡
4.若执行kubeadm init出错或强制终止,则再需要执行该命令时,需要先执行kubeadm reset重置
然后就又出现了问题,如下
[root@k8s_master centos_master]# kubeadm init --pod-network-cidr=192.168.0.0/16 --kubernetes-version=v1.15.1 --apiserver-advertise-address=192.168.56.103
name: Invalid value: "k8s_master": a DNS-1123 subdomain must consist of lower case alphanumeric characters, '-' or '.', and must start and end with an alphanumeric character (e.g. 'example.com', regex used for validation is '[a-z0-9]([-a-z0-9]*[a-z0-9])?(\.[a-z0-9]([-a-z0-9]*[a-z0-9])?)*')
2.1 更正主机名
经过检查,是因为这里的hostname不能带有_所以只能回去修改,把三个honstname分别按照之前的步骤进行修改,修改完之后重启虚拟机即可。改成如下:
k8s-master:192.168.56.103
k8s-node2:192.168.56.101
k8s-node3:192.168.56.102
2.2 更改Cgroup Driver
接着再来一次,然后又报错。。。
[root@k8s-master centos_master]# kubeadm init --pod-network-cidr=192.168.0.0/16 --kubernetes-version=v1.15.1 --apiserver-advertise-address=192.168.56.103
[init] Using Kubernetes version: v1.15.1
[preflight] Running pre-flight checks
	[WARNING IsDockerSystemdCheck]: detected "cgroupfs" as the Docker cgroup driver. The recommended driver is "systemd". Please follow the guide at https://kubernetes.io/docs/setup/cri/
error execution phase preflight: [preflight] Some fatal errors occurred:
	[ERROR NumCPU]: the number of available CPUs 1 is less than the required 2
[preflight] If you know what you are doing, you can make a check non-fatal with `--ignore-preflight-errors=...`
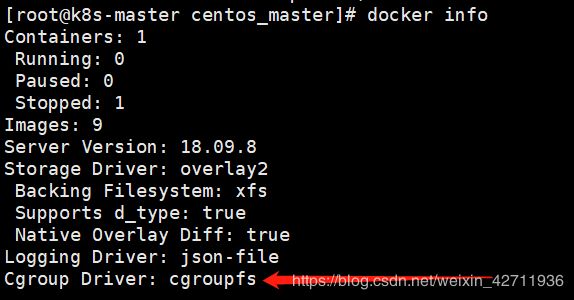
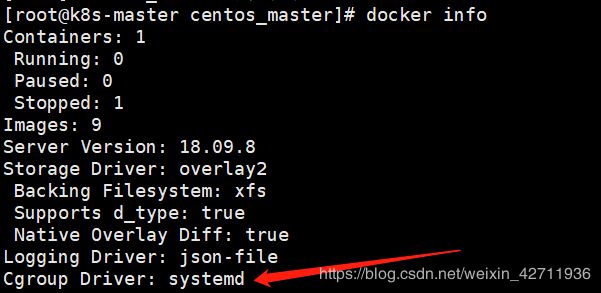
第一个警告是因为推荐的驱动与我们之前安装的驱动不一样,输入docker info可以查看docker的驱动如下。

之前我们的docker的cgroup drive和kubelet的cgroup drive都是cgroupfs,并且他们两的驱动需要保持一致,因此我们这里需要把它们都改成systemed。
2.2.1 修改docker的cgroup drive
修改或创建/etc/docker/daemon.json,加入下面的内容:
{
  "exec-opts": ["native.cgroupdriver=systemd"]
}
然后重启docker,或者直接重启虚拟机也可以。
开始修改,报错~
 是因为在用vim打开一个文件时,其会产生一个cmd.swap文件,用于保存数据,当文件非正常关闭时,可用此文件来恢复,当正常关闭时,此文件会被删除,非正常关闭时,不会被删除,所以提示存在.swap文件。
进入该目录,
ls -a查询隐藏文件
将后缀名为.swp的文件删除
rm .daemon.json.swp
再次编辑文件不再出现提示警告!
然后还是不行,报错说这是一个目录,没法进行编辑,最后查了好久好久,才发现是我创建的方式不对,我使用的是mkdir创建文件,但是发现这个是用来创建目录的!!!正确的方法是用vi创建,即 vi /etc/docker/daemon.json, 然后顺势把内容写进去,这里虽然耗费了非常多的时间,不过对linux系统也有了更深的了解。
正确处理后,重启docker
systemctl daemon-reload
systemctl restart docker
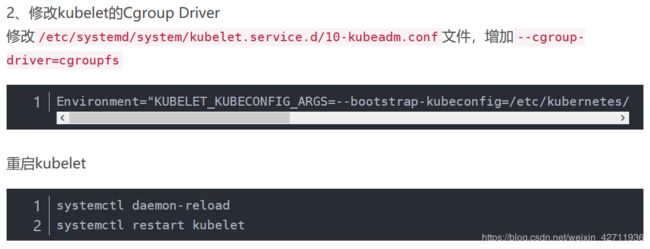
2.2.2 修改kubelet的cgroup drive
下面是大部分的教程推荐的

但是实际使用时,发现那个地址是空的,最后发现可能是因为我们的版本是1.15.1,属于新版,地址应该修改成
/usr/lib/systemd/system/kubelet.service.d/10-kubeadm.conf
代码如下
[root@k8s-master centos_master]# vi /usr/lib/systemd/system/kubelet.service.d/10-kubeadm.conf

# Note: This dropin only works with kubeadm and kubelet v1.11+
[Service]
Environment="KUBELET_KUBECONFIG_ARGS=--bootstrap-kubeconfig=/etc/kubernetes/bootstrap-kubelet.conf --kubeconfig=/etc/kubernetes/kubelet.conf"
Environment="KUBELET_CONFIG_ARGS=--config=/var/lib/kubelet/config.yaml"
# This is a file that "kubeadm init" and "kubeadm join" generates at runtime, populating the KUBELET_KUBEADM_ARGS variable dynamically
EnvironmentFile=-/var/lib/kubelet/kubeadm-flags.env
# This is a file that the user can use for overrides of the kubelet args as a last resort. Preferably, the user should use
# the .NodeRegistration.KubeletExtraArgs object in the configuration files instead. KUBELET_EXTRA_ARGS should be sourced from this file.
EnvironmentFile=-/etc/sysconfig/kubelet
ExecStart=
ExecStart=/usr/bin/kubelet $KUBELET_KUBECONFIG_ARGS $KUBELET_CONFIG_ARGS $KUBELET_KUBEADM_ARGS $KUBELET_EXTRA_ARGS
~
~
~
然后在Environment="KUBELET_KUBECONFIG_ARGS=--bootstrap-kubeconfig=/etc/kubernetes/bootstrap-kubelet.conf --kubeconfig=/etc/kubernetes/kubelet.conf"后面添加上--cgroup-driver=systemd。
变成
Environment="KUBELET_KUBECONFIG_ARGS=--bootstrap-kubeconfig=/etc/kubernetes/bootstrap-kubelet.conf --kubeconfig=/etc/kubernetes/kubelet.conf --cgroup-driver=systemd"
接着重启kubelet
systemctl daemon-reload
systemctl restart kubelet
2.2.3 对另外两台虚拟机做同样操作修改cgroup drive
2.3 提升虚拟机配置
之前的报错第一个已经不见了,现在解决下一个。
[root@k8s-master centos_master]# kubeadm init --pod-network-cidr=192.168.0.0/16 --kubernetes-version=v1.15.1 --apiserver-advertise-address=192.168.56.103
[init] Using Kubernetes version: v1.15.1
[preflight] Running pre-flight checks
error execution phase preflight: [preflight] Some fatal errors occurred:
	[ERROR NumCPU]: the number of available CPUs 1 is less than the required 2
[preflight] If you know what you are doing, you can make a check non-fatal with `--ignore-preflight-errors=...`
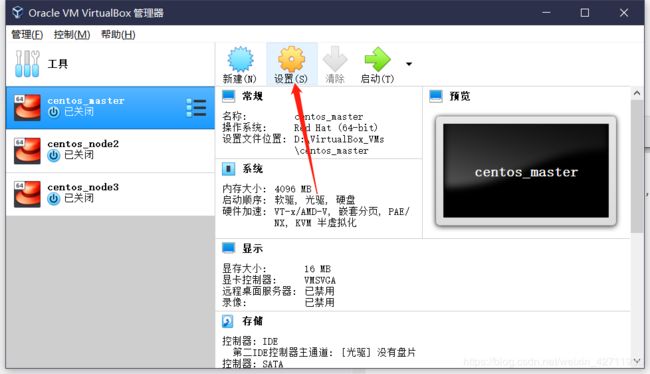
这是因为虚拟机配置低了,回头看我们的虚拟机配置
 果然只有一个CPU,所以需要关闭虚拟机,把它的配置升级一下。

 本来想是不是要给三个CPU会不会更好一点,但是后面的8CPU告诉我这不切实际。。。
最后两外虚拟机同样操作,每个虚拟机给2个CPU。
2.4 再次初始化集群
[root@k8s-master centos_master]# kubeadm init --pod-network-cidr=192.168.0.0/16 --kubernetes-version=v1.15.1 --apiserver-advertise-address=192.168.56.103
[init] Using Kubernetes version: v1.15.1
[preflight] Running pre-flight checks
[preflight] Pulling images required for setting up a Kubernetes cluster
[preflight] This might take a minute or two, depending on the speed of your internet connection
[preflight] You can also perform this action in beforehand using 'kubeadm config images pull'
[kubelet-start] Writing kubelet environment file with flags to file "/var/lib/kubelet/kubeadm-flags.env"
[kubelet-start] Writing kubelet configuration to file "/var/lib/kubelet/config.yaml"
[kubelet-start] Activating the kubelet service
[certs] Using certificateDir folder "/etc/kubernetes/pki"
[certs] Generating "ca" certificate and key
[certs] Generating "apiserver" certificate and key
[certs] apiserver serving cert is signed for DNS names [k8s-master kubernetes kubernetes.default kubernetes.default.svc kubernetes.default.svc.cluster.local] and IPs [10.96.0.1 192.168.56.103]
[certs] Generating "apiserver-kubelet-client" certificate and key
[certs] Generating "etcd/ca" certificate and key
[certs] Generating "etcd/server" certificate and key
[certs] etcd/server serving cert is signed for DNS names [k8s-master localhost] and IPs [192.168.56.103 127.0.0.1 ::1]
[certs] Generating "apiserver-etcd-client" certificate and key
[certs] Generating "etcd/peer" certificate and key
[certs] etcd/peer serving cert is signed for DNS names [k8s-master localhost] and IPs [192.168.56.103 127.0.0.1 ::1]
[certs] Generating "etcd/healthcheck-client" certificate and key
[certs] Generating "front-proxy-ca" certificate and key
[certs] Generating "front-proxy-client" certificate and key
[certs] Generating "sa" key and public key
[kubeconfig] Using kubeconfig folder "/etc/kubernetes"
[kubeconfig] Writing "admin.conf" kubeconfig file
[kubeconfig] Writing "kubelet.conf" kubeconfig file
[kubeconfig] Writing "controller-manager.conf" kubeconfig file
[kubeconfig] Writing "scheduler.conf" kubeconfig file
[control-plane] Using manifest folder "/etc/kubernetes/manifests"
[control-plane] Creating static Pod manifest for "kube-apiserver"
[control-plane] Creating static Pod manifest for "kube-controller-manager"
[control-plane] Creating static Pod manifest for "kube-scheduler"
[etcd] Creating static Pod manifest for local etcd in "/etc/kubernetes/manifests"
[wait-control-plane] Waiting for the kubelet to boot up the control plane as static Pods from directory "/etc/kubernetes/manifests". This can take up to 4m0s
[apiclient] All control plane components are healthy after 20.503142 seconds
[upload-config] Storing the configuration used in ConfigMap "kubeadm-config" in the "kube-system" Namespace
[kubelet] Creating a ConfigMap "kubelet-config-1.15" in namespace kube-system with the configuration for the kubelets in the cluster
[upload-certs] Skipping phase. Please see --upload-certs
[mark-control-plane] Marking the node k8s-master as control-plane by adding the label "node-role.kubernetes.io/master=''"
[mark-control-plane] Marking the node k8s-master as control-plane by adding the taints [node-role.kubernetes.io/master:NoSchedule]
[bootstrap-token] Using token: 4lomz9.l7dq7yewuiuo7j6r
[bootstrap-token] Configuring bootstrap tokens, cluster-info ConfigMap, RBAC Roles
[bootstrap-token] configured RBAC rules to allow Node Bootstrap tokens to post CSRs in order for nodes to get long term certificate credentials
[bootstrap-token] configured RBAC rules to allow the csrapprover controller automatically approve CSRs from a Node Bootstrap Token
[bootstrap-token] configured RBAC rules to allow certificate rotation for all node client certificates in the cluster
[bootstrap-token] Creating the "cluster-info" ConfigMap in the "kube-public" namespace
[addons] Applied essential addon: CoreDNS
[addons] Applied essential addon: kube-proxy

Your Kubernetes control-plane has initialized successfully!

To start using your cluster, you need to run the following as a regular user:

  mkdir -p $HOME/.kube
  sudo cp -i /etc/kubernetes/admin.conf $HOME/.kube/config
  sudo chown $(id -u):$(id -g) $HOME/.kube/config

You should now deploy a pod network to the cluster.
Run "kubectl apply -f [podnetwork].yaml" with one of the options listed at:
  https://kubernetes.io/docs/concepts/cluster-administration/addons/

Then you can join any number of worker nodes by running the following on each as root:

kubeadm join 192.168.56.103:6443 --token 4lomz9.l7dq7yewuiuo7j6r \
    --discovery-token-ca-cert-hash sha256:a7c45b56471cfa88e897007b74618bae0c16bf4179d98710622bc64e3f0f6ed4
成功!
2.5 解读
可以看到,提示集群成功初始化,并且我们需要执行以下命令:
mkdir -p $HOME/.kube
sudo cp -i /etc/kubernetes/admin.conf $HOME/.kube/config
sudo chown $(id -u):$(id -g) $HOME/.kube/config
另外, 提示我们还需要创建网络
You should now deploy a pod network to the cluster. Run “kubectl apply
-f [podnetwork].yaml” with one of the options listed at: https://kubernetes.io/docs/concepts/cluster-administration/addons/
并说了其他节点加入集群的方式
Then you can join any number of worker nodes by running the following
on each as root:kubeadm join 192.168.56.103:6443 --token 4lomz9.l7dq7yewuiuo7j6r
–discovery-token-ca-cert-hash sha256:a7c45b56471cfa88e897007b74618bae0c16bf4179d98710622bc64e3f0f6ed4
3 建造集群第二步
首先按照提示执行以下命令:
mkdir -p $HOME/.kube
sudo cp -i /etc/kubernetes/admin.conf $HOME/.kube/config
sudo chown $(id -u):$(id -g) $HOME/.kube/config
然后查看一下pod状态,果然没有创建网络的话,dns相关组件是堵塞状态。
[root@k8s-master centos_master]# kubectl get pod -n kube-system
NAME                                 READY   STATUS    RESTARTS   AGE
coredns-5c98db65d4-dnb85             0/1     Pending   0          60m
coredns-5c98db65d4-jhdsl             0/1     Pending   0          60m
etcd-k8s-master                      1/1     Running   0          59m
kube-apiserver-k8s-master            1/1     Running   0          59m
kube-controller-manager-k8s-master   1/1     Running   0          59m
kube-proxy-78k2m                     1/1     Running   0          60m
kube-scheduler-k8s-master            1/1     Running   0          59m
4 建造集群第三步:搭建网络
搭建网络的时候,同样遇到很多不合时宜的教程或是其他讲解的误导,为了防止大家看迷糊,所以下面直接写正确的步骤了。
根据官方文档
https://docs.projectcalico.org/v3.8/getting-started/kubernetes/
(1)这一步我们在初始化的时候已经完成,所以忽略。
sudo kubeadm init --pod-network-cidr=192.168.0.0/16
(2)这一步我们同样已经完成,忽略。
mkdir -p $HOME/.kube
sudo cp -i /etc/kubernetes/admin.conf $HOME/.kube/config
sudo chown $(id -u):$(id -g) $HOME/.kube/config
(3)执行以下命令
kubectl apply -f https://docs.projectcalico.org/v3.8/manifests/calico.yaml
然后会看到如下界面
configmap "calico-config" created
customresourcedefinition.apiextensions.k8s.io "felixconfigurations.crd.projectcalico.org" created
customresourcedefinition.apiextensions.k8s.io "ipamblocks.crd.projectcalico.org" created
customresourcedefinition.apiextensions.k8s.io "blockaffinities.crd.projectcalico.org" created
customresourcedefinition.apiextensions.k8s.io "ipamhandles.crd.projectcalico.org" created
customresourcedefinition.apiextensions.k8s.io "bgppeers.crd.projectcalico.org" created
customresourcedefinition.apiextensions.k8s.io "bgpconfigurations.crd.projectcalico.org" created
customresourcedefinition.apiextensions.k8s.io "ippools.crd.projectcalico.org" created
customresourcedefinition.apiextensions.k8s.io "hostendpoints.crd.projectcalico.org" created
customresourcedefinition.apiextensions.k8s.io "clusterinformations.crd.projectcalico.org" created
customresourcedefinition.apiextensions.k8s.io "globalnetworkpolicies.crd.projectcalico.org" created
customresourcedefinition.apiextensions.k8s.io "globalnetworksets.crd.projectcalico.org" created
customresourcedefinition.apiextensions.k8s.io "networksets.crd.projectcalico.org" created
customresourcedefinition.apiextensions.k8s.io "networkpolicies.crd.projectcalico.org" created
clusterrole.rbac.authorization.k8s.io "calico-kube-controllers" created
clusterrolebinding.rbac.authorization.k8s.io "calico-kube-controllers" created
clusterrole.rbac.authorization.k8s.io "calico-node" created
clusterrolebinding.rbac.authorization.k8s.io "calico-node" created
daemonset.extensions "calico-node" created
serviceaccount "calico-node" created
deployment.extensions "calico-kube-controllers" created
serviceaccount "calico-kube-controllers" created
(4)接下来执行以下命令观察
watch kubectl get pods --all-namespaces
直到每一个pod的状态都变成running。
如下图就是箭头那一列,等到那一列都变成running之后
 变成如下场景

因为K8S集群默认不会将pod调度到Master上,这样master的资源就浪费了,设置master节点也可以被调度
[root@k8s-master centos_master]# kubectl taint nodes --all node-role.kubernetes.io/master-
node/k8s-master untainted
使用以下命令确认我们的集群中现在有一个节点。
kubectl get nodes -o wide
得到如下反馈
NAME         STATUS   ROLES    AGE     VERSION   INTERNAL-IP      EXTERNAL-IP   OS-IMAGE                KERNEL-VERSION               CONTAINER-RUNTIME
k8s-master   Ready    master   2d22h   v1.15.1   192.168.56.103           CentOS Linux 7 (Core)   3.10.0-957.21.3.el7.x86_64   docker://18.9.8
Congratulations!现在我们有了一个配备了Calico的单主机Kubernetes集群。
5 建造集群第四步:将其他节点加入集群
在其他两个节点k8s-node2和k8s-node3上,执行主节点生成的kubeadm join命令即可加入集群:
kubeadm join 192.168.56.103:6443 --token 4lomz9.l7dq7yewuiuo7j6r --discovery-token-ca-cert-hash sha256:a7c45b56471cfa88e897007b74618bae0c16bf4179d98710622bc64e3f0f6ed4
然后报错
[root@k8s-node2 centos_master]# kubeadm join 192.168.56.103:6443 --token 4lomz9.l7dq7yewuiuo7j6r --discovery-token-ca-cert-hash sha256:a7c45b56471cfa88e897007b74618bae0c16bf4179d98710622bc64e3f0f6ed4
[preflight] Running pre-flight checks
error execution phase preflight: couldn't validate the identity of the API Server: abort connecting to API servers after timeout of 5m0s
原因:默认token的有效期为24小时,master节点的token过期了
解决:创建新的token
(1)在master节点上,得到新的token
[root@k8s-master centos_master]# kubeadm token create
amrjle.m6zuzmlcfim6ntdk
(2)在master节点上,获取ca证书sha256编码hash值
[root@k8s-master centos_master]# openssl x509 -pubkey -in /etc/kubernetes/pki/ca.crt | openssl rsa -pubin -outform der 2>/dev/null | openssl dgst -sha256 -hex | sed 's/^.* //'
a7c45b56471cfa88e897007b74618bae0c16bf4179d98710622bc64e3f0f6ed4
(3)编辑新的添加节点的kubeadm join如下
kubeadm join 192.168.56.103:6443 --token amrjle.m6zuzmlcfim6ntdk --discovery-token-ca-cert-hash sha256:a7c45b56471cfa88e897007b74618bae0c16bf4179d98710622bc64e3f0f6ed4
(4)重新添加节点,以node2为例
    [root@k8s-node2 centos_master]# kubeadm join 192.168.56.103:6443 --token amrjle.m6zuzmlcfim6ntdk --discovery-token-ca-cert-hash sha256:a7c45b56471cfa88e897007b74618bae0c16bf4179d98710622bc64e3f0f6ed4
    [preflight] Running pre-flight checks
    [preflight] Reading configuration from the cluster...
    [preflight] FYI: You can look at this config file with 'kubectl -n kube-system get cm kubeadm-config -oyaml'
    [kubelet-start] Downloading configuration for the kubelet from the "kubelet-config-1.15" ConfigMap in the kube-system namespace
    [kubelet-start] Writing kubelet configuration to file "/var/lib/kubelet/config.yaml"
    [kubelet-start] Writing kubelet environment file with flags to file "/var/lib/kubelet/kubeadm-flags.env"
    [kubelet-start] Activating the kubelet service
    [kubelet-start] Waiting for the kubelet to perform the TLS Bootstrap...

    This node has joined the cluster:
    * Certificate signing request was sent to apiserver and a response was received.
    * The Kubelet was informed of the new secure connection details.

    Run 'kubectl get nodes' on the control-plane to see this node join the cluster.
成功~,node3同理
6 建造集群完毕
将所有节点加入集群后,在master节点(主节点)上,运行kubectl get nodes查看集群状态如下
[root@k8s-master centos_master]# kubectl get nodes
NAME         STATUS   ROLES    AGE     VERSION
k8s-master   Ready    master   2d23h   v1.15.1
k8s-node2    Ready       3m38s   v1.15.1
k8s-node3    Ready       3m28s   v1.15.1
另外,可查看所有pod状态,运行kubectl get pods -n kube-system
[root@k8s-master centos_master]# kubectl get pods -n kube-system
NAME                                       READY   STATUS    RESTARTS   AGE
calico-kube-controllers-7bd78b474d-4vgnh   1/1     Running   0          41h
calico-node-p59hr                          1/1     Running   0          41h
calico-node-rdcqs                          1/1     Running   0          4m46s
calico-node-sc79x                          1/1     Running   0          4m56s
coredns-5c98db65d4-dnb85                   1/1     Running   0          2d23h
coredns-5c98db65d4-jhdsl                   1/1     Running   0          2d23h
etcd-k8s-master                            1/1     Running   2          2d23h
kube-apiserver-k8s-master                  1/1     Running   2          2d23h
kube-controller-manager-k8s-master         1/1     Running   2          2d23h
kube-proxy-78k2m                           1/1     Running   2          2d23h
kube-proxy-n9ggl                           1/1     Running   0          4m46s
kube-proxy-zvglw                           1/1     Running   0          4m56s
kube-scheduler-k8s-master                  1/1     Running   2          2d23h
如图,所有pod都是running,则代表集群运行正常。
备注:
另外,k8s项目提供了一个官方的dashboard,因为我们平时还是命令行用的多,接下来还要搭建istio,所以这里就不再赘述,具体怎么安装可以自行去找一下教程,最终效果如下。
7 小结
至此,kubernetes集群全部搭建正常!下一章我们开始在kubernetes集群之上搭建istio服务网格。

