SpringBoot配置ELK日志分析系统搭建
SpringBoot配置ELK日志分析系统
- ELK介绍
- 环境配置
- 准备工作
- 配置Elasticsearch
- 配置Kibana
- 配置Logstash
- 准备微服务
- 运行测试
ELK介绍
引用网上别人的介绍:
Logstash:日志收集工具,可以从本地磁盘,网络服务(自己监听端口,接受用户日志),消息队列中收集各种各样的日志,然后进行过滤分析,并将日志输出到Elasticsearch中。
Elasticsearch:日志分布式存储/搜索工具,原生支持集群功能,可以将指定时间的日志生成一个索引,加快日志查询和访问。
Kibana:可视化日志Web展示工具,对Elasticsearch中存储的日志进行展示,还可以生成炫丽的仪表盘。
环境配置
准备工作
- 首先建议在linux上配置ELK会更为方便,Windows对组件兼容较差,官网上各种版本都有可以自行下载。
附上传送门:https://www.elastic.co/cn/downloads - 服务器需要java运行环境,配置方式也不赘述了,不会的请移步传送门:
http://www.runoob.com/w3cnote/win7-linux-java-setup.html - 在根目录创建名为elk的文件夹
mkdir elk
将下载好的三个文件解压进文件夹中
博客中文件夹的结构为:
elk:
	elasticsearch
	logstash
	kibana
配置Elasticsearch
vi /elk/elasticsearch/config/elasticsearch.yml
//配置外网连接,如果不能用请检查防火墙配置
network.host: 0.0.0.0
http.port: 9200
//后台启动elasticsearch服务
/elk/elasticsearch/bin/elasticsearch &
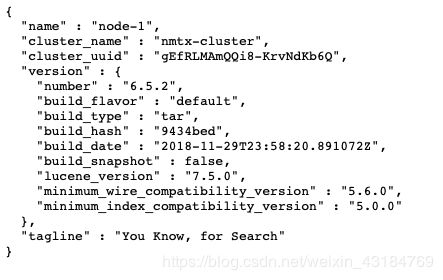
启动没有报错成功后,在浏览器输入ip:9200端口,显示下图所示为启动成功

配置Kibana
vi /elk/kibana/config/kibana.yml
//常用配置:
elasticsearch.url: "http:localhost:9200" //配置elasticsearch所在的IP和端口
server.port: 8888  //设置服务端口即可视化页面映射端口
server.host: "IP"   //设置服务IP
启动测试
/elk/kibana/bin/kibana &
启动完成没有报错后,在浏览器输入IP:Ports,在配置文件中配置的地址,
出现如下页面为成功
配置Logstash
我们在项目中使用的是springboot自带的logback,我们使用自定义的配置文件
首先在logstash目录中创建一个文件夹
mkdir /elk/logstash/webconfig
创建并编辑一个新配置文件
vi /elk/logstash/webconfig/log_elk.conf
在配置文件中添加
配置文件详细入门参考传送门:https://www.cnblogs.com/moonlightL/p/7760512.html
input {
 # 我们创建了两个微服务demo 所以建立两个不同的输入,将两个服务的日志分别输入到不同的索引中
  tcp {
    mode => "server"
    host => "0.0.0.0"  # 允许任意主机发送日志
    type => "elk1"      # 设定type以区分每个输入源
    port => 4567
    codec => json_lines    # 数据格式
  }
  tcp {
    mode => "server"
    host => "0.0.0.0"
    type => "elk2"
    port => 4667
    codec => json_lines
  }

}
filter {
  #Only matched data are send to output.
}
output {
  # For detail config for elasticsearch as output,
  # See: https://www.elastic.co/guide/en/logstash/current/plugins-outputs-elasticsearch.html

  if [type] == "elk1" {
    elasticsearch {
      action => "index"          # 输出时创建映射
      hosts  => "192.168.87.136:9200"   # ElasticSearch 的地址和端口
      index  => "elk1"         # 指定索引名
      codec  => "json"
     }
  }
  if [type] == "elk2" {
    elasticsearch {
      action => "index"          #The operation on ES
      hosts  => "192.168.87.136:9200"   #ElasticSearch host, can be array.
      index  => "elk2"         #The index to write data to.
      codec  => "json"
     }
  }
}
启动Logstash
//-f后可以接指定的配置文件,也可以是一个目录,它会自动将目录中的所有配置文件一起导入合成一个配置文件,实现多配置文件启动

//单文件:
/elk/logstash/bin/logstash -f /elk/logstash/wegconfig/log_elk.conf   &
//目录:
/elk/logstash/bin/logstash -f /elk/logstash/wegconfig  &
准备微服务
使用idea创建springboot项目,勾选web组件。
在resource文件夹下创建配置文件logback-spring.xml
localhost:4567
新建一个IndexController类
@RestController
public class IndexController {
    private final Logger logger = LoggerFactory.getLogger(getClass());

    @GetMapping("/index")
    public Object index() {
            logger.debug("======ELK2测试=======");
            logger.info("======ELK2测试=======");
            logger.warn("======ELK2测试=======");
            logger.error("======ELK2测试=======");

        return "success";
    }
}
在另一个微服务中也同理创建,只需要修改logback-spring.xml中的Logstash端口号,在Controller中日志输出的内容也可以做简单区分。
最后启动两个微服务。
运行测试
- 依次启动Elasticsearch,Kibana,Logstash和两个微服务
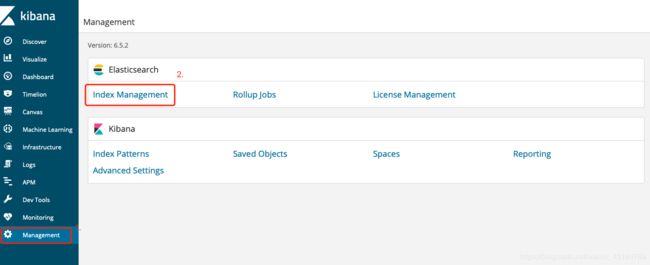
- 打开Kibana页面


页面中已经有了我们配置的两个索引,其中有11条日志是在我们启动微服务时springboot输出的日志,在有第一条日志通过tcp发送到Logstash,Logstash将它转发到Elasticsearch时Elasticsearch自动为我们创建了索引。
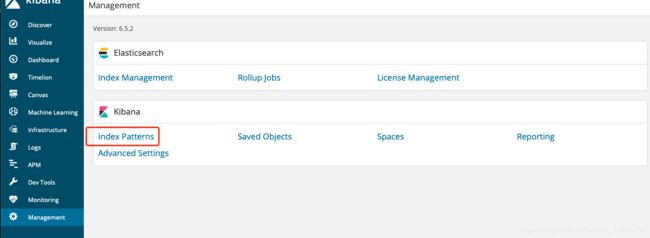
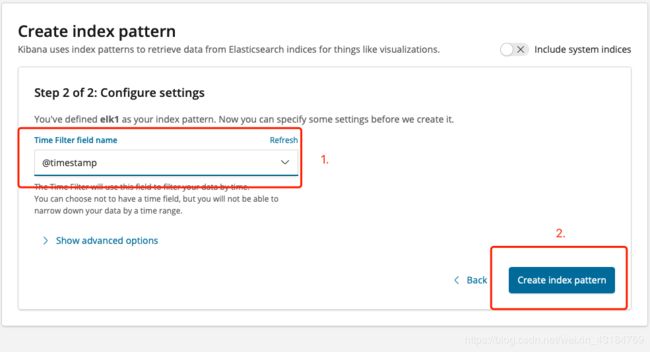
接着我们在Kibana中添加该索引


两个索引添加完成后

我们在浏览器中访问两个微服务的index地址后刷新kibana页面。

简单的搭建到此就结束了