find命令
还在为文件查找,分类管理文件而发愁吗?超详细的find命令用法,帮你解决这些问题。
下面我通过一些例子,来帮大家了解find命令:
为了实验效果更加明显,我先在/mnt下建立了一些文件,并修改了他们的权限及所有人,所在组。
[root@westos mnt]# touch file{1..5}
[root@westos mnt]# chown gq.westos file1
[root@westos mnt]# chown root.westos file2
[root@westos mnt]# chown westos.westos file3
OK,现在我的文件就建立好了。用一条命令对这些文件的权限进行监控,
[root@westos mnt]# watch -n 1 ls -lR /mnt/
/mnt/:
total 0
-rw-r--r-- 1 gq westos 0 Nov 12 06:10 file1
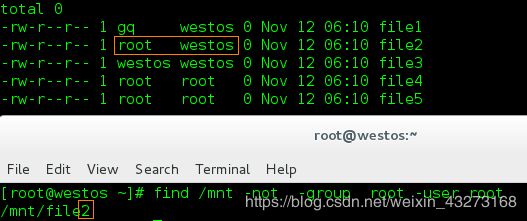
-rw-r--r-- 1 root westos 0 Nov 12 06:10 file2
-rw-r--r-- 1 westos westos 0 Nov 12 06:10 file3
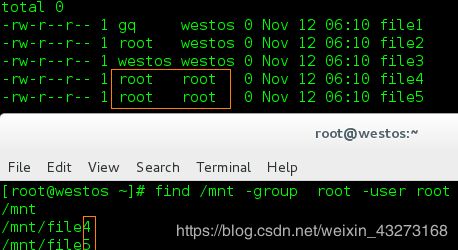
-rw-r--r-- 1 root root 0 Nov 12 06:10 file4
-rw-r--r-- 1 root root 0 Nov 12 06:10 file5
现在使用find命令按所有人所在组进行文件的查找(注意 -o 代表或的关系):
find /mnt -user root 查找/mnt下属于root用户的文件

find /mnt -group root 查找/mnt下属于root组的文件
find /mnt -group root -user root 查找/mnt下属于root用户,root组的文件
find /mnt -not -group root -user root 查找/mnt下属于root用户,但不root组的文件
find /mnt -not -group root -0 -user root 查找/mnt下属于root用户,或者不属于root组的文件
现在使用find命令按名称进行文件的查找
注意:-maxdepth代表最深几层目录 -mindepth 代表最浅几层目录
find /etc -name passwd 查找/etc 下文件名为passwd 字符的文件

find -maxdepth 1 -name passwd 查找当前位置文件名passwd字符且最深一层目录的文件
![]()
find /etc -maxdepth 2 -name passwd 查找/etc文件名passwd字符且最深两层目录的文件
find /etc -maxdepth 1 -name passwd 查找/etc下文件名为passwd字符且最深一层目录的文件

find /etc -maxdepth 1 -name *.conf 查找/etc下文件名以.conf字符结尾且最深一层目录的文件
find /etc -maxdepth 2 -name *.conf 查找/etc下文件名以.conf字符结尾且最深两层目录的文件

find /etc -maxdepth 2 -mindepth 2 -name *.conf 查找/etc下文件名以.conf字符结尾且只有两层目录的文件
现在使用find命令按文件大小进行文件的查找
为了实验效果,先截取不同大小的数据在/mnt下的文件中。
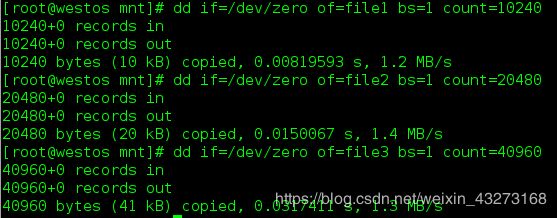
[root@westos mnt]# dd if=/dev/zero of=file1 bs=1 count=10240
10240+0 records in
10240+0 records out
10240 bytes (10 kB) copied, 0.00819593 s, 1.2 MB/s
[root@westos mnt]# dd if=/dev/zero of=file2 bs=1 count=20480
20480+0 records in
20480+0 records out
20480 bytes (20 kB) copied, 0.0150067 s, 1.4 MB/s
[root@westos mnt]# dd if=/dev/zero of=file3 bs=1 count=40960
40960+0 records in
40960+0 records out
40960 bytes (41 kB) copied, 0.0317411 s, 1.3 MB/s
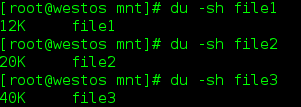
查看这些文件大小
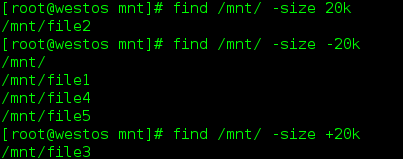
[root@westos mnt]# find /mnt/ -size 20k 查找/mnt 下,文件大小为20k的文件
/mnt/file2
[root@westos mnt]# find /mnt/ -size -20k 查找/mnt 下,文件小于20k的文件
/mnt/
/mnt/file1
/mnt/file4
/mnt/file5
[root@westos mnt]# find /mnt/ -size +20k 查找/mnt 下,文件大于为20k的文件
/mnt/file3
现在使用find命令按文件类型进行文件的查找
find /etc/ -type d 查找/etc 小文件类型为目录的文件
find /etc/ -type f 查找/etc 小文件类型为文件的文件
find /etc/ -type l 查找/etc 小文件类型为链接的文件
find /etc/ -type b 查找/etc 小文件类型为块设备的文件
find /etc/ -type t 查找/etc 小文件类型为字符型设备的文件
现在使用find命令按文件修改时间进行文件的查找
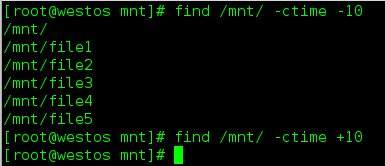
[root@westos mnt]# find /mnt/ -ctime -10 查找/mnt 下修改时间是10天之内的文件
/mnt/
/mnt/file1
/mnt/file2
/mnt/file3
/mnt/file4
/mnt/file5
[root@westos mnt]# find /mnt/ -ctime +10 查找/mnt 下修改时间是10天之前的文件
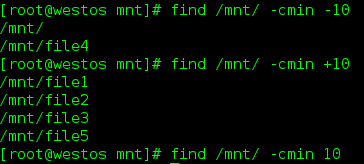
[root@westos mnt]# find /mnt/ -cmin -10 查找/mnt 下修改时间是10分钟的文件
/mnt/
/mnt/file4
[root@westos mnt]# find /mnt/ -cmin +10
/mnt/file1
/mnt/file2
/mnt/file3
/mnt/file5
[root@westos mnt]# find /mnt/ -cmin 10
为了实验更加清楚,做了以下操作:
[root@westos mnt]# find /etc/ -cmin -10
[root@westos mnt]# vim /etc/passwd
[root@westos mnt]# find /etc/ -cmin -10
/etc/
/etc/passwd
现在使用find命令按文件权限大小进行文件的查找
为了实验效果,我先把/mnt 建立的文件的权限做了修改
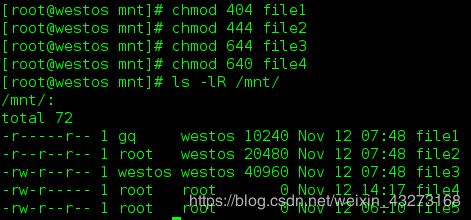
[root@westos mnt]# chmod 404 file1
[root@westos mnt]# chmod 444 file2
[root@westos mnt]# chmod 644 file3
[root@westos mnt]# chmod 640 file4
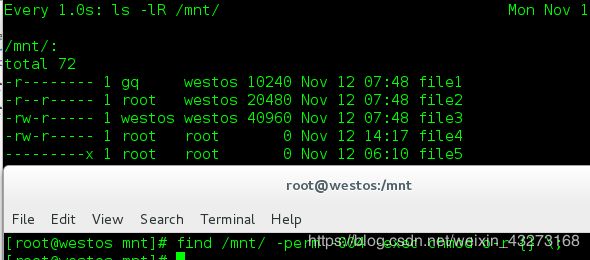
[root@westos mnt]# ls -lR /mnt/
/mnt/:
total 72
-r-----r-- 1 gq westos 10240 Nov 12 07:48 file1
-r--r--r-- 1 root westos 20480 Nov 12 07:48 file2
-rw-r--r-- 1 westos westos 40960 Nov 12 07:48 file3
-rw-r----- 1 root root 0 Nov 12 14:17 file4
-rw-r--r-- 1 root root 0 Nov 12 06:10 file5
[root@westos mnt]# find /mnt/ -perm 444 查找/mnt 下权限为444的文件
/mnt/file2
[root@westos mnt]# find /mnt/ -perm -444 查找/mnt 下所有者权限为含r,所在组权限含r,其他人权限含的文件
/mnt/
/mnt/file2
/mnt/file3
/mnt/file5
[root@westos mnt]# find /mnt/ -perm /444 查找/mnt 下 或者所有者权限为含r,或者所在组权限含r,或者其他人权限含的文件
/mnt/
/mnt/file1
/mnt/file2
/mnt/file3
/mnt/file5
/mnt/file4
为了更好的解释/777 的含义,进行如下操作
[root@westos mnt]# chmod 000 file5
[root@westos mnt]# chmod o+x file5
[root@westos mnt]# find /mnt/ -perm /777
查找/mnt 下 或者所有者权限为含r或者含w,或者含x,或者所在组权限含r或者含w,或者含x,或者其他人权限含r或者含w,或者含x的文件
/mnt/
/mnt/file1
/mnt/file2
/mnt/file3
/mnt/file4
[root@westos mnt]# chmod o+x file5
[root@westos mnt]# find /mnt/ -perm /777
/mnt/
/mnt/file1
/mnt/file2
/mnt/file3
/mnt/file5
/mnt/file4
[root@westos mnt]# find /mnt -perm -004 查找/mnt 下其他人含有r 权限的文件,而对所有人,所在组无要求的文件
/mnt
/mnt/file1
/mnt/file2
/mnt/file3
/mnt/file5
现在我们学会了使用find命令来满足不同的文件查找需求,那找出文件后,如何对这些文件进行处理呢?别着急,现在就带大家来学习。
对find命令查出的文件进行处理
[root@westos ~]find /mnt/ -perm -004 -exec chmod o-r {} \;
查找/mnt 下其他人含有r 权限的文件,而对所有人,所在组无要求的文件将这些文件其他人的r权限去掉。
[root@westos ~]find /etc/ -name *.conf -exec cp -rp {} /mnt \;
查找/etc 下文件名含有conf 的文件,并把文件连同文件的权限一同备份到/mnt
[root@westos ~]# find /mnt/ -name *.conf -exec rm -fr {} \; 查找/mnt 下文件名含有conf 的文件,并把文件删除
![]()


