oozie简介安装及使用
Oozie介绍
Oozie英文翻译为:驯象人。一个基于工作流引擎的开源框架,由Cloudera公司贡献给Apache。提供对Hadoop MapReduce、Pig Jobs的任务调度与协调。所谓的功能简单来说就是将各个功能串起来,一个任务执行完接着下一个任务开始进行,与工厂中的流水线类似。
Oozie的功能模块
分为三个模块
1.Workflow (各个流程的执行内容,将流程写入Workflow)
2.Coordinator (如果任务需要定时就配置Coordinator)
3.Bundle (多个Coordinator)
部署Hadoop(CDH版本的,因为oozie需要进行各个任务的调度协调衔接,如MapReduce与hive之类的,各个版本号需要不冲突才能使用,所以cdh版本使用更加方便)
1.修改Hadoop配置
core-site.xml
Oozie Server的Hostname
 <property>
 <name>hadoop.proxyuser."xxx(各自名字不同,后续xxx都为各自名称不同所简单的表示)".hosts</name>
 <value>*</value>
 </property>
允许被Oozie代理的用户组
 <property>
 <name>hadoop.proxyuser.xxxx.groups</name>
 <value>*</value>
 </property>
mapred-site.xml
配置 MapReduce JobHistory Server 地址 ,默认端口10020
<property>
    <name>mapreduce.jobhistory.address</name>
    <value>hadoop102(根据自己的名字自行填写,后续不提示):10020</value>
</property>
配置 MapReduce JobHistory Server web ui 地址, 默认端口19888
 <property>
  <name>mapreduce.jobhistory.webapp.address</name>
  <value>XXXX(自己的host名):19888</value>
  </property
yarn-site.xml
任务历史服务
<property>
	<name>yarn.log.server.url</name>
	<value>http://hadoop102:19888/jobhistory/logs/</value>
</property>
完成后:记得scp同步到其他机器节点进行同步!!!
2.启动Hadoop集群
sbin/start-dfs.sh
sbin/start-yarn.sh
sbin/mr-jobhistory-daemon.sh start historyserver(开启历史任务便于查看)
3.部署Oozie
自行安装oozie .将文件安装到指定目录,完成后Oozie目录下会出现hadooplibs目录。
在Oozie目录下创建libext目录,将hadooplibs里面的jar包,拷贝到libext目录下。
拷贝Mysql驱动包到libext目录下(oozie工作有自己的页面,页面上的工作流程与执行状态是从mysql中取数据显示的,所以使用到mysql)
将ext-2.2.zip拷贝到libext/目录下(查看是否已经有了,版本自己对应)
4.修改Oozie配置文件
oozie-site.xml
属性:oozie.service.JPAService.jdbc.driver
属性值:com.mysql.jdbc.Driver
解释:JDBC的驱动
属性:oozie.service.JPAService.jdbc.url
属性值:jdbc:mysql://xxxx:3306/oozie
解释:oozie所需的数据库地址
属性:oozie.service.JPAService.jdbc.username
属性值:xxxx
解释:数据库用户名
属性:oozie.service.JPAService.jdbc.password
属性值:xxxx
解释:数据库密码
属性:oozie.service.HadoopAccessorService.hadoop.configurations
属性值:*=/opt/module/CDH/hadoop-2.5.0-cdh5.3.6/etc/hadoop(根据自己的名字来配置)
解释:让Oozie引用Hadoop的配置文件
5.在Mysql中创建Oozie的数据库(创建了数据库执行的部分内容会在放置在mysql中,然后oozie的页面显示会从mysql读取内容显示)
在mysql中create database oozie;
6.初始化Oozie
上传Oozie目录下的yarn.tar.gz文件到HDFS:
bin/oozie-setup.sh sharelib create -fs hdfs://hadoop102:8020 -locallib oozie-sharelib-4.0.0-cdh5.3.6-yarn.tar.gz
创建oozie.sql文件
bin/ooziedb.sh create -sqlfile oozie.sql -run
打包项目,生成war包
bin/oozie-setup.sh prepare-war
Oozie的启动与关闭
bin/oozied.sh start
bin/oozied.sh stop
启动后可以访问oozie的web页面
地址:http://hadoop102:11000/oozie
Oozie的使用
Oozie调度shell脚本
mkdir -p oozie-apps/shell
在oozie-apps/shell目录下创建两个文件——job.properties和workflow.xml文件
touch workflow.xml
touch job.properties
编辑job.properties和workflow.xml文件
job.properties
#HDFS地址
nameNode=hdfs://hadoop102:8020
#ResourceManager地址
jobTracker=hadoop103:8032
#队列名称
queueName=default
examplesRoot=oozie-apps
oozie.wf.application.path=${nameNode}/user/${user.name}/${examplesRoot}/shell
workflow.xml
<workflow-app xmlns="uri:oozie:workflow:0.4" name="shell-wf">
<!--开始节点-->
<start to="shell-node"/>
<!--动作节点-->
<action name="shell-node">
    <!--shell动作-->
    <shell xmlns="uri:oozie:shell-action:0.2">
        <job-tracker>${jobTracker}</job-tracker>
        <name-node>${nameNode}</name-node>
        <configuration>
            <property>
                <name>mapred.job.queue.name</name>
                <value>${queueName}</value>
            </property>
        </configuration>
        <!--要执行的脚本-->
        <exec>mkdir</exec>
        <argument>/opt/module/d</argument>
        <capture-output/>
    </shell>
    <ok to="end"/>
    <error to="fail"/>
</action>
<!--kill节点-->
<kill name="fail">
    <message>Shell action failed, error message[${wf:errorMessage(wf:lastErrorNode())}]</message>
</kill>
<!--结束节点-->
<end name="end"/>
</workflow-app>
上传任务配置
/opt/module/cdh/hadoop-2.5.0-cdh5.3.6/bin/hadoop fs -put oozie-apps/ /user/xxxx
执行任务
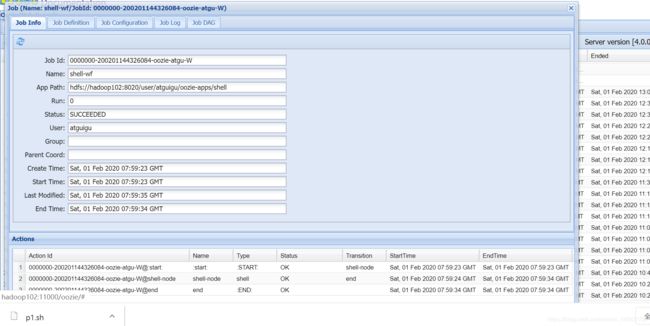
bin/oozie job -oozie http://hadoop102:11000/oozie -config oozie-apps/shell/job.properties -run
来最后一个练习 ,Oozie定时任务/循环任务
各个机器需要时间同步(时间同步方式网上自行查找)
1. 配置oozie-site.xml文件
将内容复制到conf/oozie-site.xml文件中(设为东八区:GMT+0800)
<property>
    <name>oozie.processing.timezone</name>
    <value>GMT+0800</value>
    <description>
        Oozie server timezone. Valid values are UTC and GMT(+/-)####, for example 'GMT+0530' would be India
        timezone. All dates parsed and genered dates by Oozie Coordinator/Bundle will be done in the specified
        timezone. The default value of 'UTC' should not be changed under normal circumtances. If for any reason
        is changed, note that GMT(+/-)#### timezones do not observe DST changes.
    </description>
</property>
2.在oozie目录下创建oozie-apps文件夹,oozie-apps文件夹下创建corn文件夹
创建
coordinator.xml
job.properties
workflow.xml
三个文件
coordinator.xml
定时任务
前面是间隔时间开始时间和结束时间
	<coordinator-app name="cron-coord" frequency="${coord:minutes(5)}" start="${start}" end="${end}" timezone="UTC"
                 xmlns="uri:oozie:coordinator:0.2">
        <action>
        <workflow>
            <app-path>${workflowAppUri}</app-path>
            <configuration>
                <property>
                    <name>jobTracker</name>
                    <value>${jobTracker}</value>
                </property>
                <property>
                    <name>nameNode</name>
                    <value>${nameNode}</value>
                </property>
                <property>
                    <name>queueName</name>
                    <value>${queueName}</value>
                </property>
            </configuration>
        </workflow>
    </action>
</coordinator-app>
job.properties
nameNode=hdfs://hadoop102:8020
jobTracker=hadoop103:8032
queueName=default

oozie.coord.application.path=${nameNode}/user/${user.name}/oozie-apps/cron
start=2020-02-02T19:35+0800
end=2020-02-02T22:00+0800
workflowAppUri=${nameNode}/user/${user.name}/oozie-apps/cron
workflow.xml
<workflow-app xmlns="uri:oozie:workflow:0.4" name="shell-wf">
<!--开始节点-->
<start to="shell-node"/>
<!--动作节点-->
<action name="shell-node">
    <!--shell动作-->
    <shell xmlns="uri:oozie:shell-action:0.2">
        <job-tracker>${jobTracker}</job-tracker>
        <name-node>${nameNode}</name-node>
        <configuration>
            <property>
                <name>mapred.job.queue.name</name>
                <value>${queueName}</value>
            </property>
        </configuration>
        <!--要执行的脚本-->
        <exec>p1.sh</exec>
		<file>/user/atguigu/oozie-apps/cron/p1.sh</file>
        <capture-output/>
    </shell>
    <ok to="end"/>
    <error to="fail"/>
</action>
<!--kill节点-->
<kill name="fail">
    <message>Shell action failed, error message[${wf:errorMessage(wf:lastErrorNode())}]</message>
</kill>
<!--结束节点-->
<end name="end"/>
</workflow-app>
   <exec>p1.sh</exec>
	<file>/user/atguigu/oozie-apps/cron/p1.sh</file>
    <capture-output/>
里面要执行的一个脚本也存放在cron目录下
p1.sh内容是将时间存放在log文件中
内容为 date >> /opt/module/test.log
将文件传到hdfs上
bin/hdfs dfs -put ../../oozie-4.0.0-cdh5.3.6/oozie-apps /user/atguigu/
执行任务
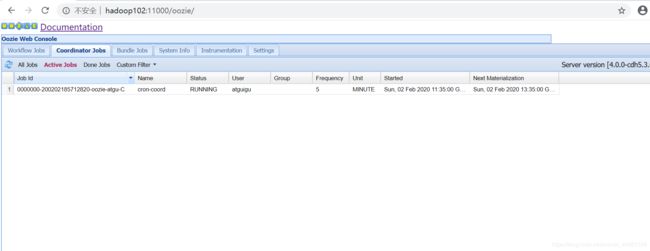
bin/oozie job -oozie http://hadoop102:11000/oozie -config oozie-apps/cron/job.properties -run


