从maven配置讲起,快速搭建Spring Boot
一、Spring和Spring Boot有什么关系呢
Spring Boot 是基于Spring之上的一个快速应用构建框架,Spring Boot内部整合了大量的依赖,而且这些依赖已经经过测试是没有版本冲突的,能够通过少量的配置就能让程序运行,它主要解决了Spring 依赖太多,配置繁琐的问题。
二、搭建前准备
搭建Spring Boot环境之前,你所需要安装:
- JDK1.8
- IDEA
- Maven
三、Maven 安装以及配置本地仓库
这里顺便写一下Maven的配置
Maven官网下载: https://maven.apache.org/download.cgi
历史版本的Maven:http://archive.apache.org/dist/maven/maven-3/
Maven安装配置
- 下载
- 解压
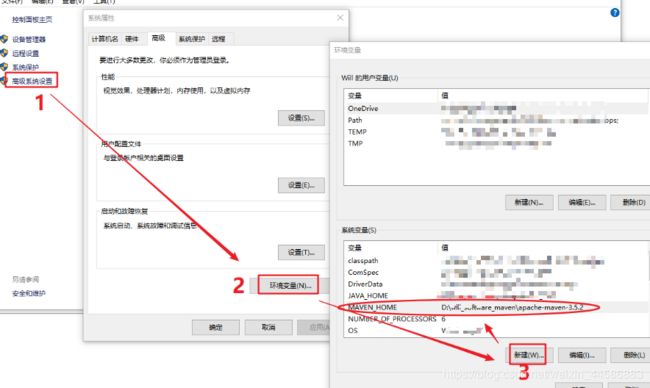
- 配置环境变量:我的电脑 — 属性
- 添加 MAVEN_HOME 系统变量
- 在path变量后面新增 %MAVEN_HOME%\bin\
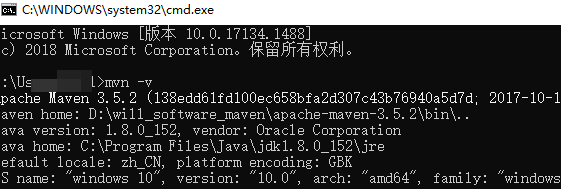
配置完成 运行 — CMD 打开命令窗口,输入 mvn -v 查看版本确认是否配置成功
版本过高的坑
这里有一个坑就是Maven 的版本不适宜过高,比如 我的IDEA是2018.3.2版本的,而Maven安装了3.6.3
在导入Spring Boot依赖的时候就会报错:
解决:
重新下载一个旧一点版本的maven,我下载了3.5.2版本,重新下载解压配置环境变量即可。
配置本地仓库
配置本地仓库是为了避免因网络问题导致开发时下载包慢的问题,因为常用的包都在本地了。
拿到我之前maven仓库解压出来,需要的朋友可以联系我要,
然后在maven 的conf 下 找到setting.xml, 然后把刚才解压的maven仓库配置上去即可。
D:\will_software_maven\maven_repository 这里顺便说一下配置阿里云的私服
    	alimaven
    	aliyun maven
    	http://maven.aliyun.com/nexus/content/repositories/central
    	*,!cloudera
IDEA 配置maven
File —> Setting —> Maven
四、开发Spring Boot程序基本步骤
步骤:
- 导入Spring Boot依赖(起步依赖)
- 编写application.properties配置文件
- 编写Application 入口程序
五、测试
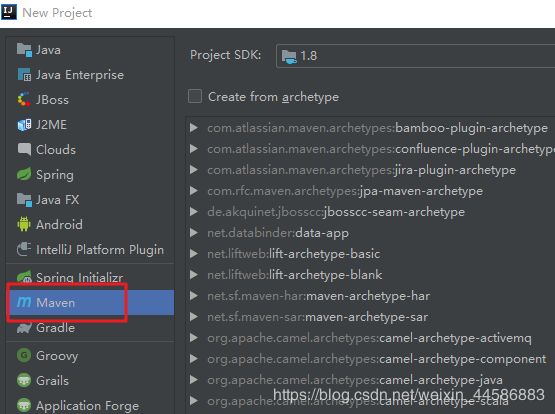
1、新建一个maven工程
File ——> new ——> Project,选择Maven,下一步,填写哈项目名等信息之后完成
2、配置项目下的pom.xml文件
        org.springframework.boot
        spring-boot-starter-parent
        1.5.13.RELEASE


    4.0.0

    com.XXX
    metadata01
    1.0-SNAPSHOT


        UTF-8
        UTF-8
        1.8


            alimaven
            alimaven
            http://maven.aliyun.com/nexus/content/groups/public/


            org.springframework.boot
            spring-boot-starter
            1.5.13.RELEASE


            org.springframework.boot
            spring-boot-starter-test
            1.5.13.RELEASE


            org.springframework.boot
            spring-boot-starter-web
            1.5.13.RELEASE


            org.springframework.boot
            spring-boot-starter-tomcat
            1.5.13.RELEASE


            org.apache.tomcat
            tomcat-catalina
            8.5.35


            com.alibaba
            fastjson
            1.2.47


                org.springframework.boot
                spring-boot-maven-plugin
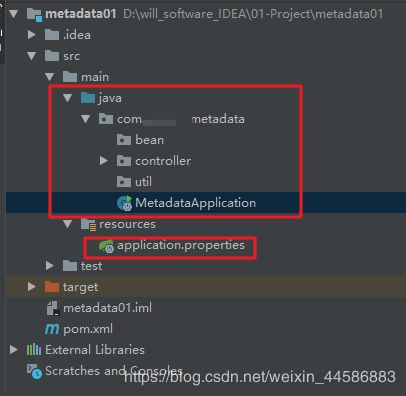
3、完成项目结构
红框部分都是要自己添加的
4、在resources 下面创建并编写 application.properties 文件
server.port=8888
spring.application.name=Metadata Application
5、创建Application主程序入口
package com.XXX.metadata;

import org.springframework.boot.SpringApplication;
import org.springframework.boot.autoconfigure.SpringBootApplication;

@SpringBootApplication
public class MetadataApplication {
    public static void main(String[] args) {
        SpringApplication.run(MetadataApplication.class, args);
    }
}
6、在controller 编写一个test
package com.dossen.metadata.controller;

import org.springframework.web.bind.annotation.RequestMapping;
import org.springframework.web.bind.annotation.RestController;

@RestController
@RequestMapping("/")
public class TestController {
    @RequestMapping("/test")
    public String test(String json) {
        System.out.println(json);
        return json;

    }
}
7、运行主程序
8、在浏览器地址栏输入:
http://localhost:8888/test?json=12345678控制台也输出了12345678
测试成功!


