Spring Cloud Security OAuth2 实现分布式认证授权授权环境搭建
啥是Spring Cloud Security OAuth2?
Spring-Security-OAuth2是对OAuth2的一种实现,并且跟我们之前学习的Spring Security相辅相成,与Spring Cloud体系的集成也非常便利,接下来,我们需要对它进行学习,最终使用它来实现我们设计的分布式认证授权解 决方案。
OAuth2.0的服务提供方涵盖两个服务,即授权服务 (Authorization Server,也叫认证服务) 和资源服务 (Resource Server),使用 Spring Security OAuth2 的时候你可以选择把它们在同一个应用程序中实现,也可以选择建立使用 同一个授权服务的多个资源服务。
授权服务 (Authorization Server)应包含对接入端以及登入用户的合法性进行验证并颁发token等功能,对令牌 的请求端点由 Spring MVC 控制器进行实现,下面是配置一个认证服务必须要实现的endpoints:
(1)AuthorizationEndpoint 服务于认证请求。默认 URL: /oauth/authorize 。
(2)TokenEndpoint 服务于访问令牌的请求。默认 URL: /oauth/token 。 资源服务 (Resource Server),应包含对资源的保护功能,对非法请求进行拦截,对请求中token进行解析鉴 权等,下面的过滤器用于实现 OAuth 2.0 资源服务:
(3)OAuth2AuthenticationProcessingFilter用来对请求给出的身份令牌解析鉴权。
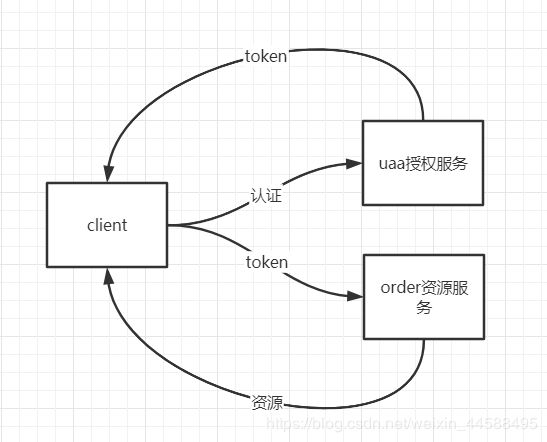
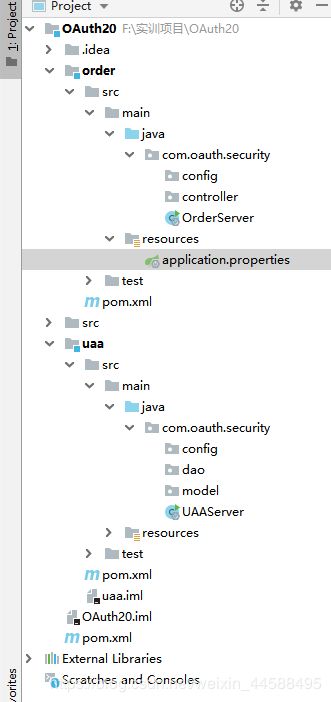
本教程分别创建uaa授权服务(也可叫认证服务)和order订单资源服务。
认证流程如下:
1、客户端请求UAA授权服务进行认证。
2、认证通过后由UAA颁发令牌。
3、客户端携带令牌Token请求资源服务。
4、资源服务校验令牌的合法性,合法即返回资源信息。
2、搭建工程
父工程引入的依赖:
    4.0.0

    com.oauth.security
    OAuth2.0
    1.0-SNAPSHOT
    pom


        org.springframework.boot
        spring-boot-starter-parent
        2.1.3.RELEASE


        UTF-8
        UTF-8
        1.8


                org.springframework.cloud
                spring-cloud-dependencies
                Greenwich.RELEASE
                pom
                import


                javax.servlet
                javax.servlet-api
                3.1.0
                provided


                javax.interceptor
                javax.interceptor-api
                1.2


                com.alibaba
                fastjson
                1.2.47


                org.projectlombok
                lombok
                1.18.0


                mysql
                mysql-connector-java
                5.1.47


                org.springframework.security
                spring-security-jwt
                1.0.10.RELEASE


                org.springframework.security.oauth.boot
                spring-security-oauth2-autoconfigure
                2.1.3.RELEASE


                com.baomidou
                mybatis-plus-boot-starter
                3.1.0
uaa的依赖文件:
        OAuth2.0
        com.oauth.security
        1.0-SNAPSHOT

    4.0.0
    uaa


            org.springframework.cloud
            spring-cloud-starter-netflix-hystrix


            org.springframework.cloud
            spring-cloud-starter-netflix-ribbon


            org.springframework.cloud
            spring-cloud-starter-openfeign


            com.netflix.hystrix
            hystrix-javanica


            org.springframework.retry
            spring-retry


            org.springframework.boot
            spring-boot-starter-actuator


            org.springframework.boot
            spring-boot-starter-web


            org.springframework.boot
            spring-boot-starter-freemarker


            org.springframework.data
            spring-data-commons


            org.springframework.cloud
            spring-cloud-starter-security


            org.springframework.cloud
            spring-cloud-starter-oauth2


            org.springframework.security
            spring-security-jwt


            javax.interceptor
            javax.interceptor-api


            mysql
            mysql-connector-java


            org.springframework.boot
            spring-boot-starter-jdbc


            com.alibaba
            fastjson


            org.projectlombok
            lombok


            com.baomidou
            mybatis-plus-boot-starter
uaa的配置文件:
spring.application.name=uaa-service
server.port=53020
spring.main.allow-bean-definition-overriding=true

logging.level.root=info
logging.level.org.springframework.web=info

spring.http.encoding.enabled=true
spring.http.encoding.charset=UTF-8
spring.http.encoding.force=true

server.tomcat.remote_ip_header=x-forwarded-for
server.tomcat.protocol_header=x-forwarded-proto
server.use-forward-headers=true
server.servlet.context-path=/uaa

spring.freemarker.enabled=true
spring.freemarker.suffix=.html
spring.freemarker.request-context-attribute=rc
spring.freemarker.content-type=text/html
spring.freemarker.charset=UTF-8
spring.mvc.throw-exception-if-no-handler-found=true
spring.resources.add-mappings=false

#数据库连接
spring.datasource.url=jdbc:mysql://localhost:3306/security?useUnicode=true&characterEncoding=utf-8&serverTimezone=CTT
spring.datasource.username=root
spring.datasource.password=111111
spring.datasource.driver-class-name=com.mysql.jdbc.Driver

#mybatis-plus配置
mybatis-plus.type-aliases-package=com.oauth.security.entity
mybatis-plus.mapper-locations=classpath:mapper/*Mapper.xml

#eureka.client.serviceUrl.defaultZone=http://localhost:53000/eureka/
# eureka.instance.preferIpAddress=true
# eureka.instance.instance-id=${spring.application.name}:${spring.cloud.client.ip- address}:${spring.application.instance_id:${server.port}}
management.endpoints.web.exposure.include=refresh,health,info,env

feign.hystrix.enabled=true
feign.compression.request.enabled=true
feign.compression.request.mime-types[0]=text/xml
feign.compression.request.mime-types[1]=application/xml
feign.compression.request.mime-types[2]=application/json
feign.compression.request.min-request-size=2048
feign.compression.response.enabled=true
uaa的启动类:
package com.oauth.security;

import org.mybatis.spring.annotation.MapperScan;
import org.springframework.boot.SpringApplication;
import org.springframework.boot.autoconfigure.SpringBootApplication;
import org.springframework.cloud.client.discovery.EnableDiscoveryClient;
import org.springframework.cloud.netflix.hystrix.EnableHystrix;
import org.springframework.cloud.openfeign.EnableFeignClients;

/**
 * @ClassName UAAServer
 * @Description UAA服务启动类
 * @Author 戴书博
 * @Date 2020/5/9 20:56
 * @Version 1.0
 **/
@SpringBootApplication
@EnableDiscoveryClient
@EnableHystrix
@EnableFeignClients(basePackages = {"com.oauth.security"})
@MapperScan("com.oauth.security.dao")
public class UAAServer {
    public static void main(String[] args) {
        SpringApplication.run(UAAServer.class, args);
    }
}
Order的依赖:
        OAuth2.0
        com.oauth.security
        1.0-SNAPSHOT

    4.0.0

    order


            org.springframework.boot
            spring-boot-starter-actuator


            org.springframework.boot
            spring-boot-starter-web


            org.springframework.cloud
            spring-cloud-starter-security


            org.springframework.cloud
            spring-cloud-starter-oauth2


            javax.interceptor
            javax.interceptor-api


            com.alibaba
            fastjson


            org.projectlombok
            lombok
Order的启动类:
package com.oauth.security;

import org.springframework.boot.SpringApplication;
import org.springframework.boot.autoconfigure.SpringBootApplication;
import org.springframework.cloud.client.discovery.EnableDiscoveryClient;

/**
 * @ClassName OrderServer
 * @Description
 * @Author
 * @Date 2020/5/9 21:11
 * @Version 1.0
 **/
@SpringBootApplication
@EnableDiscoveryClient
public class OrderServer {
    public static void main(String[] args) {
        SpringApplication.run(OrderServer.class, args);
    }
}
Order的配置文件:
spring.application.name=order-service
server.port=53021
spring.main.allow-bean-definition-overriding=true

logging.level.root=info
logging.level.org.springframework.web=info
spring.http.encoding.enabled=true
spring.http.encoding.charset=UTF-8
spring.http.encoding.force=true
server.tomcat.remote_ip_header=x-forwarded-for
server.tomcat.protocol_header=x-forwarded-proto
server.use-forward-headers=true
server.servlet.context-path=/order


spring.freemarker.enabled=true
spring.freemarker.suffix=.html
spring.freemarker.request-context-attribute=rc
spring.freemarker.content-type=text/html
spring.freemarker.charset=UTF-8
spring.mvc.throw-exception-if-no-handler-found=true
spring.resources.add-mappings=false

#eureka.client.serviceUrl.defaultZone=http://localhost:53000/eureka/
# eureka.instance.preferIpAddress=true
#eureka.instance.instance-id=${spring.application.name}:${spring.cloud.client.ip- address}:${spring.application.instance_id:${server.port}}
management.endpoints.web.exposure.include=refresh,health,info,env

feign.hystrix.enabled=true
feign.compression.request.enabled=true
feign.compression.request.mime-types[0]=text/xml
feign.compression.request.mime-types[1]=application/xml
feign.compression.request.mime-types[2]=application/json
feign.compression.request.min-request-size=2048
feign.compression.response.enabled=true
3、授权服务配置
(1)配置客户端详情:
ClientDetailsServiceConfigurer 能够使用内存或者JDBC来实现客户端详情服务(ClientDetailsService),ClientDetailsService负责查找ClientDetails,而ClientDetails有几个重要的属性如下列表:
clientId:(必须的)用来标识客户的Id。
secret:(需要值得信任的客户端)客户端安全码,如果有的话。
scope:用来限制客户端的访问范围,如果为空(默认)的话,那么客户端拥有全部的访问范围。
authorizedGrantTypes:此客户端可以使用的授权类型,默认为空。
authorities:此客户端可以使用的权限(基于Spring Security authorities)。
客户端详情(Client Details)能够在应用程序运行的时候进行更新,可以通过访问底层的存储服务(例如将客户 端详情存储在一个关系数据库的表中,就可以使用 JdbcClientDetailsService)或者通过自己实现 ClientRegistrationService接口(同时你也可以实现 ClientDetailsService 接口)来进行管理。暂时配置如下:
package com.oauth.security.config;

import org.springframework.context.annotation.Configuration;
import org.springframework.security.crypto.bcrypt.BCryptPasswordEncoder;
import org.springframework.security.oauth2.config.annotation.configurers.ClientDetailsServiceConfigurer;
import org.springframework.security.oauth2.config.annotation.web.configuration.AuthorizationServerConfigurerAdapter;
import org.springframework.security.oauth2.config.annotation.web.configuration.EnableAuthorizationServer;

/**
 * @ClassName AuthorizationServer
 * @Description
 * @Author
 * @Date 2020/5/9 22:00
 * @Version 1.0
 **/
@Configuration
@EnableAuthorizationServer
public class AuthorizationServer extends AuthorizationServerConfigurerAdapter {


    @Override
    public void configure(ClientDetailsServiceConfigurer clients) throws Exception {
//        clients.withClientDetails(clientDetailService)
        clients.inMemory()
                .withClient("c1") //client_id
                .secret(secret)
                .resourceIds("res1")
                //该client允许的授权类型 authorization_code,password,refresh_token,implicit,client_credentials
                .authorizedGrantTypes("authorization_code", "password","client_credentials","implicit","refresh_token")
                .scopes("all")
                //授权页面
                .autoApprove(false)
                //回调地址
                .redirectUris("http://www.baidu.com");
    }
}
(2)配置令牌:
AuthorizationServerTokenServices 接口定义了一些操作使得你可以对令牌进行一些必要的管理,令牌可以被用来 加载身份信息,里面包含了这个令牌的相关权限。
自己可以创建 AuthorizationServerTokenServices 这个接口的实现,则需要继承 DefaultTokenServices 这个类, 里面包含了一些有用实现,你可以使用它来修改令牌的格式和令牌的存储。默认的,当它尝试创建一个令牌的时 候,是使用随机值来进行填充的,除了持久化令牌是委托一个 TokenStore 接口来实现以外,这个类几乎帮你做了 所有的事情。并且 TokenStore 这个接口有一个默认的实现,它就是 InMemoryTokenStore ,如其命名,所有的 令牌是被保存在了内存中。除了使用这个类以外,你还可以使用一些其他的预定义实现,下面有几个版本,它们都 实现了TokenStore接口:
InMemoryTokenStore:这个版本的实现是被默认采用的,它可以完美的工作在单服务器上(即访问并发量 压力不大的情况下,并且它在失败的时候不会进行备份),大多数的项目都可以使用这个版本的实现来进行 尝试,你可以在开发的时候使用它来进行管理,因为不会被保存到磁盘中,所以更易于调试。
JdbcTokenStore:这是一个基于JDBC的实现版本,令牌会被保存进关系型数据库。使用这个版本的实现时, 你可以在不同的服务器之间共享令牌信息,使用这个版本的时候请注意把"spring-jdbc"这个依赖加入到你的 classpath当中。
JwtTokenStore:这个版本的全称是 JSON Web Token(JWT),它可以把令牌相关的数据进行编码(因此对 于后端服务来说,它不需要进行存储,这将是一个重大优势),但是它有一个缺点,那就是撤销一个已经授 权令牌将会非常困难,所以它通常用来处理一个生命周期较短的令牌以及撤销刷新令牌(refresh_token)。 另外一个缺点就是这个令牌占用的空间会比较大,如果你加入了比较多用户凭证信息。JwtTokenStore 不会保存任何数据,但是它在转换令牌值以及授权信息方面与 DefaultTokenServices 所扮演的角色是一样的。
package com.oauth.security.config;

import org.springframework.context.annotation.Bean;
import org.springframework.context.annotation.Configuration;
import org.springframework.security.oauth2.provider.token.TokenStore;
import org.springframework.security.oauth2.provider.token.store.InMemoryTokenStore;

/**
 * @ClassName TokenConfig
 * @Description
 * @Author
 * @Date 2020/5/9 22:13
 * @Version 1.0
 **/
@Configuration
public class TokenConfig {

    @Bean
    public TokenStore tokenStore() {
        //使用内存存储令牌
        return new InMemoryTokenStore();
    }
}
//在AuthorizationServer中
    @Autowired
    private TokenStore tokenStore;
    @Autowired
    private ClientDetailsService clientDetailsService;

    /**
     * 令牌管理服务
     */
    @Bean
    public AuthorizationServerTokenServices tokenService() {
        DefaultTokenServices service = new DefaultTokenServices();
        //配置客户端详情服务
        service.setClientDetailsService(clientDetailsService);
        //支持刷新令牌
        service.setSupportRefreshToken(true);
        //令牌存储策略
        service.setTokenStore(tokenStore);
        // 令牌默认有效期2小时
        service.setAccessTokenValiditySeconds(7200);
        // 刷新令牌默认有效期3天 return service;
        service.setRefreshTokenValiditySeconds(259200);
        return service;
    }
(3)令牌的访问端点:
AuthorizationServerEndpointsConfigurer 这个对象的实例可以完成令牌服务以及令牌endpoint配置。
authorizationCodeServices:这个属性是用来设置授权码服务的(即 AuthorizationCodeServices 的实例对 象),主要用于 "authorization_code" 授权码类型模式。
//在AuthorizationServer中添加
    @Autowired
    private AuthorizationCodeServices authorizationCodeServices;
    @Autowired
    private AuthenticationManager authenticationManager;

    @Override
    public void configure(AuthorizationServerEndpointsConfigurer endpoints) {
        endpoints
                .authenticationManager(authenticationManager)
                .authorizationCodeServices(authorizationCodeServices)
                .tokenServices(tokenService())
                .allowedTokenEndpointRequestMethods(HttpMethod.POST);
    }
然后还要将UserDetailsService、service、mapper等添加到这个项目中,代码拷贝见https://blog.csdn.net/weixin_44588495/article/details/105918081
如果不愿意拷贝也没关系,最后有项目的地址。
package com.oauth.security.config;

import org.springframework.context.annotation.Bean;
import org.springframework.context.annotation.Configuration;
import org.springframework.security.authentication.AuthenticationManager;
import org.springframework.security.config.annotation.web.builders.HttpSecurity;
import org.springframework.security.config.annotation.web.configuration.WebSecurityConfigurerAdapter;
import org.springframework.security.config.http.SessionCreationPolicy;
import org.springframework.security.crypto.bcrypt.BCryptPasswordEncoder;
import org.springframework.security.crypto.password.NoOpPasswordEncoder;
import org.springframework.security.crypto.password.PasswordEncoder;

/**
 * @ClassName WebSecurityConfig
 * @Description
 * @Author
 * @Date 2020/5/10 9:07
 * @Version 1.0
 **/
@Configuration
public class WebSecurityConfig extends WebSecurityConfigurerAdapter {

    /**
     * 配置认证管理器
     */
    @Bean
    public AuthenticationManager authenticationManager() throws Exception {
        return super.authenticationManager();
    }

    //密码编码器
    @Bean
    public PasswordEncoder passwordEncoder() {
        return NoOpPasswordEncoder.getInstance();
    }

    //安全拦截机制(最重要)
    @Override
    protected void configure(HttpSecurity http) throws Exception {
        http.csrf().disable()
                .authorizeRequests()
                .antMatchers("/r/r1").hasAnyAuthority("p1")
                .antMatchers("/login*").permitAll()
                .anyRequest().authenticated()
                .and()
                .formLogin();
    }
}
(5)令牌端点的安全约束:
    /**
     * 配置令牌端点(Token Endpoint)的安全约束
     */
    @Override
    public void configure(AuthorizationServerSecurityConfigurer security) {
        security.tokenKeyAccess("permitAll()")        //(1)
                .checkTokenAccess("permitAll()")      //(2)
                .allowFormAuthenticationForClients() ;//(3)
    }
(1)tokenkey这个endpoint当使用JwtToken且使用非对称加密时,资源服务用于获取公钥而开放的,这里指这个 endpoint完全公开。 (2)checkToken这个endpoint完全公开 (3) 允许表单认证
下一篇文章我们就来测试一下
github:[email protected]:Zesystem/OAuth2.0.git

