- Spring MVC 全面指南:从入门到精通的详细解析
一杯梅子酱
技术栈学习springmvcjava
引言:SpringMVC,作为Spring框架的一个重要模块,为构建Web应用提供了强大的功能和灵活性。无论是初学者还是有一定经验的开发者,掌握SpringMVC都将显著提升你的Web开发技能。本文旨在为初学者提供一个全面且易于理解的学习路径,通过详细的知识点分析和实际案例,帮助你快速上手SpringMVC,让学习过程既深刻又高效。一、SpringMVC简介1.1什么是SpringMVC?Spri
- SpringBoot和SpringMVC是什么关系?SpringBoot替代SpringMVC了吗?
瑞金彭于晏
springboot后端javaMVCspring数据库
SpringBoot和SpringMVC都是SpringFramework生态系统中的一部分,但它们各自扮演着不同的角色和提供不同的功能集。理解它们之间的关系,首先需要了解SpringFramework本身。SpringFrameworkSpringFramework是一个全面的、开源的应用程序开发框架,它提供了广泛的功能来支持企业应用开发的几乎所有方面。SpringFramework的核心特性之
- spring mvc @RequestBody String类型参数
zoyation
spring-mvcspringmvc
通过如下配置:text/html;charset=UTF-8application/json;charset=UTF-8在springmvc的Controller层使用@RequestBody接收Content-Type为application/json的数据时,默认支持Map方式和对象方式参数@RequestMapping(value="/{code}/saveUser",method=Requ
- 基于JavaWeb开发的Java+SpringMvc+vue+element实现上海汽车博物馆平台
网顺技术团队
成品程序项目javavue.js汽车课程设计springboot
基于JavaWeb开发的Java+SpringMvc+vue+element实现上海汽车博物馆平台作者主页网顺技术团队欢迎点赞收藏⭐留言文末获取源码联系方式查看下方微信号获取联系方式承接各种定制系统精彩系列推荐精彩专栏推荐订阅不然下次找不到哟Java毕设项目精品实战案例《1000套》感兴趣的可以先收藏起来,还有大家在毕设选题,项目以及论文编写等相关问题都可以给我留言咨询,希望帮助更多的人文章目录基
- 【免费】springboot项目申报管理系统|毕业设计|Javaweb项目
计算机学姐来啦
springbootssmjavaspringboot课程设计后端毕设毕业设计java-ee
收藏点赞不迷路关注作者有好处编号:springboot375springboot项目申报管理系统开发语言:Java数据库:MySQL技术:Spring+SpringMVC+MyBatis工具:IDEA/Ecilpse、Navicat、Maven1.万字文档展示(部分)2.系统图片展示第5章系统详细设计5.1管理员功能模块的实现5.1.1项目列表如图5.1显示的就是项目列表页面,此页面提供给管理员的
- Java 后端程序员必须要懂的几种框架分享
Java烟雨
javamvc开发语言
MVC框架MVC模式是软件工程中的一种软件架构模式,可以把软件系统分为三个基本部分:模型(Model),编写程序应有的功能(实现算法等等)、进行数据管理和数据库设计,。视图(View),界面设计人员进行图形界面设计。控制器(Controller),负责转发请求,对请求进行处理。比较知名的MVC框架有SpringMVC,是一种基于请求驱动类型的轻量级Web框架,目的是帮助我们后端程序员简化开发。我个
- 第 12 章 Spring MVC 扩展和 SSM 框架整合
HUNAG-DA-PAO
springmvcjava
SpringMVC框架处理JSON数据SON格式数据在现阶段的Web项目开发中扮演着非常重要的角色。在前端页面和后台交互的过程中,需要一种格式清晰、高效且两端都可以轻松使用的数据格式做交互的媒介,JSON正可以满足这一需求。JSON数据的传递处理在Java中处理JSON数据的传递通常涉及到序列化和反序列化操作。序列化是将Java对象转换为JSON格式的字符串,以便可以将其存储或通过网络传输;反序列
- springmvc 前后端日期格式的转换
owlets_ju
javajava
1.后台Date类型返回前端String类型@JsonFormat(pattern="yyyy-MM-ddHH:mm:ss",timezone="GMT+8")它的作用是,出参时,自动把Date型对象数据转化成格式化后的字符串输出:yyyy-MM-ddHH:mm:ss示例:@JsonFormat(pattern="yyyy-MM-ddHH:mm:ss",timezone="GMT+8")priva
- 第 2-2 课:深入探究底层原理,应用更加得心应手
Java大联盟
案例上手Spring全家桶SpringSpringBootSpringCloudSpringMVCSpringSpringBootSpring
前言上一讲我们学习了SpringMVC框架的使用,为了更好地理解这个框架,本讲来仿写一个SpringMVC框架,用到的技术比较简单,只需要XML解析+反射就可以完成,不需要JDK动态代理。自己手写框架的前提是必须理解框架的底层原理和运行机制,因此我们还是先来回顾一下SpringMVC的实现原理。SpringMVC实现原理SpringMVC的核心组件和工作流程的内容具体可以参考第2-1讲的内容,通过
- 【SpringMVC】五、Json数据交互 Json乱码处理 Jackson Fastjson【狂神篇】
Y1567409
程序员json交互
简洁和清晰的层次结构使得JSON成为理想的数据交换语言。易于人阅读和编写,同时也易于机器解析和生成,并有效地提升网络传输效率。在JavaScript语言中,一切都是对象。因此,任何JavaScript支持的类型都可以通过JSON来表示,例如字符串、数字、对象、数组等。要求和语法格式:对象表示为键值对,数据由逗号分隔花括号保存对象方括号保存数组JSON键值对是用来保存JavaScript对象的一种方
- 深度长文解析SpringWebFlux响应式框架15个核心组件源码
快乐非自愿
javaspring
SpringWebFlux介绍SpringWebFlux是SpringFramework5.0版本引入的一个响应式Web框架,它与SpringMVC并存,提供了一种全新的编程范式,支持异步非阻塞的Web应用开发。WebFlux完全基于响应式编程模型,支持ReactiveStreams规范,可以在诸如Netty、Undertow以及Servlet3.1+容器上运行。WebFlux的核心控制器是Dis
- 基于java+ssm+vue毕业设计源码合集(1-100)源码+文档+调试+讲解
小程序设计
javajava课程设计vue.js
技术栈介绍:SSM(Spring、SpringMVC、MyBatis)框架搭配Vue前端框架是当前较为流行的项目开发技术栈。以下是详细的技術列表:1.后端技术:-Spring:一个开源的Java平台,提供了用于构建企业级应用程序的全面解决方案。-SpringMVC:Spring框架的一个子项目,用于构建Web应用程序,提供了处理请求、数据验证、视图解析等功能的模块。-MyBatis:一个优秀的持久
- 《Spring实战》读书笔记-第5章 构建Spring Web应用程序
2401_86367086
面试辅导大厂内推spring前端java
5.1SpringMVC起步SpringMVC框架主要包括请求调度Servlet、处理器映射(handlermapping)、控制器以及视图解析器(viewresolver)这些组件。跟踪SpringMVC的请求Web请求从离开浏览器开始到获取响应返回,它会经历好多站,每站都会留下一些信息同时带上其他信息。一路上请求会将信息带到很多站点,并产生期望的结果请求带着URL以及其他信息离开浏览器后,第一
- 计算机毕业设计 SSM高校网上报名系统 网上报名数据系统 会计网上报名系统Java
计算机程序老哥
作者主页:计算机毕业设计老哥有问题可以主页问我一、开发介绍1.1开发环境开发语言:Java数据库:MySQL系统架构:B/S后端:SSM(Spring+SpringMVC+Mybatis)前端:Vue工具:IDEA或者Eclipse,JDK1.8,Maven二、系统介绍2.1图片展示注册登录页面:登陆前端页面功能:首页、级别专业、系统论坛、系统公告、个人中心、后台管理、在线客服首页级别专业系统公告
- Spring MVC 执行流程详解
胡耀超
Springjava面试常见问题springmvcjavaSpringMVC
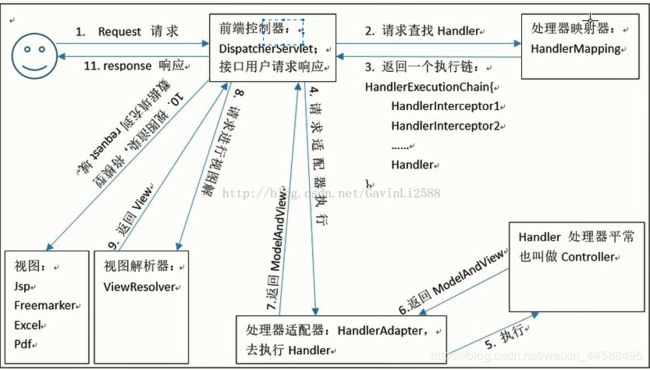
SpringMVC是一个典型的基于MVC设计模式的框架,它用于开发JavaWeb应用程序。在SpringMVC中,每个请求都要经历一系列的步骤,从客户端请求到服务器返回响应。下面的执行流程图很好地描述了SpringMVC的执行流程,从请求发起到最后返回数据。接下来,我将全面、深入地讲解SpringMVC的执行流程。SpringMVC执行流程图:+---------++---------------
- 【SpringMVC篇】——我们为什么学习SpringMVC?
南斋孤鹤
SSM框架Springservlet学习
我觉得在学一门技术之前,总要明白为什么而学?学习了这门技术能解决什么问题?或者说他是为了解决什么问题而诞生的?学了他能干什么?目录我觉得在学一门技术之前,总要明白为什么而学?学习了这门技术能解决什么问题?或者说他是为了解决什么问题而诞生的?学了他能干什么?为什么学习SpringMVC?Servlet作用具体来说,Servlet技术的主要作用如下:什么是springmvc?SpringMVC的出现解
- SpringMVC的架构有什么优势?——视图与模型(二)
不会编程的小孩子
架构
#SpringMVC的架构有什么优势?——视图与模型(二)前言关键字:机器学习人工智能AIchatGPT学习实现使用搭建深度python事件远程dockermysql安全技术部署技术自动化代码视图(View)视图是展示结果的组件,它们负责渲染模型数据并生成HTML输出。SpringMVC支持多种视图技术,包括JSP、Thymeleaf等。视图(View)是SpringMVC中渲染并呈现结果的组件,
- springboot整合springmvc
小僵123456
SpringBootspringboot后端java
1、创建springboot项目,勾选Springweb当前springboot选择的是2.6.13版本,jdk1.8尽量选2.几的springboot2、在pom.xml中导入相应的坐标org.springframework.bootspring-boot-starter-web3、配置application.yml,按需配置,可选server:port:8080spring:datasourc
- SpringMVC架构介绍
丹_妮
spring
MVC框架要做的事情?1)将url映射到java类或java类的方法2)封装用户提交的数据3)处理请求-调用相关的业务处理-封装响应数据4)将响应的数据进行渲染jsphtml为什么要学习SpringMVC?性能较struts2好简单、便捷、易学天生和Spring无缝集成,使用Spring的IOC和AOP还有事务使用约定由于配置能够进行简单的junit测试支持restful风格异常处理本地化、国际化
- Spring MVC 架构详解
firepation
SpringJavaspringmvc
SpringMVC(Model-View-Controller)是Spring框架中用于构建Web应用程序的模块。它通过分离应用程序的不同方面(输入逻辑、业务逻辑和UI逻辑)来简化开发工作。本文将详细介绍SpringMVC架构及其基本组件,包括DispatcherServlet、HandlerMapping、Controller和ViewResolver。SpringMVC架构SpringMVC架
- springmvc用配置类替换xml配置
码里法
其他javamvcspring
ssm基础项目整合前言xml配置mybatis.xmlspingmvc.xmlweb.xml配置类jdbc配置类mybatis配置SpringConfig配置SpringMvcConfig配置shiro配置WebInit前言其实这中间用配置类,发现问题还挺多的,所以记录一下,尤其是针对shiro的配置。xml配置mybatis.xmlArchetypeCreatedWebApplicationdi
- SpringMvc参数解析器HandlerMethodArgumentResolver
Yx8080
SpringMvc大数据
介绍首先什么是Handler?我的理解是SpringMVC中真正用于处理业务逻辑的类,也就是常说的、标注了@Controller注解的Controller类;Controller类中使用@RequestMapping(或GetMapping等变种注解)标注的方法称为处理器方法;处理器方法的参数指的就是该方法的参数。处理器方法参数解析器HandlerMethodArgumentResolver用于自
- SpringMVC参数解析器HandlerMethodArgumentResolver
这是一条海鱼
SpringMVC
前言在享受SpringMVC带给你便捷的时候,你是否曾经这样疑问过:Controller的handler方法参数能够自动完成参数封装(有时即使没有@PathVariable、@RequestParam、@RequestBody等注解都可),甚至在方法参数任意位置写HttpServletRequest、HttpSession、Writer…等类型的参数,它自动就有值了便可直接使用。对此你是否想问一句
- HandlerMethodArgumentResolver-处理器参数解析
后台开发者Ethan
springmvcspringjava
HandlerMethodArgumentResolverspringmvc中仅仅加个@Controller@RequestMaping等注解就可以将普通的java方法成为一个Handler处理器。spring通过HandlerMethodArgumentResolver来解析handler处理器参数问题。HandlerMethodArgumentResolver接口booleansupports
- 如何进行架构技术方案选型?
猫咪张
系统架构设计strutsspringmvcjsf架构设计ejb
在架构设计时,通常面临的一个难题是,如何选择架构的技术方案.这也是各种项目都会碰到的问题.我们到底是选择C/S,B/S模式,如果选择C/S,那么到底是三层C/S还是两层,到底要不要分布式,B/S的展示层是自己写MVC,还是应用已有的开源的如SpringMVC,Struts2.0,JSF技术。总之,可选的确实是太多了。那么怎么去选择呢?这个问题确实有点难,但也有解决方法的。首先,我们需要研究我们项目
- SpringMVC基础
zzzzzzzziu
spring
引言SpringMVC是Spring框架提供的一个基于MVC(Model-View-Controller)模式的轻量级Web开发框架。它作为Spring为表示层(UI)开发提供的一整套完备的解决方案,具有许多显著的特点和优势。以下是对SpringMVC的详细解析:SpringMVC的基本概念MVC模式:MVC是一种将应用程序分为三个核心部分(模型、视图、控制器)的软件设计模式。SpringMVC严
- Spring MVC: 构建Web应用的强大框架
ღ᭄ꦿ࿐Never say never꧂
Javaspringmvcspringboot后端
SpringMVC:构建现代Web应用的强大框架1.MVC设计模式简介MVC(Model-View-Controller)是一种广泛使用的软件设计模式,它将应用程序的逻辑分为三个相互关联的组件:Model(模型):负责管理数据、业务逻辑和规则。View(视图):负责用户界面的展示,将数据呈现给用户。Controller(控制器):作为模型和视图之间的中介,处理用户请求并控制数据流。这种分离使得应用
- JavaWeb - Spring Boot - 请求参数
湫湫玺云台
后端JavaWebspringbootjava后端
@RequestMapping从注解名称上我们可以看到,@RequestMapping注解的作用就是将请求和处理请求的控制器方法关联起来,建立映射关系。SpringMVC接收到指定的请求,就会来找到在映射关系中对应的控制器方法来处理这个请求。@RequestMapping标识一个类:设置映射请求的请求路径的初始信息@RequestMapping标识一个方法:设置映射请求请求路径的具体信息@Cont
- springboot注解-@Configuration
Qiansion齐木楠雄
基本使用@Configuration是springboot中常用的注解,它的意思是声明一个类为配置类(相当于之前我们经常使用xml的形式进行一些组件的配置,现在不过是换了个方式)并将其添加到IOC容器中。在springmvc中,如果我们想要引入一个bean,我们通常添加一个配置文件。在此之前,我们需要先声明一个beanpublicclassCat{publicStringname;publicCa
- chapter01 Java语言概述 知识点Note
月下绯烟
Javajava开发语言
JavaSEJavaEEJavaME大数据Java基础常用技术栈mysqlJDBCSSMspring+springmvc+mybatisLinuxnacosHadoopFlinkJAVAEE消息队列rabbitMQdocker数据库redisspringbootspringcloudsshstruts+spring+hibernate过时技术栈很少用JAVA虚拟机jvm分布式微服务高并发常见dos
- java观察者模式
3213213333332132
java设计模式游戏观察者模式
观察者模式——顾名思义,就是一个对象观察另一个对象,当被观察的对象发生变化时,观察者也会跟着变化。
在日常中,我们配java环境变量时,设置一个JAVAHOME变量,这就是被观察者,使用了JAVAHOME变量的对象都是观察者,一旦JAVAHOME的路径改动,其他的也会跟着改动。
这样的例子很多,我想用小时候玩的老鹰捉小鸡游戏来简单的描绘观察者模式。
老鹰会变成观察者,母鸡和小鸡是
- TFS RESTful API 模拟上传测试
ronin47
TFS RESTful API 模拟上传测试。
细节参看这里:https://github.com/alibaba/nginx-tfs/blob/master/TFS_RESTful_API.markdown
模拟POST上传一个图片:
curl --data-binary @/opt/tfs.png http
- PHP常用设计模式单例, 工厂, 观察者, 责任链, 装饰, 策略,适配,桥接模式
dcj3sjt126com
设计模式PHP
// 多态, 在JAVA中是这样用的, 其实在PHP当中可以自然消除, 因为参数是动态的, 你传什么过来都可以, 不限制类型, 直接调用类的方法
abstract class Tiger {
public abstract function climb();
}
class XTiger extends Tiger {
public function climb()
- hibernate
171815164
Hibernate
main,save
Configuration conf =new Configuration().configure();
SessionFactory sf=conf.buildSessionFactory();
Session sess=sf.openSession();
Transaction tx=sess.beginTransaction();
News a=new
- Ant实例分析
g21121
ant
下面是一个Ant构建文件的实例,通过这个实例我们可以很清楚的理顺构建一个项目的顺序及依赖关系,从而编写出更加合理的构建文件。
下面是build.xml的代码:
<?xml version="1
- [简单]工作记录_接口返回405原因
53873039oycg
工作
最近调接口时候一直报错,错误信息是:
responseCode:405
responseMsg:Method Not Allowed
接口请求方式Post.
- 关于java.lang.ClassNotFoundException 和 java.lang.NoClassDefFoundError 的区别
程序员是怎么炼成的
真正完成类的加载工作是通过调用 defineClass来实现的;
而启动类的加载过程是通过调用 loadClass来实现的;
就是类加载器分为加载和定义
protected Class<?> findClass(String name) throws ClassNotFoundExcept
- JDBC学习笔记-JDBC详细的操作流程
aijuans
jdbc
所有的JDBC应用程序都具有下面的基本流程: 1、加载数据库驱动并建立到数据库的连接。 2、执行SQL语句。 3、处理结果。 4、从数据库断开连接释放资源。
下面我们就来仔细看一看每一个步骤:
其实按照上面所说每个阶段都可得单独拿出来写成一个独立的类方法文件。共别的应用来调用。
1、加载数据库驱动并建立到数据库的连接:
Html代码
St
- rome创建rss
antonyup_2006
tomcatcmsxmlstrutsOpera
引用
1.RSS标准
RSS标准比较混乱,主要有以下3个系列
RSS 0.9x / 2.0 : RSS技术诞生于1999年的网景公司(Netscape),其发布了一个0.9版本的规范。2001年,RSS技术标准的发展工作被Userland Software公司的戴夫 温那(Dave Winer)所接手。陆续发布了0.9x的系列版本。当W3C小组发布RSS 1.0后,Dave W
- html表格和表单基础
百合不是茶
html表格表单meta锚点
第一次用html来写东西,感觉压力山大,每次看见别人发的都是比较牛逼的 再看看自己什么都还不会,
html是一种标记语言,其实很简单都是固定的格式
_----------------------------------------表格和表单
表格是html的重要组成部分,表格用在body里面的
主要用法如下;
<table>
&
- ibatis如何传入完整的sql语句
bijian1013
javasqlibatis
ibatis如何传入完整的sql语句?进一步说,String str ="select * from test_table",我想把str传入ibatis中执行,是传递整条sql语句。
解决办法:
<
- 精通Oracle10编程SQL(14)开发动态SQL
bijian1013
oracle数据库plsql
/*
*开发动态SQL
*/
--使用EXECUTE IMMEDIATE处理DDL操作
CREATE OR REPLACE PROCEDURE drop_table(table_name varchar2)
is
sql_statement varchar2(100);
begin
sql_statement:='DROP TABLE '||table_name;
- 【Linux命令】Linux工作中常用命令
bit1129
linux命令
不断的总结工作中常用的Linux命令
1.查看端口被哪个进程占用
通过这个命令可以得到占用8085端口的进程号,然后通过ps -ef|grep 进程号得到进程的详细信息
netstat -anp | grep 8085
察看进程ID对应的进程占用的端口号
netstat -anp | grep 进程ID
&
- 优秀网站和文档收集
白糖_
网站
集成 Flex, Spring, Hibernate 构建应用程序
性能测试工具-JMeter
Hmtl5-IOCN网站
Oracle精简版教程网站
鸟哥的linux私房菜
Jetty中文文档
50个jquery必备代码片段
swfobject.js检测flash版本号工具
- angular.extend
boyitech
AngularJSangular.extendAngularJS API
angular.extend 复制src对象中的属性去dst对象中. 支持多个src对象. 如果你不想改变一个对象,你可以把dst设为空对象{}: var object = angular.extend({}, object1, object2). 注意: angular.extend不支持递归复制. 使用方法: angular.extend(dst, src); 参数:
- java-谷歌面试题-设计方便提取中数的数据结构
bylijinnan
java
网上找了一下这道题的解答,但都是提供思路,没有提供具体实现。其中使用大小堆这个思路看似简单,但实现起来要考虑很多。
以下分别用排序数组和大小堆来实现。
使用大小堆:
import java.util.Arrays;
public class MedianInHeap {
/**
* 题目:设计方便提取中数的数据结构
* 设计一个数据结构,其中包含两个函数,1.插
- ajaxFileUpload 针对 ie jquery 1.7+不能使用问题修复版本
Chen.H
ajaxFileUploadie6ie7ie8ie9
jQuery.extend({
handleError: function( s, xhr, status, e ) {
// If a local callback was specified, fire it
if ( s.error ) {
s.error.call( s.context || s, xhr, status, e );
}
- [机器人制造原则]机器人的电池和存储器必须可以替换
comsci
制造
机器人的身体随时随地可能被外来力量所破坏,但是如果机器人的存储器和电池可以更换,那么这个机器人的思维和记忆力就可以保存下来,即使身体受到伤害,在把存储器取下来安装到一个新的身体上之后,原有的性格和能力都可以继续维持.....
另外,如果一
- Oracle Multitable INSERT 的用法
daizj
oracle
转载Oracle笔记-Multitable INSERT 的用法
http://blog.chinaunix.net/uid-8504518-id-3310531.html
一、Insert基础用法
语法:
Insert Into 表名 (字段1,字段2,字段3...)
Values (值1,
- 专访黑客历史学家George Dyson
datamachine
on
20世纪最具威力的两项发明——核弹和计算机出自同一时代、同一群年青人。可是,与大名鼎鼎的曼哈顿计划(第二次世界大战中美国原子弹研究计划)相 比,计算机的起源显得默默无闻。出身计算机世家的历史学家George Dyson在其新书《图灵大教堂》(Turing’s Cathedral)中讲述了阿兰·图灵、约翰·冯·诺依曼等一帮子天才小子创造计算机及预见计算机未来
- 小学6年级英语单词背诵第一课
dcj3sjt126com
englishword
always 总是
rice 水稻,米饭
before 在...之前
live 生活,居住
usual 通常的
early 早的
begin 开始
month 月份
year 年
last 最后的
east 东方的
high 高的
far 远的
window 窗户
world 世界
than 比...更
- 在线IT教育和在线IT高端教育
dcj3sjt126com
教育
codecademy
http://www.codecademy.com codeschool
https://www.codeschool.com teamtreehouse
http://teamtreehouse.com lynda
http://www.lynda.com/ Coursera
https://www.coursera.
- Struts2 xml校验框架所定义的校验文件
蕃薯耀
Struts2 xml校验Struts2 xml校验框架Struts2校验
>>>>>>>>>>>>>>>>>>>>>>>>>>>>>>>>>>>>>>
蕃薯耀 2015年7月11日 15:54:59 星期六
http://fa
- mac下安装rar和unrar命令
hanqunfeng
mac
1.下载:http://www.rarlab.com/download.htm 选择
RAR 5.21 for Mac OS X 2.解压下载后的文件 tar -zxvf rarosx-5.2.1.tar 3.cd rar sudo install -c -o $USER unrar /bin #输入当前用户登录密码 sudo install -c -o $USER rar
- 三种将list转换为map的方法
jackyrong
list
在本文中,介绍三种将list转换为map的方法:
1) 传统方法
假设有某个类如下
class Movie {
private Integer rank;
private String description;
public Movie(Integer rank, String des
- 年轻程序员需要学习的5大经验
lampcy
工作PHP程序员
在过去的7年半时间里,我带过的软件实习生超过一打,也看到过数以百计的学生和毕业生的档案。我发现很多事情他们都需要学习。或许你会说,我说的不就是某种特定的技术、算法、数学,或者其他特定形式的知识吗?没错,这的确是需要学习的,但却并不是最重要的事情。他们需要学习的最重要的东西是“自我规范”。这些规范就是:尽可能地写出最简洁的代码;如果代码后期会因为改动而变得凌乱不堪就得重构;尽量删除没用的代码,并添加
- 评“女孩遭野蛮引产致终身不育 60万赔偿款1分未得”医腐深入骨髓
nannan408
先来看南方网的一则报道:
再正常不过的结婚、生子,对于29岁的郑畅来说,却是一个永远也无法实现的梦想。从2010年到2015年,从24岁到29岁,一张张新旧不一的诊断书记录了她病情的同时,也清晰地记下了她人生的悲哀。
粗暴手术让人发寒
2010年7月,在酒店做服务员的郑畅发现自己怀孕了,可男朋友却联系不上。在没有和家人商量的情况下,她决定堕胎。
12月5日,
- 使用jQuery为input输入框绑定回车键事件 VS 为a标签绑定click事件
Everyday都不同
jspinput回车键绑定clickenter
假设如题所示的事件为同一个,必须先把该js函数抽离出来,该函数定义了监听的处理:
function search() {
//监听函数略......
}
为input框绑定回车事件,当用户在文本框中输入搜索关键字时,按回车键,即可触发search():
//回车绑定
$(".search").keydown(fun
- EXT学习记录
tntxia
ext
1. 准备
(1) 官网:http://www.sencha.com/
里面有源代码和API文档下载。
EXT的域名已经从www.extjs.com改成了www.sencha.com ,但extjs这个域名会自动转到sencha上。
(2)帮助文档:
想要查看EXT的官方文档的话,可以去这里h
- mybatis3的mapper文件报Referenced file contains errors
xingguangsixian
mybatis
最近使用mybatis.3.1.0时无意中碰到一个问题:
The errors below were detected when validating the file "mybatis-3-mapper.dtd" via the file "account-mapper.xml". In most cases these errors can be d

