Dcoker Harbor私有仓库介绍+实验(内涵搭建、管理等部分)
文章目录
- 前言:
- 一、Harbor简介
- 二、Harbor 架构即组件介绍
- 2.1 Harbor架构介绍
- 2.2 harbor-login 介绍
- 2.2.1 harbor-login工作流程
- 2.3 harbor-push
- 2.3.1 harbor-push工作流程
- 2.4 clair
- 2.5 私有仓库的优点
- 三、配置文件参数详解
- 3.1 所需/必要参数
- 3.2 可选参数
- 四、搭建Harbor私有仓库
- 3.1 下载harbor安装程序和docker-compose
- 3.2 Harbor 的使用
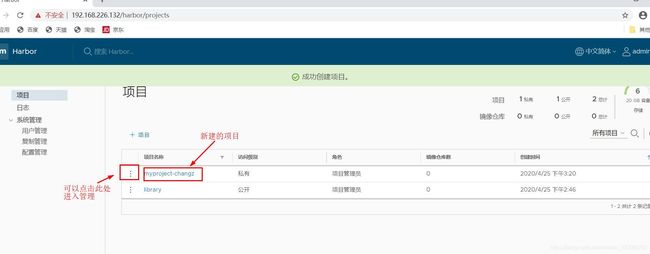
- 3.2.1 登录、项目创建
- 3.2.2 Harbor端服务器本地上传镜像
- 3.2.3 客户端服务器使用Harbor
- 四、私有仓库管理
- 4.1 维护管理Harbor
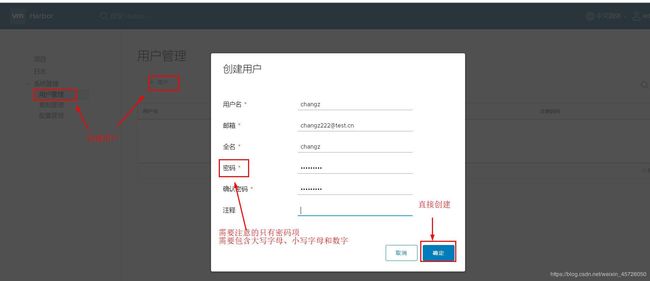
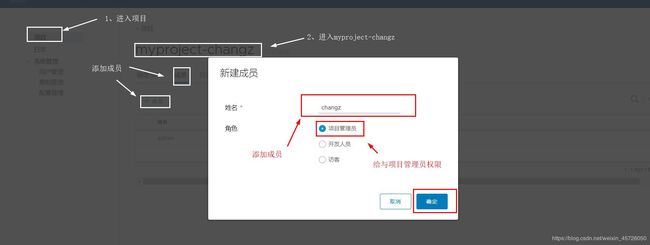
- 4.2 创建Harbor用户
- 总结:
前言:
- Habor是由VMWare公司开源的容器镜像仓库。事实上,Habor是在Docker Registry上进行了相应的企业级扩展,从而获得了更加广泛的应用,这些新的企业级特性包括:管理用户界面,基于角色的访问控制 ,AD/LDAP集成以及审计日志等,足以满足基本企业需求。
官方地址:https://vmware.github.io/harbor/cn/
一、Harbor简介
- harbor是vmware开源的企业级registry,可以让你迅速的搭建自己的私有registry,harbor扩展的docker的registry,使harbor支持以下特性
- ① RBAC 基于角色的权限控制( 是实施面向企业安全策略的一种有效的访问控制方式 )
- ② 基于策略的镜像复制
- ③ 漏扫
- ④ LADP/AD支持
- ⑤ 镜像删除和垃圾清理
- ⑥ Notary镜像签名
- ⑦ 用户界面
- ⑧ 审计
- ⑨ RESful api
- ⑩ 安装简单(基于compose)
二、Harbor 架构即组件介绍
2.1 Harbor架构介绍
Harbor 主要有6大模块,默认每个Harbor的组件都被封装成一个docker container,所以可以通过compose来部署Harbor,总共分为8个容器运行,可通过docker cpmpos ps 查看
[root@localhost ~]# docker-compose ps
       Name                    Command             State              Ports
--------------------------------------------------------------------------------------
harbor-adminserver   /harbor/harbor_adminserver    Up
harbor-db            docker-entrypoint.sh mysqld   Up      3306/tcp
harbor-jobservice    /harbor/harbor_jobservice     Up
harbor-log           /bin/sh -c crond && rm -f     Up      127.0.0.1:1514->514/tcp
                     ...
harbor-ui            /harbor/harbor_ui             Up
nginx                nginx -g daemon off;          Up      0.0.0.0:443->443/tcp,
                                                           0.0.0.0:4443->4443/tcp,
                                                           0.0.0.0:80->80/tcp
registry /entrypoint.sh serve /etc/ Up 5000/tcp -
harbor-adminserver:harbor系统管理接口,可以修改系统配置以及获取系统信息
-
harbor-db:存储项目的元数据、用户、规则、复制策略等信息
-
harbor-jobservice:harbor里面主要是为了镜像仓库之前同步使用的
-
harbor-log:收集其他harbor的日志信息。rsyslogd
-
harbor-ui:一个用户界面模块,用来管理registry。主要是前端的页面和后端CURD的接口
-
nginx:harbor的一个反向代理组件,代理registry、ui、token等服务。这个代理会转发harbor web和docker client的各种请求到后端服务上。是个nginx。nginx负责流量转发和安全验证,对外提供的流量都是从nginx中转,它将流量分发到后端的ui和正在docker镜像存储的docker registry
-
registry:存储docker images的服务,并且提供pull/push服务。harbor需要对image的访问进行访问控制,当client每次进行pull、push的时候,registry都需要client去token服务获取一个可用的token。
-
redis:存储缓存信息
-
webhook:当registry中的image状态发生变化的时候去记录更新日志、复制等操作。
token service:在docker client进行pull/push的时候token(令牌)的发放
2.2 harbor-login 介绍
2.2.1 harbor-login工作流程
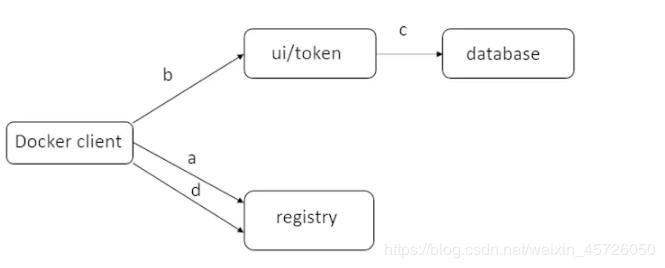
a:nginx代理在80端口收到client发来的请求,然后把该请求转发到后端的registry
b:registry收到请求,因为registry是配置的token-based的认证,所以会直接返回一个401状态码,然后返回一个url,通过client去哪里获取token,也就是token service
c:当docker client收到这个url后,会对这个url发送请求,需要在请求头中植入用户名和密码。
d:当请求到达nginx反向代理后,nginx会把该请求转发至ui服务上,因为ui符核token服务在一个容器里,token服务会解码请求头中用户名和密码
e:拿到用户名和密码后会合db(数据库)中的进行对比,如果验证无误,则返回成功,在返回的http请求中包含一个私有key
2.3 harbor-push
2.3.1 harbor-push工作流程
-
省略了proxy转发这一步
-
当登录harbor成功后,docker push 就可以使用了
a:docker client和registry交互,获取到token service 的url
b:随后docker client和token service 交互后,告诉token 需要进行push操作
c:token服务查看db,该用户是否有相关的权限来push image,如果有此权限,则返回一个私有的key
d:docker client拿到token 后,会对registry发起push请求,当registry收到请求后,会用自己的公钥解密token,如果验证token是合格的,则开始image传输过程
2.4 clair
- clair 是 coreos 开源的容器漏洞扫描工具,在容器逐渐普及的今天,容器镜像安全问题日益严重。clair 是目前少数的开源安全扫描工具,主要提供OS(centos,debian,ubuntu等)的软件包脆弱性扫描。clair的可以单机部署也可以部署到k8s上,可以与现有的registry集成。harbor 很好的整合了 clair ,通过简单的UI就可以对上传的镜像扫描,还可以通过每天的定时扫描对所有镜像进行统一扫描,架构如下:
-
Notary
notary是一套docker镜像的签名工具,用来保证镜像在pull,push和传输过程中的一致性和完整性,避免中间人攻击、避免非法的镜像更新和运行
2.5 私有仓库的优点
-
其实,私有库的镜像最原始来源还是从公库中下载的,但是企业公司中为什么不都直接使用公库下载需要的镜像呢,允许使用 registry 搭建本地私有仓库,具备这些公库不具备的优点:
① 节省网络带宽,针对每个镜像不用每个人都去中央仓库上面下载,只需要从私有仓库中下载即可
② 提供镜像资源利用,针对公司内部使用的镜像,推送到本地私有仓库,以供内部相关人员使用
三、配置文件参数详解
- 关于Harbor.cfg配置文件有两类参数:所需/必要参数和可选参数
3.1 所需/必要参数
-
这些参数需要在配置文件Harbor.cfg中设置,如果用户更新它们后,需要运行install.sh脚本重新安装Harbour,参数将生效,具体参数如下:
① hostname:用于访问用户界面和register服务,它应该是目标主机的IP地址或完全限定的域名(FQDN)
② ui_url_protocol:(http 或 https,默认为http)用于访问UI和令牌/通知服务的协议。如果公证处于启用状态,则此参数必须为https。(令牌默认有30分钟生命周期)
③ max_job_workers:镜像复制作业线程
④ db_password:用于db_auth 的MySQL 数据库root用户的密码(用户信息数据验证的存放位置,一般使用mysql)
⑤ customize_crt:该属性可设置为打开或关闭,默认打开,打开此属性,准备脚本创建私钥和根证书,用于生成/验证注册表令牌
当由外部来源提供密钥和根证书时,将此属性设置为off
⑥ ssl_cert:SSL证书的路径,仅当协议设置为htts时才应用
⑦ ssl_cert_key:SSL密钥的路径,仅当协议设置为https时才应用
⑧ secretkey_path:用于复制策略中加密或解密远程register密码的密钥路径
3.2 可选参数
- 这些参数对于更新是可选的,即用户可以将其保留为默认值,并在启动Harbor后再Web UI上进行更新。
- 如果进入Harbor.cfg,只会再第一次启动Harbour时生效,随后对这些参数的更新,Harbor.cfg 将被忽略。
- PS:如果选择通过UI设置这些参数,请确保再启动Harbor后立即执行此操作。具体来说,必须再注册或者再Harbor中创建任何新用户之前设置所需的auth_mode。当系统中由用户时(除了默认admin用户),auth_mode不能被更改。具体参数如下:
- ① Email:Harbor需要该参数才能向用户发送“密码重置”点自邮件,并且只有再需要该功能时才需要。
- 在默认的情况下SSL连接时没有启用。如果SMTP服务器需要SSL,但不支持STARTTLS,那么应该通过设置启用SSL email_ssl =TRUE
- ② harbour_admin_password:管理员的初始密码,只在Harbour第一次启动时生效。之后,此设置将被忽略,并且应UI中设置管理员的密码
- 默认用户名/密码为 admin/Harbor12345
- ③ auth_mode:使用的认证类型,默认情况下,它是db_auth,即凭据存储在数据库中,对于LDAP(目录/文件形式)身份验证,请将其设置为idap_auth
- ④ self_registration:启动/禁用用户注册功能。禁用时,新用户只能由Admin用户创建,只有管理员用户可以在Harbour中创建新用户
- 当auth_mode 设置为ldap_auth时,自注册功能将使用储于禁用状态,并且该标志被忽略
- ⑤ Token_expiration:由令牌服务创建的令牌的到期时间(分钟),默认为30分钟(30分钟没有与harbor进行交互,则会失效,可在web页面和配置文件中做修改)
- ⑥ project_creation_restriction:用于控制哪些用户有权限创建项目的标志。默认情况下,每个人都可以创建一个项目
- 如果将其值设置为"adminonly",那么只有admin可以创建项目
- ⑦ verify_remote_cert:打开或关闭,默认打开,此标志决定了当Harbor与远程register实例通信时是否验证SSL/TLS证书
- 将此属性设置为off 将绕过SSL/TLS验证,这在远程实例具有自签名或不可信证书时经常使用
- 在默认情况下,Harbour将镜像存储在本地文件系统上,在生产环境中,可以考虑使用其他存储后端而不是本地文件系统
- 例如:S3、Openstack、Swif、Ceph等。但需要更新 common/template/registry/config.yml文件。
四、搭建Harbor私有仓库
3.1 下载harbor安装程序和docker-compose
wget http://harbor.orientsoft.cn/harbor-1.2.2/harbor-offline-installer-v1.2.2.tgz
[root@localhost abc]# tar zvxf harbor-offline-installer-v1.2.2.tgz -C /usr/local/


curl -L https://github.com/docker/compose/releases/download/1.21.1/docker-compose-`uname -s`-`uname -m` -o /usr/local/bin/docker-compose
[root@localhost ~]# chmod +x docker-compose
#给与docker-cpmpose执行权限,否则会harbor会安装失败
[root@localhost ~]# cp docker-compose /usr/bin
#将docker-compose 复制到/bin目录下便于系统识别
#因为harbor中是通过dokcer-compose编排来安装多组容器,所以需要安装docker-compose软件- 修改harbor配置文件
#修改hostname地址,指向本机
[root@localhost harbor]# vim harbor.cfg
#第五行
hostname = 192.168.226.132 #指向本机地址- 启动harbor
[root@localhost harbor]# sh install.sh
.....省略部分内容
Creating network "harbor_harbor" with the default driver	#网络
Creating harbor-log ... done				#日志
Creating harbor-adminserver ... done		#管理端
Creating harbor-db          ... done		#数据库(mysql)
Creating registry           ... done		#核心,私有仓库的容器
Creating harbor-ui          ... done		#web界面端
Creating harbor-jobservice  ... done		#工作目录
Creating nginx              ... done		#nginx

✔ ----Harbor has been installed and started successfully.----

Now you should be able to visit the admin portal at http://192.168.226.132.
For more details, please visit https://github.com/vmware/harbor .- 检查启动情况
#查看镜像列表
docker images

#检查容器启动状态
dokcer ps -a
docker-compose ps
#以上两者都可以查看到容器状态,docker ps -a 查看的信息更多一些
#同时docker-compose ps 只能在当前目录中包含docker-compose.yml,docker-compose.yaml文件时才可以使用- 使用浏览器访问本地IP
3.2 Harbor 的使用
3.2.1 登录、项目创建
3.2.2 Harbor端服务器本地上传镜像
- 终端登录Harbor
[root@localhost harbor]# docker login -u admin -p Harbor12345 http://127.0.0.1/
WARNING! Using --password via the CLI is insecure. Use --password-stdin.
WARNING! Your password will be stored unencrypted in /root/.docker/config.json.
Configure a credential helper to remove this warning. See
https://docs.docker.com/engine/reference/commandline/login/#credentials-store

Login Succeeded
- 在共有仓库中下载镜像
[root@localhost harbor]# docker pull nginx
#docker pull 规则:如果不指定节点IP,默认会从docker 官方仓库下载
.....省略部分内容-
推送nginx镜像到私有仓库
-
① 定义标签
格式:docker tag [当前镜像] 仓库IP地址/项目名称/镜像名称
-
#定义标签 定义镜像v1版本(因为之后版本可能会不断更新,所以此处设置v1版本)
[root@localhost harbor]# docker tag nginx:latest 127.0.0.1/myproject-changz/nginx:v1
[root@localhost harbor]# docker images
REPOSITORY                         TAG                 IMAGE ID            CREATED
         SIZE
127.0.0.1/myproject-changz/nginx   v1                  602e111c06b6        43 hours ag
- 上传/推送镜像
[root@localhost harbor]# docker push 127.0.0.1/myproject-changz/nginx
...........省略部分内容3.2.3 客户端服务器使用Harbor
-
这里使用客户端服务器进行镜像下载、上传实验
-
① 下载镜像
-
修改配置配置文件
-
在Harbor服务器本地终端操作是没有问题的,但是如果其他客户端上传镜像到Harbor,就会报错,出现此问题的原因是 Docker Registry 交互默认使用的是HTTPS,但是搭建私有镜像默认的是HTTP服务,所以与私有镜像交互时出现以下错误
#使用192.168.226.133服务器尝试登录Harbor
[root@localhost ~]# docker login -u admin -p Harbor12345 http://192.168.226.132
WARNING! Using --password via the CLI is insecure. Use --password-stdin.
Error response from daemon: Get https://192.168.226.132/v2/: dial tcp 192.168.226.132:443: connect: connection refused- 解决方法:
- 修改docker.service 配置文件,关联私有仓库
[root@localhost ~]# cd /usr/lib/systemd/system/
[root@localhost system]# vim docker.service
#在14行fd:// 后添加--insecure-registry 192.168.226.132
ExecStart=/usr/bin/dockerd -H fd:// --insecure-registry 192.168.226.132 --containe    rd=/run/containerd/containerd.sock
- 参数简述
- ExecStart=/usr/bin/dockerd 准启动状态,加载指定目录的脚本
- fd:// --insecure-registry 192.168.226.132 --containe rd=/run/containerd/containerd.sock 指定连接 registry地址和容器的通信文件
- 重新加载进程、重启docker服务
[root@localhost system]# systemctl daemon-reload
[root@localhost system]# systemctl restart docker
[root@localhost system]# docker login -u admin -p Harbor12345 http://192.168.226.132
WARNING! Using --password via the CLI is insecure. Use --password-stdin.
WARNING! Your password will be stored unencrypted in /root/.docker/config.json.
Configure a credential helper to remove this warning. See
https://docs.docker.com/engine/reference/commandline/login/#credentials-store

Login Succeeded- 下载私有仓库中已有的镜像
[root@localhost system]# docker pull 192.168.226.132/myproject-changz/nginx:v1
v1: Pulling from myproject-changz/nginx
54fec2fa59d0: Pull complete
4ede6f09aefe: Pull complete
f9dc69acb465: Pull complete
Digest: sha256:cccef6d6bdea671c394956e24b0d0c44cd82dbe83f543a47fdc790fadea48422
Status: Downloaded newer image for 192.168.226.132/myproject-changz/nginx:v1
192.168.226.132/myproject-changz/nginx:v1
[root@localhost system]# docker images
REPOSITORY                               TAG                 IMAGE ID            CREATED             SIZE
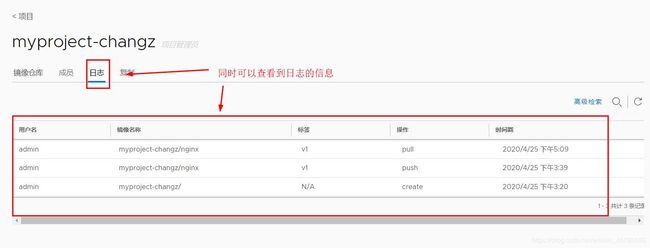
192.168.226.132/myproject-changz/nginx v1 602e111c06b6 44 hours ago 127MB- 返回Harbor可以查看到下载和日志信息
- ② 上传镜像到私有库中
- 先从共有仓库下载criros镜像
[root@localhost system]# docker pull cirros
Using default tag: latest
latest: Pulling from library/cirros
f513001ba4ab: Pull complete
8da581cc9286: Pull complete
856628d95d17: Pull complete
Digest: sha256:21874a9fd73378a29345163e026bc9c2a61aef62526f2b4f22a5d488059970f6
Status: Downloaded newer image for cirros:latest
docker.io/library/cirros:latest

[root@localhost system]# docker images
REPOSITORY                               TAG                 IMAGE ID            CREATED             SIZE
192.168.226.132/myproject-changz/nginx   v1                  602e111c06b6        44 hours ago        127MB
cirros                                   latest              3c82e4d066cf        7 weeks ago         12.6MB
- 修改标签、上传镜像到私有仓库
[root@localhost system]# docker tag cirros:latest 192.168.226.132/myproject-changz/cirros:v1
[root@localhost system]# docker push 192.168.226.132/myproject-changz/cirros:v1
The push refers to repository [192.168.226.132/myproject-changz/cirros]
858d98ac4893: Pushed
aa107a407592: Pushed
b993cfcfd8fd: Pushed
v1: digest: sha256:c7d58d6d463247a2540b8c10ff012c34fd443426462e891b13119a9c66dfd28a size: 943
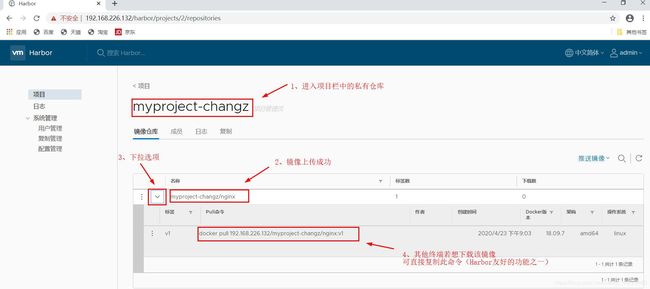
- 查看Harbor
四、私有仓库管理
4.1 维护管理Harbor
- Harbor私有仓库可以使用docker-compose进行管理,一些基本管理命令如下:
- 需注意,使用docker-compose命令时,必须在docker-compose.yml相同的目录运行
- 关闭所有容器
[root@localhost harbor]# docker-compose down -v
Stopping harbor-jobservice  ... done
Stopping nginx              ... done
Stopping harbor-ui          ... done
Stopping harbor-db          ... done
Stopping harbor-adminserver ... done
Stopping registry           ... done
Stopping harbor-log         ... done
Removing harbor-jobservice  ... done
Removing nginx              ... done
Removing harbor-ui          ... done
Removing harbor-db          ... done
Removing harbor-adminserver ... done
Removing registry           ... done
Removing harbor-log         ... done
Removing network harbor_harbor- 修改配置文件
- 如上文所说,如修改所需参数,需要重新运行install.sh,如修改可选参数,则需运行脚本 ./prepare 将配置文件内容进行重新生效
[root@localhost harbor]# ./prepare
Clearing the configuration file: ./common/config/adminserver/env
Clearing the configuration file: ./common/config/ui/env
Clearing the configuration file: ./common/config/ui/app.conf
.....省略部分内容- 重新启动所有容器
- 实验环境中,在重新刷新启动容器的时候不要关闭防火墙,否则会报错
[root@localhost harbor]# docker-compose up -d
Creating network "harbor_harbor" with the default driver
Creating harbor-log ... done
Creating harbor-db          ... done
Creating registry           ... done
Creating harbor-adminserver ... done
Creating harbor-ui          ... done
Creating harbor-jobservice  ... done
Creating nginx              ... done
4.2 创建Harbor用户
- 添加用户
- 以上用户创建完成后只是创建了系统用户,下一步需要给与用户管理项目的权限,如下:
- 使用新用户登录
- ① 首先现登出admin账户(在客户端操作)
[root@localhost system]# docker logout 192.168.226.132
Removing login credentials for 192.168.226.132- 使用新用户登录(切换用户身份)
[root@localhost system]# docker login 192.168.226.132
Username: changz
Password:
WARNING! Your password will be stored unencrypted in /root/.docker/config.json.
Configure a credential helper to remove this warning. See
https://docs.docker.com/engine/reference/commandline/login/#credentials-store

Login Succeeded
- 之后可以使用新用户进行镜像上传/下载等操作
总结:
-
简单来说Harbor私有仓库进行简单的部署还是比较简单的,主要思路如下:
-
① 环境:docker-ce
-
② 准备软件: Harbor、docker-compose
-
③ 修改harbor.cfg 中的hostname
-
④ 安装启动harbor(install.sh)
-
⑤ 搭建完成
-
在客户端,如果想要登入harbor,需要修改/usr/lib/systemd/system/docker.server 配置文件,在准启动(Exstart)配置项中的-H fd:// 后添加 –insecure-registry [harbor服务器地址],后重载进程和docker即可
-
之后会在Kerbernetes中也使用到私有仓库~~这个之后再介绍啦


