FFA-Net:文章理解与代码注释
FFA-Net: Feature Fusion Attention Network for Single Image Dehazing (AAAI 2020)
Pytorch代码(GitHub)
本文目录
- 摘要:
- 主要内容:
- 特征融合注意网络(Fusion Feature Attention Network , FFA-Net)
- 特征注意(Feature Attention,FA)
- Channel Attention (CA)
- Pixel Attention (PA)
- 基本块结构(Basic Block Structure)
- 群结构和全局残差学习(Group Architecture and Global Residual Learning)
- 特征融合注意(Feature Fusion Attention)
- 损失函数(Loss Function)
- 实施细节(Implementation Details)
- 数据集和指标(Datasets and Metrics)
- 训练设置(Training Settings)
- 实验结果(Results on RESIDE Dataset)
- 代码注释
- `data_utils.py`
- `option.py`
- `metrics.py`
- `FFA.py`
- `main.py`
- 附:为方便理解网络,将FFA.py的blocks改为1
- 总结:
摘要:
本文提出了一种端对端的特征融合注意网络(feature fusion attention network, FFA-Net)来直接恢复无雾图像。FFA-Net由三个关键部分组成:
1)考虑到不同通道的特征包含完全不同的权重信息和在不同图像像素上雾的不均匀分布,提出了一个新颖的特征注意(Feature Attention, FA)模块,其将通道注意(Channel Attention, CA)和像素注意(Pixel Attention, PA)机制相结合。FA不平等地处理不同的特征和像素,这为处理不同类型的信息提供了额外的灵活性,扩展了CNNs的表示能力。
2)一个基本块结构由局部残差学习(Local Residual Learning, LRL)和特征注意(FA)组成,局部残差学习允许通过多个局部残差连接绕过薄雾区或低频等不太重要的信息,让主网络结构关注更有效的信息。
3)基于注意的不同层次特征融合(FFA)结构,从特征注意(FA)模块中自适应学习特征权重,赋予重要特征更多的权重。这种结构还可以保留浅层的信息,并将其传递到深层。
实验结果表明,我们提出的FFANet在数量和质量上都大大超过了以前最先进的单图像去雾方法,将SOTS室内测试数据集上最佳公布的PSNR指标从30.23db提高到35.77db。
主要内容:
特征融合注意网络(Fusion Feature Attention Network , FFA-Net)
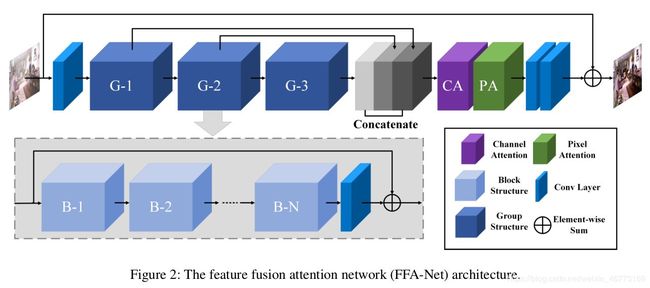
如图2所示,FFA网络的输入是一个模糊的图像,它被传递到一个浅层特征提取部分,然后被输入到N个具有多跳连接的群结构中,通过我们提出的特征注意模块将N个群结构的输出特征融合在一起。最终,这些特征会被传递到重构部分和全局残差学习结构,从而得到无雾输出。
此外,每一个群结构都将B个基本块结构与局部残差学习相结合,每一个基本块都结合了跳跃连接和特征注意(FA)模块。FA是由通道注意和像素注意组成的注意机制结构。
特征注意(Feature Attention,FA)
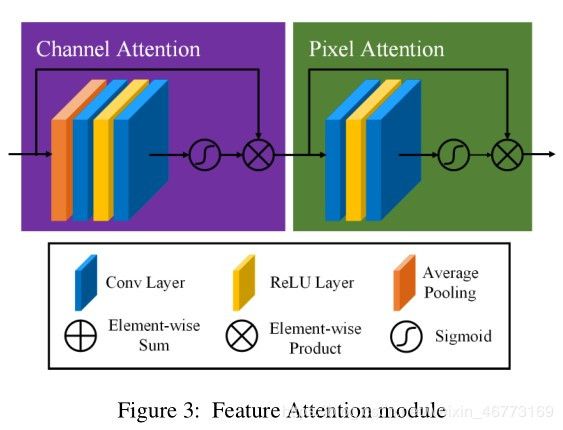
大多数图像去雾网络对通道和像素特征的处理是平等的,不能处理雾度分布不均匀和加权通道的图像。本文提出的特征注意(如图3)由通道注意和像素注意组成,这可以在处理不同类型的信息时提供额外的灵活性。
FA不平等地处理不同的特征和像素区域,这可以在处理不同类型的信息时提供额外的灵活性,并且可以扩展CNNs的表示能力。关键的一步是如何为每个通道和像素特征生成不同的权重。我们的解决方案如下。
Channel Attention (CA)
通道注意主要关注不同的频道特征对于DCP具有完全不同的加权信息。首先,利用全局平均池化将通道全局空间信息转化为通道描述符。
g c = H p ( F c ) = 1 H × W ∑ i = 1 H ∑ j = 1 W X c ( i , j ) g_c=H_p(F_c)=\frac{1}{H \times W}\sum_{i=1}^H\sum_{j=1}^WX_c(i,j) gc=Hp(Fc)=H×W1i=1∑Hj=1∑WXc(i,j)
其中, X C ( i , j ) X_C(i,j) XC(i,j) 表示第 c c c 个通道 X c X_c Xc 在 ( i , j ) (i,j) (i,j) 位置的值, H p H_p Hp 为全局池化函数。特征图的大小从 C × H × W C\times H\times W C×H×W 变成 C × 1 × 1 C\times 1\times 1 C×1×1 。为了得到不同通道的不同权值,特征随后通过两个卷积层和sigmoid,ReLu激活函数。
C A c = σ ( C o n v ( δ ( C o n v ( g c ) ) ) ) CA_c=\sigma(Conv(\delta(Conv(g_c)))) CAc=σ(Conv(δ(Conv(gc))))
其中, σ \sigma σ 是 sigmoid 函数, δ \delta δ 是Relu函数。
F c ∗ = C A c ⨂ F c F_c^*=CA_c {\small\bigotimes} F_c Fc∗=CAc⨂Fc
最后,我们按元素顺序将输入 F c F_c Fc 与通道 C A c CA_c CAc 的权值进行对应元素相乘(element-wise multiply)。
—补充:—
实现CA的关键:1x1卷积
我们已经知道,卷积能够在输入张量的每一个方块周围提取空间图块,并对所有的图块应用相同的变换。极端情况是提取的图块只包含一个方块。这是卷积运算等价于让每个方块向量经过一个Dense(全连接)层:它计算得到的特征能够将输入张量通道中的信息混合在一起,但不会将跨空间的信息混合在一起(因为它一次只查看一个方块)。这种 1x1 卷积 [也叫作逐点卷积(pointwise convolution)]是 Inception 模块的特色,它有助于区分开通道特征学习和空间特征学习。(来自《Python 深度学习》)
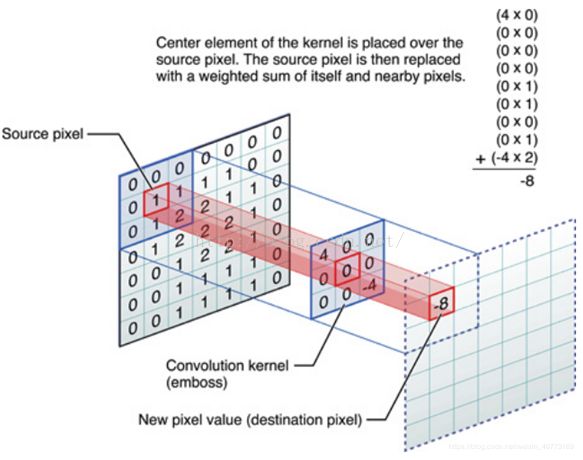
卷积能够在输入张量的每一个方块周围提取空间图块:如3x3的卷积核,每次提取(3x3=)9个方块,如输入为7x7,3x3的卷积核每在7x7上滑动一次,执行对应元素相乘,然后相加,得到一个值(注意,每次滑动进行卷积后,只得到 一个值),最后得到的输出为5x5。如下图所示:
- conv2D nxn滤镜,抓通道相关性和空间相关性 (n>1)
假设输入为32x32x3(通道数为3):
这是用一个Filter得到的结果,得到一个activation map。(filter 总会自动扩充到和输入照片一样的depth)。
当我们用6个5*5的Filter时,我们将会得到6个分开的activation maps,如图所示:
得到的“新照片”的大小为:28x28x6。
具体请查看此篇博客关于深度学习中卷积核操作
另:这里5x5的卷积核在空间上考虑了像素和周围像素的关系(即像素注意),而每次用3层的5x5滤镜,”3层“则考虑了通道与通道之间的关系(即通道注意)。因此本方法同时包含像素注意和通道注意,但是不是简单相加,而是两者的融合。当网络要分别学习空间特征和逐通道特征时,本论文的CA和PA模块是分别学习的两者的实例。
- conv2D 1x1滤镜,抓通道相关性
假设输入张量size=(64, 128, 128),使用nn.Conv2d(64, 8, 1, padding=0, bias=True),即用1x1的卷积核(滤镜),输出通道数为8。实际操作时是用64层的1x1滤镜对输入张量进行逐点卷积(并不需要考虑像素跟周边像素的关系),这样进行8次,即用8个64层的1x1滤镜。输出张量size=(8, 128, 128),估计的参数量为 ( 1 × 64 + 1 ) × 8 = 520 (1\times64+1)\times8=520 (1×64+1)×8=520 。
Pixel Attention (PA)
考虑到不同图像像素上的雾度分布不均匀,本文提出了一个像素注意(Pixel Attention,PA)模块,使网络更加关注信息特征,如浓密的雾度像素和高频图像区域。
与 C A CA CA 类似,我们使用ReLu和sigmoid激活函数将输入 F ∗ F^* F∗( C A CA CA 的输出)直接输入到两个卷积层中。形状由 C × H × W C\times H\times W C×H×W 变为 1 × H × W 1\times H\times W 1×H×W 。
P A = σ ( C o n v ( δ ( C o n v ( F ∗ ) ) ) ) PA=\sigma(Conv(\delta(Conv(F^*)))) PA=σ(Conv(δ(Conv(F∗))))
最后,我们对输入 F ∗ F^* F∗ 和 P A PA PA 使用元素乘法, F ~ \tilde{F} F~ 表示通道注意(FA)模块的输出。
F ~ = F ∗ ⨂ P A \tilde{F}=F^* {\small\bigotimes} PA F~=F∗⨂PA
—补充—
sigmoid:
A logistic function or logistic curve is a common “S” shape (sigmoid curve).(from wiki)
定义式:
S ( x ) = 1 1 + e − x S(x)=\frac{1}{1+e^{-x}} S(x)=1+e−x1
函数图像:
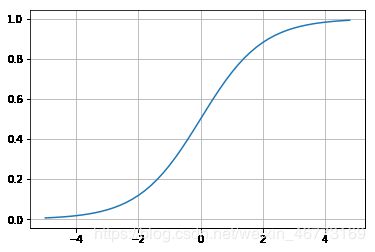
sigmoid函数将任意值“压缩”到[0, 1]区间内,其输出值可以看作概率值。常用在二分类问题和回归问题。
缺点:在函数曲线两端比较平坦,出现软饱和性,容易产生梯度消失。
修正线性单元(Rectified Linear Unit, ReLU):
定义式:
f ( x ) = m a x ( 0 , x ) f(x)=max(0, x) f(x)=max(0,x)
函数图像:
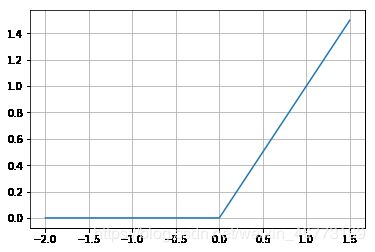
ReLU函数其实是分段线性函数,把所有的负值都变为0,而正值不变,这种操作被称为单侧抑制。也就是说:在输入是负值的情况下,它会输出0,那么神经元就不会被激活。这意味着同一时间只有部分神经元会被激活,从而使得网络很稀疏,进而对计算来说是非常有效率的。
更多信息参考博客:ReLU激活函数:简单之美(relu函数在神经网络的原理作用讲得非常好)
基本块结构(Basic Block Structure)
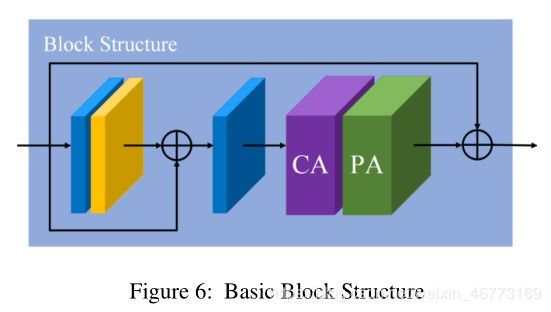
如图6所示,基本块结构由局部残差学习和特征注意(FA)模块组成,局部残差学习允许通过多个局部残差连接绕过薄雾或低频区域等不太重要的信息,而主网络则注重有效的信息。
群结构和全局残差学习(Group Architecture and Global Residual Learning)
本文提出的群结构结合了B基本块结构和跳转连接模块。连续的B块增加了FFA网络的深度和表现力,跳转连接使得FFA网避免了训练困难。在FFA网络的最后,使用两层卷积网络实现和一个快捷的全局残差学习模块添加了一个恢复部分。最后,恢复想要的无雾图像。
特征融合注意(Feature Fusion Attention)
如上所述,首先将G个群结构输出的所有特征图在通道方向上连接起来。此外,我们通过乘以由特征注意(FA)机制获得的自适应学习权重来融合特征。由此,我们可以保留低层的信息并将其传递到深层,由于权重机制的存在,使得FFA网络更加关注厚雾区、高频纹理和色彩保真度等有效信息。
损失函数(Loss Function)
均方误差(mean squared error,MSE)或L2损失是目前应用最广泛的单图像去雾的损失函数。然而Lim等人指出,在PSNR和SSIM指标方面,许多使用L1损失的图像恢复任务训练取得了比L2损失更好的性能。遵循同样的策略,本文默认采用简单的L1损失。尽管许多去雾算法也使用感知损失( perceptual loss)和GAN损失,但我们选择了去优化L1损失。
L ( Θ ) = 1 N ∑ i = 1 N ∣ ∣ I g t i − F F A ( I h a z e i ) ∣ ∣ L(\Theta)=\frac{1}{N}\sum_{i=1}^N||I_{gt}^i-FFA(I_{haze}^i)|| L(Θ)=N1i=1∑N∣∣Igti−FFA(Ihazei)∣∣
其中, Θ \Theta Θ 表示FFA-Net的参数, I g t I_{gt} Igt 表示真实标签, I h a z e I_{haze} Ihaze 表示输入。
实施细节(Implementation Details)
群结构(Group Structure)的数量G=3。在每一个群结构中,我们设置基本块结构(Basic Block Structure)的个数B=19。除开通道注意(Channel Attention,CA)的卷积层滤波器大小为 1x1,我们设置所有卷积层滤波器的大小为 3x3。除开CA模块,所有特征图的大小保持不变。每个群结构输出64个滤波器(即输出通道为64)。
疑惑1:
发现FFA.py代码部分PA层所使用的卷积核大小为1x1,怀疑作者此处代码失误。
原实现PA层代码如下:
class PALayer(nn.Module):
    def __init__(self, channel):
        super(PALayer, self).__init__()
        self.pa = nn.Sequential(
          	# PA层的卷积核不应该是3x3么,为什么这里是1x1?
            # 这样的话PA层与CA层只差一个全局平均池化操作的区别,而且1x1是抓通道特征,并不能实现像素注意的功能
          	# 论文中“实施细节”除写道只有CA模块的卷积核为1x1,怀疑此处代码失误
            nn.Conv2d(channel, channel // 8, 1, padding=0, bias=True),
            nn.ReLU(inplace=True),  # inplace 原位操作,即不经过复制操作,而是直接在原来的内存上改变它的值
            nn.Conv2d(channel // 8, 1, 1, padding=0, bias=True),
          	# 第一个'1'表示输出的通道数为1,即实现CxHxW -> 1xHxW
            nn.Sigmoid()
        )
疑惑2:
nn.Conv2d(channel // 8, 1, 1, padding=0, bias=True) 仍是用一个channel//8层的滤镜进行卷积操作,是包含了通道特征的提取的,这里就同时对空间和通道进行特征提取了,而不是单一的只包含空间特征提取,那么像素注意是指提取空间特征么?还是说像素注意指的就是同时空间和通道上的特征提取?PA模块是到底如何进行像素注意的呢?
结合通道注意部分的代码,我设想像素注意应该用一层的3x3滤镜对输入的channel//8个通道分别进行卷积操作,然后对通道方向的值求和做平均,得到一个值。
数据集和指标(Datasets and Metrics)
RESIDE 包含1399张无雾图像和13990张带雾图像(由对应的无雾图像产生)。全球大气光范围从0.8到1.0,散射参数从0.04到0.2变化。为了与之前最先进的方法比较,我们采用PSNR和SSIM指标,在包含500张室内图像和500张室外图像的SOTS数据集( Synthetic Objective Testing Set)进行了综合比较测试。我们还测试了实际带雾图像(Realistic Hazy Images)的主观评价结果。
补充:
注意:FFA论文使用的数据集为RESIDE的standard版本(非V0版)
reside-standard的结构:
填坑:ITS的百度云链接需要自备梯子才能跳转到百度云下载链接,否则会弹出"404"错误。
训练设置(Training Settings)
我们在RGB通道中训练FFA-Net,并且通过随机旋转90,180,270度和水平翻转来进行训练数据增强。提取2个大小为240x240的图像作为FFA-Net的输入。整个网络分别对室内和室外图像进行了 5 × 1 0 5 5\times 10^5 5×10⁵ 次、 1 × 1 0 6 1\times 10^6 1×10⁶ 次训练。我们使用Adam优化器, β 1 \beta_1 β1 和 β 2 \beta_2 β2分别取默认值0.9和0.999。
初始学习率为 1 × 1 0 − 4 1\times 10^{-4} 1×10⁻⁴ ,我们采用余弦退火策略(cosine annealing strategy)调整学习率(从初始学习率到0)。假设总的batches是 T T T , η \eta η 表示初始学习率。在batch t t t , η t \eta_t ηt 可表示为:
η t = 1 2 ( 1 + c o s ( t π T ) ) η \eta_t=\frac{1}{2}(1+cos(\frac{t\pi}{T}))\eta ηt=21(1+cos(Ttπ))η
实验结果(Results on RESIDE Dataset)
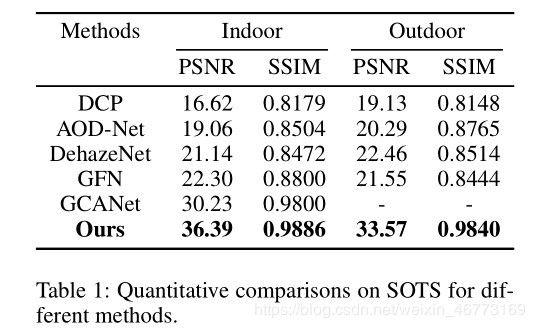
从定量和定性两个方面比较FFA-Net和以往最先进的图像去雾算法。比较了DCP、AOD-Net、DehazeNet、GCANet四种最新的去雾算法,比较结果见表1。
代码注释
data_utils.py
import torch.utils.data as data
import torchvision.transforms as tfs
from torchvision.transforms import functional as FF
import os, sys

sys.path.append('.')
sys.path.append('..')
import numpy as np
import torch
import random
from PIL import Image
from torch.utils.data import DataLoader
from matplotlib import pyplot as plt
from torchvision.utils import make_grid
from net.metrics import *                # metrics.py
from net.option import opt               # option.py

BS = opt.bs
print('BS:',BS)
crop_size = 'whole_img'   # 裁剪图片的大小
if opt.crop:
    crop_size = opt.crop_size

def tensorShow(tensors, titles=None):
    '''
        t:BCWH
    '''
    fig = plt.figure()
    for tensor, tit, i in zip(tensors, titles, range(len(tensors))):
        img = make_grid(tensor)
        npimg = img.numpy()
        ax = fig.add_subplot(211 + i)
        ax.imshow(np.transpose(npimg, (1, 2, 0)))
        ax.set_title(tit)
    plt.show()

class RESIDE_Dataset(data.Dataset):
    def __init__(self, path, train, size=crop_size, format='.png'):
        super(RESIDE_Dataset, self).__init__()
        self.size = size
        # print('crop size:', size) # ---本人测试命令
        self.train = train
        self.format = format
        self.haze_imgs_dir = os.listdir(os.path.join(path, 'hazy'))
        # 返回指定路径下所有文件和文件夹的名字,并存放于一个列表中
        # print('self_haze_imgs_dir :', self.haze_imgs_dir) # 本人测试命令
        self.haze_imgs = [os.path.join(path, 'hazy', img) for img in self.haze_imgs_dir]
        # hazy图像所有的路径,并存放于一个列表中
        # print('self_haze_imgs:',self.haze_imgs) # ---本人测试命令
        self.clear_dir = os.path.join(path, 'clear')
        # print('self_clean:', self.clear_dir) # ---本人测试命令

    def __getitem__(self, index):
        haze = Image.open(self.haze_imgs[index])
        # print('haze_size:',haze.size,haze.size[::-1]) # ---本人测试命令
        # print('index:', index) # ---本人测试命令
        if isinstance(self.size, int):  # 如果size是int型,则返回True
            # print('这个isinstance方法被调用') # ---本人测试命令
            while haze.size[0] < self.size or haze.size[1] < self.size:
                index = random.randint(0, 20000)
                haze = Image.open(self.haze_imgs[index])
        img = self.haze_imgs[index]  # 从haze_imgs(路径名称列表)中取出对于索引值的路径
        # print('img:', img) # ---本人测试命令
        # id = img.split('/')[-1].split('_')[0] # 此命令在windows下执行会报路径错误,改为以下命令
        id = img.split('\\')[-1].split('_')[0]
        # 提取最后‘\’之后和第一个‘_’之前的内容,以hazy图像的路径找到对应clear图像的序号
        # print('id:',id) # ---本人测试命令
        clear_name = id + self.format
        # print('clear_name:', clear_name) # ---本人测试命令
        # test_dir = os.path.join(self.clear_dir, clear_name) # ---本人测试命令
        # print('clear_dir:',test_dir) # ---本人测试命令

        clear = Image.open(os.path.join(self.clear_dir, clear_name))
        clear = tfs.CenterCrop(haze.size[::-1])(clear)
        # haze.size=(W, H) -> haze.size[::-1]=(H, W),然后按(H, W)对clear进行中心裁剪

        if not isinstance(self.size, str): # 如果size不是str类型,则返回True
            # print('这个not isinstance方法被调用')
            i, j, h, w = tfs.RandomCrop.get_params(haze, output_size=(self.size, self.size))
            '''
            w, h = haze.size
            th, tw = output_size
            i = random.randint(0, h - th)
            j = random.randint(0, w - tw)
            return i, j, th, tw
            '''
            haze = FF.crop(haze, i, j, h, w)  # 把haze随机裁剪成(i, j, h, w)的大小
            clear = FF.crop(clear, i, j, h, w)
        haze, clear = self.augData(haze.convert("RGB"), clear.convert("RGB"))
        # 使用数据增强后把图片转为RGB格式
        return haze, clear

    def augData(self, data, target):  # 数据增强
        if self.train:
            rand_hor = random.randint(0, 1)  # 从[0, 1]中随机选一个数
            rand_rot = random.randint(0, 3)  # 从[0, 1, 2, 3]中随机选一个数
            data = tfs.RandomHorizontalFlip(rand_hor)(data)
            # 依据概率rand_hor对data(图片)进行水平翻转(这里,rand_hor=0:不翻转;=1:翻转)
            target = tfs.RandomHorizontalFlip(rand_hor)(target)
            if rand_rot:  # rand_rot>0时执行此命令
                data = FF.rotate(data, 90 * rand_rot)  # 将data旋转的角度为90*rand_rot
                target = FF.rotate(target, 90 * rand_rot)
        data = tfs.ToTensor()(data)  # range [0, 255] -> [0.0, 1.0]
        data = tfs.Normalize(mean=[0.64, 0.6, 0.58], std=[0.14, 0.15, 0.152])(data)
        # 归一化操作
        # 输入的data(图片)大小为CxWxH(三维张量),mean为各通道的均值,std为各通道的方差
        # output = (input - mean) / std

        target = tfs.ToTensor()(target)
        return data, target

    def __len__(self):
        return len(self.haze_imgs)

import os
pwd = os.getcwd()
print(pwd)
# path = '/FFA-Net-master/data'  # path to your 'data' folder
path = '../data'  # path to your 'data' folder

ITS_train_loader = DataLoader(dataset=RESIDE_Dataset(path + '/RESIDE/ITS', train=True, size=crop_size), batch_size=BS,
                              shuffle=True)
ITS_test_loader = DataLoader(dataset=RESIDE_Dataset(path + '/RESIDE/SOTS/indoor', train=False, size='whole img'),
                             batch_size=1, shuffle=False)
OTS_train_loader = DataLoader(dataset=RESIDE_Dataset(path + '/RESIDE/OTS', train=True, format='.jpg'), batch_size=BS,
                               shuffle=True)
OTS_test_loader = DataLoader(dataset=RESIDE_Dataset(path + '/RESIDE/SOTS/outdoor', train=False, size='whole img', format='.png'), batch_size=1,
                              shuffle=False)
# 如果train_loader没有数据,即检查Dataset的__len__()函数输出为零,会报ValueError:num_samples...的错

if __name__ == "__main__":
    pass
option.py
import torch,os,sys,torchvision,argparse
import torchvision.transforms as tfs
import time,math
import numpy as np
from torch.backends import cudnn
from torch import optim
import torch,warnings
from torch import nn
import torchvision.utils as vutils
warnings.filterwarnings('ignore')

parser=argparse.ArgumentParser()  # 命令行选项、参数和子命令解析器
'''
argparse 模块可以让人轻松编写用户友好的命令行接口。
程序定义它需要的参数,然后 argparse 将弄清如何从 sys.argv 解析出那些参数。
argparse 模块还会自动生成帮助和使用手册,并在用户给程序传入无效参数时报出错误信息。
'''

# 添加参数
# default - 当参数未在命令行中出现时使用的值。
# type - 命令行参数应当被转换成的类型。
# action='store_true',只要运行时该变量有传参就将该变量设为True
parser.add_argument('--steps',type=int,default=10) # 10000
parser.add_argument('--device',type=str,default='Automatic detection')
parser.add_argument('--resume',type=bool,default=True)
parser.add_argument('--eval_step',type=int,default=5)  # 5000
parser.add_argument('--lr', default=0.0001, type=float, help='learning rate')
parser.add_argument('--model_dir',type=str,default='./trained_models/')
parser.add_argument('--trainset',type=str,default='its_train')
parser.add_argument('--testset',type=str,default='its_test')
parser.add_argument('--net',type=str,default='ffa')
parser.add_argument('--gps',type=int,default=3,help='residual_groups')
parser.add_argument('--blocks',type=int,default=20,help='residual_blocks')
parser.add_argument('--bs',type=int,default=16,help='batch size')
parser.add_argument('--crop',action='store_true')
parser.add_argument('--crop_size',type=int,default=240,help='Takes effect when using --crop ')
parser.add_argument('--no_lr_sche',action='store_true',help='no lr cos schedule')
parser.add_argument('--perloss',action='store_true',help='perceptual loss')

opt=parser.parse_args()  # 解析参数
opt.device='cuda' if torch.cuda.is_available() else 'cpu'
model_name=opt.trainset+'_'+opt.net.split('.')[0]+'_'+str(opt.gps)+'_'+str(opt.blocks)
# split('.')[0] , 以'.'作分隔符,输出'.'之前的内容

opt.model_dir=opt.model_dir+model_name+'.pk'
log_dir='logs/'+model_name

# ---以下为本人自己的测试命令---
# print('opt:', opt)
# print('model_name:', model_name)
# print('model_dir:',opt.model_dir)
# print('log_dir:', log_dir)

if not os.path.exists('trained_models'):
   os.mkdir('trained_models')  # 创建路径
if not os.path.exists('numpy_files'):
   os.mkdir('numpy_files')
if not os.path.exists('logs'):
   os.mkdir('logs')
if not os.path.exists('samples'):
   os.mkdir('samples')
if not os.path.exists(f"samples/{model_name}"):
   os.mkdir(f'samples/{model_name}')
if not os.path.exists(log_dir):
   os.mkdir(log_dir)
metrics.py
from math import exp
import math
import numpy as np
import torch
import torch.nn.functional as F
from torch.autograd import Variable
from math import exp
import math
import numpy as np
import torch
import torch.nn.functional as F
from torch.autograd import Variable
from  torchvision.transforms import ToPILImage

def gaussian(window_size, sigma):
    gauss = torch.Tensor([exp(-(x - window_size // 2) ** 2 / float(2 * sigma ** 2)) for x in range(window_size)])
    return gauss / gauss.sum()

def create_window(window_size, channel):
    _1D_window = gaussian(window_size, 1.5).unsqueeze(1)  # 添加一个轴,变成二维张量
    _2D_window = _1D_window.mm(_1D_window.t()).float().unsqueeze(0).unsqueeze(0)
    # torch.mul(a, b)是矩阵a和b对应位相乘,a和b的维度必须相等,比如a的维度是(1, 2),b的维度是(1, 2),返回的仍是(1, 2)的矩阵
    # torch.mm(a, b)是矩阵a和b矩阵相乘,比如a的维度是(1, 2),b的维度是(2, 3),返回的就是(1, 3)的矩阵
    # .t(), 求转置,输入tensor结构维度<=2D
    # 在二维张量前面添加2个轴,变成四维张量

    window = Variable(_2D_window.expand(channel, 1, window_size, window_size).contiguous())
    # 把张量扩展成(channel, 1, window_size, window_size)的大小,以原来的值填充(其自身的值不变)
    # contiguous:view只能用在contiguous的variable上。contiguous一般与transpose,permute,view搭配使用
    # 即使用transpose或permute进行维度变换后,需要用contiguous()来返回一个contiguous copy,然后方可使用view对维度进行变形

    return window

def _ssim(img1, img2, window, window_size, channel, size_average=True):
    mu1 = F.conv2d(img1, window, padding=window_size // 2, groups=channel)
    mu2 = F.conv2d(img2, window, padding=window_size // 2, groups=channel)
    mu1_sq = mu1.pow(2)  # mul的2次方
    mu2_sq = mu2.pow(2)
    mu1_mu2 = mu1 * mu2
    sigma1_sq = F.conv2d(img1 * img1, window, padding=window_size // 2, groups=channel) - mu1_sq
    sigma2_sq = F.conv2d(img2 * img2, window, padding=window_size // 2, groups=channel) - mu2_sq
    sigma12 = F.conv2d(img1 * img2, window, padding=window_size // 2, groups=channel) - mu1_mu2
    C1 = 0.01 ** 2
    C2 = 0.03 ** 2
    ssim_map = ((2 * mu1_mu2 + C1) * (2 * sigma12 + C2)) / ((mu1_sq + mu2_sq + C1) * (sigma1_sq + sigma2_sq + C2))

    if size_average:
        return ssim_map.mean()
    else:
        return ssim_map.mean(1).mean(1).mean(1)

def ssim(img1, img2, window_size=11, size_average=True):
    img1=torch.clamp(img1,min=0,max=1)
    # 将输入img1张量每个元素的范围限制到区间[min, max],返回结果到一个新张量。
    img2=torch.clamp(img2,min=0,max=1)

    (_, channel, _, _) = img1.size()  # 取出img1的通道数
    window = create_window(window_size, channel)
    if img1.is_cuda:
        window = window.cuda(img1.get_device())
    window = window.type_as(img1)  # 将window张量转换为给定img1类型的张量
    return _ssim(img1, img2, window, window_size, channel, size_average)


def psnr(pred, gt):
    pred=pred.clamp(0,1).cpu().numpy() # 将gpu上的数据类型转为cpu上的数据类型,然后转化为numpy()数组
    gt=gt.clamp(0,1).cpu().numpy()
    imdff = pred - gt
    rmse = math.sqrt(np.mean(imdff ** 2))
    if rmse == 0:
        return 100
    return 20 * math.log10( 1.0 / rmse)

if __name__ == "__main__":
    pass
注:SSIM和PSNR的代码可根据公式结合来加以理解,参见博客:图像质量评价指标之 PSNR 和 SSIM
FFA.py
import torch.nn as nn
import torch

def default_conv(in_channels, out_channels, kernel_size, bias=True):
    return nn.Conv2d(in_channels, out_channels, kernel_size, padding=(kernel_size // 2), bias=bias)  # '//'整数除法,'/'浮点数除法

class PALayer(nn.Module):
    def __init__(self, channel):
        super(PALayer, self).__init__()
        self.pa = nn.Sequential(
        	# PA层的卷积核不应该是3x3么,为什么这里是1x1?
        	# 这样的话PA层与CA层只差一个全局平均池化操作的区别,而且1x1是抓通道特征,并不能实现像素注意的功能
          	# 论文中“实施细节”处写道只有CA模块的卷积核为1x1,怀疑此处代码失误
            nn.Conv2d(channel, channel // 8, 1, padding=0, bias=True),
            nn.ReLU(inplace=True),  # inplace 原位操作,即不经过复制操作,而是直接在原来的内存上改变它的值
            nn.Conv2d(channel // 8, 1, 1, padding=0, bias=True),
            # 第一个'1'表示输出的通道数为1,即实现CxHxW -> 1xHxW
            nn.Sigmoid()
        )

    def forward(self, x):
        y = self.pa(x)
        return x * y

class CALayer(nn.Module):
    def __init__(self, channel):
        super(CALayer, self).__init__()
        self.avg_pool = nn.AdaptiveAvgPool2d(1)
        # 自适应平均池化,输出大小为: 1 x 1,即把一张图片(HxW)的所有的值加起来取平均,大小变为1x1
        self.ca = nn.Sequential(
         	# 这里,'1'表示卷积核的大小为1x1,这是实现特征注意功能的关键:
            # 用channel个channel//8层的conv2D 1x1滤镜作逐点卷积,抓通道相关性
            nn.Conv2d(channel, channel // 8, 1, padding=0, bias=True),
            nn.ReLU(inplace=True),
            nn.Conv2d(channel // 8, channel, 1, padding=0, bias=True),
            nn.Sigmoid()
        )

    def forward(self, x):
        y = self.avg_pool(x)
        y = self.ca(y)
        return x * y

class Block(nn.Module):
    def __init__(self, conv, dim, kernel_size, ):
        super(Block, self).__init__()
        self.conv1 = conv(dim, dim, kernel_size, bias=True)
        self.act1 = nn.ReLU(inplace=True)
        self.conv2 = conv(dim, dim, kernel_size, bias=True)
        self.calayer = CALayer(dim)
        self.palayer = PALayer(dim)

    def forward(self, x):
        res = self.act1(self.conv1(x))
        res = res + x
        res = self.conv2(res)
        res = self.calayer(res)
        res = self.palayer(res)
        res += x
        return res

class Group(nn.Module):
    def __init__(self, conv, dim, kernel_size, blocks):
        super(Group, self).__init__()
        modules = [Block(conv, dim, kernel_size) for _ in range(blocks)]
        # moduels列表里有n(=blocks)个Block块

        modules.append(conv(dim, dim, kernel_size))
        self.gp = nn.Sequential(*modules)
        # modules列表前加*号,表示将列表解开成独立的参数。
        # 转化为Sequential模型,网络为n个Block块线性堆叠。

    def forward(self, x):
        res = self.gp(x)
        res += x
        return res

class FFA(nn.Module):
    def __init__(self, gps, blocks, conv=default_conv):
        super(FFA, self).__init__()
        self.gps = gps
        self.dim = 64
        kernel_size = 3
        pre_process = [conv(3, self.dim, kernel_size)]
        assert self.gps == 3
        self.g1 = Group(conv, self.dim, kernel_size, blocks=blocks)
        self.g2 = Group(conv, self.dim, kernel_size, blocks=blocks)
        self.g3 = Group(conv, self.dim, kernel_size, blocks=blocks)
        self.ca = nn.Sequential(*[
            nn.AdaptiveAvgPool2d(1),
            nn.Conv2d(self.dim * self.gps, self.dim // 16, 1, padding=0),
            nn.ReLU(inplace=True),
            nn.Conv2d(self.dim // 16, self.dim * self.gps, 1, padding=0, bias=True),
            nn.Sigmoid()
        ])
        self.palayer = PALayer(self.dim)

        post_precess = [
            conv(self.dim, self.dim, kernel_size),
            conv(self.dim, 3, kernel_size)]

        self.pre = nn.Sequential(*pre_process)
        self.post = nn.Sequential(*post_precess)

    def forward(self, x1):
        x = self.pre(x1)
        res1 = self.g1(x)
        res2 = self.g2(res1)
        res3 = self.g3(res2)
        w = self.ca(torch.cat([res1, res2, res3], dim=1))
        # 按序号为1的轴进行拼接,即按通道进行拼接,每个res大小为([1, 64, H, W]),
        # cat后大小为([1, 192, H, W]),w.size() = ([1, 192, 1, 1])

        w = w.view(-1, self.gps, self.dim)[:, :, :, None, None]  # 添加两个轴(元素是None)
        # w.size() = ([1, 3, 64, 1, 1])

        out = w[:, 0, ::] * res1 + w[:, 1, ::] * res2 + w[:, 2, ::] * res3
        # w的三个通道分别与res1,2,3相乘再相加,out.size()=([1, 64, H, W])

        out = self.palayer(out)
        x = self.post(out)
        return x + x1

if __name__ == "__main__":
    # 当.py文件被直接运行时,if __name__ == '__main__'之下的代码块将被运行;
    # 当.py文件以模块形式被导入时, if __name__ == '__main__'之下的代码块不被运行
    net = FFA(gps=3, blocks=19)
    print(net)
main.py
import torch, os, sys, torchvision, argparse
import torchvision.transforms as tfs

from net.models.FFA import FFA # FFA.py
from net.metrics import psnr, ssim # metrics.py
from net.models import *
import time, math
import numpy as np
from torch.backends import cudnn
from torch import optim
import torch, warnings
from torch import nn
# from tensorboardX import SummaryWriter
import torchvision.utils as vutils

warnings.filterwarnings('ignore')
from net.option import opt, model_name, log_dir # option.py
from net.data_utils import *  # data_utils.py
from torchvision.models import vgg16

print('log_dir :', log_dir)
print('model_name:', model_name)

models_ = {
    'ffa': FFA(gps=opt.gps, blocks=opt.blocks),
}

loaders_ = {
    'its_train': ITS_train_loader,
    'its_test': ITS_test_loader,
    'ots_train': OTS_train_loader,
    'ots_test': OTS_test_loader
}

start_time = time.time()  # 返回当前时间的时间戳
T = opt.steps  # default=100000


def lr_schedule_cosdecay(t, T, init_lr=opt.lr):
    # 文章中公式(9),采用cosine annealing strategy进行学习率衰减,直到0
    lr = 0.5 * (1 + math.cos(t * math.pi / T)) * init_lr
    return lr


def train(net, loader_train, loader_test, optim, criterion):
    losses = []
    start_step = 0
    max_ssim = 0
    max_psnr = 0
    ssims = []
    psnrs = []
    if opt.resume and os.path.exists(opt.model_dir):  # 如果已有训练好的模型,返回true
        print(f'resume from {opt.model_dir}')  # 带f的print可以执行表达式
        ckp = torch.load(opt.model_dir)  # 将对象文件反序列化为内存
        losses = ckp['losses']  # 取出已训练好的模型的loss
        net.load_state_dict(ckp['model'])
        # 使用反序列化状态字典加载model’s参数字典
        # state_dict是个简单的Python dictionary对象,它将每个层映射到它的参数张量

        start_step = ckp['step']
        max_ssim = ckp['max_ssim']
        max_psnr = ckp['max_psnr']
        psnrs = ckp['psnrs']
        ssims = ckp['ssims']
        print(f'start_step:{start_step} start training ---')
    else:
        print('train from scratch *** ')
    for step in range(start_step + 1, opt.steps + 1):  # opt.steps=10(default)
        net.train()  # 定义的网络进入训练模式
        lr = opt.lr
        if not opt.no_lr_sche:
            lr = lr_schedule_cosdecay(step, T)
            for param_group in optim.param_groups:  # 在训练中动态的调整学习率
                param_group["lr"] = lr
        x, y = next(iter(loader_train))
        # 读取一个读取一个batch的数据,batch size=16时实际对应16张图像
        # dataloader本质上是一个可迭代对象,使用iter()访问,不能使用next()访问;
        # 使用iter(dataloader)返回的是一个迭代器,然后可以使用next访问

        x = x.to(opt.device)  # 若opt.device=cuda,即转移到GPU运行
        y = y.to(opt.device)
        out = net(x)  # 把x输入网络训练
        loss = criterion[0](out, y)
        if opt.perloss:  # Perceptual loss为L1损失和L2损失的加权和
            loss2 = criterion[1](out, y)
            loss = loss + 0.04 * loss2

        loss.backward()  # 反向传播求梯度

        optim.step()  # 更新参数
        optim.zero_grad()  # 清除梯度,为下一个batch训练做准备
        losses.append(loss.item())  # loss是个标量,item表示取出这个标量,然后放入losses中
        print(
            f'\rtrain loss : {loss.item():.5f}| step :{step}/{opt.steps}|lr :{lr :.7f} |time_used :{(time.time() - start_time) / 60 :.1f}',
            end='', flush=True)

        # with SummaryWriter(logdir=log_dir,comment=log_dir) as writer:
        #  writer.add_scalar('data/loss',loss,step)

        if step % opt.eval_step == 0:  # default=5000
            with torch.no_grad():  # 切断梯度计算,不会进行反向传播,因为SSIM和PSNR的计算不需要
                ssim_eval, psnr_eval = test(net, loader_test, max_psnr, max_ssim, step)  # 计算SSIM,PSNR

            print(f'\nstep :{step} |ssim:{ssim_eval:.4f}| psnr:{psnr_eval:.4f}')

            # with SummaryWriter(logdir=log_dir,comment=log_dir) as writer:
            #  writer.add_scalar('data/ssim',ssim_eval,step)
            #  writer.add_scalar('data/psnr',psnr_eval,step)
            #  writer.add_scalars('group',{
            #     'ssim':ssim_eval,
            #     'psnr':psnr_eval,
            #     'loss':loss
            #  },step)
            ssims.append(ssim_eval)
            psnrs.append(psnr_eval)
            if ssim_eval > max_ssim and psnr_eval > max_psnr:
                max_ssim = max(max_ssim, ssim_eval)
                max_psnr = max(max_psnr, psnr_eval)
                torch.save({
                    'step': step,
                    'max_psnr': max_psnr,
                    'max_ssim': max_ssim,
                    'ssims': ssims,
                    'psnrs': psnrs,
                    'losses': losses,
                    'model': net.state_dict()
                }, opt.model_dir)  # 保存各项参数到model_dir中
                print(f'\n model saved at step :{step}| max_psnr:{max_psnr:.4f}|max_ssim:{max_ssim:.4f}')

    # 把参数保存为.npy文件
    np.save(f'./numpy_files/{model_name}_{opt.steps}_losses.npy', losses)
    np.save(f'./numpy_files/{model_name}_{opt.steps}_ssims.npy', ssims)
    np.save(f'./numpy_files/{model_name}_{opt.steps}_psnrs.npy', psnrs)


def test(net, loader_test, max_psnr, max_ssim, step):
    net.eval()  # 网络参数会被固定,权值不会被更新
    torch.cuda.empty_cache()  # 清空显存
    ssims = []
    psnrs = []
    # s=True
    for i, (inputs, targets) in enumerate(loader_test):
        inputs = inputs.to(opt.device)
        targets = targets.to(opt.device)
        pred = net(inputs)
        # # print(pred)
        # tfs.ToPILImage()(torch.squeeze(targets.cpu())).save('111.png')
        # vutils.save_image(targets.cpu(),'target.png')
        # vutils.save_image(pred.cpu(),'pred.png')
        ssim1 = ssim(pred, targets).item()
        psnr1 = psnr(pred, targets)
        ssims.append(ssim1)
        psnrs.append(psnr1)
    # if (psnr1>max_psnr or ssim1 > max_ssim) and s :
    #     ts=vutils.make_grid([torch.squeeze(inputs.cpu()),torch.squeeze(targets.cpu()),torch.squeeze(pred.clamp(0,1).cpu())])
    #     vutils.save_image(ts,f'samples/{model_name}/{step}_{psnr1:.4}_{ssim1:.4}.png')
    #     s=False
    return np.mean(ssims), np.mean(psnrs)

if __name__ == "__main__":
    '''
    直接执行该模块(main.py),此时__name__=main.py,以下语句才会被执行;
    如果该模块 import 到其他模块中,此时__name__=main,以下语句不会被执行,。
    '''
    loader_train = loaders_[opt.trainset]
    loader_test = loaders_[opt.testset]
    net = models_[opt.net]
    net = net.to(opt.device)
    if opt.device == 'cuda':
        net = torch.nn.DataParallel(net)
        # 在多个GPU上并行计算,是将输入一个batch的数据均分成多份,分别送到对应的GPU进行计算,各个GPU得到的梯度累加。
        # cudnn.benchmark = True让内置的cuDNN 的auto-tuner自动寻找最适合当前配置的高效算法,来达到优化运行的效率

    criterion = []
    criterion.append(nn.L1Loss().to(opt.device))  # 采用L1损失,放入certerion[0]中
    if opt.perloss:
        vgg_model = vgg16(pretrained=True).features[:16]
        # 使用预训练的权重,只调用特征提取部分的前16层,分类部分已抛弃掉
        vgg_model = vgg_model.to(opt.device)
        for param in vgg_model.parameters():
            param.requires_grad = False  # vgg_model不进行梯度计算
        criterion.append(PerLoss(vgg_model).to(opt.device))  # 计算的Perceptual loss损失放入criterion[1]中

    optimizer = optim.Adam(params=filter(lambda x: x.requires_grad, net.parameters()), lr=opt.lr, betas=(0.9, 0.999),
                           eps=1e-08)
    # filter函数将net模型中属性requires_grad = True的参数筛选出来,传到优化器(以Adam为例)中,只有这些参数会被求导数和更新
    optimizer.zero_grad()

    train(net, loader_train, loader_test, optimizer, criterion)
n.L1Loss().to(opt.device))  # 采用L1损失,放入certerion[0]中
    if opt.perloss:
        vgg_model = vgg16(pretrained=True).features[:16]
        # 使用预训练的权重,只调用特征提取部分的前16层,分类部分已抛弃掉
        vgg_model = vgg_model.to(opt.device)
        for param in vgg_model.parameters():
            param.requires_grad = False  # vgg_model不进行梯度计算
        criterion.append(PerLoss(vgg_model).to(opt.device))  # 计算的Perceptual loss损失放入criterion[1]中

    optimizer = optim.Adam(params=filter(lambda x: x.requires_grad, net.parameters()), lr=opt.lr, betas=(0.9, 0.999),
                           eps=1e-08)
    # filter函数将net模型中属性requires_grad = True的参数筛选出来,传到优化器(以Adam为例)中,只有这些参数会被求导数和更新
    optimizer.zero_grad()

    train(net, loader_train, loader_test, optimizer, criterion)
附:为方便理解网络,将FFA.py的blocks改为1
if __name__ == "__main__":
    net = FFA(gps=3, blocks=1)  # blocks改为1
    print(net)
- 可直观看到网络结构:
FFA(
  (g1): Group(
    (gp): Sequential(
      (0): Block(
        (conv1): Conv2d(64, 64, kernel_size=(3, 3), stride=(1, 1), padding=(1, 1))
        (act1): ReLU(inplace=True)
        (conv2): Conv2d(64, 64, kernel_size=(3, 3), stride=(1, 1), padding=(1, 1))
        (calayer): CALayer(
          (avg_pool): AdaptiveAvgPool2d(output_size=1)
          (ca): Sequential(
            (0): Conv2d(64, 8, kernel_size=(1, 1), stride=(1, 1))
            (1): ReLU(inplace=True)
            (2): Conv2d(8, 64, kernel_size=(1, 1), stride=(1, 1))
            (3): Sigmoid()
          )
        )
        (palayer): PALayer(
          (pa): Sequential(
            (0): Conv2d(64, 8, kernel_size=(1, 1), stride=(1, 1))
            (1): ReLU(inplace=True)
            (2): Conv2d(8, 1, kernel_size=(1, 1), stride=(1, 1))
            (3): Sigmoid()
          )
        )
      )
      (1): Conv2d(64, 64, kernel_size=(3, 3), stride=(1, 1), padding=(1, 1))
    )
  )
  (g2): Group(
    (gp): Sequential(
      (0): Block(
        (conv1): Conv2d(64, 64, kernel_size=(3, 3), stride=(1, 1), padding=(1, 1))
        (act1): ReLU(inplace=True)
        (conv2): Conv2d(64, 64, kernel_size=(3, 3), stride=(1, 1), padding=(1, 1))
        (calayer): CALayer(
          (avg_pool): AdaptiveAvgPool2d(output_size=1)
          (ca): Sequential(
            (0): Conv2d(64, 8, kernel_size=(1, 1), stride=(1, 1))
            (1): ReLU(inplace=True)
            (2): Conv2d(8, 64, kernel_size=(1, 1), stride=(1, 1))
            (3): Sigmoid()
          )
        )
        (palayer): PALayer(
          (pa): Sequential(
            (0): Conv2d(64, 8, kernel_size=(1, 1), stride=(1, 1))
            (1): ReLU(inplace=True)
            (2): Conv2d(8, 1, kernel_size=(1, 1), stride=(1, 1))
            (3): Sigmoid()
          )
        )
      )
      (1): Conv2d(64, 64, kernel_size=(3, 3), stride=(1, 1), padding=(1, 1))
    )
  )
  (g3): Group(
    (gp): Sequential(
      (0): Block(
        (conv1): Conv2d(64, 64, kernel_size=(3, 3), stride=(1, 1), padding=(1, 1))
        (act1): ReLU(inplace=True)
        (conv2): Conv2d(64, 64, kernel_size=(3, 3), stride=(1, 1), padding=(1, 1))
        (calayer): CALayer(
          (avg_pool): AdaptiveAvgPool2d(output_size=1)
          (ca): Sequential(
            (0): Conv2d(64, 8, kernel_size=(1, 1), stride=(1, 1))
            (1): ReLU(inplace=True)
            (2): Conv2d(8, 64, kernel_size=(1, 1), stride=(1, 1))
            (3): Sigmoid()
          )
        )
        (palayer): PALayer(
          (pa): Sequential(
            (0): Conv2d(64, 8, kernel_size=(1, 1), stride=(1, 1))
            (1): ReLU(inplace=True)
            (2): Conv2d(8, 1, kernel_size=(1, 1), stride=(1, 1))
            (3): Sigmoid()
          )
        )
      )
      (1): Conv2d(64, 64, kernel_size=(3, 3), stride=(1, 1), padding=(1, 1))
    )
  )
  (ca): Sequential(
    (0): AdaptiveAvgPool2d(output_size=1)
    (1): Conv2d(192, 4, kernel_size=(1, 1), stride=(1, 1))
    (2): ReLU(inplace=True)
    (3): Conv2d(4, 192, kernel_size=(1, 1), stride=(1, 1))
    (4): Sigmoid()
  )
  (palayer): PALayer(
    (pa): Sequential(
      (0): Conv2d(64, 8, kernel_size=(1, 1), stride=(1, 1))
      (1): ReLU(inplace=True)
      (2): Conv2d(8, 1, kernel_size=(1, 1), stride=(1, 1))
      (3): Sigmoid()
    )
  )
  (pre): Sequential(
    (0): Conv2d(3, 64, kernel_size=(3, 3), stride=(1, 1), padding=(1, 1))
  )
  (post): Sequential(
    (0): Conv2d(64, 64, kernel_size=(3, 3), stride=(1, 1), padding=(1, 1))
    (1): Conv2d(64, 3, kernel_size=(3, 3), stride=(1, 1), padding=(1, 1))
  )
)
- 用summary()调出每层的输出大小和参数。
先安装:
pip install torchsummary
在FFA.py末添加:
from torchsummary import summary
summary(net, input_size=(3, 64, 64), batch_size=1)
结果如下:
----------------------------------------------------------------
        Layer (type)               Output Shape         Param #
================================================================
            Conv2d-1            [1, 64, 64, 64]           1,792
            Conv2d-2            [1, 64, 64, 64]          36,928
              ReLU-3            [1, 64, 64, 64]               0
            Conv2d-4            [1, 64, 64, 64]          36,928
 AdaptiveAvgPool2d-5              [1, 64, 1, 1]               0
            Conv2d-6               [1, 8, 1, 1]             520
              ReLU-7               [1, 8, 1, 1]               0
            Conv2d-8              [1, 64, 1, 1]             576
           Sigmoid-9              [1, 64, 1, 1]               0
          CALayer-10            [1, 64, 64, 64]               0
           Conv2d-11             [1, 8, 64, 64]             520
             ReLU-12             [1, 8, 64, 64]               0
           Conv2d-13             [1, 1, 64, 64]               9
          Sigmoid-14             [1, 1, 64, 64]               0
          PALayer-15            [1, 64, 64, 64]               0
            Block-16            [1, 64, 64, 64]               0
           Conv2d-17            [1, 64, 64, 64]          36,928
            Group-18            [1, 64, 64, 64]               0
           Conv2d-19            [1, 64, 64, 64]          36,928
             ReLU-20            [1, 64, 64, 64]               0
           Conv2d-21            [1, 64, 64, 64]          36,928
AdaptiveAvgPool2d-22              [1, 64, 1, 1]               0
           Conv2d-23               [1, 8, 1, 1]             520
             ReLU-24               [1, 8, 1, 1]               0
           Conv2d-25              [1, 64, 1, 1]             576
          Sigmoid-26              [1, 64, 1, 1]               0
          CALayer-27            [1, 64, 64, 64]               0
           Conv2d-28             [1, 8, 64, 64]             520
             ReLU-29             [1, 8, 64, 64]               0
           Conv2d-30             [1, 1, 64, 64]               9
          Sigmoid-31             [1, 1, 64, 64]               0
          PALayer-32            [1, 64, 64, 64]               0
            Block-33            [1, 64, 64, 64]               0
           Conv2d-34            [1, 64, 64, 64]          36,928
            Group-35            [1, 64, 64, 64]               0
           Conv2d-36            [1, 64, 64, 64]          36,928
             ReLU-37            [1, 64, 64, 64]               0
           Conv2d-38            [1, 64, 64, 64]          36,928
AdaptiveAvgPool2d-39              [1, 64, 1, 1]               0
           Conv2d-40               [1, 8, 1, 1]             520
             ReLU-41               [1, 8, 1, 1]               0
           Conv2d-42              [1, 64, 1, 1]             576
          Sigmoid-43              [1, 64, 1, 1]               0
          CALayer-44            [1, 64, 64, 64]               0
           Conv2d-45             [1, 8, 64, 64]             520
             ReLU-46             [1, 8, 64, 64]               0
           Conv2d-47             [1, 1, 64, 64]               9
          Sigmoid-48             [1, 1, 64, 64]               0
          PALayer-49            [1, 64, 64, 64]               0
            Block-50            [1, 64, 64, 64]               0
           Conv2d-51            [1, 64, 64, 64]          36,928
            Group-52            [1, 64, 64, 64]               0
AdaptiveAvgPool2d-53             [1, 192, 1, 1]               0
           Conv2d-54               [1, 4, 1, 1]             772
             ReLU-55               [1, 4, 1, 1]               0
           Conv2d-56             [1, 192, 1, 1]             960
          Sigmoid-57             [1, 192, 1, 1]               0
           Conv2d-58             [1, 8, 64, 64]             520
             ReLU-59             [1, 8, 64, 64]               0
           Conv2d-60             [1, 1, 64, 64]               9
          Sigmoid-61             [1, 1, 64, 64]               0
          PALayer-62            [1, 64, 64, 64]               0
           Conv2d-63            [1, 64, 64, 64]          36,928
           Conv2d-64             [1, 3, 64, 64]           1,731
================================================================
Total params: 379,939
Trainable params: 379,939
Non-trainable params: 0
----------------------------------------------------------------
Input size (MB): 0.05
Forward/backward pass size (MB): 56.35
Params size (MB): 1.45
Estimated Total Size (MB): 57.85
----------------------------------------------------------------
注: CALayer-10即为残差连接部分,对应于Class CALayer 中最后一条语句 return x * y。假如summary()中不指定batch_size,那么Output Shape 的第一个轴将为-1。
总结:
- 整个网络由1个卷积层+3个群结构+Concatenate模块+1个CA模块+1个PA模块组成+2个卷积层组成,其中,每个群结构包含19个基础块结构,每个基础块结构又由1个卷积层+1个relu层+1个卷积层+1个CA模块+1个PA模块组成,CA和PA模块详细见“主要内容”部分,另外通过长跳和短跳残差连接绕过薄雾或低频区域等不太重要的信息,使得信息的流动更加容易。一般网络越深(如大于400层),网络训练将更加困难,使用残差连接能够让很深的网络训练更加容易。本文网络共704层,训练总参数:4455913。
- 疑问:作者在PA模块代码中使用1x1卷积核和论文描述不符。(见疑惑1)
- 疑问:在PA模块中,实现像素注意的原理。(见疑惑2)
附件下载:将整个模型绘制成层组成的图
