朋友圈评论回复的两种实现方式
关于微信朋友圈的实现思路有很多种,各有不同。我这里用两种方式实现,这两种方式的demo都可以在我的github下载:https://github.com/zhengwenming/WeChat,目前已经有1030个star,我也是受宠若惊了,所以只能不负众望,继续更新。
- cell嵌套UITableView的方式,姑且命名为方式1
- 一个UITableView+headerView的方式,命名为方式2
看过我WeChat的大佬都应该知道,之前的WeChat是用方式1实现的,代码量多,逻辑复杂,依赖第三方,最最重要的是开发者看了demo后很难集成到自己的项目中去,也就是很少人能看懂并且使用,导致WeChat成了花瓶–好看的摆设。基于以上原因,我最近抽时间把方式2的demo完成开源出来供各位大佬享用了,VC中简练的77行代码解决朋友圈。
下面比较以下两种方式的优缺点:
方式1:逻辑复杂,页面结构复杂,依赖第三方,很难集成
方式2:逻辑简单,页面结构简单,不依赖第三方,很容易集成
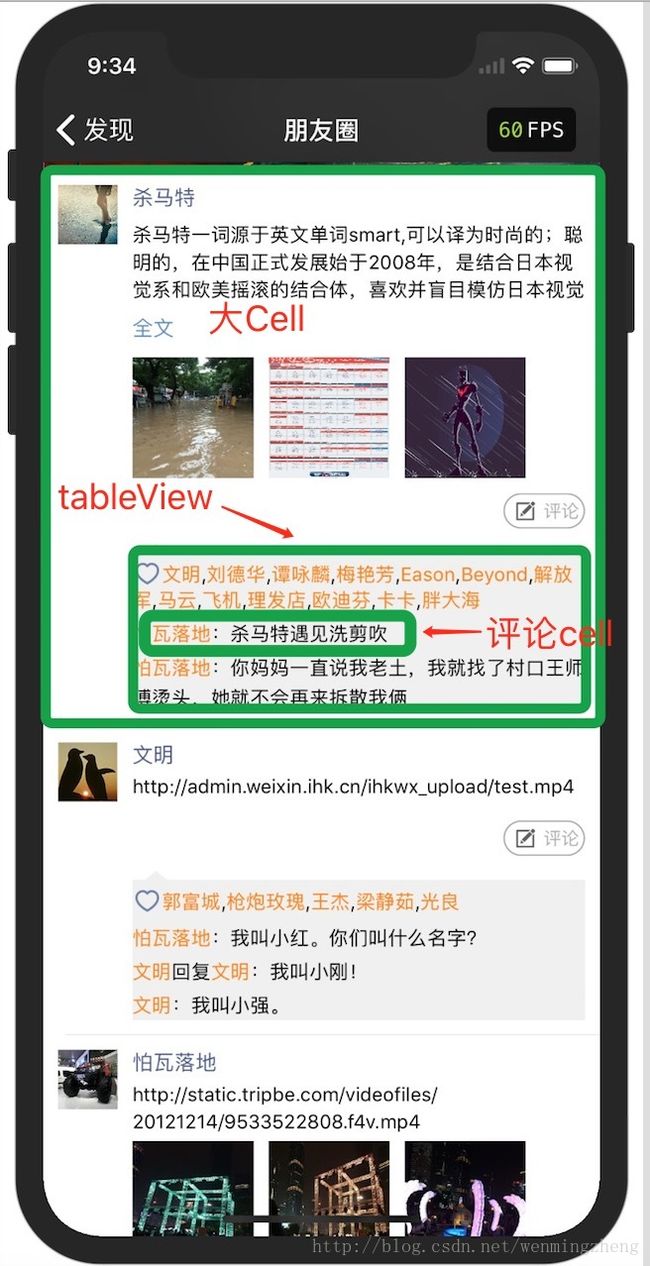
先解释一下方式1,整个朋友圈的页面用一个大的tableView,大的tableView里面的cell放置各个控件,最后是用于显示评论内容的小的tableView,这就造成了iOS界经常说了cell嵌套tableView的结构,开发中还经常遇到cell中嵌套UICollectionView的结构,等等。布局依赖Masonry,是自动布局autolayout技术,并且依赖第三方缓存cell高度。如图所示:大框为大Cell,小框为大Cell中的一个特殊控件UITableView,小tableView里还有评论的二级cell。不推荐使用。
方式2,一个tableView,cell用来展示评论数据,headerView用来展示头像、发布文字和时间等等。缓存cell高度,如下图所示,cell部分和上部的头视图部分。推荐使用。
下面主要介绍极力推荐的方式2主要思路和代码
继承关系WMTimeLineViewController2:TimeLineBaseViewController:BaseViewController
由于封装和继承这些分离代码的技术,使得整个朋友圈VC里面目前100行代码,当然真实项目要加很多网络请求和逻辑判断,点击事件回调等等,但是也可以控制在300-400行代码,很容易维护。
首先是处理json数据,这里我用本地的测试json数据,把数据处理成model,放到数组dataSource中
        ///本地的json测试数据
-(NSDictionary *)jsonDic{
    if (_jsonDic==nil) {
        NSData *data = [NSData dataWithContentsOfURL:[NSURL fileURLWithPath:[[NSBundle mainBundle] pathForResource:@"data" ofType:@"json"]]];
        _jsonDic = [NSJSONSerialization JSONObjectWithData:data options:NSJSONReadingAllowFragments error:nil];
    }
    return _jsonDic;
}

#pragma mark
#pragma mark 从本地获取朋友圈2的测试数据
-(void)getTestData2{
    for (NSDictionary *eachDic in self.jsonDic[@"data"][@"rows"]) {
        MessageInfoModel2 *messageModel = [[MessageInfoModel2 alloc] initWithDic:eachDic];
        [self.dataSource addObject:messageModel];
    }
}
这里注意MessageInfoModel2的自定义初始化方法-(instancetype)initWithDic:(NSDictionary *)dic,MessageInfoModel2是headerView对应的model,属性如下:
@interface MessageInfoModel2 : NSObject

@property (nonatomic, copy) NSString *cid;

///发布说说的id
@property(nonatomic,copy)NSString *message_id;

///发布说说的内容
@property(nonatomic,copy)NSString *message;

///发布说说的展开状态
@property (nonatomic, assign) BOOL isExpand;

///发布说说的时间标签
@property(nonatomic,copy)NSString *timeTag;

///发布说说的类型(可能含有视频)
@property(nonatomic,copy)NSString *message_type;

///发布说说者id
@property(nonatomic,copy)NSString *userId;

///发布说说者名字
@property(nonatomic,copy)NSString *userName;

///发布说说者头像
@property(nonatomic,copy)NSString *photo;

///评论小图
@property(nonatomic,copy)NSMutableArray *messageSmallPics;

///评论大图
@property(nonatomic,copy)NSMutableArray *messageBigPics;

///评论相关的所有信息
@property(nonatomic,copy)NSMutableArray *commentModelArray;
///sectionHeaderView的高度
@property (nonatomic, assign) CGFloat headerHeight;
///发布文字的布局
@property (nonatomic, strong) Layout *textLayout;
///九宫格的布局
@property (nonatomic, strong) Layout *jggLayout;

@property(nonatomic,strong)NSMutableAttributedString *mutablAttrStr;

-(instancetype)initWithDic:(NSDictionary *)dic;

@end

-(instancetype)initWithDic:(NSDictionary *)dic{
    self = [super init];
    if (self) {
        self.cid                = dic[@"cid"];
        self.message_id         = dic[@"message_id"];
        self.message            = dic[@"message"];
        self.timeTag            = dic[@"timeTag"];
        self.message_type       = dic[@"message_type"];
        self.userId             = dic[@"userId"];
        self.userName           = dic[@"userName"];
        self.photo              = dic[@"photo"];
        self.messageSmallPics   = dic[@"messageSmallPics"];
        self.messageBigPics     = dic[@"messageBigPics"];

        NSMutableArray *likeUsers = [NSMutableArray array];

        for (NSDictionary *friendInfoDic in dic[@"likeUsers"]) {
            [likeUsers addObject:[[FriendInfoModel alloc]initWithDic:friendInfoDic]];
        }
        if (likeUsers.count) {
            CommentInfoModel2 *model2 = [CommentInfoModel2 new];
            model2.likeUsersArray = likeUsers.mutableCopy;
            //处理点赞人的attributeStr字符串
            NSMutableArray *rangesArray = [NSMutableArray array];
            NSMutableArray *nameArray = [NSMutableArray array];

            NSMutableAttributedString *mutablAttrStr = [[NSMutableAttributedString alloc]init];
            NSTextAttachment *attch = [[NSTextAttachment alloc] init];
            //定义图片内容及位置和大小
            attch.image = [UIImage imageNamed:@"Like"];
            attch.bounds = CGRectMake(0, -5, attch.image.size.width, attch.image.size.height);
            //创建带有图片的富文本
            [mutablAttrStr insertAttributedString:[NSAttributedString attributedStringWithAttachment:attch] atIndex:0];


            for (int i = 0; i 3&&self.messageSmallPics.count<=6){
            jgg_height = 2*image_Width+kGAP;
        }else  if (self.messageSmallPics.count>6&&self.messageSmallPics.count<=9){
            jgg_height = 3*image_Width+2*kGAP;
        }

        self.jggLayout.frameLayout =  CGRectMake(self.textLayout.frameLayout.origin.x, CGRectGetMaxY(self.textLayout.frameLayout)+kGAP, jgg_Width, jgg_height);

        self.headerHeight = CGRectGetMaxY(self.jggLayout.frameLayout)+kGAP;
    }
    return self;
}
其中headerHeight为保存计算好的headerView高度,textLayout和jggLayout分别保存的为文字的富文本的frame信息和九宫格所占用的frame信息,注意,这些都是事先算好的,后续滑动tableView后不会重复计算。提升流畅度和FPS。再说说这个头视图headerView,定义如下
@interface WMTimeLineHeaderView : UITableViewHeaderFooterView
@property(nonatomic,retain)MessageInfoModel2 *model;

@end
它是继承UITableViewHeaderFooterView的,是要在滑动的时候复用的,复用占用的内存消耗少,类比cell的复用,此处不做展开细讲,只需要知道朋友圈2的headerView是复用的,效率高就可以了,复用的方法,我也在朋友圈2demo中有代码可以参考。
OK,类比MessageInfoModel2的方式处理CommentInfoModel2,CommentInfoModel2是保存评论信息的model类,当然其中也是保存了评论富文本和高度,如下
//评论富文本,也是model初始化的时候算出来的,比如:文明 回复 小红 :你好吗?
@property(nonatomic,copy)NSAttributedString *attributedText;
//点赞的富文本    @property(nonatomic,copy)NSMutableAttributedString *likeUsersAttributedText;
    //每个评论cell的高度,从富文本算出来的
    @property (nonatomic, assign)CGFloat rowHeight;
CommentInfoModel2的自定义初始化方法如下,其中重要的部分是处理富文本和rowHeight。另外还处理了点赞人的富文本
-(instancetype)initWithDic:(NSDictionary *)dic{
    self = [super init];
    if (self) {
        self.commentId          = dic[@"commentId"];
        self.commentUserId      = dic[@"commentUserId"];
        self.commentUserName    = dic[@"commentUserName"];
        self.commentPhoto       = dic[@"commentPhoto"];
        self.commentText        = dic[@"commentText"];
        self.commentByUserId    = dic[@"commentByUserId"];
        self.commentByUserName  = dic[@"commentByUserName"];
        self.commentByPhoto     = dic[@"commentByPhoto"];
        self.createDateStr      = dic[@"createDateStr"];
        self.checkStatus        = dic[@"checkStatus"];
        //开始提前计算rowHeight和attributedText
        NSString *str  = nil;
        if (![self.commentByUserName isEqualToString:@""]) {
            str= [NSString stringWithFormat:@"%@回复%@:%@",
                  self.commentUserName, self.commentByUserName, self.commentText];
        }else{
            str= [NSString stringWithFormat:@"%@:%@",
                  self.commentUserName, self.commentText];
        }
        NSMutableAttributedString *text = [[NSMutableAttributedString alloc] initWithString:str];
        [text addAttribute:NSForegroundColorAttributeName
                     value:[UIColor orangeColor]
                     range:NSMakeRange(0, self.commentUserName.length)];
        [text addAttribute:NSForegroundColorAttributeName
                     value:[UIColor orangeColor]
                     range:NSMakeRange(self.commentUserName.length + 2, self.commentByUserName.length)];
        UIFont *font = [UIFont systemFontOfSize:13.0];
        [text addAttribute:NSFontAttributeName value:font range:NSMakeRange(0, str.length)];

        NSMutableParagraphStyle *style = [[NSMutableParagraphStyle alloc] init];
        if ([text.string isMoreThanOneLineWithSize:CGSizeMake(kScreenWidth - 2*kGAP-kAvatar_Size-10, CGFLOAT_MAX) font:font lineSpaceing:3.0]) {//margin
            style.lineSpacing = 3;
        }else{
            style.lineSpacing = CGFLOAT_MIN;
        }

        [text addAttribute:NSParagraphStyleAttributeName value:style range:NSMakeRange(0, text.string.length)];
        self.rowHeight = [text.string boundingRectWithSize:CGSizeMake(kScreenWidth - 2*kGAP-kAvatar_Size-10, CGFLOAT_MAX) font:font lineSpacing:3.0].height+0.5+3.0;//5.0为最后一行行间距
        self.attributedText = text;
    }
    return self;
}
model处理好了,就是处理tableView的属性和注册headerVie和注册cell了,代码在viewDidLoad中
self.tableView.separatorStyle = UITableViewCellSeparatorStyleNone;
    [self.tableView registerClass:NSClassFromString(@"WMTimeLineHeaderView") forHeaderFooterViewReuseIdentifier:@"WMTimeLineHeaderView"];
    [self registerCellWithClass:@"CommentCell2" tableView:self.tableView];
    [self registerCellWithNib:@"LikeUsersCell2" tableView:self.tableView];
有几个MessageInfoModel2就有几个headerView对应
有几个headerView就有几个section
-(NSInteger)numberOfSectionsInTableView:(UITableView *)tableView{
    return self.dataSource.count;
}
每个section下面对应有几条评论,就有几个CommentInfoModel2对应,有几个评论就有几个row或者说几个CommentCell
//显示评论的数据
-(NSInteger)tableView:(UITableView *)tableView numberOfRowsInSection:(NSInteger)section{
    MessageInfoModel1 *eachModel = self.dataSource[section];
    return eachModel.commentModelArray.count;
}
//坐享其成的时候到了,因为处理json数据成为model的时候已经计算了每个section对应的headerView的高度了,存在MessageInfoModel2里面的headerHeight属性里面了,所以这里直接使用
-(CGFloat)tableView:(UITableView *)tableView heightForHeaderInSection:(NSInteger)section{
    MessageInfoModel2 *eachModel = self.dataSource[section];
    return eachModel.headerHeight;
}
//这里是复用WMTimeLineHeaderView的头视图的方法,并且把每个section对应的model传递给headerView。传递给headerView之后,headerView拿到数据就知道自己应该显示谁的头像和谁发布的图片和说说文字了。
-(UIView *)tableView:(UITableView *)tableView viewForHeaderInSection:(NSInteger)section{
    WMTimeLineHeaderView *headerView = (WMTimeLineHeaderView *)[tableView dequeueReusableHeaderFooterViewWithIdentifier:@"WMTimeLineHeaderView"];
    MessageInfoModel2 *eachModel = self.dataSource[section];
    headerView.model = eachModel;
    return headerView;
}
//这里是配置要显示或者说要返回什么cell的,这里判断一下有没有评论数据,如果有就返回点赞LikeUsersCell2这个类型的cell,如果没有就返回评论CommentCell2这个类型的cell,并且把CommentInfoModel2评论数据model传递给评论cell。这样评论cell就可以知道自己显示什么类型的富文本了。
-(UITableViewCell *)tableView:(UITableView *)tableView cellForRowAtIndexPath:(NSIndexPath *)indexPath{
    MessageInfoModel2 *eachModel = self.dataSource[indexPath.section];
    CommentInfoModel2  *commentModel =  eachModel.commentModelArray[indexPath.row];
    if (commentModel.likeUsersArray.count) {
        LikeUsersCell2 *likeUsersCell = (LikeUsersCell2 *)[tableView dequeueReusableCellWithIdentifier:@"LikeUsersCell2"];
        likeUsersCell.model = commentModel;
        return likeUsersCell;
    }else{
        CommentCell2 *cell2 = (CommentCell2 *)[tableView dequeueReusableCellWithIdentifier:@"CommentCell2"];
        cell2.model = commentModel;
        return cell2;
    }
}
下面接着看CommentCell2如何显示传递过来的CommentInfoModel2的数据的。
@interface CommentCell2 : UITableViewCell
@property(nonatomic,strong)CommentInfoModel2 *model;
@end
.m中的setModel方法,把事先计算好的富文本显示在lable上就OK了。
-(void)setModel:(CommentInfoModel2 *)model{
        self.contentLabel.attributedText = model.attributedText;
}
但是cell的宽度默认是占据整个屏幕宽度的,UI或者上面的效果图上,cell左边是有缩进的,也就是空了一段空白的距离,整个我们这样巧妙的处理一下。
#pragma mark
#pragma mark cell左边缩进64,右边缩进10
-(void)setFrame:(CGRect)frame{
    CGFloat leftSpace = 2*kGAP+kAvatar_Size;
    frame.origin.x = leftSpace;
    frame.size.width = kScreenWidth - leftSpace -10;
    [super setFrame:frame];
}
好了,到此77行的朋友圈2模式已经介绍完了,是不是很简单啊,当然运行后的效果也是很赞的,滑动基本60FPS。后续还有继续更新,添加键盘和评论时候的键盘定位等等,性能优化这块还是有比较长的路要走,比如大家熟悉的切圆角、离屏渲染,cell中播放视频卡顿等等问题。
最后列举一些性能优化点供大家参考。
1、cell复用机制+sectionView复用机制(已经完成)
2、将cell的高度和cell里控件的frame存在model里(已经完成)
3、减少cell内部控件的层级,层级不易太深(已经完成)
4、缩略图和大图URL(拿起大刀让后台兄弟去完成,因为后台不提供缩略图功能,朋友圈很容易内存警告)
5、图片圆角cornerRadius,缓存圆角等等(未完成)
6、高度缓存(cell评论区高度+section区头高度)(完成)
7、异步加载渲染(图片+文本+view)(利用SDWebImage异步下载图片,文本和view没完成异步处理)


