十、Linux下的网络环境部署
文章目录
- 十、Linux下的网络环境部署
- 10.1 IP
- 10.1.1 IP基本概念
- 10.1.2 关于IP的基本命令
- 10.1.3 更改IP地址
- 10.1.3.1 图形方式
- 10.1.3.2 命令方式
- 10.1.3.3 文件方式
- 文件方式添加dhcp
- 文件方式配置静态网络
- 10.2 dhcp服务器的搭建【实现rhel8给rhel7分配IP地址】
- 10.3 网关
- 10.3.1 网关设定
- 10.3.1.1 命令方式-临时网关
- 10.3.1.2 文件方式-永久网关
- 文件方式修改系统全局网关
- 文件方式修改网卡设定网关
- 10.3.2 路由器-【实现不同网络位通信】
- 10.4 dns-域名系统【了解dns】
- 10.5 网桥设定
- 10.5.1文件方式网桥设定
- 10.5.2 图形方式
十、Linux下的网络环境部署
10.1 IP
10.1.1 IP基本概念
- IP全称:Internet Protocol
- 协议名称:tcp/ip
- 协议版本:ipv4
- IP地址:32位二进制数
- 11111111.11111111.11111111.11111111 = 255.255.255.255
- 123.123.123.23 /24=123.123.123.23/255.255.255.0
- 其中123.123.123 为网络位
- 最后一组数字【23】为主机位
- 其中255.255.255.0 叫做子网掩码
- 两台机子有着相同网络位不主机位的IP才可以进行通信
- 例如:123.123.123.23/24 和123.123.123.67/24可以通信
- 例如 123.123.123.23/24和234.234.234.34/24 不可以通信
10.1.2 关于IP的基本命令
| 命令 | 效果 |
|---|---|
| ip addr show | ifconfig | 查看IP地址 |
| ip addr show | 查看IP |
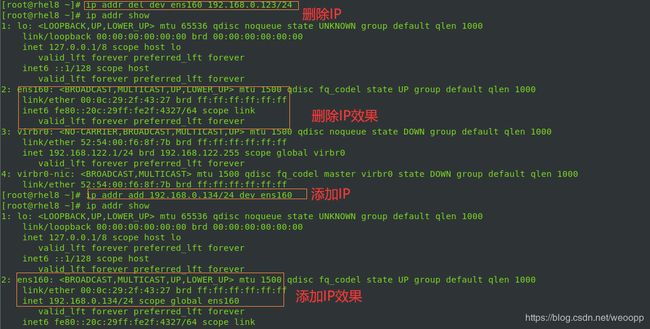
| ip addr del dev [device] xxx.xxx.xxx.xxx/24 | 删除IP |
| ip addr add xxx.xxx.xxx.xxx/24 dev [device | 添加IP |
| ifconfig [device] xxx.xxx.xxx.xxx netmask 255.255.255.0 | 查看此网卡的某IP |
| ping xxx.xxx.xxx.xxx/www.xxxxx.com | 检测网络通畅 |
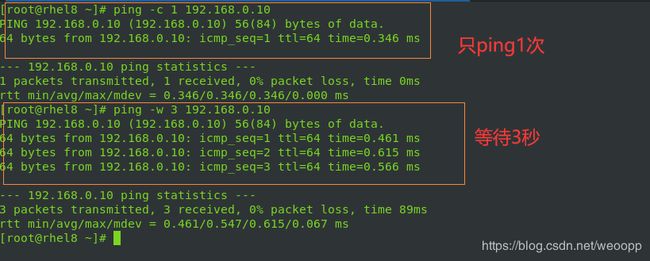
| ping -c 1 xxx.xxx.xxx.xxx/www.xxx.com | 只ping一次 |
| ping -w 1 xxx.xxx.xxx.xxx/www.xxx.com | 只等待一秒 |
- 例子1 -查看IP地址
[root@localhost Desktop]$ ip addr show | ifconfig
- 例子2 检测网络通畅
[root@localhost Desktop]$ ping -c 1 192.168.0.10
[root@localhost Desktop]$ ping -w 3 192.168.0.10
- 例子3 增加/删除IP
[root@localhost Desktop]$ ip addr del ens160 192.168.0.123/24  #删除IP
[root@localhost Desktop]$ ip addr add 192.168.0.100/24 del ens160  #增加IP
10.1.3 更改IP地址
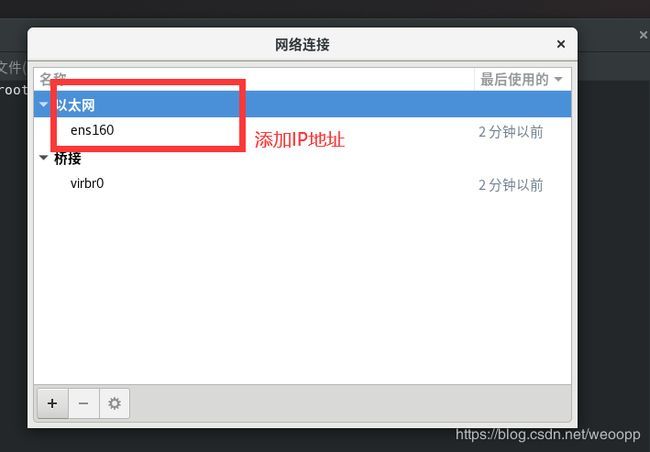
10.1.3.1 图形方式
- 第一种
[root@localhost Desktop]$ nm-connection-editor #打开图形来增加IP地址
- 第二种
[root@localhost Desktop]$ nmtui
10.1.3.2 命令方式
| 命令 | 效果 |
|---|---|
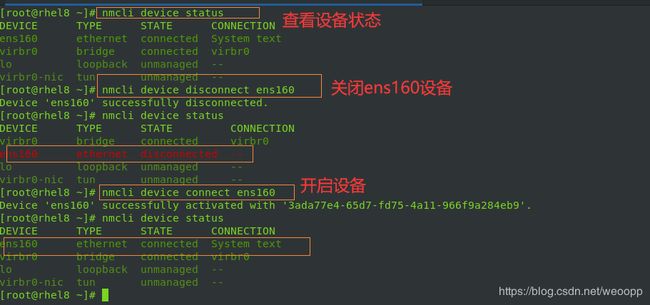
| nmcli device status | 查看设备状态 |
| nmcli device disconnect xxxx | 关闭设备 |
| nmcli device connect xxxx | 开始设备 |
| nmcli connection show | 查看网卡信息 |
| nmcli connection down xxxx | 关闭网卡信息 |
| nmcli connection up xxxx | 开启网卡信息 |
| nmcli connection delete xxxx | 删除连接 |
| nmcli connection modify xxxx ip4 xxx.xxx.xxx.xxx/24 | 添加IP,后需重启连接才能生效 |
| nmcli connection add con-name xxx ifname ens33 type ethernet ip4 xxx.xxx.xxx.xxx/24 | 添加连接 |
| nmcli connection add con-name xxxx ifname ens33 type ethernet ipv4.method auto | 添加dhcp网络 |
- 例子1查看/关闭/开启设备
[root@localhost Desktop]$ nmcli device status  #查看设备状态
[root@localhost Desktop]$ nmcli device disconnect ens160   #关闭设备
[root@localhost Desktop]$ nmcli device connect ens160 #开启设备
- 例子2 查看/关闭/打开连接
[root@localhost Desktop]$ nmcli connection show  #查看网卡连接信息
[root@localhost Desktop]$ nmcli connection down text #关闭某连接
[root@localhost Desktop]$ nmcli conneection up text #打开某链接
10.1.3.3 文件方式
文件方式添加dhcp
- 配置目录:/etc/sysconfig/network-scripts
- 配置文件:ifcfg-ensxx
(1)进入配置文件并修改
[root@localhost Desktop]$ vim //etc/sysconfig/network-scripts/ifcfg-ens160 #修改配置文件如下
DEVICE=ens160 #网卡名称
ONBOOT=yes #网络服务启动网卡激活
BOOTPROTO=dhcp #网卡工作模式为dhcp
NAME=text #连接名称
(2)重启网络
- 在rhel7 中重启
[root@localhost Desktop]$ systemctl restart network
- 在rhel8 中重启
[root@localhost Desktop]$ systemctl restart NetworkManager
[root@localhost Desktop]$ nmcli connection down  旧的连接
[root@localhost Desktop]$ nmcli connection up 新的连接
(3)总结
文件方式配置静态网络
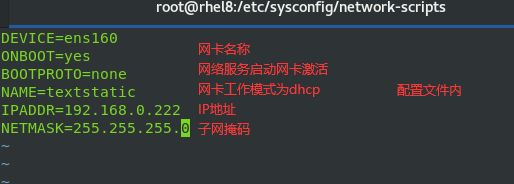
- 配置目录:/etc/sysconfig/network-scripts
- 配置文件:ifcfg-ensxx
(1)进入配置文件并修改
[root@localhost Desktop]$ vim //etc/sysconfig/network-scripts/ifcfg-ens160 #修改配置文件如下
DEVICE=ens160 #网卡名称
ONBOOT=yes #网络服务启动网卡激活
BOOTPROTO=none #网卡工作模式为dhcp
NAME=text #连接名称
IPADDR=xxx.xxx.xxx.xxx #ip地址
NETMASK=255.255.255.0 #子网掩码
其中none可以用static替换
(2)重启网络
- 在rhel7 中重启
[root@localhost Desktop]$ systemctl restart network
- 在rhel8 中重启
[root@localhost Desktop]$ systemctl restart NetworkManager
[root@localhost Desktop]$ nmcli connection down  旧的连接
[root@localhost Desktop]$ nmcli connection up 新的连接
总结
10.2 dhcp服务器的搭建【实现rhel8给rhel7分配IP地址】
- 两台主机rhel7和rhel8
- 实现rhel8给rhel7分配IP地址
(1)在rhel8中配置静态网络


(2)在rhel8中把镜像接入光驱

(3)在rhel8中安装dhcp

(4)在rhel8中配置dhcp文件并重启dhcpd服务
10.3 网关
- 路由器上和客户主机处在同一个网段的ip叫做客户主机的网关
10.3.1 网关设定
10.3.1.1 命令方式-临时网关
[root@localhost Desktop]$ route -n #查看网关
[root@localhost Desktop]$ ip route add default via xxx.xxx.xxx.xxx #添加默认网关
[root@localhost Desktop]$ ip route del default via xxx.xxx.xxx.xxx #删除默认网关
10.3.1.2 文件方式-永久网关
文件方式修改系统全局网关
- rhel7 中配置全局网关
[root@localhost Desktop]$ vim /etc/sysconfig/network #进入配置文件
GATEWAY=xxx.xxx.xxx.xxx # 在文件中加上这句 网关设定
[root@localhost Desktop]$ systemctl stop NetworkManager #停止网络服务
[root@localhost Desktop]$ systemctl restart network #重启网络
[root@localhost Desktop]$ systemctl start NetworkManager#开启网络服务
- 在rhel8中配置全局网关
[root@localhost Desktop]$ vim /etc/sysconfig/network #进入配置文件
GATEWAY=xxx.xxx.xxx.xxx # 在文件中加上这句 网关设定
[root@localhost Desktop]$ systemctl restart NetworkManager #重启网络服务
[root@localhost Desktop]$ nmcli connection down 链接名称 #停止连接
[root@localhost Desktop]$ nmcli connection up 链接名称  #开启连接
文件方式修改网卡设定网关
- 在rhel7中设定网关
[root@localhost Desktop]$ vim /etc/sysconfig/network-scripts/ifcfg-ens-xxxx #进入配置文件修改配置文件如下
DEVICE=ens160
ONBOOT=yes
BOOTPROTO=none
IPADDR=xxx.xxx.xxx.xxx
NETMASK=255.255.255.0
GATEWAY=xxx.xxx.xxx.xxx ##网关
[root@localhost Desktop]$ systemctl stop NetworkManager #停止网络服务
[root@localhost Desktop]$ systemctl restart network #重启网络
[root@localhost Desktop]$ systemctl start NetworkManager#开启网络服务
- 在rhel8中设定网关
[root@localhost Desktop]$ vim /etc/sysconfig/network-scripts/ifcfg-ens-xxxx #进入配置文件修改配置文件如下
DEVICE=ens160
ONBOOT=yes
BOOTPROTO=none
IPADDR=xxx.xxx.xxx.xxx
NETMASK=255.255.255.0
GATEWAY=xxx.xxx.xxx.xxx ##网关
[root@localhost Desktop]$ systemctl restart NetworkManager #重启网络服务
[root@localhost Desktop]$ nmcli connection down 链接名称 #停止连接
[root@localhost Desktop]$ nmcli connection up 链接名称  #开启连接
10.3.2 路由器-【实现不同网络位通信】
实验环境:三台主机
- A:rhel8 :123.123.123.11
- B:Windows :192.168.0.110
- C:rhel7 :路由器
网卡a:123.123.123.100
网卡b:192.168.0.100
(1)路由器设置【以下配置在rhel7中完成】
- 在rhel7中再添加一个网卡使得rhel变成双网卡主机

- 设定网卡a的静态IP地址【与rhel8同网段】

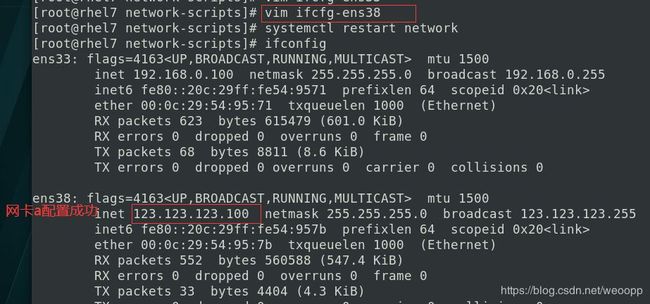
- 设定网卡b的静态IP地址【与windows同网段】


- 打开内核路由功能


- 打开地址伪装功能
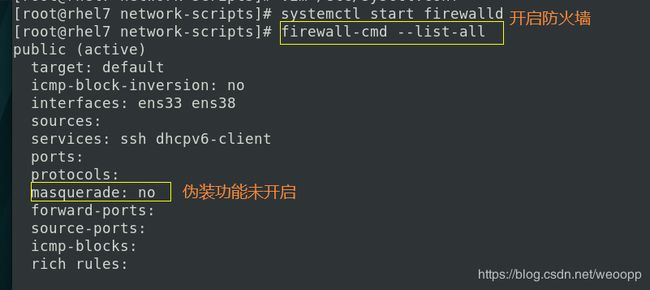
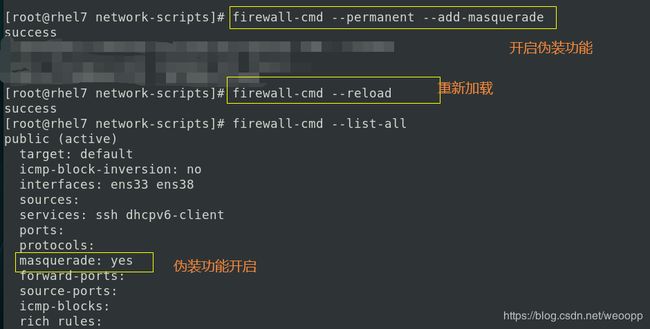
(2)在rhel8中设定网关 发现可以进行不同网络位地址通信

10.4 dns-域名系统【了解dns】
- 负责作域名转换成ip这个工作的主机叫做dns服务器(地址解析)
了解域名系统【dns】
实验环境:两个主机为同一网段
- rhel8 :192.168.0.123
- Windows:192.168.0.110
- 知道 www.baidu.com= 39.156.66.18
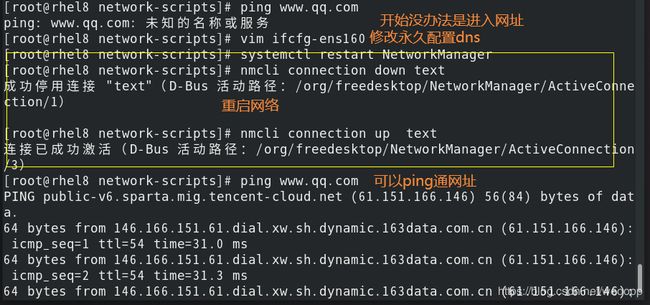
(1)当我们没有网卡设定没有dns时我们是只能ping通IP地址的

(2)要想ping通百度网址时,我们可以写入本地解析文件


(3)但是要ping通其他的网址又不行了,我们可以修改dns服务器只想文件来连接dns服务器来让它解析其他的网址【我们使用电信dns服务器,其网址为114.114.114.114】


(4)上面的方法只是临时连接dns服务器,要用就连接我们需要修改网卡配置文件

10.5 网桥设定
10.5.1文件方式网桥设定
(1)当我们要用虚拟系统管理器新建虚拟机时,在网络设定的时候是没有网桥选项的
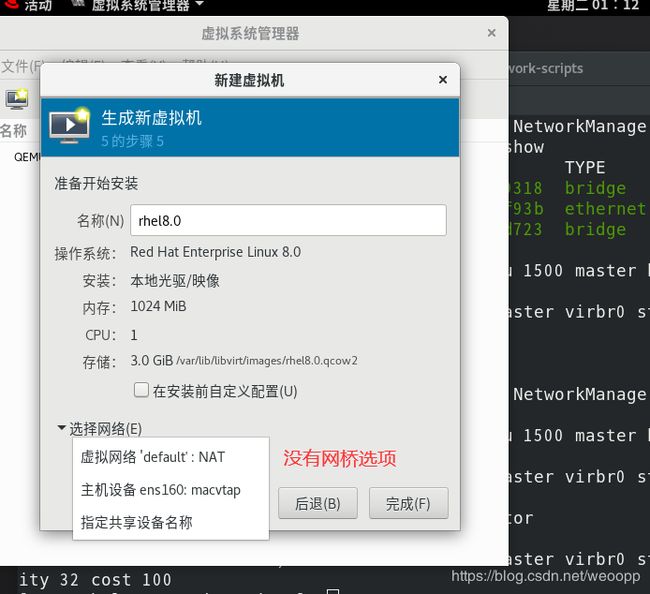
(2)以下我们来进行网桥设定
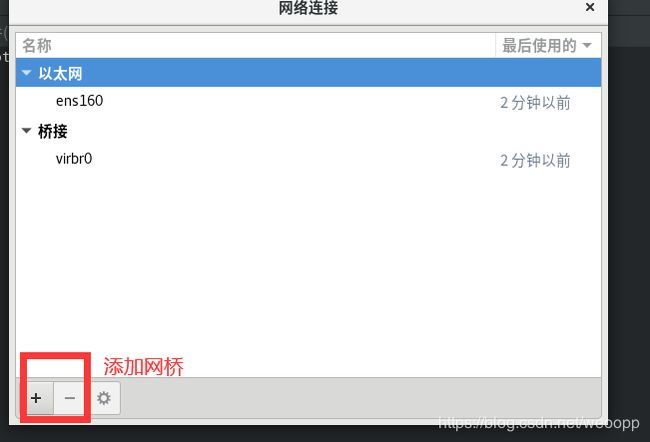
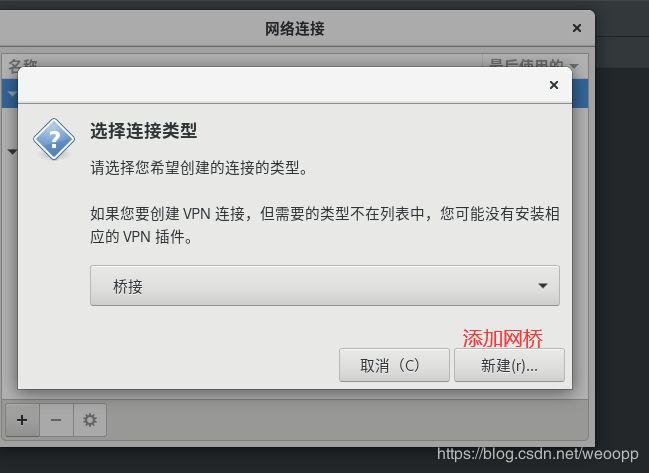
10.5.2 图形方式
[root@localhost Desktop]$ nm-connection-editor
[root@localhost Desktop]$ nmtui

