srping cloud stream rocketmq
项目地址
rockermq样例地址
spring cloud stream解决的痛点是什么
屏蔽了各种MQ的差异,统一了编程模型(可以类比成基于MQ通信圈的”Spring Data”)
前提rocketmq已启动
第一步
导入spring cloud的依赖 决定使用哪个版本
    org.springframework.cloud
    spring-cloud-dependencies
    Finchley.SR2
    pom
第二步
引入 spring cloud stream的依赖
			org.springframework.cloud
			spring-cloud-stream
			2.1.0.RELEASE
第三步
加入 spring cloud rocketmq 的依赖
			org.springframework.cloud
			spring-cloud-stream-binder-rocketmq
			0.2.1.RELEASE
至此 基础操作就完成了
然后修改application为yml 开始编写测试用例
rocketmq对spring cloud stream 实现的步骤

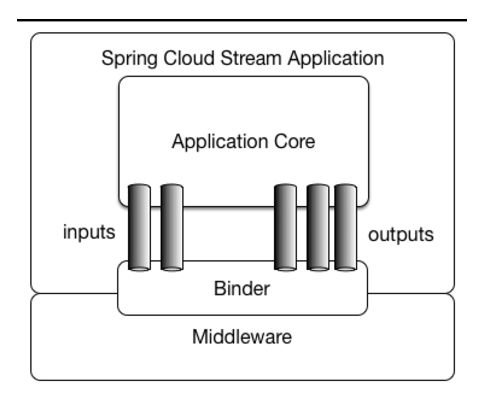
使用spring cloud stream 主要是使用binder跟binding

看图可知 ,通过binder绑定消息中间件, 通过input跟output两个通道进行消息的接收跟发送
binder表示绑定具体哪一个消息中间件
Binding: 包括 Input Binding 和 Output Binding。 Binding 在消息中间件与应用程序提供的
Provider 和 Consumer 之间提供了一个桥梁,实现了开发者只需使用应用程序的 Provider 或 Consumer
生产或消费数据即可,屏蔽了开发者与底层消息中间件的接触。
我们会用到@input 跟@output两个注解
@input表示消费者通道(订阅)
@output是生产者通道(生产消息)
注解配置rocketmq的地址
因为 stream可以接入多个消息中间件 可以设置默认 中间件
yml配置
设置input output 这里的名字可以自己定义 需要跟注解定义的对应起来
spring:
  cloud:
    stream:
      rocketmq:
        binder:
          namesrv-addr: 127.0.0.1:9876
# 定义name为output的binding
      bindings:
        output1:
          destination: test-topic
          content-type: application/json
# 定义name为input的binding
        input1:
          destination: test-topic
          content-type: application/json
          group: test-group
server:
  port: 1000
binding跟rocketmq同级
自定义output input 原本又source.class跟sink.class定义了 这里我们自定义尝试下
public interface StreamClient {

    @Input("input1")
    SubscribableChannel input1();

    @Output("output1")
    MessageChannel output1();
}
这里假使你@input 注解跟@output注解 引号内字符串一致,就会报无效的错误
编写接收者
@Component
@EnableBinding(StreamClient.class)
@Slf4j
public class MQReciver {

    @StreamListener("input1")
    public void test(String message){
        log.info(message);
    }
}
编写消息发送者 这列我们通过controller 调用
@RestController
@RequestMapping("test")
public class MQRest {

    @Autowired
    StreamClient streamClient;

    @GetMapping("mq")
    public void test(){
        String now = "now" + new Date();
        streamClient.output1().send(MessageBuilder.withPayload(now).build());
    }
}
到此 你启动 应用后 调用接口 就会 收到发送的消息了