【代码阅读】PointRCNN网络可视化,代码详解
目录
- 数据准备
- 统计gt_box
- dataset
- PointRCNN
- PointRCNN网络结构
- 训练过程
- 思考
数据准备
统计gt_box
作者使用generate_gt_database.py生成储存了数据集所有Car的gt box的信息的文件,包括每个gt box的:
- sample_id:gt box所对应的文件名
- cls_type:gt box的cls type
- gt_box3d:gt box的3D信息
- points:gt box中包含的点云
- intensity:gt box中包含的电云的强度
- obj:这个gt box对应object所有的信息,例如center,size,angle,occlusion,level等
dataset
首先定义kitti_dataset,定义通用接口,初始化data的寻找路径等
# lib/datasets/kitti_dataset.py
class KittiDataset(torch_data.Dataset):
    def __init__(self, root_dir, split='train'):
        self.split = split
        is_test = self.split == 'test'
        self.imageset_dir = os.path.join(root_dir, 'KITTI', 'object', 'testing' if is_test else 'training')

        split_dir = os.path.join(root_dir, 'KITTI', 'ImageSets', split + '.txt')
        self.image_idx_list = [x.strip() for x in open(split_dir).readlines()]
        self.num_sample = self.image_idx_list.__len__()

        self.image_dir = os.path.join(self.imageset_dir, 'image_2')
        self.lidar_dir = os.path.join(self.imageset_dir, 'velodyne')
        self.calib_dir = os.path.join(self.imageset_dir, 'calib')
        self.label_dir = os.path.join(self.imageset_dir, 'label_2')
        self.plane_dir = os.path.join(self.imageset_dir, 'planes')

    def get_image(self, idx):

    def get_image_shape(self, idx):

    def get_lidar(self, idx):

    def get_calib(self, idx):

    def get_label(self, idx):

    def get_road_plane(self, idx):

    def __len__(self):

    def __getitem__(self, item):
然后定义PointRCNN特殊的dataset,主要是完成提取数据,数据增广等操作。这里主要看准备用于训练rpn的数据。其实代码中的注释已经写的非常好了,这里就直接写一下都做了些什么:
- 读取calib,image_shape,pts
# lib/datasets/kitti_rcnn_dataset.py
    def get_rpn_sample(self, index):
        sample_id = int(self.sample_id_list[index])
        if sample_id < 10000:
            calib = self.get_calib(sample_id)
            # img = self.get_image(sample_id)
            img_shape = self.get_image_shape(sample_id)
            pts_lidar = self.get_lidar(sample_id)

            # get valid point (projected points should be in image)
            # 将pts转换到cam0坐标系内
            pts_rect = calib.lidar_to_rect(pts_lidar[:, 0:3])
            pts_intensity = pts_lidar[:, 3]
        else:
            calib = self.get_calib(sample_id % 10000)
            # img = self.get_image(sample_id % 10000)
            img_shape = self.get_image_shape(sample_id % 10000)

            pts_file = os.path.join(self.aug_pts_dir, '%06d.bin' % sample_id)
            assert os.path.exists(pts_file), '%s' % pts_file
            aug_pts = np.fromfile(pts_file, dtype=np.float32).reshape(-1, 4)
            pts_rect, pts_intensity = aug_pts[:, 0:3], aug_pts[:, 3]

		# 将pts_rect投影到cam2的图像坐标系,pts_imgs为(u,v)坐标
        pts_img, pts_rect_depth = calib.rect_to_img(pts_rect)
        # 将pts_imgs在图像外的去掉,将pts_rect在给定边界外的去掉,得到保留点的flag。图像的外的点通过(u,v)不在图像内获得,pts_rect的点根据cfg获得,x∈[-40,40],y∈[-1,3],z∈[0,70.1]
        pts_valid_flag = self.get_valid_flag(pts_rect, pts_img, pts_rect_depth, img_shape)

        pts_rect = pts_rect[pts_valid_flag][:, 0:3]
        pts_intensity = pts_intensity[pts_valid_flag]

        if cfg.GT_AUG_ENABLED and self.mode == 'TRAIN':
            # all labels for checking overlapping
            # 去掉是‘DonotCare’的obj
            all_gt_obj_list = self.filtrate_dc_objects(self.get_label(sample_id))
            all_gt_boxes3d = kitti_utils.objs_to_boxes3d(all_gt_obj_list)  # Nx7 (x,y,z,h,w,l,ry)

            gt_aug_flag = False
            if np.random.rand() < cfg.GT_AUG_APPLY_PROB:
                # augment one scene
                # 添加其他场景中的obj到这个场景。
                # gt_aug_flag是True代表加入了新的obj
                # pts_rect, pts_intensity都是加入了新的点之后的点云和强度(if gt_aug_flag)
                # extra_gt_boxes3d, extra_gt_obj_list是新加入的(if gt_aug_flag)
                gt_aug_flag, pts_rect, pts_intensity, extra_gt_boxes3d, extra_gt_obj_list = \
                    self.apply_gt_aug_to_one_scene(sample_id, pts_rect, pts_intensity, all_gt_boxes3d)

        # generate inputs
        # 将点降采样或者补充成16384个
        if self.mode == 'TRAIN' or self.random_select:
            if self.npoints < len(pts_rect):
                pts_depth = pts_rect[:, 2]
                pts_near_flag = pts_depth < 40.0
                far_idxs_choice = np.where(pts_near_flag == 0)[0]
                near_idxs = np.where(pts_near_flag == 1)[0]
                near_idxs_choice = np.random.choice(near_idxs, self.npoints - len(far_idxs_choice), replace=False)

                choice = np.concatenate((near_idxs_choice, far_idxs_choice), axis=0) \
                    if len(far_idxs_choice) > 0 else near_idxs_choice
                np.random.shuffle(choice)
            else:
                choice = np.arange(0, len(pts_rect), dtype=np.int32)
                if self.npoints > len(pts_rect):
                    extra_choice = np.random.choice(choice, self.npoints - len(pts_rect), replace=False)
                    choice = np.concatenate((choice, extra_choice), axis=0)
                np.random.shuffle(choice)

            ret_pts_rect = pts_rect[choice, :]
            ret_pts_intensity = pts_intensity[choice] - 0.5  # translate intensity to [-0.5, 0.5]
        else:
            ret_pts_rect = pts_rect
            ret_pts_intensity = pts_intensity - 0.5

        pts_features = [ret_pts_intensity.reshape(-1, 1)]
        ret_pts_features = np.concatenate(pts_features, axis=1) if pts_features.__len__() > 1 else pts_features[0]

        sample_info = {'sample_id': sample_id, 'random_select': self.random_select}

        if self.mode == 'TEST':
            if cfg.RPN.USE_INTENSITY:
                pts_input = np.concatenate((ret_pts_rect, ret_pts_features), axis=1)  # (N, C)
            else:
                pts_input = ret_pts_rect
            sample_info['pts_input'] = pts_input
            sample_info['pts_rect'] = ret_pts_rect
            sample_info['pts_features'] = ret_pts_features
            return sample_info

        gt_obj_list = self.filtrate_objects(self.get_label(sample_id))
        if cfg.GT_AUG_ENABLED and self.mode == 'TRAIN' and gt_aug_flag:
            gt_obj_list.extend(extra_gt_obj_list)
        gt_boxes3d = kitti_utils.objs_to_boxes3d(gt_obj_list)

        gt_alpha = np.zeros((gt_obj_list.__len__()), dtype=np.float32)
        for k, obj in enumerate(gt_obj_list):
            gt_alpha[k] = obj.alpha

        # data augmentation
        aug_pts_rect = ret_pts_rect.copy()
        aug_gt_boxes3d = gt_boxes3d.copy()
        if cfg.AUG_DATA and self.mode == 'TRAIN':
        	# rotation,scale,flip
            aug_pts_rect, aug_gt_boxes3d, aug_method = self.data_augmentation(aug_pts_rect, aug_gt_boxes3d, gt_alpha,
                                                                              sample_id)
            sample_info['aug_method'] = aug_method

        # prepare input
        if cfg.RPN.USE_INTENSITY:
            pts_input = np.concatenate((aug_pts_rect, ret_pts_features), axis=1)  # (N, C)
        else:
            pts_input = aug_pts_rect

        if cfg.RPN.FIXED:
            sample_info['pts_input'] = pts_input
            sample_info['pts_rect'] = aug_pts_rect
            sample_info['pts_features'] = ret_pts_features
            sample_info['gt_boxes3d'] = aug_gt_boxes3d
            return sample_info

        # generate training labels
        rpn_cls_label, rpn_reg_label = self.generate_rpn_training_labels(aug_pts_rect, aug_gt_boxes3d)
        sample_info['pts_input'] = pts_input
        sample_info['pts_rect'] = aug_pts_rect
        sample_info['pts_features'] = ret_pts_features
        sample_info['rpn_cls_label'] = rpn_cls_label
        sample_info['rpn_reg_label'] = rpn_reg_label
        sample_info['gt_boxes3d'] = aug_gt_boxes3d
        return sample_info
PointRCNN
PointRCNN是CVPR2019中3D目标检测的文章。3D目标检测是一个计算机视觉中比较新的任务,其他的文献综述可以参考我的另外一篇博客3D Object Detection 3D目标检测综述
该文章使用two-stage方式,利用PointNet++作为主干网络,先完成segmentation任务,判断每个三维点的label。对分为前景的每个点,使用feature生成框。然后对框进行roi crop,进行框的优化。该论文网络复杂,代码量巨大,真是佩服论文作者的代码功底,自愧不如。本文着重对网络结构的理解。代码来源是文章作者给出的代码,用的是pytorch,github传送门
接下来,我将先对运算过程进行可视化,然后再列出部分本篇论文我注意到的点。
PointRCNN网络结构
由于PointRCNN使用PointNet++作为主干网络,所以对PointNet++的具体网络结构不是很了解的同学可以参考我的另一篇博客PointNet++具体实现详解,其中也是着重对网络结构的理解。先看PointRCNN的网络结构的可视化:
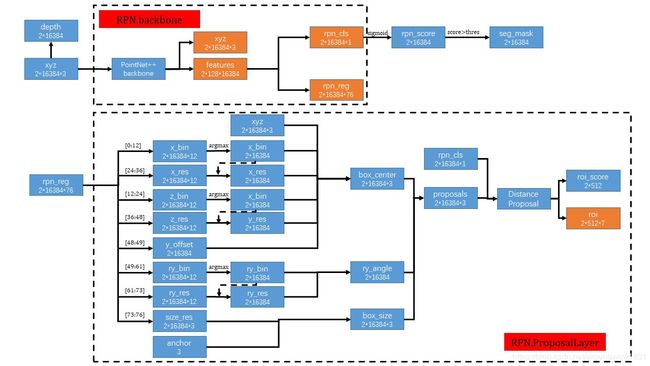


- 图的解释
- 虚线大框:一个虚线框代表一个完整的子网络,对应代码中的一个class
- 红色小框:每个子网络的名称
- 蓝色小块:大多数一个蓝色小块代表一个tensor,蓝色小框的第一行为tensor的名称,第二行为tensor的尺寸。少量未标注尺寸的为一个子网络
- 橘色小块:一个子网络的输出
- 箭头:一种操作,没有标的大部分为resize或者permutation操作,也有concatenate操作
- RPN
- RPN.BackBone
- 输入:点云(batch,number of points,number of channels)
- 输出:xyz,每个点的 feature,每个点的分类结果 rpn_cls,每个点对框的回归结果 rpn_reg
- 三维点云xyz经过主干网络得到point-wise的特征feature
- feature经过分类头和回归头得到point-wise的分类结果rpn_cls和回归结果rpn_reg,分类头和回归头由Conv1d组成
- cls_rpn经过sigmoid变换到[0, 1]之间,表示该点为车的score,score大于阈值thres的点被认为是属于车的点,从而构造seg_mask,用于构造RCNN的输入
- 通过每个点的三维信息xyz计算点距离原点的深度信息depth,用于RCNN的输入
- RPN.ProposalLayer
- 输入:rpn_reg,rpn_cls
- 输出:roi
- 将rpn_reg分解,并与三维点xyz和anchor计算proposals
- 使用Distance Proposal 减小proposal的数量。Distance Proposal:
- 用雷达点的y坐标以40为界分为两块区域,[0, 40] 和 [40, 80]
- 按照rpn_cls(代表是box的置信度)进行排序,[0, 40]的区域选取6300个框,[40, 80]选取2700个框
- 将框转为BEV,然后使用nms,两个区域分别选取前358和154个框(nms后如果框的数量少于这两个值就全部选取,用0补足到512个框)
- 输出每个batch的512个框roi
- RPN.BackBone
- RCNN
- RCNN.ProposalTargetLayer
- 输入:roi,gt_boxes,xyz,seg_mask,depth,feature
- 输出:采样过后的roi,roi_iou,对应的roi_gt_boxes,roi中包括的pts_sample和feature_sample,batch_cls_mask,reg_valid_mask
- 使用RoISample再次采样RoI,RoISample:
- 计算所有roi与真值之间的IoU,并按照IoU分为fg(前景),easy bg(简单背景)和 hard bg(困难背景),中sample数64个,fg最多32个,剩余的由bg补充,其中hard bg占比0.8。
- 然后对roi做augmentation,更新roi和对应的IoU
- 将xyz,seg_mask,depth和feature进行concatenate,得到pts_feature
- 对pts_feature进行RoIPooling,每个RoI中取512个点,得到pooled_feature,并得到不包含点的RoI的flag
- 将pooled_feature中的坐标和feature分离,然后做roi的augmentation,并将坐标系转到roi中心,更新roi中点的三维坐标和gt_box的坐标
- 计算batch_cls_mask,reg_valid_mask用于计算loss,batch_cls_mask统计roi不为hard bg且其中包含点的mask,作为cls_label在计算loss中使用;reg_valid_mask统计roi属于fg的mask
- pts_sample和feature_sample重组,提取直接由三维点云获得的信息xyz_feature(包括xyz,seg_mask和depth),然后使用xyz_up_layer进行特征提取,与rpn得到的feature进行concatenate,然后使用merged_down_layer进行merge,得到merged_feature
- 将merged_feature送入3个PointNet++中提出的SA层中,得到高级特征
- 然后使用分类头和回归头进行预测
- RCNN.ProposalTargetLayer
训练过程
PointRCNN是two-stage结构的网络,所以训练过程也是先训练RPN,再训练RCNN。
- RPN
- label:在通过dataloader构建训练数据的同时,构建label
- cls_label:将gt_box内的点置1,gt_box之外extended_gt_box之内的点置-1(表示忽略)
- reg_label:计算gt_box之内的点的reg量
- loss:SigmoidFocalLoss + Full-bin Loss(CrossEntropyLoss + SmoothL1Loss)
- label:在通过dataloader构建训练数据的同时,构建label
- RCNN
- label:
- cls_label:在RCNN.ProposalTargetLayer中的batch_cls_mask为label
- reg_label:使用RCNN.ProposalTargetLayer中的roi_gt_boxes计算
- loss:SigmoidFocalLoss + Full-bin Loss(CrossEntropyLoss + SmoothL1Loss)
- label:
思考
- 文章使用two-stage的方法,在proposal的过程中,每个个三维点都回归一个proposal,使得理论上所有的box都能够被找到
- 文章使用bin based回归方式,而且是在所有回归的地方都使用bin based的方式,提高了网络的收敛速度和准确率。
- 文章使用PointNet++作为主干框架,使得不需要在体素化阶段损失信息
- 其他3D物体检测的文章可以参考我的另一篇博客另外一篇博客3D Object Detection 3D目标检测综述