centos7 图形化安装oracle11g
1.环境准备
1.1.安装XWindow
[root@bgs-8p114-maxin ~]# yum groupinstall "X Window System"1.2.安装源码包和依赖包
yum -y install  binutils-* \
compat-libstdc++-* \
compat-libcap1-* \
elfutils-libelf-* \
elfutils-libelf-devel-* \
gcc* \
gcc-c++-* \
glibc* \
glibc-common-* \
glibc-devel-* \
glibc-headers-* \
ksh-* \
libaio-* \
libaio-devel-* \
libgcc-* \
libstdc++-* \
libstdc++-devel* \
make-* \
sysstat-* \
unixODBC-* \
unixODBC-devel-* \
numactl-devel-* \
pdksh-* \     ****
kernel-headers* \
wget \
yum -y install xsetroot xterm twm
yum -y install xclock
2.环境准备
2.1.设置内核参数
cp /etc/sysctl.conf /etc/sysctl.conf.bak
[root@bgs-8p114-maxin ~]# vi /etc/sysctl.conf
#修改以下两个参数
kernel.shmmax = 1054472192 #最大为物理内存一半
kernel.shmall = 2097152
#追加以下参数
fs.aio-max-nr = 1048576
fs.file-max = 6815744
kernel.shmmni = 4096
kernel.sem = 250 32000 100 128
net.ipv4.ip_local_port_range = 9000 65500 #
net.core.rmem_default = 262144
net.core.rmem_max = 4194304
net.core.wmem_default = 262144
net.core.wmem_max = 1048586
#使内核参数生效
[root@bgs-8p114-maxin ~]# sysctl -p
2.2.oracle安装步骤中check的时候要求要设置分区
[root@bgs-8p114-maxin database]# dd if=/dev/zero of=/home/swap bs=1G count=17
[root@bgs-8p114-maxin database]# mkswap /home/swap
mkswap: /home/swap: warning: don't erase bootbits sectors
        on whole disk. Use -f to force.
Setting up swapspace version 1, size = 17825788 KiB
no label, UUID=1f5c357d-9f2d-4c83-8529-45423d38af7a
[root@bgs-8p114-maxin database]# swapon /home/swap
[root@bgs-8p114-maxin database]# free -m
3.下载Oracle 11g R2 Linux版本
3.1.创建目录
[root@bgs-8p114-maxin ~]# mkdir -p /opt/data/database         #oracle数据库软件包解压目录
[root@bgs-8p114-maxin ~]# mkdir -p /opt/data/oracle           #oracle数据库安装目录
[root@bgs-8p114-maxin ~]# mkdir -p /opt/data/oraInventory     #oracle数据库配置文件目录
[root@bgs-8p114-maxin ~]# cd /opt/data/database
[root@bgs-8p114-maxin database]# wget http://mirror.baifendian.com/oracle/11g/linux.x64_11gR2_database_1of2.zip
[root@bgs-8p114-maxin database]# wget http://mirror.baifendian.com/oracle/11g/linux.x64_11gR2_database_2of2.zip
3.2.创建运行oracle数据库的系统用户和用户组
[root@bgs-8p114-maxin database]# groupadd oinstall #创建用户组oinstall
[root@bgs-8p114-maxin database]# groupadd dba      #创建用户组dba
[root@bgs-8p114-maxin database]# useradd -g oinstall -g dba -m oracle  #创建用户oracle,并加入oinstall和dba用户组
[root@bgs-8p114-maxin database]# passwd oracle     #设置用户oracle的登录密码,根据提示输入两次密码
[root@bgs-8p114-maxin database]# unzip linux.x64_11gR2_database_1of2.zip
[root@bgs-8p114-maxin database]# unzip linux.x64_11gR2_database_2of2.zip
[root@bgs-8p114-maxin database]# chown -R oracle:oinstall /opt/data/oracle   #设置目录所有者为oinstall用户组的oracle用户
[root@bgs-8p114-maxin database]# chown -R oracle:oinstall /opt/data/oraInventory
[root@bgs-8p114-maxin database]# chown -R oracle:oinstall opt/data/database
[root@bgs-8p114-maxin database]# cd /opt/data/database
3.3.限制oracle用户策略
#备份limits.conf 文件
[root@bgs-8p114-maxin database]# cp /etc/security/limits.conf /etc/security/limits.conf.bak

#修改 limits.conf 文件
[root@bgs-8p114-maxin database]# vi /etc/security/limits.conf
#(Linux PAM,插入式认证模块,用来限制用户的策略)
oracle soft nproc 2047
oracle hard nproc 16384
oracle soft nofile 1024
oracle hard nofile 65536

#备份login 文件
[root@bgs-8p114-maxin database]# cp /etc/pam.d/login /etc/pam.d/login.bak

#修改login 文件 修改 /etc/pam.d/login (limits.conf是pam_limits.so的配置文件,将上面的策略每次登录生效) 追加以下内容
[root@bgs-8p114-maxin database]# vi /etc/pam.d/login
session required /lib64/security/pam_limits.so
session required pam_limits.so
3.4.修改/etc/profile文件
[root@bgs-8p114-maxin database]# vi /etc/profile
#给/etc/profile追加以下内容
if [ $USER = "oracle" ] ; then
if [ $SHELL = "/bin/ksh" ]; then
ulimit -p 16384
ulimit -n 65536
else
ulimit -u 16384 -n 65536
fi
umask 022
fi

[root@bgs-8p114-maxin database]# source /etc/profile
3.5.修改操作系统标识符(oracle默认不支持CentosOS系统安装)
[root@bgs-8p114-maxin database]# vi /etc/redhat-release
把:CentOS release 6.8 (Final)
修改为:redhat-4
:wq! #保存退出
3.6.配置oracle用户环境变量
#修改 /home/oracle/.bashrc ,添加以下内容
[root@bgs-8p114-maxin database]# vim /home/oracle/.bashrc
# .bashrc

# Source global definitions
if [ -f /etc/bashrc ]; then
        . /etc/bashrc
fi

# Uncomment the following line if you don't like systemctl's auto-paging feature:
# export SYSTEMD_PAGER=

# User specific aliases and functions
PATH=$PATH:$HOME/.local/bin:$HOME/bin

export PATH

ORACLE_HOSTNAME=bgs-5p19-zhaochangyin     #注意这里的hostname的值换成部署的机器
export ORACLE_BASE=/opt/data/oracle
export ORACLE_HOME=$ORACLE_BASE/product/11.2.0/db_1
export ORACLE_SID=oracle
export ORACLE_TERM=xterm
export PATH=$ORACLE_HOME/bin:/usr/sbin:$PATH
export LD_LIBRARY_PATH=$ORACLE_HOME/lib:/lib:/usr/lib
export NLS_LANG=AMERICAN_AMERICA.UTF8


#让环境变量生效:
[root@bgs-8p114-maxin database]# source /home/oracle/.bashrc
4.安装
4.1.在windows中安装xmanager
到官网下载即可,http://www.netsarang.com/。下载完成按提示进行安装。
4.2.通过xmanager连接xshell并进行安装
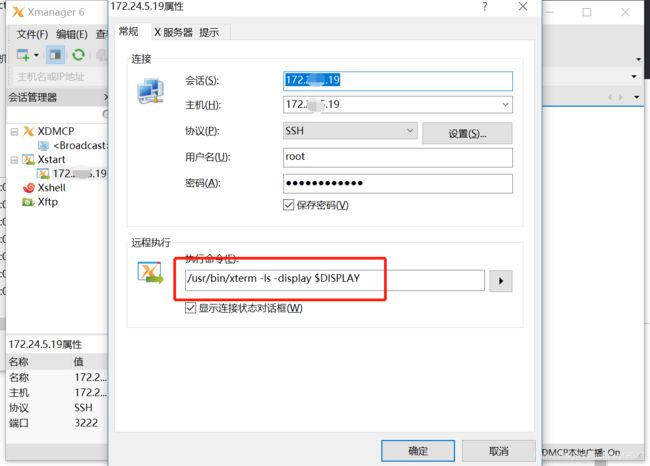
4.2.1.打开Xstart,如下图进行连接
其中,/usr/bin/xterm为服务器中xterm命令的路径。
连接成功之后,在窗口中输入如下命令,其中的ip为本机windows的ip,注意这里的ip。
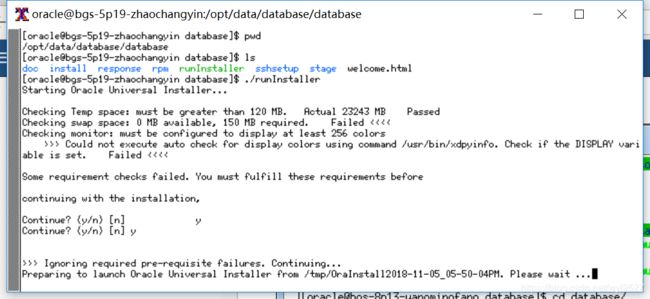
4.2.2.然后进入到oracle的解压路径,进行安装:
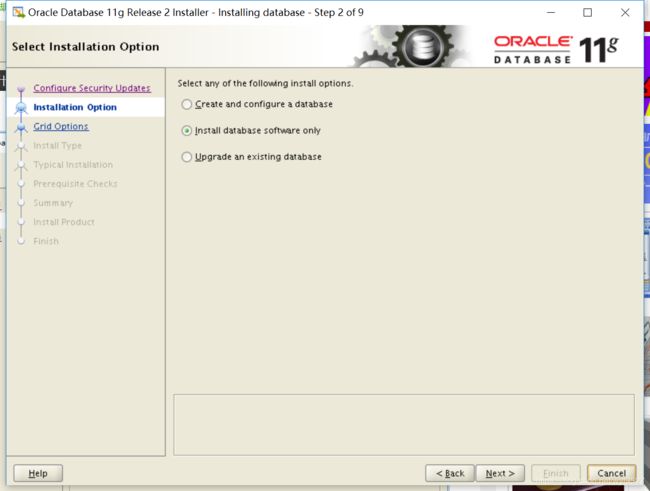
进入安装:
直接next
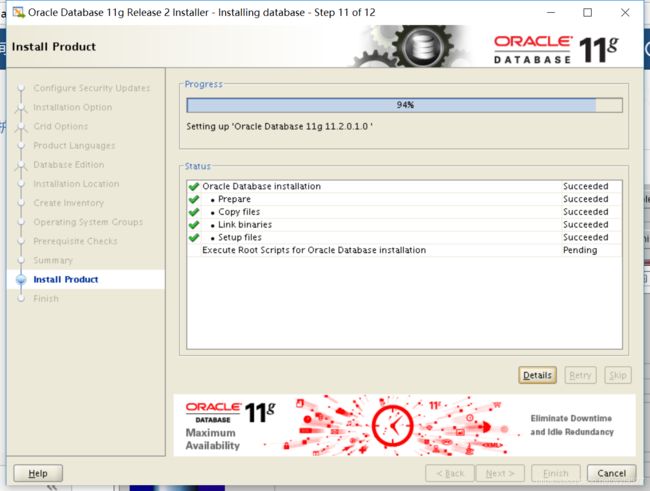
安装到这里时,需要到图中指定目录下执行脚本(root用户),执行完之后回到该安装页面点击ok。
至此,oracle安装完成。
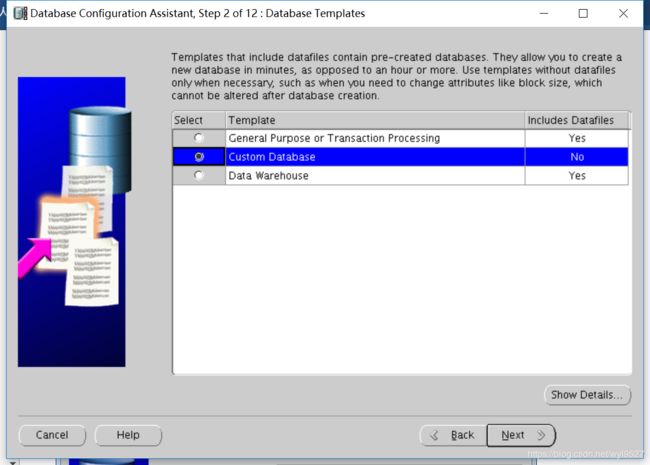
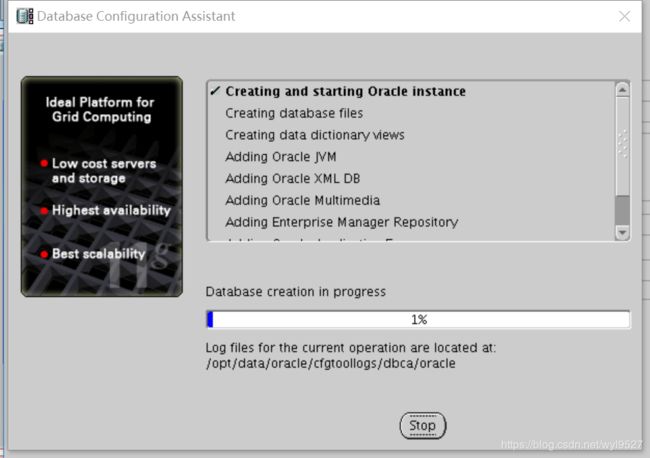
Xstart中输入dbca 进入图形化安装界面开始安装数据库 注:按图片步骤安装并注意提示即安装成功。
注意:前提是你已经配置了环境变量,前面配置的时候配置了,不过如果没有sorce一下,是不能生效的,所以没有找到的情况下,再source一下,或许切换用户的缘故导致没有找到,还有就是找到全路径下的dbca指令。
![]()
安装完后,表示oracle数据库安装成功。
用navicat远程连接,在连接前,创建用户和授权。
一、创建用户
oracle内部有两个建好的用户:system和sys。用户可直接登录到system用户以创建其他用户,因为system具有创建别 的用户的 权限。 在安装oracle时,用户或系统管理员首先可以为自己建立一个用户。
语法[创建用户]: create user 用户名 identified by 口令[即密码];
例子: create user test identified by test;
(2)授权命令
语法: grant connect, resource to 用户名;
例子: grant connect, resource to test;
