Alios-Thins教程连载 ④ 图文并茂教你使用乐鑫esp8266轻松连接阿里飞燕平台,个人设备实现轻松对接天猫精灵 。(下篇)(附带demo)
-
本系列博客学习由非官方人员 半颗心脏 潜心所力所写,仅仅做个人技术交流分享,不做任何商业用途。如有不对之处,请留言,本人及时更改。
-
1、 如何搭建阿里开源系统Alios-Things环境,烧录到乐鑫esp8266,打印 HelloWorld 。
-
2、 乐鑫esp8266如何在Alios-Things环境移植 gpio 驱动,点亮一盏LED。
-
3、 图文并茂教你使用乐鑫esp8266轻松连接阿里生活平台,个人设备实现轻松对接天猫精灵 。(上篇)
-
4、 图文并茂教你使用乐鑫esp8266轻松连接阿里生活平台,个人设备实现轻松对接天猫精灵 。(下篇)
-
文章目录
- 一、 前言;
- 二、 `linkkitapp`工程代码运行流程;
- 三、 `linkkit_example.c`代码简单分析;
- 四、 `linkkit_app.c`代码简单分析;
- 五、 如何集成天猫精灵控制;
- 六、 后记;
一、 前言;
- 这阿里生活平台系列的博文已经有一个多月没更新了,主要是边学边记录这开发笔记!没时间更新博文,大家谅解下,关注下本博客!有时间过来浏览下,每个月固定几篇干货分享给大家哈!告密下,本系列博文将有视频教学同步到阿里云大学物联网专题,不容错过哦!多谢支持!
- 上篇我已经介绍怎么在分支
1.3下面使用linkkitapp来连接阿里生活平台,主要概述就是云端新建产品,以及怎么配合测试版app来配网连接服务器!那么本篇博客,继续讲述linkkitapp的代码逻辑过程!
二、 linkkitapp工程代码运行流程;
Created with Raphaël 2.2.0 工程开始运行。 检查是否有保存了路由器账户和密码? 连接服务器,开始与服务器通讯交互数据。 开始走配网流程!(包括开始配网,配网确认!) yes no
- 上述我总结的流程图,很详细地说明了过程:
- 首先工程开始时候,会检查设备有没有保存了最近连接成功的路由器
AP热点的名字和密码,如果有连接记录,他会自动去连接这个路由器,一直直到连接成功!如果没有,会自动进去配网模式! - 一旦连接配网成功之后,就会自动连接路由器,同时本地还会发出
UDP广播包告诉局域网内的手机有新设备! - 配网过程的代码在
linkkit_example.c文件,包括配网开始,配网确认激活,以及网络监控连接成功触发函数! - 与服务器交互的代码在
linkkit_app.c文件,包括收到服务器下发数据触发,以及主动上报!
- 首先工程开始时候,会检查设备有没有保存了最近连接成功的路由器
三、 linkkit_example.c代码简单分析;
- 由于前面讲述的是
1.3分支的代码,那么这里依然教大家怎么看1.3分支的;入口函数是application_start()! 1.3分支的没有配网开始的回调,但是有连接路由器过程的回调,这点我感觉遗憾!下篇我会做下2.0分支的代码,敬请期待!- 因为流程需要用户手动确认配网,所以,我加个按键中断检测!我移植第二篇的博文代码过来,在中断回调这样写:
static void gpio_isr_handler()
{
    //for esp8266 ,need to disable interrupt
    hal_gpio_disable_irq(&input);
    printf("gpio_isr_handler() \n");
    do_awss_active();  //用户确认配网函数调用
    //delay 2s ,then enable interrupt
    aos_post_delayed_action(2000, gpio_enable_irq, NULL);
}
- 其他的也没啥好说了,这个
wifi_service_event()方法是回调路由器连接情况; - 核心调用还是
do_awss_active()是配网确认,而do_awss_reset()是再次进去配网模式!
四、 linkkit_app.c代码简单分析;
- 下面提到的
TSL模型,在上节并没有提到,它其实是一种数据模型,是为了便于与服务器通讯!具体的可以去官网文档自行浏览!当然了,我也会教大家怎么新建这个数据模型!
int linkkit_main()
{
    sample_context_t* sample_ctx = &g_sample_context;
    int execution_time = 0;
    int get_tsl_from_cloud = 0;

    execution_time = execution_time < 1 ? 1 : execution_time;
    LINKKIT_PRINTF("sample execution time: %d minutes\n", execution_time);
    LINKKIT_PRINTF("%s tsl from cloud\n", get_tsl_from_cloud == 0 ? "Not get" : "get"); //打印TSL自定义是从云端获取还是本地获取

    memset(sample_ctx, 0, sizeof(sample_context_t));
    sample_ctx->thing_enabled = 1;

    //开始linkkit任务,连接服务器
    linkkit_start(16, get_tsl_from_cloud, linkkit_loglevel_debug, &alinkops, linkkit_cloud_domain_sh, sample_ctx);
    //如果不是从云端设置获取tsl,那么从本地获取!
    if (!get_tsl_from_cloud) {
        linkkit_set_tsl(TSL_STRING, strlen(TSL_STRING));
    }
#ifdef SUBDEV_ENABLE  //是否定义了网关的子设备
    linkkit_subdev_init(&subdev_ops, &g_subdev_sample_context);
#endif
    aos_post_delayed_action(100, linkkit_action, sample_ctx);

    return 0;
}
- 自定义回调方法设置,下面函数中,我们看到在自定义了各种参数,包括方法,具体的什么含义,大家去官网文档看看,很详细的!
static linkkit_ops_t alinkops = {
    .on_connect         = on_connect,
    .on_disconnect      = on_disconnect,
    .raw_data_arrived   = raw_data_arrived,
    .thing_create       = thing_create,
    .thing_enable       = thing_enable,
    .thing_disable      = thing_disable,
    .thing_call_service = thing_call_service,
    .thing_prop_changed = thing_prop_changed,  //服务器下发属性修改时候出发
    .response_arrived   = on_response_arrived,
    .linkit_data_arrived = masterdev_linkit_data_arrived,
};
- 最重要的还是
thing_prop_changed()方法,其里面是服务器下发属性的时候,我们就在这里面做对应的动作设置!大家可以感兴趣地打印下这些参数是什么,只有自己亲身实践了,才会知道这里面是什么东西!下面的代码是我开源的一盏LED点亮的下发处理!
static int thing_prop_changed(const void* thing_id, const char* property, void* ctx)
{
    char *value_str = NULL;
    char property_buf[64] = {0};
    int response_id = -1;

    INFO("post property(%s) response id: %d ", property, response_id);

    if (strstr(property, "PowerSwitch") != 0)  //判断属性是否PowerSwitch
    {
        int PowerSwitch;
        /* generate property identifier HSVColor.Hue */
        snprintf(property_buf, sizeof(property_buf), "%s", property, "PowerSwitch");
        /* get value by linkkit_get_value */
        linkkit_get_value(linkkit_method_get_property_value, thing_id,  property_buf, &PowerSwitch, &value_str);

        if (PowerSwitch == 1)
        {
            hal_gpio_output_low(&trigger);  //低电平
        }
        else if (PowerSwitch == 0)
        {
            hal_gpio_output_high(&trigger); //高电平
        }

        if (value_str)
        {
            free(value_str);
            value_str = NULL;
        }

        INFO("property(%s), PowerSwitch:%d\n", property, PowerSwitch);
    }

    /* do user's process logical here. */
    linkkit_post_property(thing_id, property); //上报数据

    return 0;
}
- 最重要的一项,需要修改自己的
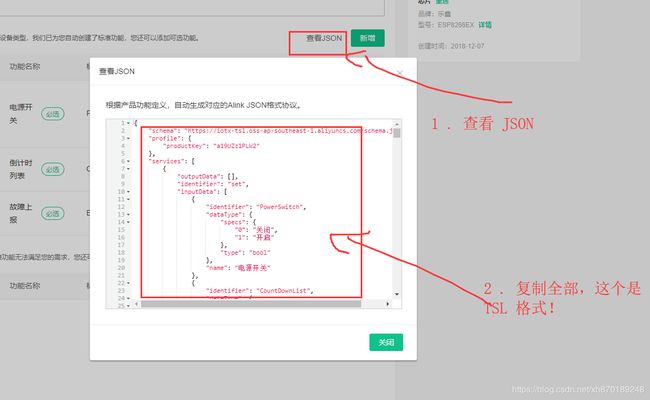
TSL模型,首先我们在我们的后台项目那里找到数据,复制他:
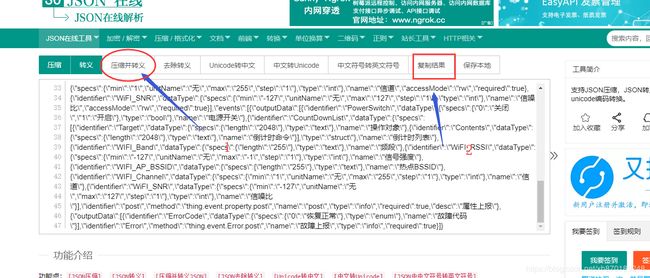
- 然后压缩转义这个数据格式,来这网址 https://www.sojson.com/yasuo.html ,意义在于添加在我们的文件中的大概第42行的代码的数组
TSL_STRING初始化覆盖就可以了!
五、 如何集成天猫精灵控制;
- 这个相信都是大家所期待的,呵呵!当你和
app交互成功后,你在天猫精灵APP上打开主页看到如下: - 你可以备注下这个设备,用方糖或者天猫精灵x1语音控制下!
六、 后记;
- 上篇讲到的配网时候,要自己弄二维码,其实可以去后台给予的二维码扫描配网!
另外,不要把我的博客作为学习标准,我的只是笔记,难有疏忽之处,如果有,请指出来,也欢迎留言哈!
- 玩转
esp8266带你飞、加群付费QQ群,不喜的朋友勿喷勿加:434878850 - 本博文对应硬件代码,针对
1.3分支和2.0分支, 详见readme.txt:https://github.com/xuhongv/StudyInEsp8266/tree/master/31_ESP8266_AliOS-Things - esp8266源代码学习汇总(持续更新,欢迎star):https://github.com/xuhongv/StudyInEsp8266
- esp32源代码学习汇总(持续更新,欢迎star):https://github.com/xuhongv/StudyInEsp32


