pve添加新硬盘---U盘安装Proxmox VE(二)
转自我的个人博客《pve添加新硬盘---U盘安装Proxmox VE(二)》
上一篇《U盘安装Proxmox VE(一)》制作好启动盘后,插入U盘,设置bios从U盘启动,开始安装pve。
一、安装设置
选择Install Proxmox VE后,不再报错no cdrom found,但是自检过后出现白屏,鼠标可以正常移动,鼠标右击有菜单,就是看不到agree选项,PVE版本是当前最新版6.1。怀疑是分辨率问题,尝试设置主板bios,更换显示屏,鼠标拖动页面均无法解决。
遂,放弃。更换pve版本为5.4.3,问题解决。接下来就是无脑的下一步,设置ip,root用户密码等等,记下来便可。
将其注释掉,改为:
//              if (data.status !== 'Active') {
                if(false){
                    Ext.Msg.show({
                        title: gettext('No valid subscription'),
                        icon: Ext.Msg.WARNING,
                        msg: Proxmox.Utils.getNoSubKeyHtml(data.url),
                        buttons: Ext.Msg.OK,
                        callback: function(btn) {
                            if (btn !== 'ok') {
                                return;
                            }
                            orig_cmd();
                        }
                    });
                } else {
                    orig_cmd();
                }
二、挂载硬盘
安装完成后,ssh到pve母鸡,手动挂载现有的两块硬盘(我的硬盘已经分好区,所以此处不再赘述linux下硬盘分区格式化等操作):
1、查看硬盘
命令:
fdisk -l
示例:
root@home:~# fdisk -l
Disk /dev/sda: 1.8 TiB, 2000398934016 bytes, 3907029168 sectors
Units: sectors of 1 * 512 = 512 bytes
Sector size (logical/physical): 512 bytes / 4096 bytes
I/O size (minimum/optimal): 4096 bytes / 4096 bytes
Disklabel type: dos
Disk identifier: 0xd0575bc9

Device     Boot Start        End    Sectors  Size Id Type
/dev/sda1        2048 3907029167 3907027120  1.8T 83 Linux


Disk /dev/sdb: 465.8 GiB, 500107862016 bytes, 976773168 sectors
Units: sectors of 1 * 512 = 512 bytes
Sector size (logical/physical): 512 bytes / 512 bytes
I/O size (minimum/optimal): 512 bytes / 512 bytes
Disklabel type: dos
Disk identifier: 0xbd5a704a

Device     Boot Start       End   Sectors   Size Id Type
/dev/sdb1        2048 976773167 976771120 465.8G 83 Linux


Disk /dev/sdc: 55.9 GiB, 60022480896 bytes, 117231408 sectors
Units: sectors of 1 * 512 = 512 bytes
Sector size (logical/physical): 512 bytes / 512 bytes
I/O size (minimum/optimal): 512 bytes / 512 bytes
Disklabel type: gpt
Disk identifier: 861EED41-47F8-4F19-B1F7-F2D9FB730757

Device       Start       End   Sectors  Size Type
/dev/sdc1       34      2047      2014 1007K BIOS boot
/dev/sdc2     2048   1050623   1048576  512M EFI System
/dev/sdc3  1050624 117231374 116180751 55.4G Linux LVM


Disk /dev/mapper/pve-swap: 6.9 GiB, 7381975040 bytes, 14417920 sectors
Units: sectors of 1 * 512 = 512 bytes
Sector size (logical/physical): 512 bytes / 512 bytes
I/O size (minimum/optimal): 512 bytes / 512 bytes


Disk /dev/mapper/pve-root: 13.8 GiB, 14763950080 bytes, 28835840 sectors
Units: sectors of 1 * 512 = 512 bytes
Sector size (logical/physical): 512 bytes / 512 bytes
I/O size (minimum/optimal): 512 bytes / 512 bytes
我的系统是安装在sdc这块硬盘下(dq77kb的msata弄了一块64G的ssd),需要挂载的是一块2tb和500gb的机械盘/dev/sda和/dev/sdb,这两块硬盘都是一个分区/dev/sda1和/dev/sdb1。
2、挂载硬盘
新建文件夹
mkdir /2tb
mkdir /500gb
挂载到目录
mount /dev/sda1 /2tb
mount /dev/sdb1 /500gb
3、永久挂载
上述挂载方式为一次性的,重启会失效。
3.1、查询硬盘分区uid
命令:
blkid
示例:
root@home:~# blkid
/dev/sda1: UUID="9268f19d-0fe8-4542-bc58-6e1f0627cdd3" TYPE="ext4" PARTUUID="d0575bc9-01"
/dev/sdb1: UUID="9cc9cdf4-fae0-4572-a367-daaf9f7ac153" TYPE="ext4" PARTUUID="bd5a704a-01"
/dev/sdc2: UUID="3717-2207" TYPE="vfat" PARTUUID="0f01a032-76f6-4c4c-9fab-0ca91c61e84f"
/dev/sdc3: UUID="wbxqay-x0GY-JleI-WwEt-KNHt-ZvhT-EgJ7yX" TYPE="LVM2_member" PARTUUID="0f8b4c8e-c87e-4705-9e6e-e251fce15ef0"
/dev/mapper/pve-swap: UUID="be43a684-b6a3-426c-a7e7-3219403637d2" TYPE="swap"
/dev/mapper/pve-root: UUID="b83eb1f3-2efc-44e2-a2b1-47a1429281ce" TYPE="ext4"
/dev/sdc1: PARTUUID="a31210f6-f1b6-445c-8c11-46fa0931bce4"
3.2、添加硬盘分区到/etc/fstab永久挂载
root@home:~# vi /etc/fstab
#
UUID=9268f19d-0fe8-4542-bc58-6e1f0627cdd3   /2tb   ext4    defaults 0 0
UUID=9cc9cdf4-fae0-4572-a367-daaf9f7ac153   /500gb   ext4    defaults 0 0
/dev/pve/root / ext4 errors=remount-ro 0 1
/dev/pve/swap none swap sw 0 0
proc /proc proc defaults 0 0
4、PVE管理页面添加存储
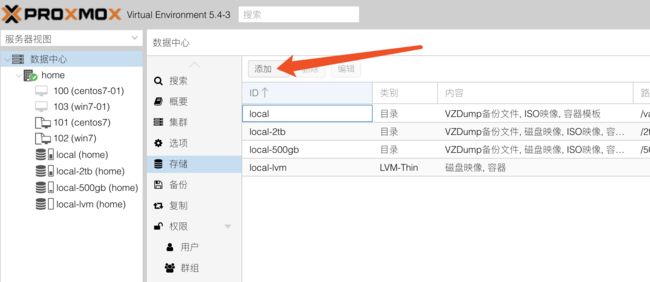
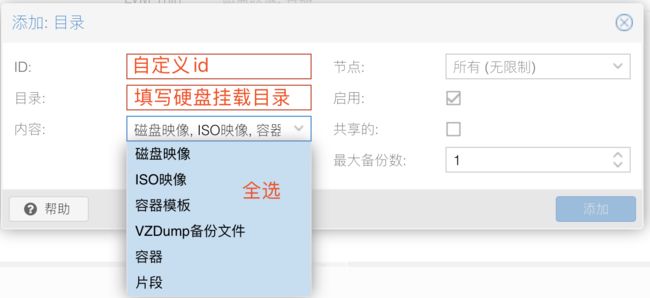
打开https://ip:8006进入管理页面,添加新硬盘。
步骤:数据中心->存储->添加->目录

三、去除令人讨厌的弹窗
vi /usr/share/javascript/proxmox-widget-toolkit/proxmoxlib.js
搜索:data.status !== 'Active'
              if (data.status !== 'Active') {
                    Ext.Msg.show({
                        title: gettext('No valid subscription'),
                        icon: Ext.Msg.WARNING,
                        msg: Proxmox.Utils.getNoSubKeyHtml(data.url),
                        buttons: Ext.Msg.OK,
                        callback: function(btn) {
                            if (btn !== 'ok') {
                                return;
                            }
                            orig_cmd();
                        }
                    });
                } else {
                    orig_cmd();
                }
将其注释掉,改为: