百度鹰眼集成遇到的坑
下面说一下集成步骤很全
1,使用cocoapods导入百度地图的基础的SDK: pod ‘BaiduMapKit’
2,登录百度地图开放平台,找到iOS的鹰眼轨迹的SDK,下载,然后把BaiduTraceSDK.framework导入工程(选择工程->General ,把SDK拖到Embedded Baniaries)

3,设置头文件路径(选择刚刚导入的SDK,Show in Finder,选择工程->Build Settings ,搜索框输入search,找到Header Serach Paths ,双击这行的右边,弹出一个大的输入框,把刚才Show in Finder的文件夹里面的Headers文件夹直接拖到大输入框里)

4,导入类库CoreLocation.framework,QuartzCore.framework,OpenGLES.framework,
SystemConfiguration.framework,CoreGraphics.framework,
Security.framework,libsqlite3.0.tbd,CoreTelephony.framework,libstdc++.6.0.9.tbd
5…. 所谓开启后台位置定位

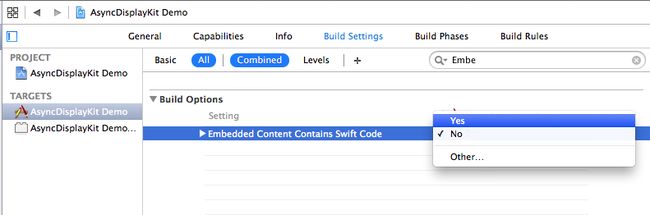
6,解决 230 image not found 的问题(有时候工程无缘无故地在还没有进入的时候就崩了,很可能也是这里的问题,有一次我明明之前已经设置好了,没动过它,它也会自动地变成了NO,坑了好久)注意:Xcode 8 把这项改了名字:Always Embed Swift Standard Libraries

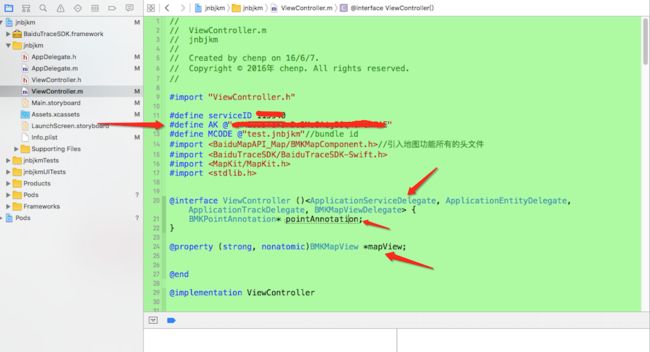
7,添加Bundle display name,并且在使用到百度SDK的文件中,把文件.m后缀改为.mm
8,允许https(在plist添加NSAppTransportSecurity,类型Dictionary ,在此目录下添加NSAllowsArbitraryLoads,类型boolean,值为YES;)
9,在buidsettings输入bite,选择Enable bite code,值为NO;
10,在plist添加NSLocationAlwaysUsageDescription
11,在工程的AppDelegate.h

12,在工程的AppDelegate.m
 -(BOOL)application:(UIApplication *)application didFinishLaunchingWithOptions:(NSDictionary *)launchOptions {
    _mapManager = [[BMKMapManager alloc]init];
    BOOL ret = [_mapManager start:你在百度开放平台创建的AK  generalDelegate:self];
    if (!ret) {
        NSLog(@"manager start failed!");
    }
    return YES;
}

 - (void)onGetNetworkState:(int)iError
{
    if (0 == iError) {
        NSLog(@"联网成功");
    }
    else{
        NSLog(@"onGetNetworkState %d",iError);
    }
}

 - (void)onGetPermissionState:(int)iError
{
    if (0 == iError) {
        NSLog(@"授权成功");
    }
    else {
        NSLog(@"onGetPermissionState %d",iError);
    }
}
13,在需要用到的控制器里
static NSString * entityName;
static BTRACE * traceInstance = NULL;
double latitudeOfEntity;
double longitudeOfEntity;


- (void)viewDidLoad {
    [super viewDidLoad];

_mapView=[[BMKMapView alloc] initWithFrame:self.view.frame];
    _mapView.backgroundColor=[UIColor redColor];
    [_mapView setZoomLevel:19];
    pointAnnotation = nil;

    [self.view addSubview:_mapView];

    [self doWork];
}


-(void) doWork {
    //把设备的uuid作为entityName
    entityName = [[[UIDevice currentDevice] identifierForVendor] UUIDString];

    traceInstance = [[BTRACE alloc] initWithAk:AK mcode:MCODE serviceId:serviceID entityName: entityName operationMode: 2];
    _mapView.delegate = self; // 此处记得不用的时候需要置nil,否则影响内存的释放
    _mapView.mapType = BMKMapTypeStandard;

    //视图加载之后就请求实时位置
    [self queryEntityList];

}

//请求实时位置
- (void)queryEntityList {
    [[BTRACEAction shared] queryEntityList:self serviceId:serviceID entityNames:entityName columnKey:nil activeTime:0 returnType:0 pageSize:0 pageIndex:0];
}


#pragma mark - Entity相关的回调方法

- (void)onQueryEntityList:(NSData *)data {
    NSString *entityListResult = [[NSString alloc] initWithData:data encoding:NSUTF8StringEncoding];
    NSLog(@"实时位置查询结果: %@", entityListResult);
    NSDictionary *dic = [NSJSONSerialization JSONObjectWithData:[entityListResult dataUsingEncoding:NSUTF8StringEncoding] options:NSJSONReadingMutableLeaves error:nil];
    NSNumber *status = [dic objectForKey:@"status"];
    if (0 == [status longValue]) {
        NSArray *entities = [dic objectForKey:@"entities"];
        NSDictionary *entity = [entities objectAtIndex:0];
        NSDictionary *realtimePoint = [entity objectForKey:@"realtime_point"];
        NSArray *location = [realtimePoint objectForKey:@"location"];
        longitudeOfEntity = [[location objectAtIndex:0] doubleValue];
        latitudeOfEntity = [[location objectAtIndex:1] doubleValue];
        dispatch_async(dispatch_get_main_queue(), ^{
            [_mapView removeOverlays:_mapView.overlays];
            [_mapView removeAnnotations:_mapView.annotations];
        });
        [self addPointAnnotation];
    }
}


//添加当前位置的标注
-(void)addPointAnnotation {
    CLLocationCoordinate2D coord;
    coord.latitude = latitudeOfEntity;
    coord.longitude = longitudeOfEntity;
    if (nil == pointAnnotation) {
        pointAnnotation = [[BMKPointAnnotation alloc] init];
    }
    pointAnnotation.coordinate = coord;

    CLLocationCoordinate2D pt=(CLLocationCoordinate2D){0,0};
    pt=(CLLocationCoordinate2D){latitudeOfEntity,longitudeOfEntity};
    pointAnnotation.title = @"最新位置";
    dispatch_async(dispatch_get_main_queue(), ^{
        [_mapView setCenterCoordinate:coord animated:true];
        [_mapView addAnnotation:pointAnnotation];
    });
}


- (BMKAnnotationView *)mapView:(BMKMapView *)mapView viewForAnnotation:(id )annotation
{
    if (annotation == pointAnnotation) {
        NSString *AnnotationViewID = @"renameMark";
        BMKPinAnnotationView *annotationView = (BMKPinAnnotationView *)[mapView dequeueReusableAnnotationViewWithIdentifier:AnnotationViewID];
        if (annotationView == nil) {
            annotationView = [[BMKPinAnnotationView alloc] initWithAnnotation:annotation reuseIdentifier:AnnotationViewID];
            // 设置颜色
            annotationView.pinColor = BMKPinAnnotationColorPurple;
            // 从天上掉下效果
            annotationView.animatesDrop = YES;
            // 设置可拖拽
            annotationView.draggable = YES;
        }
        return annotationView;
    }
    return nil;
}
注意:1.bundle id ,工程里的mode,和百度开发者中心的安全码要保持一致,否则会出现只有白色网格的情况。
- “230 image not found” Build Options->Enabled Content Contains Swift Code(Xcode 8 的是Always Embed Swift Standard Libraries)->YES
- “指定track不存在” 去到百度开发者官网的service_id那里,点击相应的ID的项目,创建一个entityName,或者选择某个entityName(如果有的话)去替换你工程里的 entityName
如果跑步起来看这里看这里