SpringCloud应用双节点高可用部署测试
目标:部署微服务应用至生产环境,除了自身的服务高可用外,配置双节点的节点高可用
环境:CentOS7.2/JDK10
步骤:方案设计->注册中心HA部署->Nginx代理部署->Keepalived双机热备部署->微服务其他应用部署->MySQL主从配置->Redis主从配置->MongoDB RepilcaSet配置->RabbitMQ集群配置->HA测试
1.方案设计
2.注册中心HA部署
在application.yml文件中配置双注册中心:
---
spring:
  profiles: eureka-01
server:
  port: 8004
eureka:
  instance:
    hostname: eureka-01
    prefer-ip-address: false
  client:
    service-url:
      defaultZone: http://boe:boe@eureka-02:8004/eureka

---
spring:
  profiles: eureka-02
server:
  port: 8004
eureka:
  instance:
    hostname: eureka-02
    prefer-ip-address: false
  client:
    service-url:
      defaultZone: http://boe:boe@eureka-01:8004/eureka
其中eureka01和02为两个节点的主机名
3.Nginx代理部署
安装rpm包:rpm -Uvh http://nginx.org/packages/centos/7/noarch/RPMS/nginx-release-centos-7-0.el7.ngx.noarch.rpm
yum安装:yum -y install nginx
遇到centos7.2 openssl版本问题:升级openssl
解决方案:http://blog.51cto.com/z00w00/2147566
nginx配置:主要说明微服务注册中心与网关反向代理配置
upstream test {
  server 10.252.97.2:8005;
  server 10.252.97.3:8005;
  ip_hash;
}

upstream eureka {
  server 10.252.97.2:8004;
  server 10.252.97.3:8004;
  ip_hash;
}

server {
    listen       80;
    client_max_body_size    0;
    proxy_set_header  Host $http_host;
    proxy_set_header  X-Real-IP  $remote_addr;
    proxy_set_header  X-Forwarded-For  $proxy_add_x_forwarded_for;
    chunked_transfer_encoding on;
    location /eureka {
      proxy_pass http://eureka;
    }
    location / {


           if ($request_method = OPTIONS ) {
                    add_header Access-Control-Allow-Origin '*';
                    add_header Access-Control-Allow-Methods 'GET, POST, OPTIONS,DELETE,PUT';
                    add_header Access-Control-Allow-Credentials true ;
                    add_header Access-Control-Allow-Headers x-ijt,Authorization,Origin,X-Requested-With,Content-Type,Accept;
                    return 200;
                }
        proxy_pass http://test;
    }

}
4.Keepalived双机热备部署
参考文章:https://www.jianshu.com/p/ab8e1c6a89ff
安装:yum install -y keepalived
配置文件:说明参考http://blog.51cto.com/jinyudong/1900148
通用:监控脚本配置
chk_nginx.sh(参考https://my.oschina.net/u/3804357/blog/1841738)
#!/bin/bash
#时间变量,用于记录日志
d=`date --date today +%Y%m%d_%H:%M:%S`
#计算nginx进程数量
n=`ps -C nginx --no-heading|wc -l`
#如果进程为0,则启动nginx,并且再次检测nginx进程数量,
#如果还为0,说明nginx无法启动,此时需要关闭keepalived
if [ $n -eq "0" ]; then
       systemctl start nginx
        n2=`ps -C nginx --no-heading|wc -l`
        if [ $n2 -eq "0"  ]; then
                echo "$d nginx down,keepalived will stop" >> /var/log/chk_nginx.log
                systemctl stop keepalived
        fi
fi
mysql.sh
#!/bin/bash
pkill keepalived
mongodb.sh
#!/bin/bash
pkill keepalived
(1)Master
vim /etc/keepalived/keepalived.conf
! Configuration File for keepalived

global_defs {
   notification_email {
	root@localhost
   }
   router_id LVS_DEVEL
}

vrrp_script chk_nginx {
    script "/usr/local/keepalived/chk_nginx.sh"   //检查服务是否正常,通过写脚本实现,脚本检查服务健康状态
    interval 3                             //检查的时间间断是3秒
}

vrrp_instance VI_1 {
    state MASTER
    interface eno16780032
    virtual_router_id 51
    priority 120
    advert_int 1
    authentication {
        auth_type PASS
        auth_pass 1111
    }
    virtual_ipaddress {
        10.252.97.4
    }
    track_script {                        //加载脚本
        chk_nginx
    }
}

virtual_server 10.252.97.4 3306 {
     delay_loop 2    #每个2秒检查一次real_server状态
     #lb_algo wrr    #LVS算法,用不到,我们就关闭了
     #lb_kind DR    #LVS模式,如果不关闭,备用服务器不能通过VIP连接主MySQL
     persistence_timeout 60   #会话保持时间,同一IP的连接60秒内被分配到同一台真实服务器
     protocol TCP
     real_server 10.252.97.2 3306 {   #检测本地mysql,backup也要写检测本地mysql
         weight 3
         notify_down /usr/local/keepalived/mysql.sh   #当mysq服down时,执行此脚本,杀死keepalived实现切换
         TCP_CHECK {
             connect_timeout 10    #连接超时时间
             nb_get_retry 3      #重连次数
             delay_before_retry 3   #重连间隔时间
             connect_port 3306      #健康检查端口
         }
     }
}

virtual_server 10.252.97.4 27017 {
     delay_loop 6
     lb_algo rr
     persistence_timeout 5
     protocol TCP
     real_server 10.252.97.2 27017 {
         notify_down /usr/local/keepalived/mongodb.sh
         TCP_CHECK {
             connect_timeout 3
             nb_get_retry 3
             delay_before_retry 3
             connect_port 27017
         }
     }
}
nginx测试脚本有问题,暂时禁用
(2)Backup
! Configuration File for keepalived

global_defs {
   notification_email {
	root@localhost
   }
   router_id LVS_DEVEL
}

vrrp_instance VI_1 {
    state BACKUP
    interface eno16780032
    virtual_router_id 51
    priority 115
    advert_int 1
    authentication {
        auth_type PASS
        auth_pass 1111
    }
    virtual_ipaddress {
        10.252.97.4
    }
}

virtual_server 10.252.97.4 3306 {
     delay_loop 2    #每个2秒检查一次real_server状态
     #lb_algo wrr    #LVS算法,用不到,我们就关闭了
     #lb_kind DR    #LVS模式,如果不关闭,备用服务器不能通过VIP连接主MySQL
     persistence_timeout 60   #会话保持时间,同一IP的连接60秒内被分配到同一台真实服务器
     protocol TCP
     real_server 10.252.97.3 3306 {   #检测本地mysql,backup也要写检测本地mysql
         weight 3
         notify_down /usr/local/keepalived/mysql.sh   #当mysq服down时,执行此脚本,杀死keepalived实现切换
         TCP_CHECK {
             connect_timeout 10    #连接超时时间
             nb_get_retry 3      #重连次数
             delay_before_retry 3   #重连间隔时间
             connect_port 3306      #健康检查端口
         }
     }
}

virtual_server 10.252.97.4 27017 {
     delay_loop 6
     lb_algo rr
     persistence_timeout 5
     protocol TCP
     real_server 10.252.97.3 27017 {
         notify_down /usr/local/keepalived/mongodb.sh
         TCP_CHECK {
             connect_timeout 3
             nb_get_retry 3
             delay_before_retry 3
             connect_port 27017
         }
     }
}
5.微服务其他应用部署
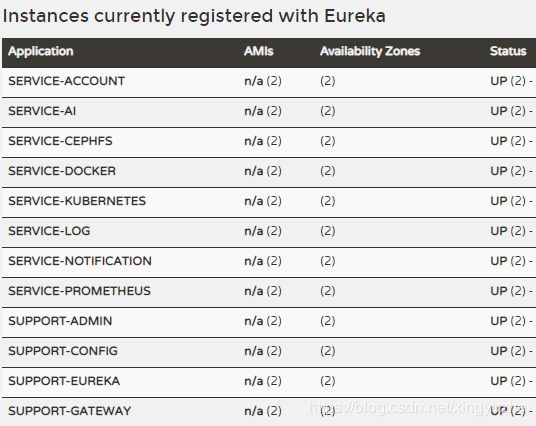
其他微服务以jar包的形式部署,查看注册中心
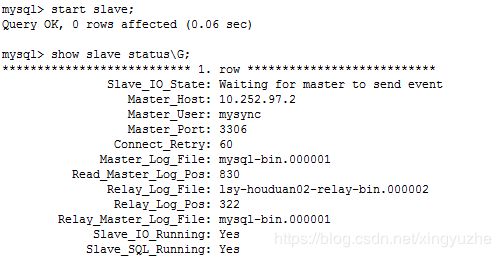
6.MySQL主从配置
mysql 8.0.13下载安装,参考文章:https://www.cnblogs.com/Twobox/p/9925460.html
密码与远程访问设置参考:
https://my.oschina.net/u/3251146/blog/2885657
https://blog.csdn.net/sgrrmswtvt/article/details/82344183
mysql主主同步参考文章:https://blog.51cto.com/lizhenliang/1362313
master配置:
[mysqld]
#
# Remove leading # and set to the amount of RAM for the most important data
# cache in MySQL. Start at 70% of total RAM for dedicated server, else 10%.
# innodb_buffer_pool_size = 128M
#
# Remove the leading "# " to disable binary logging
# Binary logging captures changes between backups and is enabled by
# default. It's default setting is log_bin=binlog
# disable_log_bin
#
# Remove leading # to set options mainly useful for reporting servers.
# The server defaults are faster for transactions and fast SELECTs.
# Adjust sizes as needed, experiment to find the optimal values.
# join_buffer_size = 128M
# sort_buffer_size = 2M
# read_rnd_buffer_size = 2M
#
# Remove leading # to revert to previous value for default_authentication_plugin,
# this will increase compatibility with older clients. For background, see:
# https://dev.mysql.com/doc/refman/8.0/en/server-system-variables.html#sysvar_default_authentication_plugin
# default-authentication-plugin=mysql_native_password
server-id = 1                    #backup这台设置2
log-bin = mysql-bin
binlog-ignore-db = mysql,information_schema     #忽略写入binlog日志的库
auto-increment-increment = 2             #字段变化增量值
auto-increment-offset = 1               #初始字段ID为1
slave-skip-errors = all                #忽略所有复制产生的错误
slave配置:
[mysqld]
#
# Remove leading # and set to the amount of RAM for the most important data
# cache in MySQL. Start at 70% of total RAM for dedicated server, else 10%.
# innodb_buffer_pool_size = 128M
#
# Remove the leading "# " to disable binary logging
# Binary logging captures changes between backups and is enabled by
# default. It's default setting is log_bin=binlog
# disable_log_bin
#
# Remove leading # to set options mainly useful for reporting servers.
# The server defaults are faster for transactions and fast SELECTs.
# Adjust sizes as needed, experiment to find the optimal values.
# join_buffer_size = 128M
# sort_buffer_size = 2M
# read_rnd_buffer_size = 2M
#
# Remove leading # to revert to previous value for default_authentication_plugin,
# this will increase compatibility with older clients. For background, see:
# https://dev.mysql.com/doc/refman/8.0/en/server-system-variables.html#sysvar_default_authentication_plugin
# default-authentication-plugin=mysql_native_password
server-id = 2                    #backup这台设置2
log-bin = mysql-bin
binlog-ignore-db = mysql,information_schema     #忽略写入binlog日志的库
auto-increment-increment = 2             #字段变化增量值
auto-increment-offset = 1               #初始字段ID为1
slave-skip-errors = all                #忽略所有复制产生的错误
7.Redis主从配置
参考文章:http://blog.51cto.com/11134648/2158209
redis安装:yum install -y redis
按文章配置redis.conf,在slave节点加入slaveof的配置项
设置密码:
参考:https://www.cnblogs.com/suanshun/p/7699084.html
8.MongoDB ReplicaSet配置
参考文章:http://blog.51cto.com/bguncle/1333623
下载centos7版本的mongodb压缩包:https://www.mongodb.org/dl/linux/x86_64-rhel70
解压到usr/local/mongodb,并配置环境变量:
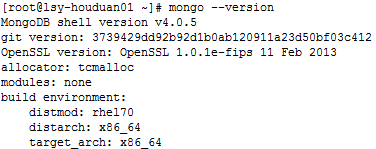
mongo --version 查看:
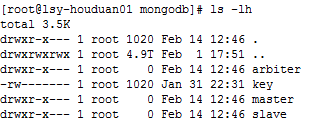
在节点共享目录下建立三个文件夹:master slave arbiter (/mnt/cephfs/mongodb/)
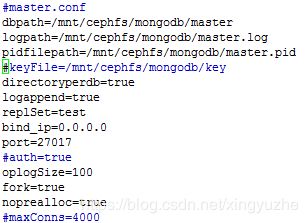
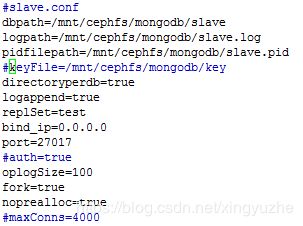
配置文件编写(关闭认证,初始化需要建立数据库与用户):
(1)主节点-master
vim /etc/mongodb_master.conf
(2)从节点-slave/arbiter
vim /etc/mongodb_slave.conf
vim /etc/mongodb_arbiter.conf
因为arbiter和slave在一台节点上,因此设置arbiter的启动端口为27019
此处关闭认证,注释keyFile配置(key生成:openssl rand -base64 745 > key)
设置keyFile权限:chmod 600 key
依次启动服务:
nohup mongod -f /etc/mongodb_master.conf &
nohup mongod -f /etc/mongodb_slave.conf &
nohup mongod -f /etc/mongodb_arbiter.conf &
主节点配置:
(1)repilca set配置
mongo 127.0.0.1进入数据库
use admin
cfg={ _id:"test", members:[ {_id:0,host:'10.252.97.2:27017',priority:2},{_id:1,host:'10.252.97.3:27017',priority:1},{_id:2,host:'10.252.97.3:27019',arbiterOnly:true}] };
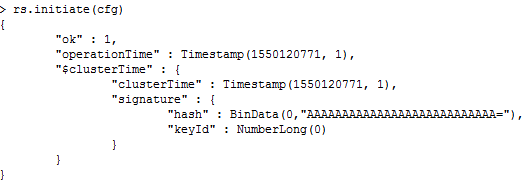
rs.initiate(cfg)
(2)用户配置
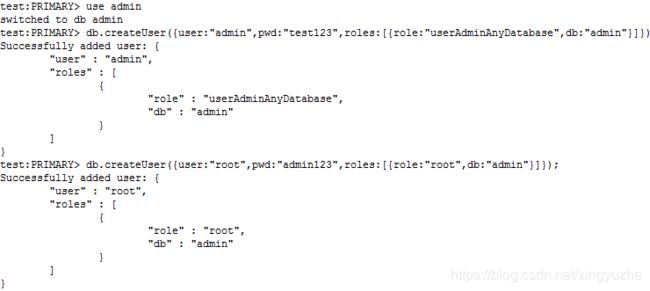
创建管理员账户:
db.createUser( { user: "admin", pwd: "test123", roles: [ { role: "userAdminAnyDatabase", db: "admin" } ] });
db.createUser( { user: "root", pwd: "admin123", roles: [ { role: "root", db: "admin" } ] });
其他用户数据库:roles设置为readWrite即可
中止主节点与从节点的mongod进程,去掉配置文件中keyFile的注释,重启服务
9.RabbitMQ集群配置
参考文章:http://blog.51cto.com/13642258/2153240 https://www.cnblogs.com/netonline/p/7678321.html
安装epel:yum install epel-release -y
安装rabbitmq:yum install rabbitmq-server -y
启动管理服务:rabbitmq-plugins enable rabbitmq_management
添加用户并支持远程访问
参考文章:http://www.ywnds.com/?p=5388
10.HA测试
(1)节点
keepalived设置为vip转发,随机停止一个节点,服务依旧能正常访问
(2)微服务
所有微服务均为2个,且分别部署在两个节点,随机停止一方,服务正常访问

