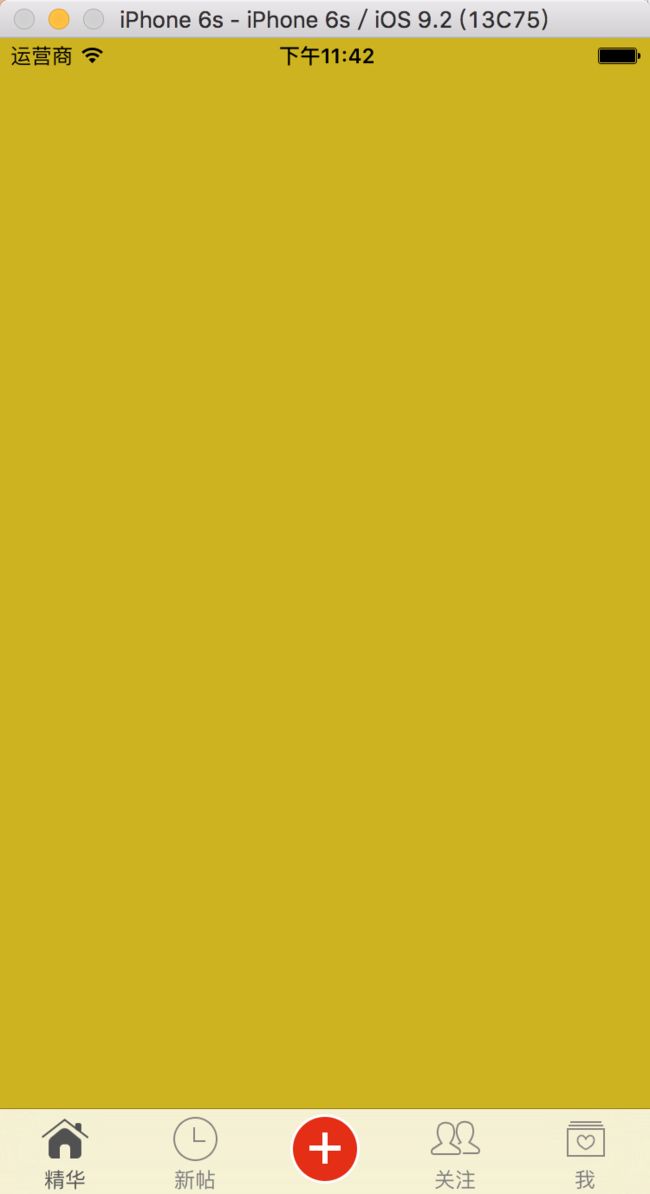
1.tabBar 的基本信息设置
1.1 tabBarItem 的信息设置
UIViewController *vc = [[UIViewController alloc] init];
    vc.tabBarItem.title = @"标题";
    vc.tabBarItem.image = [UIImage imageNamed:@"tabBar_new_icon"];
    vc.tabBarItem.selectedImage = [UIImage imageNamed:@"tabBar_new_click_icon"];
    vc.view.backgroundColor = [UIColor grayColor];

NSDictionary * attr = @{NSFont

AttributeName:[UIFont systemFontOfSize:12],NSForegroundColorAttributeName:[UIColor grayColor]};
    [vc.tabBarItem setTitleTextAttributes:attrs forState:UIControlStateNormal];
 NSDictionary * selectedAttrs = @{NSFontAttributeName:[UIFont systemFontOfSize:12],NSForegroundColorAttributeName:[UIColor darkGrayColor]};
    [vc.tabBarItem setTitleTextAttributes:selectedAttrs forState:UIControlStateSelected];

    [self addChildViewController:vc];
** 注意:**以上设置 tabBarItem 的 selectedImage 的方法,在实际运行过程中的效果与图片本身的效果会有很大差异-----系统会默认将选中图片渲染成蓝色展示
1.2 解决 tabBarItem 选中图片渲染的问题
- 代码解决
通过 UIImage的 imageWithRenderingMode 方法返回一个带有渲染模式的图片
- (UIImage *)imageWithRenderingMode:(UIImageRenderingMode)renderingMode ;

UIImageRenderingMode:
UIImageRenderingModeAutomatic  // 根据图片的使用环境和所处的绘图上下文自动调整渲染模式。
UIImageRenderingModeAlwaysOriginal   // 始终绘制图片原始状态,不使用Tint Color。
UIImageRenderingModeAlwaysTemplate   // 始终根据Tint Color绘制图片,忽略图片的颜色信息。

UIImage *image = [UIImage imageNamed:imageName];
image = [image imageWithRenderingMode:UIImageRenderingModeAlwaysOriginal];
vc.tabBarItem.selectedImage = image;
代码解决的缺陷:代码量繁琐,当图片用在另一个地方处理渲染效果时还需要再次设置
- 一次性设置---推荐使用
1.3 appearance 设置文字属性
在1.1的代码中我们是通过下面方法,设置每一个item中文字的属性的。这种方法进行设置的话,需要对每一个item都进行设置,比较繁琐
- (void)setTitleTextAttributes:(nullable NSDictionary *)attributes forState:(UIControlState)state NS_AVAILABLE_IOS(5_0) UI_APPEARANCE_SELECTOR;
- UIAppearance:通过UIAppearance设置一些UI的全局效果---实现一改全改的效果
// 通过appearance统一设置所有UITabBarItem的文字属性
// 后面带有UI_APPEARANCE_SELECTOR的方法, 都可以通过appearance对象来统一设置
 [[UITabBarItem appearance] setTitleTextAttributes:attrs forState:UIControlStateNormal];
 [[UITabBarItem appearance] setTitleTextAttributes:selectedAttrs forState:UIControlStateSelected];
2.自定义tabBar
2.1自定义控制器
创建继承于 UIViewController 的控制器----不再赘述
2.2自定义TabBarController
创建继承于 UITabBarController 的控制器
@interface ZZYTabBarViewController ()

@end

@implementation ZZYTabBarViewController

+ (void)initialize
{
    //1、设置UITabBarItem相关属性
    NSDictionary * attrs = @{NSForegroundColorAttributeName:[UIColor grayColor],NSFontAttributeName:[UIFont systemFontOfSize:12]};
    NSDictionary * selectedAttrs = @{NSForegroundColorAttributeName:[UIColor darkGrayColor],NSFontAttributeName:[UIFont systemFontOfSize:12]};

   UITabBarItem * item = [UITabBarItem appearance];
    [item setTitleTextAttributes:attrs forState:UIControlStateNormal];
    [item setTitleTextAttributes:selectedAttrs forState:UIControlStateSelected];
}

- (void)viewDidLoad {
    [super viewDidLoad];

    //2、初始化子控制器
    [self setupChildVc:[[ZZYEssenceViewController alloc] init] title:@"精华" image:@"tabBar_essence_icon" selectedImage:@"tabBar_essence_click_icon"];

    [self setupChildVc:[[ZZYNewViewController alloc] init] title:@"新帖" image:@"tabBar_new_icon" selectedImage:@"tabBar_new_click_icon"];

    [self setupChildVc:[[ZZYFriendTrendsViewController alloc] init] title:@"关注" image:@"tabBar_friendTrends_icon" selectedImage:@"tabBar_friendTrends_click_icon"];

    [self setupChildVc:[[ZZYMeViewController alloc] init] title:@"我" image:@"tabBar_me_icon" selectedImage:@"tabBar_me_click_icon"];

    //3.自定义TabBar ----- 更换TabBar
    [self setValue:[[ZZYTabBar alloc]init] forKeyPath:@"tabBar"];
//    self.tabBar
}

- (void)setupChildVc:(UIViewController *)vc title:(NSString *)title image:(NSString *)image selectedImage:(NSString *)selectedImage
{
    // 设置文字和图片
    vc.tabBarItem.title = title;
    vc.tabBarItem.image = [UIImage imageNamed:image];
    vc.tabBarItem.selectedImage = [UIImage imageNamed:selectedImage];

    ZZYNavigationController * nav = [[ZZYNavigationController alloc]initWithRootViewController:vc];
    // 添加为子控制器
    [self addChildViewController:nav];

}
** 注意 :**
在设置自定义的 TabBar 时,由于 tabBar 是系统默认 只读属性,因此需要通过 KVC 语法,将自定义的 tabBar 对象,赋值给 tabBar 属性即可
- (void)setValue:(nullable id)value forKeyPath:(NSString *)keyPath;
2.3 自定义TabBar
创建继承于UITabBar 的 TabBar
#import "ZZYTabBar.h"

@interface ZZYTabBar()
/**
 *  发布按钮
 */
@property (nonatomic, weak) UIButton * publishButton;

@end

@implementation ZZYTabBar

- (instancetype)initWithFrame:(CGRect)frame
{
    if (self = [super initWithFrame:frame]) {

        UIButton *publishButton = [UIButton buttonWithType:UIButtonTypeCustom];
        [publishButton setBackgroundImage:[UIImage imageNamed:@"tabBar_publish_icon"] forState:UIControlStateNormal];
        [publishButton setBackgroundImage:[UIImage imageNamed:@"tabBar_publish_click_icon"] forState:UIControlStateHighlighted];
        [self addSubview:publishButton];
        self.publishButton = publishButton;

    }
    return self;
}

- (void)layoutSubviews
{
    [super layoutSubviews];

    //设置发布按钮的frame
注意此处设置 frame 时直接获取 UIImage 对象宽高的方法
    self.publishButton.bounds = CGRectMake(0, 0, self.publishButton.currentBackgroundImage.size.width, self.publishButton.currentBackgroundImage.size.height);
    self.publishButton.center = CGPointMake(self.frame.size.width * 0.5, self.frame.size.height * 0.5);

    // 设置其他UITabBarButton的frame
    CGFloat buttonY = 0;
    CGFloat buttonW = self.frame.size.width / 5;
    CGFloat buttonH = self.frame.size.height;
    NSInteger index = 0;

    for (UIView * button in self.subviews) {
        if ([button isKindOfClass:NSClassFromString(@"UITabBarButton")])
        {
            //设置按钮的x值---注意此处自定义的按钮在中间,注意此处索引的处理
            CGFloat buttonX = buttonW * ((index > 1)?(index + 1):index);
            button.frame = CGRectMake(buttonX, buttonY, buttonW, buttonH);

            // 增加索引
            index++;
        }

    }
}
** 封装控件基本步骤 **
- 在 initWithFrame:方法中添加子控件,提供便利构造方法
- 在 layoutSubviews 方法中设置子控件的 frame(一定要调用 super 的 layoutSubviews )
- 增加模型属性,在模型属性 set 方法中设置数据到子控件上
2.4 对 Frame 进行封装
通过创建 UIView 的分类来方便对 view 的frame 中width height 属性的设置
#import

@interface UIView (ZZYExtension)

@property (nonatomic, assign) CGFloat width;
@property (nonatomic, assign) CGFloat height;
@property (nonatomic, assign) CGFloat x;
@property (nonatomic, assign) CGFloat y;

//- (CGFloat)x;
//- (void)setX:(CGFloat)x;
/** 在分类中声明@property, 只会生成方法的声明, 不会生成方法的实现和带有_下划线的成员变量*/

@end

#import "UIView+ZZYExtension.h"

@implementation UIView (ZZYExtension)

- (void)setWidth:(CGFloat)width
{
    CGRect frame = self.frame;
    frame.size.width = width;
    self.frame = frame;
}

- (void)setHeight:(CGFloat)height{
    CGRect frame = self.frame;
    frame.size. height = height;
    self.frame = frame;
}


- (void)setX:(CGFloat)x
{
    CGRect frame = self.frame;
    frame.origin.x = x;
    self.frame = frame;
}

- (void)setY:(CGFloat)y
{
    CGRect frame = self.frame;
    frame.origin.y = y;
    self.frame = frame;
}

- (CGFloat)width
{
    return self.frame.size.width;
}

- (CGFloat)height
{
    return self.frame.size.height;
}

- (CGFloat)x
{
    return self.frame.origin.x;
}

- (CGFloat)y
{
    return self.frame.origin.y;
}
@end
封装后的按钮 frame 设置代码
- (void)layoutSubviews
{
    [super layoutSubviews];

    CGFloat width = self.width;
    CGFloat height = self.height;

    //设置发布按钮的frame
    self.publishButton.width = self.publishButton.currentBackgroundImage.size.width;
    self.publishButton.height = self.publishButton.currentBackgroundImage.size.height;

    self.publishButton.center = CGPointMake(width * 0.5, height * 0.5);

    // 设置其他UITabBarButton的frame
    CGFloat buttonY = 0;
    CGFloat buttonW = width / 5;
    CGFloat buttonH = height;
    NSInteger index = 0;

     //下面的与上面重复
}


