Spring Boot整合Redis
目录
1.spring-data-redis项目简介
1.1 spring-data-redis项目的设计
1.2 RedisTemplate
1.3 Spring对Redis数据类型操作的封装
1.4 SessionCallback和RedisCallback
2.Spring Boot中配置和使用Redis
2.1 配置Redis
2.2 操作Redis数据类型
2.2.1 字符串和散列的操作
2.2.2 列表操作
2.2.3 集合操作
2.3 Redis的特殊用法
2.3.1 Redis事务
2.3.2 Redis流水线
2.3.3 Redis发布订阅
2.3.4 使用Lua脚本
在现今互联网应用中,NoSql已经广泛应用,在互联网中起到加速系统的作用。有两种NoSQL使用最为广泛,那就是Redis和MongoDB。
Redis是一种运行在内存的数据库,支持7种数据类型的存储。Redis的运行速度很快,大约是关系数据库几倍到几十倍的速度。如果我们将常用的数据存储在Redis中,用来代替关系数据库的查询访问,网站性能将可以得到大幅提高。在现实中,查询数据要远远大于更新数据,一般一个正常的网站查询和更新的比例大约是1:9到3:7,在查询比例较大的网站使用Redis可以数倍地提升网站的性能。
Redis自身数据类型比较少,命令功能也比较有限,运算能力一直不强,所以在Redis2.6版本之后,开始增加Lua语言的支持,这样Redis的运算能力就大大提高了,而且在Redis中Lua语言的执行是原子性的,也就是在Redis执行Lua时,不会被其他命令所打断,这就能够保证在高并发场景下的一致性。
Spring是通过spring-data-redis项目对Redis开发进行支持的,在讨论Spring Boot如何使用Redis之前,有必要简单地介绍一下这个项目。
1.spring-data-redis项目简介
1.1 spring-data-redis项目的设计
在Java中与Redis连接的驱动存在很多种,目前比较广泛使用的是Jedis,其他的还有Lettuce、Jredis和Srp。Lettuce目前使用的比较少,Jredis和Srp则已经不再推荐使用,所以我们只讨论Spring推荐使用的类库Jedis的使用。
Spring中是通过RedisConnection接口操作Redis的,而RedisConnection则对原生的Jedis进行封装。要获取RedisConnection接口对象,是通过RedisConnectionFactory接口去生成的,所以第一步要配置的便是这个工厂,而配置工厂主要是配置Redis的连接池,对于连接池可以设定其最大连接数、超时时间等属性。创建RedisConnectionFactory对象的实现的代码如下:
package com.martin.config.chapter7;

import org.springframework.context.annotation.Bean;
import org.springframework.context.annotation.Configuration;
import org.springframework.data.redis.connection.RedisConnectionFactory;
import org.springframework.data.redis.connection.RedisPassword;
import org.springframework.data.redis.connection.RedisStandaloneConfiguration;
import org.springframework.data.redis.connection.jedis.JedisConnectionFactory;
import redis.clients.jedis.JedisPoolConfig;

/**
 * @author: martin
 * @date: 2019/11/16 19:35
 * @description:
 */
@Configuration
public class RedisConfig {
    private RedisConnectionFactory connectionFactory = null;
    @Bean("redisConnectionFactory")
    public RedisConnectionFactory initRedisConnectionFactory(){
        if (this.connectionFactory != null){
            return this.connectionFactory;
        }

        JedisPoolConfig poolConfig = new JedisPoolConfig();
        //最大空闲数
        poolConfig.setMaxIdle(30);
        //最大连接数
        poolConfig.setMaxTotal(50);
        //最大等待毫秒数
        poolConfig.setMaxWaitMillis(2000);
        //创建Jedis连接工厂
        JedisConnectionFactory connectionFactory = new JedisConnectionFactory(poolConfig);
        //获取单机Redis配置
        RedisStandaloneConfiguration rsCfg = connectionFactory.getStandaloneConfiguration();
        rsCfg.setHostName("192.168.0.1");
        rsCfg.setPort(6379);
        RedisPassword redisPassword = RedisPassword.of("12345678");
        rsCfg.setPassword(redisPassword);
        return connectionFactory;
    }
}
这里我们通过一个连接池的配置创建了RedisConnectionFactory,通过它就能够创建RedisConnection接口对象。但是我们在使用一条连接时,要先从RedisConnectionFactory工厂获取,然后在使用完成后还要自己关闭它。Spring为了进一步简化开发,提供了RedisTemplate。
1.2 RedisTemplate
RedisTemplate是一个强大的类,首先它会自动从RedisConnectionFactory工厂中获取连接,然后执行对应的Redis命令,在最后还会关闭Redis连接。这些在RedisTemplate中都被封装了,所以并不需要开发者关注Redis连接的闭合问题。 创建RedisTemplate的示例代码如下:
    @Bean("redisTemplate")
    public RedisTemplate initRedisTemplate() {
        RedisTemplate redisTemplate = new RedisTemplate<>();
        redisTemplate.setConnectionFactory(initRedisConnectionFactory());
        return redisTemplate;
    }
然后测试它,测试代码如下:
package com.martin.config.chapter7;

import org.springframework.context.ApplicationContext;
import org.springframework.context.annotation.AnnotationConfigApplicationContext;
import org.springframework.data.redis.core.RedisTemplate;

/**
 * @author: martin
 * @date: 2019/11/16 20:49
 * @description:
 */
public class RedisTemplateTest {
    public static void main(String[] args) {
        ApplicationContext ctx = new AnnotationConfigApplicationContext(RedisConfig.class);
        RedisTemplate redisTemplate = ctx.getBean(RedisTemplate.class);
        redisTemplate.opsForValue().set("key1", "value1");
        redisTemplate.opsForHash().put("hash", "field", "hvalue");
    }
}
这里使用了Java配置文件RedisConfig来创建Spring IOC容器,然后从中获取RedisTemplate对象,接着设置键值。代码运行完成之后,我们在Redis中查询存入的数据,查询结果如下:
MyRedis:0>keys *key1
1) \xAC\xED\x00\x05t\x00\x04key1
我们发现,Redis存入的并不是key1这样的字符串,这是怎么回事呢?
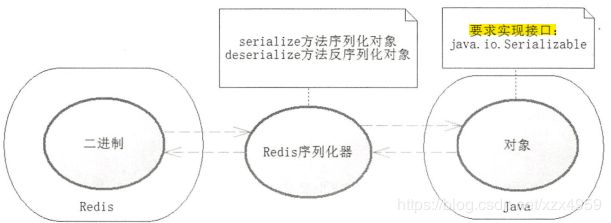
Redis是一种基于字符串存储的NoSql,而Java是基于对象的语言,对象是无法存储到Redis中的,不过Java提供了序列化机制,只要类实现了java.io.Serializable接口,就代表类的对象能够进行序列化,通过将类对象进行序列化就能够得到二进制字符串,这样Redis就可以将这些类对象以字符串进行存储。Java也可以将那些二进制字符串通过反序列化转为Java对象,通过这个原理,Spring提供了序列化器接口RedisSerializer:
package org.springframework.data.redis.serializer;

import org.springframework.lang.Nullable;

public interface RedisSerializer {
    @Nullable
    byte[] serialize(@Nullable T var1) throws SerializationException;

    @Nullable
    T deserialize(@Nullable byte[] var1) throws SerializationException;
}
该接口有两个方法,这两个方法一个是serialize,它能够把那些可以序列化的对象转换为二进制字符串;另一个是deserialize,它能够通过反序列化把二进制字符串转换为Java对象。StringRedisSerializer和JdkSerializationRedisSerializer是我们比较常用的两个实现类,其中JdkSerializationRedisSerializer是RedisTemplate默认的序列化器,“key1”这个字符串就是被它序列化变为一个比较奇怪的字符串。
 spring-data-redis序列化器原理示意图
RedisTemplate提供了如下表所示的几个可以配置的属性:
由于我们什么都没有配置,因此它会默认使用JdkSerializationRedisSerializer对对象进行序列化和反序列化。这就是我们看到复杂字符串的原因,为了解决这个问题,我们可以修改代码如下:
    @Bean("redisTemplate")
    public RedisTemplate initRedisTemplate() {
        RedisTemplate redisTemplate = new RedisTemplate<>();
        //RedisTemplate会自动初始化StringRedisSerializer
        RedisSerializer stringRedisSerializer = redisTemplate.getStringSerializer();
        //设置字符串序列化器为默认序列化器
        redisTemplate.setDefaultSerializer(stringRedisSerializer);
        redisTemplate.setConnectionFactory(initRedisConnectionFactory());
        return redisTemplate;
    }
这里,我们将Redis的默认序列化器设置为字符串序列化器,这样把他们转换出来就会采用字符串了。
MyRedis:0>get key1
value1

MyRedis:0>hget hash field
hvalue
1.3 Spring对Redis数据类型操作的封装
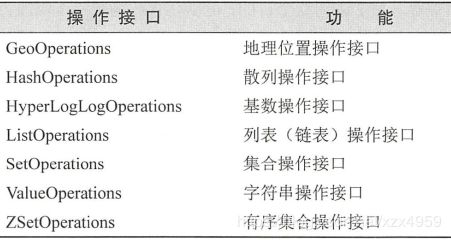
Redis能够支持7种类型的数据结构,这7种数据类型是字符串、散列、列表、集合、有序结合、计数和地理位置。为此,Spring针对每一种数据结构的操作都提供了对应的操作接口。如下表所示:
它们都可以通过RedisTemplate得到,得到的方法非常简单,代码清单如下所示:
        GeoOperations geoOperations = redisTemplate.opsForGeo();
        HashOperations hashOperations = redisTemplate.opsForHash();
        HyperLogLogOperations logLogOperations = redisTemplate.opsForHyperLogLog();
        ListOperations listOperations = redisTemplate.opsForList();
        SetOperations setOperations = redisTemplate.opsForSet();
        ValueOperations valueOperations = redisTemplate.opsForValue();
        ZSetOperations zSetOperations = redisTemplate.opsForZSet();
这样就可以通过各类的操作接口来操作不同的数据类型了。有时候我们需要对某一个键值对做连续的操作,例如有时需要连续操作一个散列数据类型或者列表多次,这时Spring为我们提供了对应的BoundXXXOperations接口,接口如下表所示:
同样地,RedisTemplate也对获取它们提供了对应的方法,实例代码如下:
        BoundGeoOperations geoOperations = redisTemplate.boundGeoOps("geo");
        BoundHashOperations hashOperations = redisTemplate.boundHashOps("hash");
        BoundListOperations listOperations = redisTemplate.boundListOps("list");
        BoundSetOperations setOperations = redisTemplate.boundSetOps("set");
        BoundValueOperations valueOperations = redisTemplate.boundValueOps("string");
        BoundZSetOperations zSetOperations = redisTemplate.boundZSetOps("zset");
获取其中的操作接口后,我们就可以对某个键的数据进行多次操作,这样我们就知道如何有效地通过Spring操作Redis的各种数据类型了。
1.4 SessionCallback和RedisCallback
如果我们希望在同一条Redis链接中,执行两条或者多条命令,可以使用Spring为我们提供的RedisCallback和SessionCallback两个接口。这样就可以避免一条一条的执行命令,对资源的浪费。
SessionCallback接口和RedisCallback接口的主要作用是让RedisTemplate进行回调,通过它们可以在同一条连接下执行多个Redis命令。其中,SessionCallback提供了良好的封装,因此在实际开发中应该优先使用;相对而言,RedisCallback接口比较底层,需要处理的内容也比较多,可读性差,一般不考虑使用。使用SessionCallback的实例代码如下:
    public static void useRedisCallback(RedisTemplate redisTemplate) {
        redisTemplate.execute((RedisCallback) (redisConnection) -> {
            redisConnection.set("key1".getBytes(), "value1".getBytes());
            redisConnection.hSet("hash".getBytes(), "field".getBytes(), "hvalue".getBytes());
            return null;
        });
    }
执行日志如下:
16:32:13.941 [main] DEBUG org.springframework.core.env.PropertySourcesPropertyResolver - Could not find key 'spring.liveBeansView.mbeanDomain' in any property source
16:32:13.944 [main] DEBUG org.springframework.beans.factory.support.DefaultListableBeanFactory - Returning cached instance of singleton bean 'redisTemplate'
16:32:18.317 [main] DEBUG org.springframework.data.redis.core.RedisConnectionUtils - Opening RedisConnection
16:32:18.742 [main] DEBUG org.springframework.data.redis.core.RedisConnectionUtils - Closing Redis Connection
从日志中我们看出,使用RedisCallback的方式能够使得RedisTemplate使用同一条Redis连接进行回调,从而可以在同一条Redis连接下执行多个方法,避免RedisTemplate多次获取不同的连接。
2.Spring Boot中配置和使用Redis
2.1 配置Redis
在Spring Boot中集成Redis更为简单,我们只需要在配置文件application.properties中加入如下代码清单:
#配置连接池属性
spring.redis.jedis.pool.min-idle=5
spring.redis.jedis.pool.max-idle=10
spring.redis.jedis.pool.max-active=10
spring.redis.jedis.pool.max-wait=2000
#配置Redis服务器属性
spring.redis.port=6379
spring.redis.host=192.168.0.1
spring.redis.password=12345678
#连接超时时间,单位毫秒
spring.redis.timeout=1000
这里我们配置了连接池和服务器的属性,用以连接Redis服务器,这样Spring Boot的自动装配机制就会读取这些配置来生成有关Redis的操作对象,这里它会自动生成RedisConnectionFactory、RedisTemplate、StringRedisTemplate等常用的Redis对象。同时为了修改RedisTemplate默认的序列化器,我们定义如下的代码:
package com.martin.config.chapter7;

import org.springframework.beans.factory.InitializingBean;
import org.springframework.beans.factory.annotation.Autowired;
import org.springframework.data.redis.core.RedisTemplate;
import org.springframework.data.redis.serializer.RedisSerializer;
import org.springframework.stereotype.Component;

/**
 * @author: martin
 * @date: 2019/11/16 19:35
 * @description:
 */
@Component
public class RedisSerializationConfig implements InitializingBean {
    @Autowired
    private RedisTemplate redisTemplate;

    @Override
    public void afterPropertiesSet() throws Exception {
        RedisSerializer redisSerializer = redisTemplate.getStringSerializer();
        redisTemplate.setDefaultSerializer(redisSerializer);
        redisTemplate.setKeySerializer(redisSerializer);
        redisTemplate.setValueSerializer(redisSerializer);
        redisTemplate.setHashKeySerializer(redisSerializer);
        redisTemplate.setHashValueSerializer(redisSerializer);
    }
}
这样我们存储到Redis的键值对就是String类型了。
2.2 操作Redis数据类型
这一节主要演示常用的Redis数据类型(字符串、散列、列表、集合和有序集合)的操作。
2.2.1 字符串和散列的操作
首先开始操作字符串和散列,这是Redis最为常用的数据类型。实例代码如下:
package com.martin.config.controller;

import org.springframework.beans.factory.annotation.Autowired;
import org.springframework.data.redis.core.BoundHashOperations;
import org.springframework.data.redis.core.RedisTemplate;
import org.springframework.stereotype.Controller;
import org.springframework.web.bind.annotation.RequestMapping;
import org.springframework.web.bind.annotation.ResponseBody;
import redis.clients.jedis.Jedis;

import java.util.HashMap;
import java.util.Map;

/**
 * @author: martin
 * @date: 2019/11/17 18:22
 * @description:
 */
@Controller
@RequestMapping("/redis")
public class RedisController {
    @Autowired
    private RedisTemplate redisTemplate;

    @RequestMapping("/stringAndHash")
    @ResponseBody
    public Map testStringAndHash() {
        redisTemplate.opsForValue().set("key1", "value1");
        redisTemplate.opsForValue().set("int_key", "1");
        redisTemplate.opsForValue().increment("int_key", 2L);
        //获取底层Jedis连接
        Jedis jedis = (Jedis) redisTemplate.getConnectionFactory().getConnection().getNativeConnection();
        //减1操作,这个命令RedisTemplate不支持,所以需要先获取底层的连接再操作
        jedis.decr("int_key");

        Map hash = new HashMap<>();
        hash.put("field1", "value1");
        hash.put("field2", "value2");
        //存入一个散列的数据类型
        redisTemplate.opsForHash().putAll("hash", hash);
        //新增一个字段
        redisTemplate.opsForHash().put("hash", "field3", "value3");
        //绑定散列操作的key,这样可以连续对同一个散列数据类型进行操作
        BoundHashOperations hashOperations = redisTemplate.boundHashOps("hash");
        //删除其中的两个字段
        hashOperations.delete("field1", "field2");
        //新增一个字段
        hashOperations.put("field4", "value4");
        Map result = new HashMap<>();
        result.put("info", "success");
        return result;
    }
}
这里需要注意的一点是我在做测试的时候,将redis连接池的配置单独放置到文件application-redis.properties中了。为了能够加载到该文件,我需要在SpringBootConfigApplication中导入该文件:
@PropertySource({"classpath:application-redis.properties"})代码中的@Autowired注入了Spring Boot为我们自动初始化的RedisTemplate和StringRedisTemplate对象。有一点需要注意的是,这里进行的加一操作,因为RedisTemplate并不能支持底层所有的Redis命令,所以这里先获取了原始的Redis连接的Jedis对象。
2.2.2 列表操作
列表在Redis中其实是一种链表结构,这就意味着查询性能不高,而增删节点的性能高,这是它的特性。操作实例代码如下:
    @RequestMapping("/list")
    @ResponseBody
    public Map testList() {
        //链表从左向右的顺序e,d,c,b
        redisTemplate.opsForList().leftPushAll("list1", "b", "c", "d", "e");
        //链表从左向右的顺序为f,g,h,i
        redisTemplate.opsForList().rightPushAll("list2", "f", "g", "h", "i");
        //绑定list2
        BoundListOperations listOperations = redisTemplate.boundListOps("list2");
        //从右边弹出一个成员
        System.out.println(listOperations.rightPop());
        System.out.println(listOperations.index(1));
        System.out.println(listOperations.size());
        List allElement = listOperations.range(0, listOperations.size() - 1);
        System.out.println(allElement);

        return (Map) new HashMap().put("success", true);
    }
2.2.3 集合操作
集合是不允许成员重复的,它在数据结构上是一个散列表的结构,所以对于它而言是无序的。Redis还提供了交集、并集和差集的运算。实例代码如下;
 @RequestMapping("/set")
    public void testSet() {
        redisTemplate.opsForSet().add("set1", "a", "b", "c", "d", "e", "e");
        redisTemplate.opsForSet().add("set2", "b", "c", "f", "g");
        //绑定集和set1操作
        BoundSetOperations setOperations = redisTemplate.boundSetOps("set1");
        //添加两个元素
        setOperations.add("h", "i");
        //删除两个元素
        setOperations.remove("e", "h");
        //返回所有的元素
        Set set1 = setOperations.members();
        //元素的个数
        setOperations.size();
        //交集
        setOperations.intersect("set2");
        //差集
        setOperations.diff("set2");
        //求交集并保存到inter集和
        setOperations.intersectAndStore("set2", "inter");
        //求并集
        setOperations.union("set2");
    }
在一些网站中,经常会有排名,如最热门的商品或者最大的购买买家,都是常见的场景。对于这类排名,刷新往往需要及时,也涉及到较大的统计,如果使用数据库会很慢。为了支持集合的排序,Redis提供了有序集合(zset),它的有序性通过在数据结构中增加一个属性-score(分数)得以支持。Spring提供了TypedTuple接口以及默认的实现类DefaultTypedTuple来支持有序集合。实例代码如下:
 @RequestMapping("/zset")
    public void testZSet() {
        Set> typedTupleSet = new HashSet<>();
        //初始化有序集合
        for (int i = 1; i < 9; i++) {
            double score = i * 0.1;
            ZSetOperations.TypedTuple typedTuple = new DefaultTypedTuple("value" + i, score);
            typedTupleSet.add(typedTuple);
        }
        //往有序集合插入元素
        redisTemplate.opsForZSet().add("zset1",typedTupleSet);
        //绑定zset有序集合操作
        BoundZSetOperations zSetOperations = redisTemplate.boundZSetOps("zset1");
        //增加一个元素
        zSetOperations.add("value10",0.26);
        //获取有序集合
        System.out.println(zSetOperations.range(1,6));
        System.out.println(zSetOperations.rangeByScore(0.2,0.6));
        //获取大于value3的元素
        RedisZSetCommands.Range range = new RedisZSetCommands.Range();
        range.gt("value3");
        //求分数
        System.out.println(zSetOperations.score("value8"));
    }
2.3 Redis的特殊用法
Redis除了操作数据类型以外,还能支持事务、流水线、发布订阅和Lua脚本等功能。
2.3.1 Redis事务
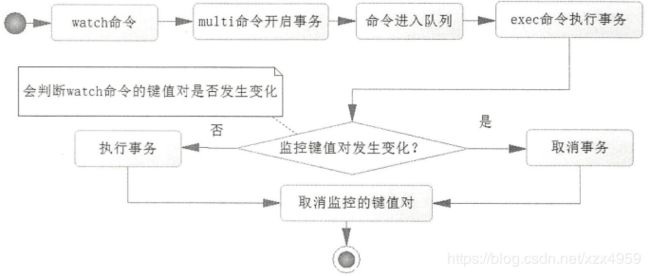
Redis中使用事务通常的命令组合是watch.......multi.......exec,也就是要在一个Redis连接中执行多个命令,其中watch命令监控Redis的一些键;multi命令是开始事务,开始事务以后,该客户端的命令不会马上执行,而是存放在一个队列中;exe命令的意义在于执行事务,只是它在队列命令执行前会判断被watch监控的Redis的键的数据是否发生过变化,如果已经发生了变化,那么Redis就会取消事务,否则就会执行事务,Redis执行事务时,要么全部执行,要么全部不执行,而且不会被其他客户端打断,这样就保证了Redis事务下数据一致性。
 Redis事务执行过程
2.3.2 Redis流水线
在默认情况下,Redis客户端是一条条命令发送给Redis客户端的,这样显然性能不高。在Redis中,使用流水线技术,可以一次性地发送多个命令去执行,大幅度地提升Redis的性能。
2.3.3 Redis发布订阅
发布订阅是消息的一种常用模式。首先是 Redis 提供一个渠道,让消息能够发送到这个渠道上 ,而多个系统可以监听这个渠道, 如短信、微信和邮件系统都可以监听这个渠道,当一条消息发送到渠道,渠道就会通知它的监听者,这样短信、微信和邮件系统就能够得到这个渠道给它们的消息了,这些监听者会根据自己的需要去处理这个消息,于是我们就可以得到各种各样的通知了 。
Redis消息监听器代码如下:
package com.martin.config.redis;

import org.springframework.data.redis.connection.Message;
import org.springframework.data.redis.connection.MessageListener;
import org.springframework.stereotype.Component;

/**
 * @author: martin
 * @date: 2020/1/21
 */
@Component
public class RedisMsgListener implements MessageListener {
    @Override
    public void onMessage(Message message, byte[] pattern) {
        //消息体
        String body = new String(message.getBody());
        //渠道名称
        String topic = new String(pattern);
        System.out.println(body);
        System.out.println(topic);
    }
}
2.3.4 使用Lua脚本
Redis中有很多的命令,但是严格来说 Redis提供的计算能力还是比较有限的 。为了增强 Redis的计算能力,Redis在2.6版本后提供了 Lua 脚本的支持,而且执行 Lua 脚本在 Redis 中还具备原子性,所以在需要保证数据一致性的高并发环境中,我们也可以使用Redis的Lua语言来保证数据的一致性,且 Lua 脚本具备更加强大的运算功能,在高并发需要保证数据一致性时,Lua 脚本方案比使用Redis自身提供的事务要更好一些 。
在 Redis 中有两种运行 Lua 的方法,一种是直接发送Lua到Redis服务器去执行,另一种是先把Lua发送给Redis,Redis会对Lua脚本进行缓存,然后返回一个SHA 1的32位编码回来,之后只需要发送SHA 1和相关参数给Redis便可以执行了。这里需要解释的是为什么会存在通过32位编码执行的方法。如果Lua脚本很长,那么就需要通过网络传递脚本给Redis去执行了,而现实的情况是网络的传递速度往往跟不上 Redis的执行速度,所以网络就会成为Redis执行的瓶颈。如果只是传递32位编码和参数,那么需要传递的消息就少了许多,这样就可以极大地减少网络传输的内容,从而提高系统的性能。
为了支持Redis的Lua脚本,Spring提供了RedisScript接口,与此同时也有一个DefaultRedisScript实现类。


