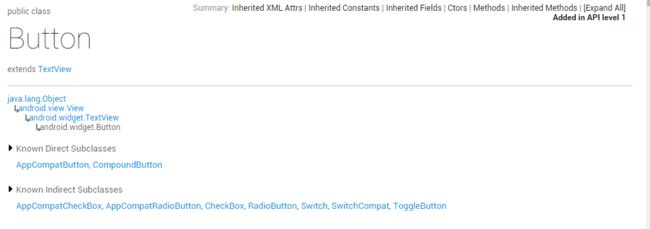
按钮和复选框控件
概述
本篇文章介绍Android SDK中的按钮和复选框控件。按钮可以分为多种,例如普通按钮(Button)、图像按钮(ImageButton)、选项按钮(RadioButton)、复选框(CheckBox)等
Button
官方介绍
Class Overview
Represents a push-button widget. Push-buttons can be pressed, or clicked, by the user to perform an action.
A typical use of a push-button in an activity would be the following:
 public class MyActivity extends Activity {
     protected void onCreate(Bundle icicle) {
         super.onCreate(icicle);

         setContentView(R.layout.content_layout_id);

         final Button button = (Button) findViewById(R.id.button_id);
         button.setOnClickListener(new View.OnClickListener() {
             public void onClick(View v) {
                 // Perform action on click
             }
         });
     }
 }
However, instead of applying an OnClickListener to the button in your activity, you can assign a method to your button in the XML layout, using the android:onClick attribute. For example:
 <Button
     android:layout_height="wrap_content"
     android:layout_width="wrap_content"
     android:text="@string/self_destruct"
     android:onClick="selfDestruct" />
Now, when a user clicks the button, the Android system calls the activity’s selfDestruct(View) method. In order for this to work, the method must be public and accept a View as its only parameter. For example:
 public void selfDestruct(View view) {
     // Kabloey
 }
The View passed into the method is a reference to the widget that was clicked.
Button Style
Every Button is styled using the system’s default button background, which is often different from one device to another and from one version of the platform to another.
If you’re not satisfied with the default button style and want to customize it to match the design of your application, then you can replace the button’s background image with a state list drawable.
A state list drawable is a drawable resource defined in XML that changes its image based on the current state of the button. Once you’ve defined a state list drawable in XML, you can apply it to your Button with the android:backgroundattribute. For more information and an example, see State List Drawable.
State List
A StateListDrawable is a drawable object defined in XML that uses a several different images to represent the same graphic, depending on the state of the object. For example, a Button widget can exist in one of several different states (pressed, focused, or neither) and, using a state list drawable, you can provide a different background image for each state.
You can describe the state list in an XML file. Each graphic is represented by an
During each state change, the state list is traversed top to bottom and the first item that matches the current state is used—the selection is not based on the “best match,” but simply the first item that meets the minimum criteria of the state.
每个状态改变时,状态列表遍历从上到下,第一项相匹配的当前状态是使用选择不是基于“最佳匹配”,但只是第一项满足最低标准的状态,即:系统是从上往下匹配的,如果匹配到一个item那么它就将采用这个item,而不是采用的最佳匹配的规则,所以设置缺省的状态,一定要写在最后,很多人为了保险起见,一开始就把缺省的写好,那么这样后面所有的item就都不会起作用了,还会因此找不着哪里出了问题。
FILE LOCATION:
res/drawable/filename.xml
The filename is used as the resource ID.
COMPILED RESOURCE DATATYPE:
Resource pointer to a StateListDrawable.
RESOURCE REFERENCE:
In Java: R.drawable.filename
In XML: @[package:]drawable/filename
SYNTAX:
"1.0" encoding="utf-8"?>
"http://schemas.android.com/apk/res/android"
android:constantSize=["true" | "false"]
android:dither=["true" | "false"]
android:variablePadding=["true" | "false"] >
- "@[package:]drawable/drawable_resource"
android:state_pressed=["true" | "false"]
android:state_focused=["true" | "false"]
android:state_hovered=["true" | "false"]
android:state_selected=["true" | "false"]
android:state_checkable=["true" | "false"]
android:state_checked=["true" | "false"]
android:state_enabled=["true" | "false"]
android:state_activated=["true" | "false"]
android:state_window_focused=["true" | "false"] />
ELEMENTS:
| selector属性 | selector说明 |
|---|---|
| android:constantSize | 我们在后面那个item里面设置drawable这个东西的大小是不是固定的。我们这个文件一般都是用作控件的Backgroup或者selector总之就是背景状态,一般背景都是把控件的后面全部覆盖,但有的时候我们要设置设固定的大小,比如一个Button有300*200大,而设置这个Button的背景图片只有200*100,而现在我们又不想图片被拉大把覆盖整个Button的底层,那么就可以把这个属性设置为true,这样图片就只显示在中间了,就像我们设置桌面背景一样,可以设置成居中、拉伸,如果这里设置成true就相当于居中,如果不设置或者设置为false就是拉伸. |
| android:dither | 是否让系统来帮我们处理颜色差异,一般android系统中使用的颜色是ARGB_8888,但很多显示设置是RGB_565,这个ARGB_8888与RGB_565有什么区别呢。这个ARGB_8888也就是说每一个像素点要拿4个字节来保存,依次每个字节是A8个字节,R8个字节,G8个字节,B8个字节,来保存,而RGB_565它只用了两个字节来保存颜色,两个字节总共16位,前5位保存R,中间6位保存G,后5位保存B.因此呀,如果android系统的点显示到屏幕上,还得转换一下,在这里这个dither就起作用了,如果我们把它设置为true的话,那显示的时候屏幕间断的取点,这样的结果,有的时候看上去就有那种分层的感觉,也就是前面一部分的颜色与后面一部分的颜色感觉断层了,就是很不平滑的感觉,如果我们这里设置为true的话,默认就是true,android系统,它会在取的点之间再经过一些计算,在其间补充一点相间的颜色使看起来比较平滑,但这样和真的图片还是有差异的,因些有的人想要得到很逼真的显示,这里就得自己来计算了,自己来计算,即占内存又占cpu,但颜色可以很逼真,如果有这样的需求那这里就要把这个属性设置为false |
| android:variablePadding | 可变的填充,在当当前这个组件被selected的时候,比如某一个tab被selected,或者listView里面的个item被selected的时候,如果设置为true的话,那么被选的这个tab或item的填充就会变大,使得看上去与其它的tab或item不一样。 |
| item属性 | item说明 |
|---|---|
| android:drawable | 如果系统匹配上当前这个item(也就是要使用这个item),那么就用这里设置的资源这个资源,一般都为图片。 |
| android:state_enabled | 设置触摸或点击事件是否可用状态,一般只在false时设置该属性,表示不可用状态。这个是当一个组件是否能处理touch或click事件的时候的状态,如果要对组件能否响应事件设置不同背景的时候,就要靠这个属性了. |
| android:state_pressed | 设置是否按压状态,一般在true时设置该属性,表示已按压状态,默认为false。就是说当前这个组件是否被按下,如果要设置按下的那一刻的状态,那么这里就要设置为true,例如,一个Button当手按下去后,还没有离开的状态(就是touched住的时候,还没有放开,和Clicked,点击时的那一刻) |
| android:state_selected | 设置是否选中状态,true表示已选中,false表示未选中。这个是当一个tab被打开的状态。或者一个listView等里面一个item被选择的时候的状态,因此这个属性设置在一般的组件上面是没有用的,只有设置有作为tab或item的布局里面的项时,这个属才起作用. |
| android:state_checked | 置是否勾选状态,主要用于CheckBox和RadioButton,true表示已被勾选,false表示未被勾选 。这个是当一个组件被checked 或者没有checked 的时候的状态,也就是说只有在可checkable上面的组件才有作用的,一般常见的就是多选按钮组与单选按钮组里面的项,这个才有作用的。 |
| android:state_checkable | 设置勾选是否可用状态,类似state_enabled,只是state_enabled会影响触摸或点击事件,而state_checkable影响勾选事件。这个是当一个组件在可以checked或不可以checked的时候的状态,现在较常见的,能够checkable的组件有,单选项和多选项,所以这个属性只有设置在像这类组件上面才有作用的。 |
| android:state_focused | 设置是否获得焦点状态,true表示获得焦点,默认为false,表示未获得焦点。 这个是当获得焦点的时候的状态,就是当控件高亮的时候的状态,哪些情况可以造成此状态呢,比如说,轨迹球(有的手机上面有一个小球,可以用手指在上面向不同的方向滚动,滚动的时候,界面里面的焦点,就会转向滚动的方向的控件),还有就是d-pad之类的东西(比如果游戏手柄上面的上下左右键,还有键盘上面的上下左右键等)这些东西就可以控制组件上面的焦点。 |
| android:state_window_focused | 设置当前窗口是否获得焦点状态,true表示获得焦点,false表示未获得焦点,例如拉下通知栏或弹出对话框时,当前界面就会失去焦点;另外,ListView的ListItem获得焦点时也会触发true状态,可以理解为当前窗口就是ListItem本身。这个是是否对当前界面是否得到焦点的两种状态的设置,比如说当我们打开一个界面,那么这个界面就获得了焦点,如果我们去把“通知”拉下来,那么这个界面就失去焦点,或者弹出了一个对话框,那么这个界面也失去焦点了。 |
| android:state_activated | 设置是否被激活状态,true表示被激活,false表示未激活,API Level 11及以上才支持,可通过代码调用控件的setActivated(boolean)方法设置是否激活该控件 |
| android:state_hovered | 设置是否鼠标在上面滑动的状态,true表示鼠标在上面滑动,默认为false,API Level 14及以上才支持。当光标移动到某一个组件之上的时候的状态,到目前为止,还没有看见过哪个手机设备带有鼠标之类的东西,可能这个专门是为平板电脑设置的或者以后可能出现带有鼠标之类的设备而准备的吧,文档中说,一般这个值设置为与focused这个值一样。 |
EXAMPLE:
XML file saved at res/drawable/button.xml:
<selector xmlns:android="http://schemas.android.com/apk/res/android">
    <item android:state_pressed="true"
          android:drawable="@drawable/button_pressed" />
    <item android:state_focused="true"
          android:drawable="@drawable/button_focused" />
    <item android:state_hovered="true"
          android:drawable="@drawable/button_focused" />
    <item android:drawable="@drawable/button_normal" />
selector>
This layout XML applies the state list drawable to a Button:
<Button
    android:layout_height="wrap_content"
    android:layout_width="wrap_content"
    android:background="@drawable/button" />
图文混排的按钮
实现方式
两种方式:
1. 使用`android:drawableXXX属性实现
  <Button
            android:layout_width="wrap_content"
            android:layout_height="wrap_content"
            android:drawableTop="@drawable/flag_mark_violet"
            android:text="按钮1" />

        <Button
            android:layout_width="wrap_content"
            android:layout_height="wrap_content"
            android:drawableBottom="@drawable/flag_mark_yellow"
            android:drawablePadding="30dp"
            android:text="按钮2" />

        <Button
            android:layout_width="wrap_content"
            android:layout_height="wrap_content"
            android:drawableLeft="@drawable/flag_mark_blue"
            android:text="按钮3" />

        <Button
            android:layout_width="wrap_content"
            android:layout_height="wrap_content"
            android:drawablePadding="20dp"
            android:drawableRight="@drawable/flag_mark_red"
            android:text="按钮4" />
代码实现
        Button button = (Button) findViewById(R.id.button);
        // 左侧图片
        SpannableString spannableStringLeft = new SpannableString("left");
        Bitmap bitmapLeft = BitmapFactory.decodeResource(getResources(),R.drawable.flag_mark_blue);
        ImageSpan imageSpanLeft = new ImageSpan(this,bitmapLeft,DynamicDrawableSpan.ALIGN_BOTTOM);
        spannableStringLeft.setSpan(imageSpanLeft, 0, 4, Spanned.SPAN_EXCLUSIVE_EXCLUSIVE);
        // 右侧图片
        SpannableString spannableStringRight = new SpannableString("right");
        Bitmap bitmapRight = BitmapFactory.decodeResource(getResources(),R.drawable.flag_mark_green);
        ImageSpan imageSpanRight = new ImageSpan(this,bitmapRight,DynamicDrawableSpan.ALIGN_BOTTOM);
        spannableStringRight.setSpan(imageSpanRight, 0, 5, Spanned.SPAN_EXCLUSIVE_EXCLUSIVE);

        button.append(spannableStringLeft);
        button.append("我的按钮");
        button.append(spannableStringRight);
ImageButton
ImageButton extends ImageView
Displays a button with an image (instead of text) that can be pressed or clicked by the user. By default, an ImageButton looks like a regular Button, with the standard button background that changes color during different button states. The image on the surface of the button is defined either by the android:src attribute in the XML element or by the setImageResource(int) method.
To remove the standard button background image, define your own background image or set the background color to be transparent.
ImageButton可以作为图像按钮使用,如果想在代码中修改ImageButton的图像可以使用ImageButton类的setImageResource或者其他类似的方法,
 "@+id/id_imgBtn"
        android:layout_width="wrap_content"
        android:layout_height="wrap_content"
        android:layout_centerInParent="true"
        android:background="@android:color/transparent"
        android:src="@drawable/flag_mark_green"/>
值的注意的是: ImageButton并不是TextView的之类,而是ImageView的之类,因此并没有android:text属性,如果要想在ImageButton上添加文字,可以自定义控件,重写onDraw方法。
RadioButton
Radio buttons allow the user to select one option from a set. You should use radio buttons for optional sets that are mutually exclusive if you think that the user needs to see all available options side-by-side. If it’s not necessary to show all options side-by-side, use a spinner instead.

To create each radio button option, create a RadioButton in your layout. However, because radio buttons are mutually exclusive, you must group them together inside a RadioGroup. By grouping them together, the system ensures that only one radio button can be selected at a time.
Responding to Click Events
When the user selects one of the radio buttons, the corresponding RadioButton object receives an on-click event.
To define the click event handler for a button, add the android:onClick attribute to the element in your XML layout. The value for this attribute must be the name of the method you want to call in response to a click event. The Activity hosting the layout must then implement the corresponding method.
For example, here are a couple RadioButton objects:
<RadioGroup xmlns:android="http://schemas.android.com/apk/res/android"
    android:layout_width="fill_parent"
    android:layout_height="wrap_content"
    android:orientation="vertical">
    <RadioButton android:id="@+id/radio_pirates"
        android:layout_width="wrap_content"
        android:layout_height="wrap_content"
        android:text="@string/pirates"
        android:onClick="onRadioButtonClicked"/>
    <RadioButton android:id="@+id/radio_ninjas"
        android:layout_width="wrap_content"
        android:layout_height="wrap_content"
        android:text="@string/ninjas"
        android:onClick="onRadioButtonClicked"/>
RadioGroup>
Note: The RadioGroup is a subclass of LinearLayout that has a vertical orientation by default.
Within the Activity that hosts this layout, the following method handles the click event for both radio buttons:
public void onRadioButtonClicked(View view) {
    // Is the button now checked?
    boolean checked = ((RadioButton) view).isChecked();

    // Check which radio button was clicked
    switch(view.getId()) {
        case R.id.radio_pirates:
            if (checked)
                // Pirates are the best
            break;
        case R.id.radio_ninjas:
            if (checked)
                // Ninjas rule
            break;
    }
}
The method you declare in the android:onClick attribute must have a signature exactly as shown above. Specifically, the method must:
- Be public
- Return void
- Define a View as its only parameter (this will be the View that was clicked)
-
Tip: If you need to change the radio button state yourself (such as when loading a saved CheckBoxPreference), use the setChecked(boolean) or toggle() method.
ToogleButton
官方文档
A toggle button allows the user to change a setting between two states.
You can add a basic toggle button to your layout with the ToggleButton object. Android 4.0 (API level 14) introduces another kind of toggle button called a switch that provides a slider control, which you can add with a Switch object.
If you need to change a button’s state yourself, you can use the CompoundButton.setChecked() or CompoundButton.toggle() methods.
  <ToggleButton
        android:layout_width="wrap_content"
        android:layout_height="wrap_content"
        android:textOn="开"
        android:textOff="关"/>
Responding to Button Presses
To detect when the user activates the button or switch, create an CompoundButton.OnCheckedChangeListener object and assign it to the button by calling setOnCheckedChangeListener(). For example:
ToggleButton toggle = (ToggleButton) findViewById(R.id.togglebutton);
toggle.setOnCheckedChangeListener(new CompoundButton.OnCheckedChangeListener() {
    public void onCheckedChanged(CompoundButton buttonView, boolean isChecked) {
        if (isChecked) {
            // The toggle is enabled
        } else {
            // The toggle is disabled
        }
    }
});
CheckBox
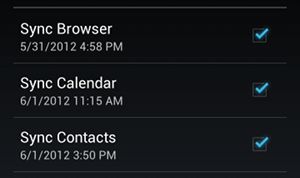
Checkboxes allow the user to select one or more options from a set. Typically, you should present each checkbox option in a vertical list.
To create each checkbox option, create a CheckBox in your layout. Because a set of checkbox options allows the user to select multiple items, each checkbox is managed separately and you must register a click listener for each one.
Responding to Click Events
When the user selects a checkbox, the CheckBox object receives an on-click event.
To define the click event handler for a checkbox, add the android:onClick attribute to the element in your XML layout. The value for this attribute must be the name of the method you want to call in response to a click event. The Activity hosting the layout must then implement the corresponding method.
For example, here are a couple CheckBox objects in a list:
<LinearLayout xmlns:android="http://schemas.android.com/apk/res/android"
    android:orientation="vertical"
    android:layout_width="fill_parent"
    android:layout_height="fill_parent">
    <CheckBox android:id="@+id/checkbox_meat"
        android:layout_width="wrap_content"
        android:layout_height="wrap_content"
        android:text="@string/meat"
        android:onClick="onCheckboxClicked"/>
    <CheckBox android:id="@+id/checkbox_cheese"
        android:layout_width="wrap_content"
        android:layout_height="wrap_content"
        android:text="@string/cheese"
        android:onClick="onCheckboxClicked"/>
LinearLayout>
Within the Activity that hosts this layout, the following method handles the click event for both checkboxes:
public void onCheckboxClicked(View view) {
    // Is the view now checked?
    boolean checked = ((CheckBox) view).isChecked();

    // Check which checkbox was clicked
    switch(view.getId()) {
        case R.id.checkbox_meat:
            if (checked)
                // Put some meat on the sandwich
            else
                // Remove the meat
            break;
        case R.id.checkbox_cheese:
            if (checked)
                // Cheese me
            else
                // I'm lactose intolerant
            break;
        // TODO: Veggie sandwich
    }
}
The method you declare in the android:onClick attribute must have a signature exactly as shown above. Specifically, the method must:
- Be public
- Return void
- Define a View as its only parameter (this will be the View that was clicked)
-
Tip: If you need to change the radio button state yourself (such as when loading a saved CheckBoxPreference), use the setChecked(boolean) or toggle() method.


