Virtualbox中 Ubuntu 18.04部署Kubernetes和kubeedge
1. 安装虚拟机
1.1 ubuntu官网下载ubuntu18.04:http://releases.ubuntu.com/18.04/
1.2 virtualbox安装ubuntu 18.04
请参考https://blog.csdn.net/qq_38628350/article/details/86656530 ,建议最小化安装,即无需安装办公软件、播放器等功能
ubuntu完毕后,请确保以下配置,如不满足要求,请调整:
1)内存不小于2G且处理器不少于2核(k8s要求),硬盘不小于10G,建议20G以上(非硬性要求),处理器如下图所示,主板对话框可修改内存
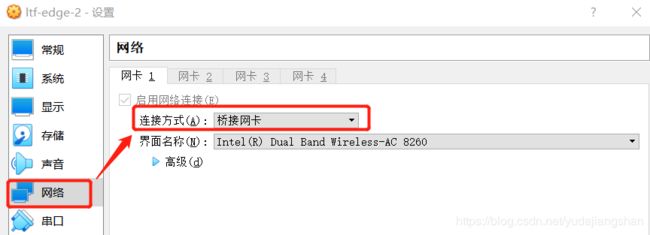
2)网络对话框选择:桥接网卡
注:以下全程使用sudo do权限
2. 安装Docker:使用阿里云镜像(学习docker请访问https://github.com/yeasy/docker_practice)
2.1 apt配置阿里云源:启动ubuntu,将以下内容写到 /etc/apt/sources.list
本部分参考:https://blog.csdn.net/zhangxiangui40542/article/details/103075325
root@ltf-edge:~# cat /etc/apt/sources.list
deb http://mirrors.aliyun.com/ubuntu/ bionic main restricted universe multiverse
deb http://mirrors.aliyun.com/ubuntu/ bionic-security main restricted universe multiverse
deb http://mirrors.aliyun.com/ubuntu/ bionic-updates main restricted universe multiverse
deb http://mirrors.aliyun.com/ubuntu/ bionic-proposed main restricted universe multiverse
deb http://mirrors.aliyun.com/ubuntu/ bionic-backports main restricted universe multiverse
deb-src http://mirrors.aliyun.com/ubuntu/ bionic main restricted universe multiverse
deb-src http://mirrors.aliyun.com/ubuntu/ bionic-security main restricted universe multiverse
deb-src http://mirrors.aliyun.com/ubuntu/ bionic-updates main restricted universe multiverse
deb-src http://mirrors.aliyun.com/ubuntu/ bionic-proposed main restricted universe multiverse
deb-src http://mirrors.aliyun.com/ubuntu/ bionic-backports main restricted universe multiverse
root@ltf-edge:~# apt-get update
2.2 安装 docker:参考https://blog.csdn.net/xie1xiao1jun/article/details/79413436
root@ltf-edge:~# apt-get update
root@ltf-edge:~# apt-get -y install apt-transport-https ca-certificates curl software-properties-common
#安装GPG证书
root@ltf-edge:~# curl -fsSL http://mirrors.aliyun.com/docker-ce/linux/ubuntu/gpg | sudo apt-key add -
#写入软件源信息
root@ltf-edge:~# add-apt-repository "deb [arch=amd64] http://mirrors.aliyun.com/docker-ce/linux/ubuntu $(lsb_release -cs) stable"
# 更新并安装 Docker-CE
root@ltf-edge:~# apt-get -y update
root@ltf-edge:~# apt-get -y install docker-ce
#查看docker 版本,并pull hello world确认
root@ltf-edge:~# docker version
root@ltf-edge:~# docker run hello-world
#阿里云镜像加速:在 /etc/docker/daemon.json 中写入如下内容( 如果文件不存在请新建该文件)
参考:https://blog.csdn.net/qq_37495786/article/details/83246421
#之后重新启动服务。
root@ltf-edge:~# systemctl daemon-reload
root@ltf-edge:~# systemctl restart docker
2.3 复制一份ubuntu
1)关闭ubuntu虚拟机
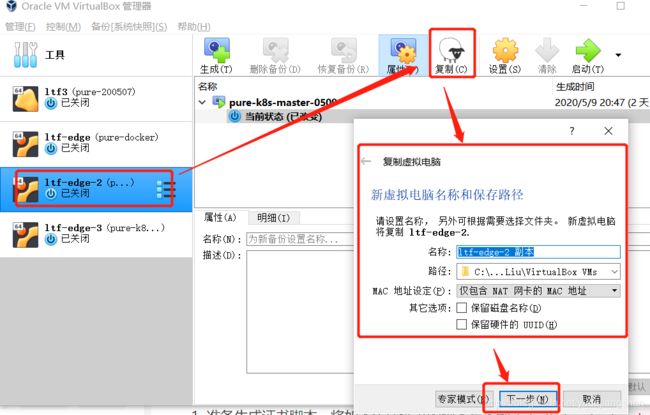
2)选中ubuntu虚拟机,然后点击复制,修改虚拟机名字,如下图,接着像安装软件一样点击下一步,完成复制,我复制出了ltf-edge-2和ltf-edge-3,在ltf-edge-2和ltf-edge-3安装kubernetes和kubeedge,其中
3. 安装 kubernetes
3.1虚拟机互相访问
1)分别打开虚拟机ltf-edge-2和ltf-edge-3
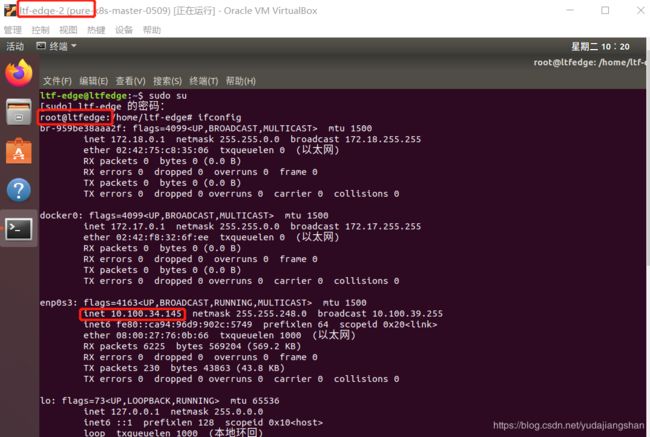
2)查询两台虚拟机ip地址:ltf-edge的ip地址为10.100.34.145,ltf-edge-3的ip地址为10.100.34.107,具体查询方法和截图如下
root@ltf-edge:~#ifconfig
注:本人virtualbox虚拟机命名为ltf-edge-2,但虚拟机本身从ltf-edge复制而来,没有修改hostname,因此在终端中显示为ltf-edge,作为k8s的master主机;ltf-edge-3修改了/etc/hostname为k8s-node,作为k8s的node(修改完需重启ubuntu)
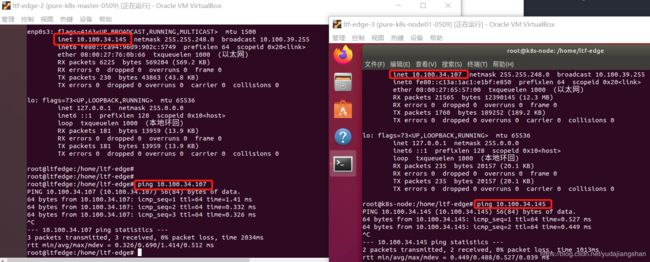
2)ltf-edge-2与ltf-edge-3互ping测试:方法如下:
root@ltf-edge:~# ping 10.100.34.107
root@k8s-node:~# ping 10.100.34.145
3)修改两台ubuntu的/etc/hosts,互相映射IP地址和主机名,修改方法如下,结果如截图所示:
root@ltf-edge:~# vim /etc/hosts
root@k8s-node:~# vim /etc/hosts
4)重启网络服务
root@ltf-edge:~# /etc/init.d/networking restart
root@k8s-node:~# /etc/init.d/networking restart
3.2安装 kubeadm kubelet kubectl(两台机器都要安装,以下只显示)
本部分参考:https://blog.csdn.net/zhangxiangui40542/article/details/103075325
#添加阿里云k8s镜像源
root@ltf-edge:~# cat /etc/apt/sources.list.d/kubernetes.list
deb https://mirrors.aliyun.com/kubernetes/apt/ kubernetes-xenial main
#安装GPG证书
root@ltf-edge:~# curl https://mirrors.aliyun.com/kubernetes/apt/doc/apt-key.gpg | apt-key add -
root@ltf-edge:~# apt-get update
#搜索k8s 1.17.2版本(kubeedge目前还不支持k8s1.18)
root@ltf-edge:~# apt-cache madison 'kubeadm' | grep 1.17.2 | head -1 | awk '{$1=$1};1' | cut -d' ' -f 3
1.17.2-00
root@ltf-edge:~# apt-get install -y --allow-change-held-packages --allow-downgrades kubeadm=1.17.2-00 kubelet=1.17.2-00 kubectl=1.17.2-00
#测试版本:两台ubuntu都需要
root@ltf-edge:~# kubeadm version
#kubelet开机自启:两台ubuntu都需要
root@ltf-edge:~# systemctl enable kubelet.service
3.3 启动Kubernetes:只需要在master虚拟机上运行
root@ltf-edge:~# swapoff -a && kubeadm init --image-repository "registry.cn-hangzhou.aliyuncs.com/google_containers" --pod-network-cidr=10.244.0.0/16
#输出如下信息(此信息非常重要,请保存一份):
......
Your Kubernetes control-plane has initialized successfully!
To start using your cluster, you need to run the following as a regular user:
mkdir -p $HOME/.kube
sudo cp -i /etc/kubernetes/admin.conf $HOME/.kube/config
sudo chown $(id -u):$(id -g) $HOME/.kube/config
You should now deploy a pod network to the cluster.
Run "kubectl apply -f [podnetwork].yaml" with one of the options listed at:
https://kubernetes.io/docs/concepts/cluster-administration/addons/
Then you can join any number of worker nodes by running the following on each as root:
kubeadm join 10.100.32.145:6443 --token ihperh.asuc8lxbtnpfm68m \
--discovery-token-ca-cert-hash sha256:05a6c203876c9195cbebf64dee2b69a5fa021b6afab54db84f6afbd18405ca30
mkdir -p $HOME/.kube
sudo cp -i /etc/kubernetes/admin.conf $HOME/.kube/config
sudo chown $(id -u):$(id -g) $HOME/.kube/config
root@ltf-edge:~# kubectl get pod --all-namespaces -o wide
The connection to the server localhost:8080 was refused - did you specify the right host or port?
root@ltf-edge:~# mkdir -p $HOME/.kube && cp -r /etc/kubernetes/admin.conf $HOME/.kube/config && sudo chown $(id -u):$(id -g) $HOME/.kube/config
# 然后查看节点
root@ltf-edge:~# kubectl get pod --all-namespaces -o wide
#节点处于NotReady状态,按照kubeadm初始化成功的提示,床架并运行kube-flannel.yml文件
root@ltf-edge:~# kubectl apply -f kube-flannel.yml #或者 root@ltf-edge:~# kubectl create -f kube-flannel.yml
注:kube-flannel.yml需要科学上网,我已下载,请访问https://blog.csdn.net/yudajiangshan/article/details/106072881
root@ltf-edge:~# kubectl get pod -n kube-system #会有kube-fannel-ds-amd64xx的pod
root@ltf-edge:~# kubectl get node #显示主节点STATUS为Ready
#然后到k8s-node ubuntu虚拟机运行刚才记录下的信息:
kubeadm join 10.100.32.145:6443 --token ihperh.asuc8lxbtnpfm68m \
--discovery-token-ca-cert-hash sha256:05a6c203876c9195cbebf64dee2b69a5fa021b6afab54db84f6afbd18405ca30
# 然后回到master ubuntu虚拟机查看
root@ltf-edge:~# kubectl get node #可能等待1~2分钟查看k8s-node STATUS是否为Ready
#k8s到此安装完毕,不要关闭虚拟机,直接进行kubeedge安装,关闭虚拟机再重启,ip地址会变
4. 安装kubeedge:主要参考https://www.latelee.org/kubeedge/kubeedge-deploy.html
4.1 下载kubeedge
1)下载发行版:本次采用发布版本为 v1.1.0, 到 https://github.com/kubeedge/kubeedge/releases 下载
kubeedge-v1.1.0-linux-amd64.tar.gz并解压,里面有文件夹cloud、edge和version文件
2)下载最新源码,git clone https://github.com/kubeedge/kubeedge.git 或git clone https://gitee.com/mirrors/KubeEdge.git
4.2 创建master虚拟机上的云节点
1)创建部署工程目录
root@ltf-edge:~# mkdir ~/kubeedge && cd kubeedge
2)生成证书:运行kubeedge源码包中嗯嗯certgen.sh
root@ltf-edge:~# bash /home/ltf-edge/github.com/kubeedge/kubeedge/build/tools/certgen.sh genCertAndKey edge
3)拷贝设备模块和设备CRD yaml 文件
root@ltf-edge:~# cp /home/ltf-edge/github.com/kubeedge/kubeedge/build/crds/devices/* ~/kubeedge/yamls
4)拷贝 node.js
root@ltf-edge:~# cp /home/ltf-edge/github.com/kubeedge/kubeedge/build/node.json ~/kubeedge/cloud
注:node.js 为节点的配置信息,需要在云端机器执行,作用是将边缘端加入集群(但实际上只是让 k8s 知道有这个节点,还不是真正意义上的加入)。
4.3 配置云端节点
1)将kubeedge-v1.1.0-linux-amd64发行版cloudcore文件夹移到cloud
root@ltf-edge:~# cp -r /home/ltf-edge/kubeedge-v1.1.0-linux-amd64/cloud/cloudcore ~/kubeedge/cloud
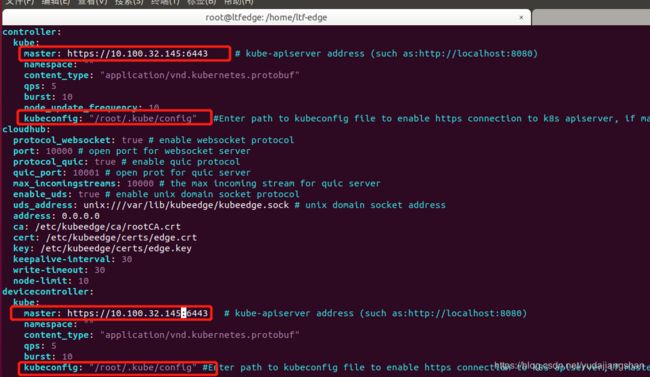
2)打开配置文件 ~/kubeedge/cloud/cloudcore/conf/controller.yaml,修改两个master的路径为:
master: 10.100.32.145:6443
并且修改两个kubeconfig由“~/.kube/config”变为“/root/.kube/config”
4.4 创建k8s-node虚拟机上的边缘节点
1)创建部署工程目录
root@k8s-node:~# mkdir ~/kubeedge && cd kubeedge
2)生成证书:运行kubeedge源码包中嗯嗯certgen.sh
root@ltf-edge:~# bash /home/ltf-edge/github.com/kubeedge/kubeedge/build/tools/certgen.sh genCertAndKey edge
3)拷贝设备模块和设备CRD yaml 文件
root@ltf-edge:~# cp /home/ltf-edge/github.com/kubeedge/kubeedge/build/crds/devices/* ~/kubeedge/yamls
4)拷贝 node.js
root@ltf-edge:~# cp /home/ltf-edge/github.com/kubeedge/kubeedge/build/node.json ~/kubeedge/cloud
注:node.js 为节点的配置信息,需要在云端机器执行,作用是将边缘端加入集群(但实际上只是让 k8s 知道有这个节点,还不是真正意义上的加入)。
4.5 配置边缘节点
1)将kubeedge-v1.1.0-linux-amd64发行版edgecore文件夹移到~/kubeedge/edge
root@ltf-edge:~# cp -r /home/ltf-edge/kubeedge-v1.1.0-linux-amd64/edge ~/kubeedge/edge
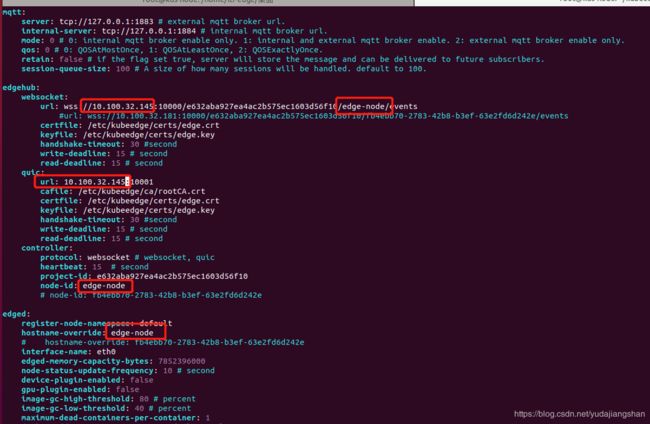
2)打开配置文件 ~/kubeedge/edge/conf/controller.yaml,修改两个master的路径为:
master: 10.100.32.145:6443
3)打开配置文件 ~/kubeedge/edge/conf/edge.yaml,修改服务IP:
将url: wss://0.0.0.0:10000和url: 127.0.0.1:10001分别用云端IP替换,改为url: wss://10.100.32.145:10000和url: 192.168.0.102:10001。
发布的v1.1.0版本,该文件的节点名称为fb4ebb70-2783-42b8-b3ef-63e2fd6d242e,需改为edge-node。master 仓库中的配置文件已是edge-node。
至此,KubeEdge 云端和边缘端的二进制文件和配置已准备、修改完毕。未提及的使用官方默认配置。
5. 部署
前面已经准备好了文件,直接部署就方便很多。注意,两台虚拟机/etckubeedge都需要有ca和certs两个文件夹,里面是证书和秘钥。
5.1 启动master虚拟机kubeedge云端核心
5.1.1 创建设备模块和设备CRD
root@ltf-edge:~# cd ~/kubeedge && kubectl apply -f yamls
5.1.2 运行云端核心
root@ltf-edge:~# cd ~/kubeedge/cloud/cloudcore && ./cloudcore
5.2 启动k8s-node kubeedge
5.2.1 运行边缘节点
root@k8s-node:~# cd ~/kubeedge/edge && ./edgecore
5.2.2 安装mosquitto
root@k8s-node:~# add-apt-repository ppa:mosquitto-dev/mosquitto-ppa // 添加源
root@k8s-node:~# apt-get update
root@k8s-node:~# apt-get install mosquitto
5.2.3 运行mosquitto
root@k8s-node:~# mosquitto -d -p 1883
5.3 验证
#在云端查看状态
root@k8s-node:~# kubectl get nodes
#在云端部署一个应用
root@k8s-node:~# kubectl apply -f /home/ltf-edge/github.com/kubeedge/kubeedge/build/deployment.yaml
#之后可以看到已经在边缘端运行了 nginx 容器。查看 pod
root@k8s-node:~# kubectl get pods -o wide
#在边缘端查看容器:
root@k8s-node:~# docker ps


